Install and configure Deployer
In this article, we’re going to install and configure Deployer to our Laravel application. Deployer is a powerful library that connects to our server(s) via SSH a perform complex deployment flows that are fully customisable without any downtime.
If you’ve been following along, then you should have all the resources you need to deploy your application. However, if you’ve just arrived, then I’ll be assuming you have the following resources ready:
- A server that can host a Laravel application accessible via SSH.
- A domain name that points to that server
- A production database ready to be used.
If you’re missing any of these resources, feel free to peruse the first and second articles of this series to get up to speed.
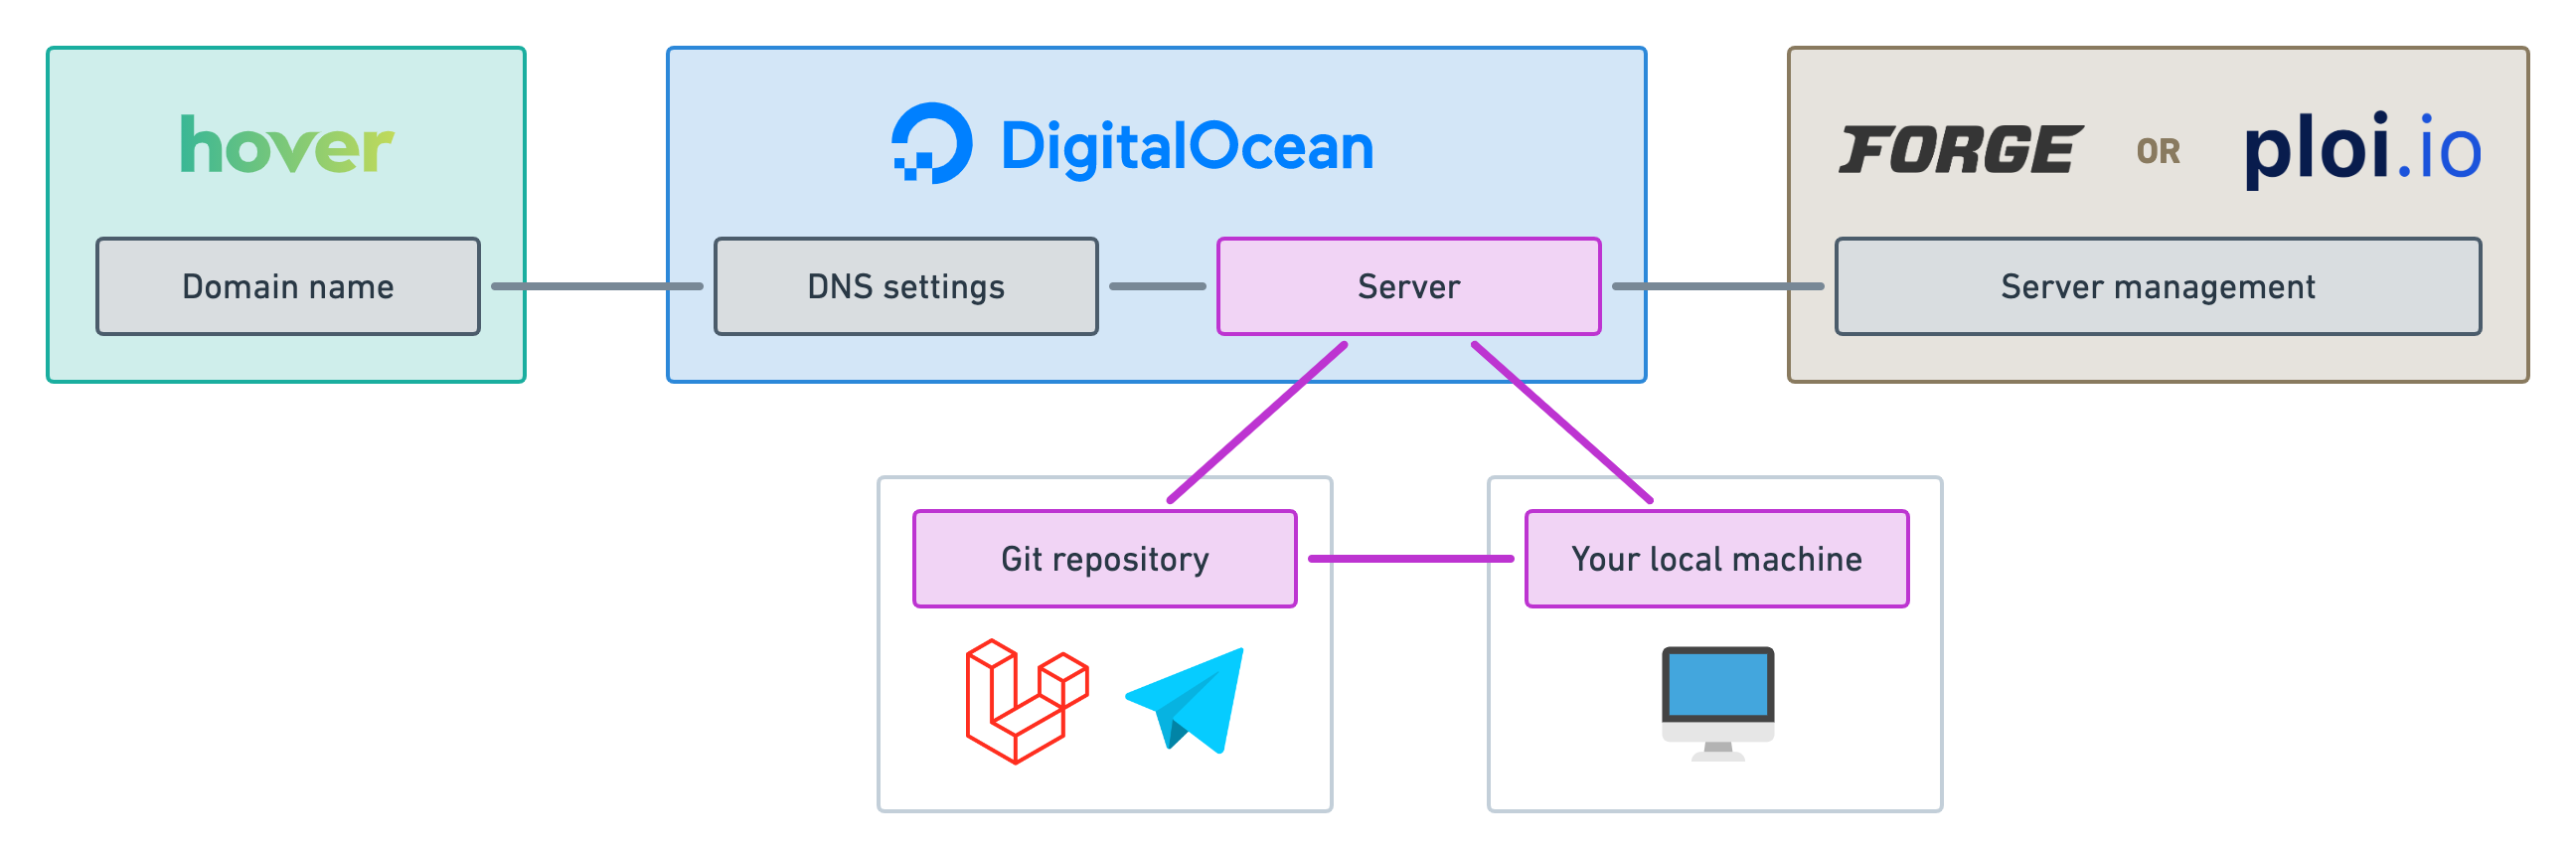
As a reminder, here’s our “Big picture” diagram for this series. In this article and the next two, we’ll be focusing on the “Server, Local machine and Git repository” triangle.
Installing Deployer
Okay, let’s do it! The first thing to do is require the Deployer library using composer.
composer require deployer/deployer:^7.0
At the time of this writing, Deployer 7 is still in beta. Very soon, you’ll be able to install it without specifying the version.
Now, you should have a new dep binary available for you. Think of dep as your php artisan but for deploying things and running commands directly on your server.
Next, let’s run the following command to initialise our deployment configuration file.
dep init
This will ask you a bunch of questions to get started.
- First, I recommend using the
YAMLformat. We will use PHP when creating custom recipes in another episode but I findYAMLmuch easier to handle as our main configuration file. - Then, choose the
Laravelproject template. - Then press Enter twice since it should autocomplete your git repository and project name.
- At the end, when asked for a host, enter an alias for your server that's easy to remember. In our case, we're going to deploy to our production server so I'll be entering:
prod. We’ll be able to provide the exact IP address or domain name in the configuration file.
You should now have an auto-generated deploy.yaml file at the root of your project that looks like this.
import:
  - recipe/laravel.php

config:
  application: 'blog-jollygood'
  repository: '[email protected]:lorisleiva/blog-jollygood.git'

hosts:
  prod:
    deploy_path: '~/{{application}}'

tasks:
  build:
  	- run: 'cd {{release_path}} && npm run build'

after:
  deploy:failed: deploy:unlock
Dissecting our config file
Before we continue to config our deployment flow, let's examine the auto-generated deploy.yaml file in more detail so we understand what we're working with. It contains five distinct sections: import, config, hosts, tasks and after. These sections configure different concepts that are important to understand when working with Deployer.
Let's examine all five of them.
Import
The import section enables us to import additional configuration files to our main configuration file. It accepts an array of files to be imported and merged with our configurations. The order matters since, in case of conflicts, the latest configuration overrides the previous ones.
In Deployer, we call these reusable config files: recipes.
Whilst you may choose to write a recipe using the YAML format, they are typically written in PHP to leverage the full power of the programming language — functions, classes, etc.
By default, our configuration file imports the Laravel recipe located at recipe/laravel.php in the Deployer library. It contains various useful tasks and options for us as we will see in a minute. Recipes may also import other recipes to create more complex and/or organised configurations.
import:
  - recipe/laravel.php
Config
The config section is a key/value store of options. You may add any key/value pair in this section and they will be accessible in your tasks but also within other options.
To retrieve the value of an option, simply wrap it in double braces — i.e. {{my_option}}. For example, you may use options within options like so.
config:
  fruit: 'banana'
  vegetable: 'celeriac'
  dietitian_message: 'Today, you should eat a {{fruit}} and a {{vegetable}}.'
Options are particularly useful for customising recipes. For example, a recipe can offer some options with default values that they use within their tasks. Then, whoever ends up importing this recipe may override these options inside the config section and therefore alter the behaviour of the task provided by the recipe. In this article, we'll see some example of official recipes and how to configure them.
By default, the application and repository options are provided. This repository option is particularly important since it will be used to clone our repository on the server when creating a new release.
config:
  application: 'blog-jollygood'
  repository: '[email protected]:lorisleiva/blog-jollygood.git'
Hosts
The hosts section defines all of the places we'd like to deploy to. Each host contains its own private key/value store of options that only applies to them.
The most valuable options for hosts are the following:
-
remote_user: The user to use to connect to our server via SSH. -
hostname: The hostname of our server. Either its IP address or its domain name. -
deploy_path: The path inside the server that should be used to deploy our application.
For example, if we had two production servers and one staging server, we could configure them like so.
hosts:
  production_1:
    remote_user: root
    hostname: '138.68.164.100'
    deploy_path: '/var/www/jollygood.app'
  production_2:
    remote_user: root
    hostname: '138.68.164.101'
    deploy_path: '/var/www/jollygood.app'
  staging:
    remote_user: root
    hostname: '138.68.164.102'
    deploy_path: '/var/www/jollygood.app'
Any options defined in our config section or external recipes will also be applied to the host configurations. In case of conflict, the host configurations will override any previously defined options. That means, our example above could be re-written like so.
config:
  remote_user: root
  deploy_path: '/var/www/jollygood.app'

hosts:
  production_1:
    hostname: '138.68.164.100'
  production_2:
    hostname: '138.68.164.101'
  staging:
    hostname: '138.68.164.102'
The only exception to this rule is the hostname option. It cannot be pushed to the config section as, otherwise, Deployer will try to use the host key as the hostname — e.g. production_1.
Note that, you may also have multiple hosts deploying on the same server. For example, say you need one production host and one staging host on the same server. Then, all you need to do is provide them with a different deploy_path.
config:
  remote_user: root

hosts:
  production:
  	hostname: '138.68.164.100'
  	deploy_path: '/var/www/jollygood.app'
  staging:
  	hostname: '138.68.164.100'
  	deploy_path: '/var/www/staging.jollygood.app'
Additionally, just like in our config section, we can reuse options within options inside the hosts section. For instance, in our example above, we could extract the /var/www path in a reusable option like this.
config:
  remote_user: root
  base_deploy_path: '/var/www'

hosts:
  production:
  	hostname: '138.68.164.100'
  	deploy_path: '{{base_deploy_path}}/jollygood.app'
  staging:
  	hostname: '138.68.164.100'
  	deploy_path: '{{base_deploy_path}}/staging.jollygood.app'
By default, our auto-generated file doesn't provide much information so we'll make sure to update that in this article.
hosts:
  prod:
    deploy_path: '~/{{application}}'
Tasks
Tasks are the backbone of the Deployer library. Any logic that should run on our server lives inside a task.
Tasks are usually defined within functions inside PHP configuration files. For example, say we wanted to create a task that restarts Nginx for us. Inside a deploy.php file, we could create it like this.
<?php

namespace Deployer;

task('nginx:restart', function () {
  run('service nginx restart');
});
You might be wondering, why did we choose the YAML format then?
Well, for starters, when tasks are that simple, it is possible to achieve the same result in a YAML file by using the script key and providing an array of command lines. This is equivalent to our PHP task above:
tasks:
  nginx:restart:
    - run: 'service nginx restart'
However, tasks are usually not that simple. They often require various conditions, loops, files to read from, write to, etc. Personally, I don't like having all of this noise on my main deploy config file. I much prefer creating external recipes written in PHP that I then import to my deploy.yaml file using the import section.
So here is the deal. If it's a tiny task that can fit in a few command lines, then we'll put them in our deploy.yaml file using the script key. However, for anything bigger than that, we'll stay organised and create our own recipes. We'll dedicate an entire episode in this series for this.
Now, there's something else you should know about tasks: they can be nested inside each other.
Say we created custom recipes with the following tasks that restart various services: nginx:restart, php-fpm:reload and mysql:restart and redis:restart. Then we could create a new parent task called restart:everything that invokes all of these tasks. Instead of providing the script key, we simply treat the task as an array of other tasks.
tasks:
  restart:everything:
    - nginx:restart
    - php-fpm:reload
    - mysql:restart
    - redis:restart
As you can see, even if our deploy.yaml file cannot leverage the full power of PHP, we can still create powerful deployment flows by nesting existing tasks within each other. That's precisely the approach we're going to take to create our main deploy task in this article.
Regarding our auto-generated file, Deployer provides a build example task that runs npm run build on our server. We'll also make sure to tweak that task for our use case in this article. Notice how options can be used inside tasks as well.
tasks:
  build:
    - run: 'cd {{release_path}} && npm run build'
Before and after
Finally, it is possible to attach a task before and/or after the execution of another.
Using our previous example about restarting services, imagine we decide that, every time we restart Nginx, we should also reload PHP-FPM afterwards. Then, all we need to do is add the following entry to our after section.
after:
  nginx:restart: php-fpm:reload
And that's it. Now the execution of the former will trigger the execution of the latter.
We can achieve a similar behaviour using the before section. Say we had access to the tasks npm:install and npm:run:prod to respectively run npm install and npm run prod on our server. We could tell our deployment flow to always run npm:install before running npm:run:prod like this.
before:
  npm:run:prod: npm:install
Both the before and after sections allow arrays to be given to trigger more than one task before or after another one. For instance:
after:
  nginx:restart:
    - php-fpm:reload
    - mysql:restart
    - redis:restart
Now, to be completely honest with you, I rarely use the before and after section since I prefer being explicit about which tasks should run and when. Heavy use of these before and after hooks can make your deployment flow overly complicated for no reason. When needing to organise my tasks, I prefer grouping them into parent tasks as we did with the restart:everything task above.
Nevertheless, they can be useful in some cases and so it's good to know they exist.
The default after section generated provides a good example of when such hooks are useful. In this case, we're saying: "if anything went wrong with our deployment (deploy:failed), then remove the lock on this host (deploy:unlock).
after:
  deploy:failed: deploy:unlock
What's this about a lock I hear? I promise it's easier than it sounds. By default, Deployer adds a lock to each host during a deployment and removes it at the very end. This ensures that if two people try to deploy at the same time — say you and your colleague — then only one of you will succeed.
Deployer commands
Now that we know more about hosts, tasks and options, let's take a quick look at some of the commands provided by the dep binary.
First of all, you can run any task on your server by writing dep following by the name of your task. For example dep nginx:restart.
If you have more than one host configured in your deploy.yaml file, Deployer will ask you which one to use. You may also specify an explicit host by adding the host alias at the end of the command. For example, if you had a production and a staging host:
# Restart Nginx on the production host.
dep nginx:restart production

# Restart Nginx on the staging host.
dep nginx:restart staging
On top of executing tasks on your hosts, the dep binary has a few useful baked-in commands:
-
dep list: List all available tasks (including tasks from imported recipes). -
dep init: Generate our initialdeploy.yamlordeploy.phpfile. -
dep <task>: Run the given task. -
dep tree <task>: Display the task-tree for the given task. This is useful to debug tasks nested inside other tasks. -
dep ssh: Connect to your host via SSH. -
dep logs: Follow the latest application logs. -
dep run '<command>': Execute the given command on your host.
Note that you can specify a host at the end of most of these commands — just like we did with dep nginx:restart production. Feel free to add the -h option to any command to see all available options.
Configuring our host
Alright, enough theory. Let's apply what we've learned to configure our deploy.yaml file.
We'll start with our host. In the previous episodes, we've created a server accessible via SSH using the root user. The IP address of that server is 139.59.161.163 but we made the domain name jollygood.app redirect to it so let's use that instead.
As mentioned earlier, we can configure the SSH user and hostname of our hosts using the remote_user and hostname options respectively.
  hosts:
    prod:
+     remote_user: root
+     hostname: jollygood.app
      deploy_path: '~/{{application}}'
By default, our application will be deployed in ~/{{application}} which in our case is equivalent to /home/root/blog-jollygood. That's not going to work for us since we told Nginx that our application will be located at /var/www/jollygood.app. So let's change this.
  hosts:
    prod:
      remote_user: root
      hostname: jollygood.app
-     deploy_path: '~/{{application}}'
+     deploy_path: '/var/www/{{hostname}}'
If everything went well, you should now be able to connect to your host by running dep ssh. If you need more options to configure your SSH connection, you can have a look at the supported SSH options here. However, I recommend configuring the ~/.ssh/config file instead for that purpose when possible.
Our main deploy task
By default, the Laravel recipe provides a deploy task for us which is tailor-made for Laravel applications. That means if we run dep deploy, we should already be deploying our application.
However, it's a good idea to explicitly provide a deploy task ourselves to make sure our deployment flow doesn't change if the library decides to update it.
So we’ll create a new task called deploy basically copy/pasting the deployment flow provided by the Laravel recipe.
  tasks:
+   deploy:
+     - deploy:prepare
+     - deploy:vendors
+     - artisan:storage:link
+     - artisan:view:cache
+     - artisan:config:cache
+     - deploy:publish
    build:
      - run: 'cd {{release_path}} && npm run build'
We don't need to import any additional recipe since all of these tasks are either defined in the Laravel recipe or within recipes it imports.
Let’s have a quick look at what these tasks do.
-
deploy:prepare. Creates a new release folder and prepare everything inside it. We'll see what that means in more detail in the next episode. -
deploy:vendors. Installs composer dependencies. -
artisan:storage:link. Creates a symlink for the public disk on the first deployment. -
artisan:view:cache. Caches the blade views. -
artisan:config:cache. Caches the configuration files. -
deploy:publish. Publishes the new release by making it the currently active release.
Whilst we could run dep deploy immediately and that's very exciting, there's still much more we can do to configure our deployments. So let's be a bit more patient and continue to make our deployment flow more powerful. 💪
Running migrations
If your application uses a database, chances are you’re going to want migrations to run in production during each deployment.
To do that, you simply need to add a task provided by the Laravel recipe called artisan:migrate.
  tasks:
    deploy:
      - deploy:prepare
      - deploy:vendors
      - artisan:storage:link
      - artisan:view:cache
      - artisan:config:cache
+     - artisan:migrate
      - deploy:publish
And that’s it! The Laravel recipe provides lots of other useful artisan commands — see the full list here. You can use them to run artisan commands directly in your server during a deployment.
For example, say you want to ensure no one updates the database during a migration, then you can use the artisan:down and artisan:up tasks to temporarily put your application in maintenance mode.
  tasks:
    deploy:
      - deploy:prepare
      - deploy:vendors
      - artisan:storage:link
      - artisan:view:cache
      - artisan:config:cache
+     - artisan:down
      - artisan:migrate
+     - artisan:up
      - deploy:publish
Reloading PHP-FPM
Another task you’ll likely want to include in your deployment flow is restarting PHP-FPM at the very end of the deployment.
PHP-FPM is a special PHP implementation that is hugely popular in PHP servers because it tends to be faster than other implementations.
However, PHP-FPM caches a lot of things and so, if we want our changes to be live after deploying, we’ve got to remember to reload PHP-FPM.
Fortunately for us, there is an official recipe for that. All we need to do is import it and define the PHP version we’re using.
  import:
    - recipe/laravel.php
+   - contrib/php-fpm.php

  config:
    application: 'mylaravelapp'
    repository: '[email protected]:lorisleiva/mylaravelapp.git'
+   php_fpm_version: '8.0'
Now, we can use the provided task php-fpm:reload at the very end of our deployment flow like so.
  tasks:
    deploy:
      - deploy:prepare
      - deploy:vendors
      - artisan:storage:link
      - artisan:view:cache
      - artisan:config:cache
      - artisan:migrate
      - deploy:publish
+     - php-fpm:reload
Building assets
What if you want to compile your JavaScript and your CSS during each deployment? That way, you can use npm run dev or npm run watch locally whilst being sure that your assets will always be compiled using npm run prod in production.
That’s no problem at all. There’s again a recipe for that. Import the contrib/npm.php recipe and you can now use the npm:install task in your deployment flow. Note that it might take a while to execute during the first deployment, but after that, Deployer will use your previous release as a cache to massively speed up the task.
  import:
    - recipe/laravel.php
    - contrib/php-fpm.php
+   - contrib/npm.php

  ...

  tasks:
    deploy:
      - deploy:prepare
      - deploy:vendors
      - artisan:storage:link
      - artisan:view:cache
      - artisan:config:cache
      - artisan:migrate
+     - npm:install
      - deploy:publish
      - php-fpm:reload
    build:
      - run: 'cd {{release_path}} && npm run build'
Now, what about npm run prod? Well, it’s not part of the official npm recipe because different applications have different npm scripts. But that’s fine, we can create that task directly within that deploy.yaml file as we've seen before.
Since npm run prod is very similar to npm run build, we'll simply repurpose the auto-generated build task like so.
  tasks:
    ...
-   build:
-     - run: 'cd {{release_path}} && npm run build'
+   npm:run:prod:
+     - run: 'cd {{release_path}} && npm run prod'
And that’s it! Now, we can add it to our deployment flow.
  tasks:
    deploy:
      - deploy:prepare
      - deploy:vendors
      - artisan:storage:link
      - artisan:view:cache
      - artisan:config:cache
      - artisan:migrate
      - npm:install
+     - npm:run:prod
      - deploy:publish
      - php-fpm:reload
    npm:run:prod:
      - run: 'cd {{release_path}} && npm run prod'
Note that if you prefer using yarn instead of npm, there’s also a recipe for that. Simply swap the recipe and update the rest of the code accordingly — provided you installed yarn on your server already.
  import:
    - recipe/laravel.php
+   - contrib/yarn.php

  ...

  tasks:
    deploy:
      - deploy:prepare
      - deploy:vendors
      - artisan:storage:link
      - artisan:view:cache
      - artisan:config:cache
      - artisan:migrate
+     - yarn:install
+     - yarn:run:prod
      - deploy:publish
      - php-fpm:reload
+   yarn:run:prod:
+     - run: 'cd {{release_path}} && yarn run prod'
Other recipes
Deployer comes with a lot of maintained recipes out-of-the-box. For example, you can use the Slack or Discord recipes to notify you before and after each deployment. Feel free to check all available recipes in the Deployer documentation.
If there is something you can’t find or if you'd like to create some special tasks tailored to the needs of your application, don't worry. We will see how to do this in another episode of this series.
Conclusion
What? already? But we haven't deployed?
I know but look at what we've achieved.
- We configured a powerful deployment flow with only a few lines of code.
- We went through the main concepts of Deployer and saw how to configure them to work in our favour.
- We saw how to write custom tasks in our
deploy.yamlfile and run them using thedeplibrary. - We listed helpful commands provided by Deployer such as
dep ssh.
We're now fully ready to hit the red button and run dep deploy which, I promise, we will do in the next episode!
If you'd like to see the full deploy.yaml file we've built in this tutorial, you may click the button below to see it on GitHub.
If you prefer to use PHP for your main configuration file — or if you're just curious about what it might look like — click the button below to see the equivalent of our deploy.yaml file using PHP.
See you in the next episode! 🚀
EDIT 2021-11-08: Deployer now implements inline tasks using - run: '<command>' rather than script: [<array of commands>]. The article was updated accordingly.
Set up a server for Laravel applications

Deploy with zero-downtime