Deploy with zero-downtime
In the previous episode, we installed Deployer and defined our deployment flow by configuring a deploy.yaml file at the root of our project. Enough theory, it's about time we ship this thing to our server.
Ship it!
In our deploy.yaml file, we configured our deployment flow inside the deploy task. Therefore, all we need to do to start a deployment is to run:
dep deploy
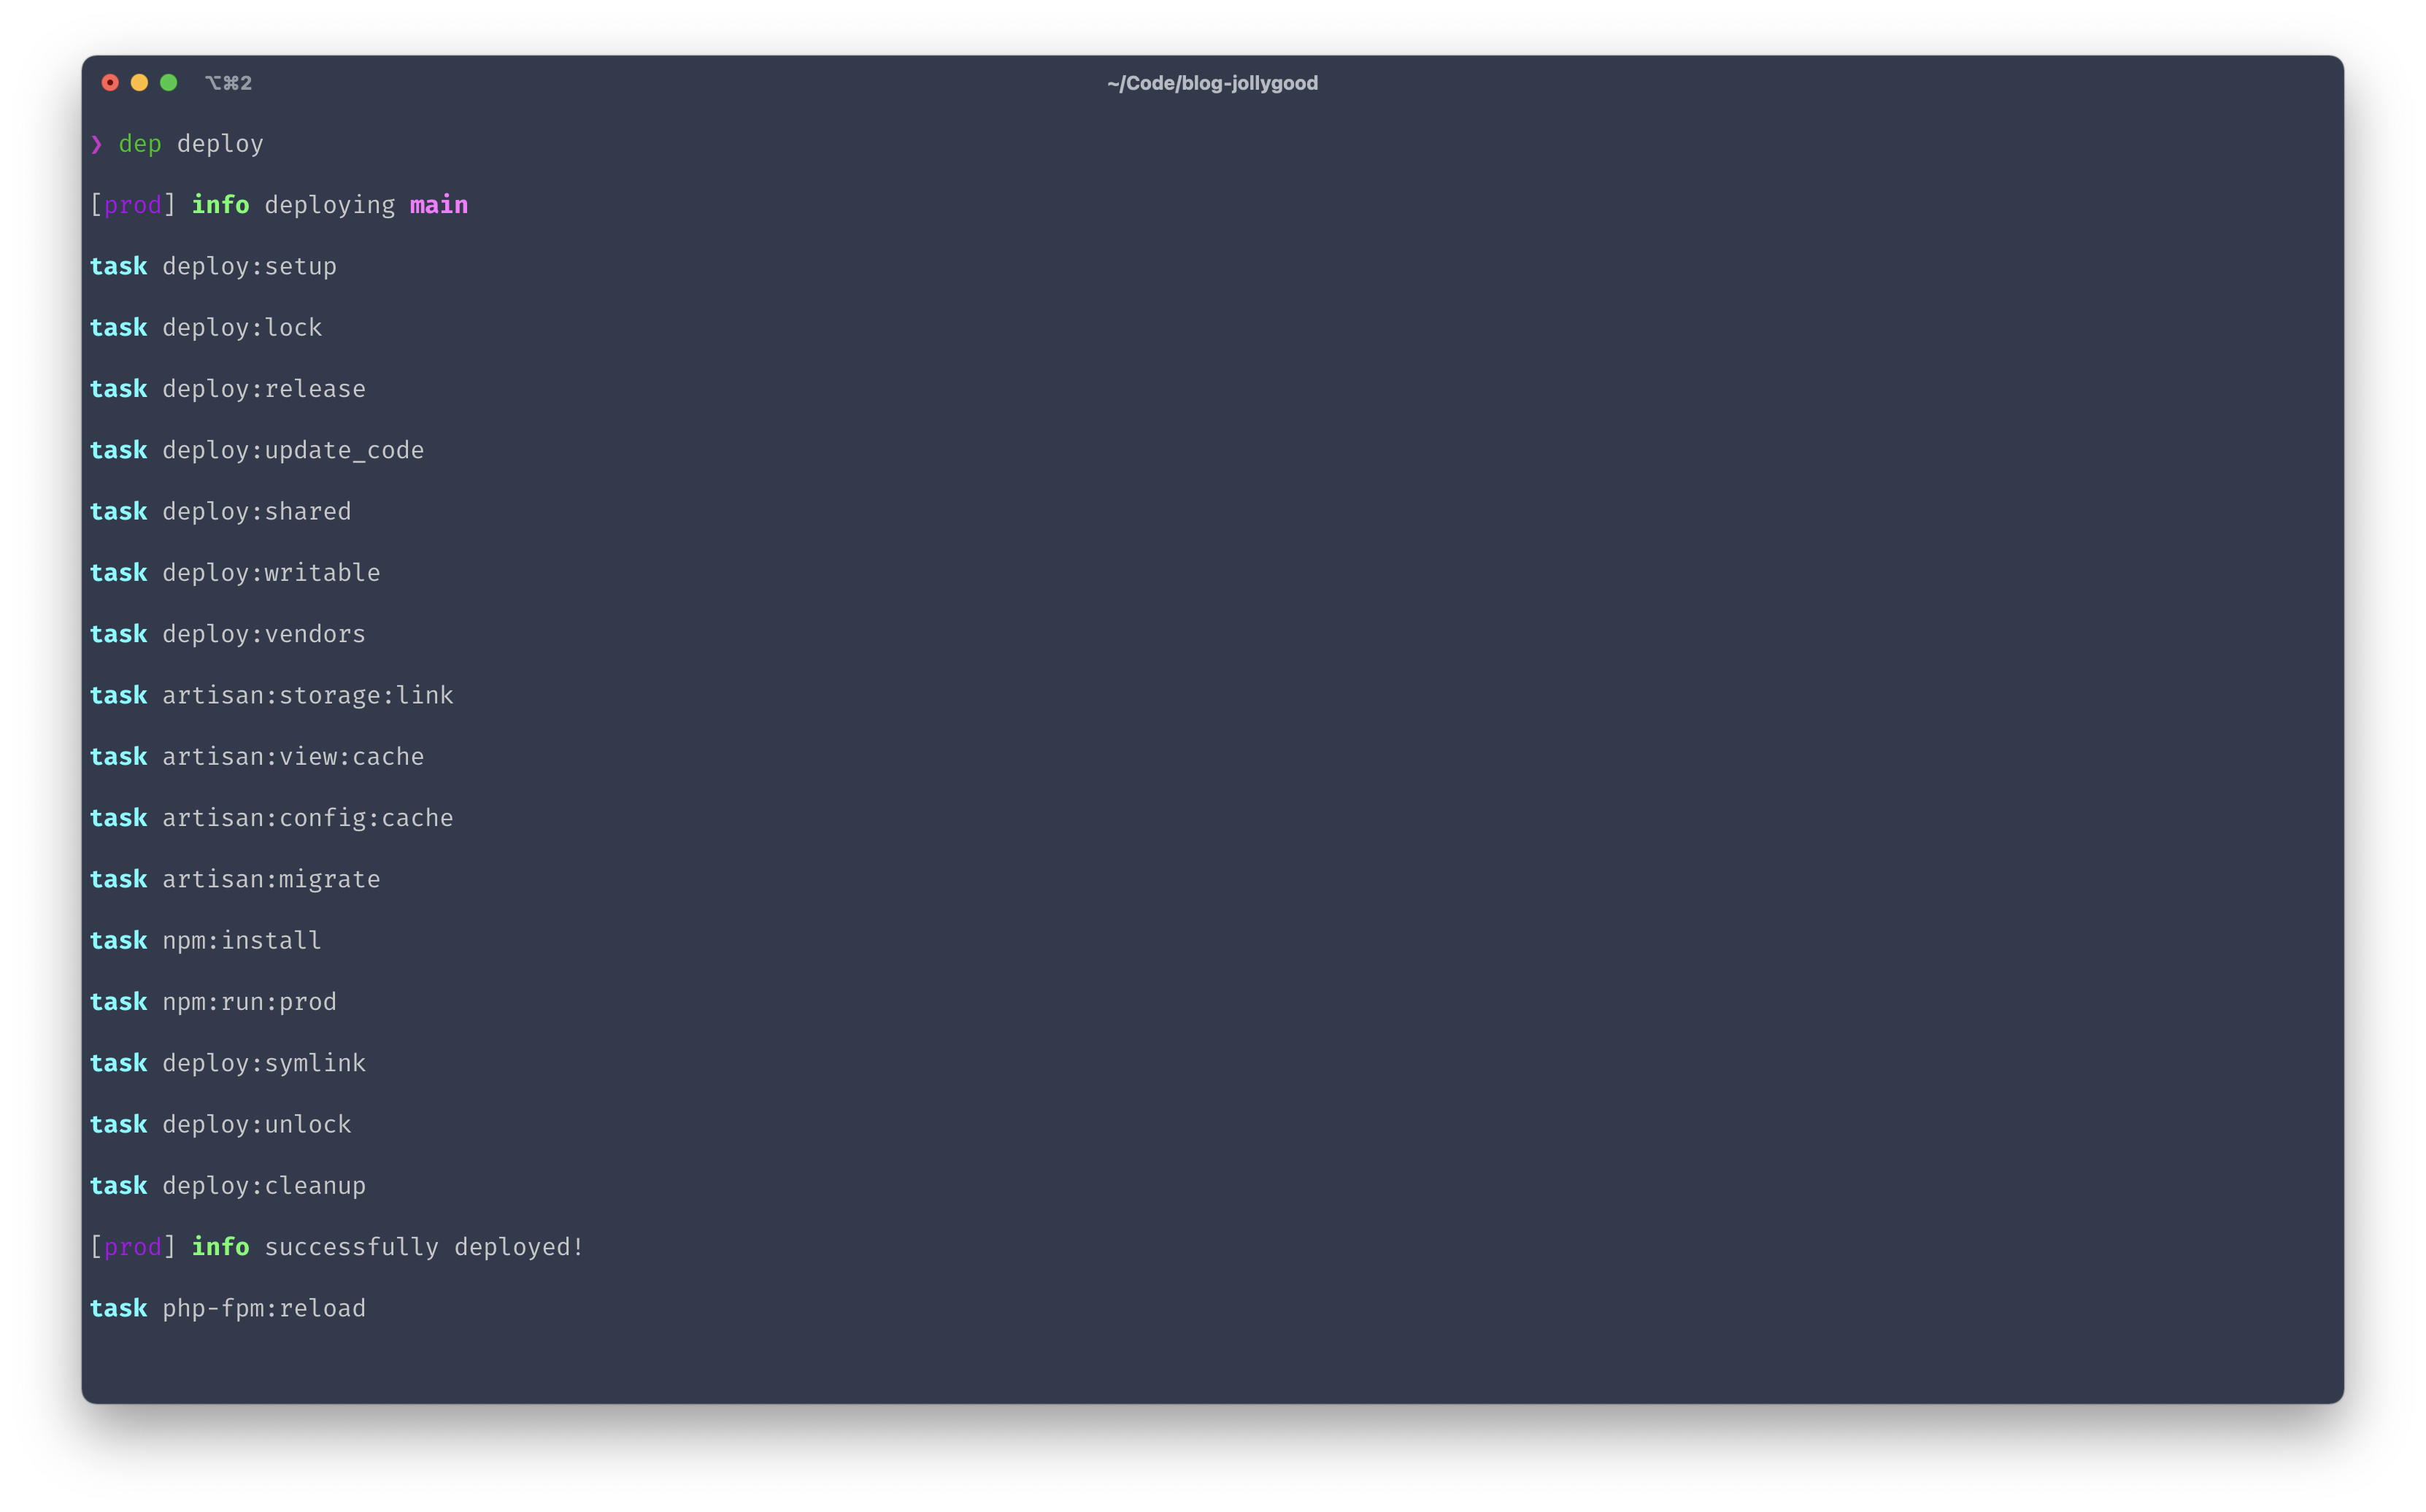
If everything went well, we should have the following output.
![Console output of the first deployment.
[prod] info deploying main
task deploy:setup
task deploy:lock
task deploy:release
task deploy:update_code
task deploy:shared
task deploy:writable
task deploy:vendors
task artisan:storage:link
task artisan:view:cache
task artisan:config:cache
task artisan:migrate
[prod] warning Your .env file is empty! Skipping...
task npm:install
task npm:run:prod
task deploy:symlink
task deploy:unlock
task deploy:cleanup
[prod] info successfully deployed!
task php-fpm:reload](/assets/articles/2021/0410-deployer-4-deploy/deploy-first.png)
What happened?
Our application was successfully deployed to our server using a technique that causes no downtime to your users. We call this “zero-downtime”.
Concretely, the following happens during each deployment:
- A brand new folder is created and the entire project is cloned into it. We call that folder: a release. Deployer does that efficiently by caching things from one release to another.
- Our deployment tasks are being executed inside that release. For example,
deploy:vendorwhich executescomposer install. - Once all tasks have been successfully executed, that release is marked as the new "current" release. It does that by creating a
currentsymlink that points to the release folder we’ve just created.
Since all our deployment tasks are being executed before we symlink the directory to the new release, the current folder always acts as the latest stable release without ever experiencing any downtime.
This is why, when we configured Nginx on our server, we told it to serve our application inside that current folder by defining our root as /var/www/jollygood.app/current/public.
After this first deployment, if we look at the folder structure of our deploy_path inside our server — in our case /var/www/jollygood.app — we should see something like this.
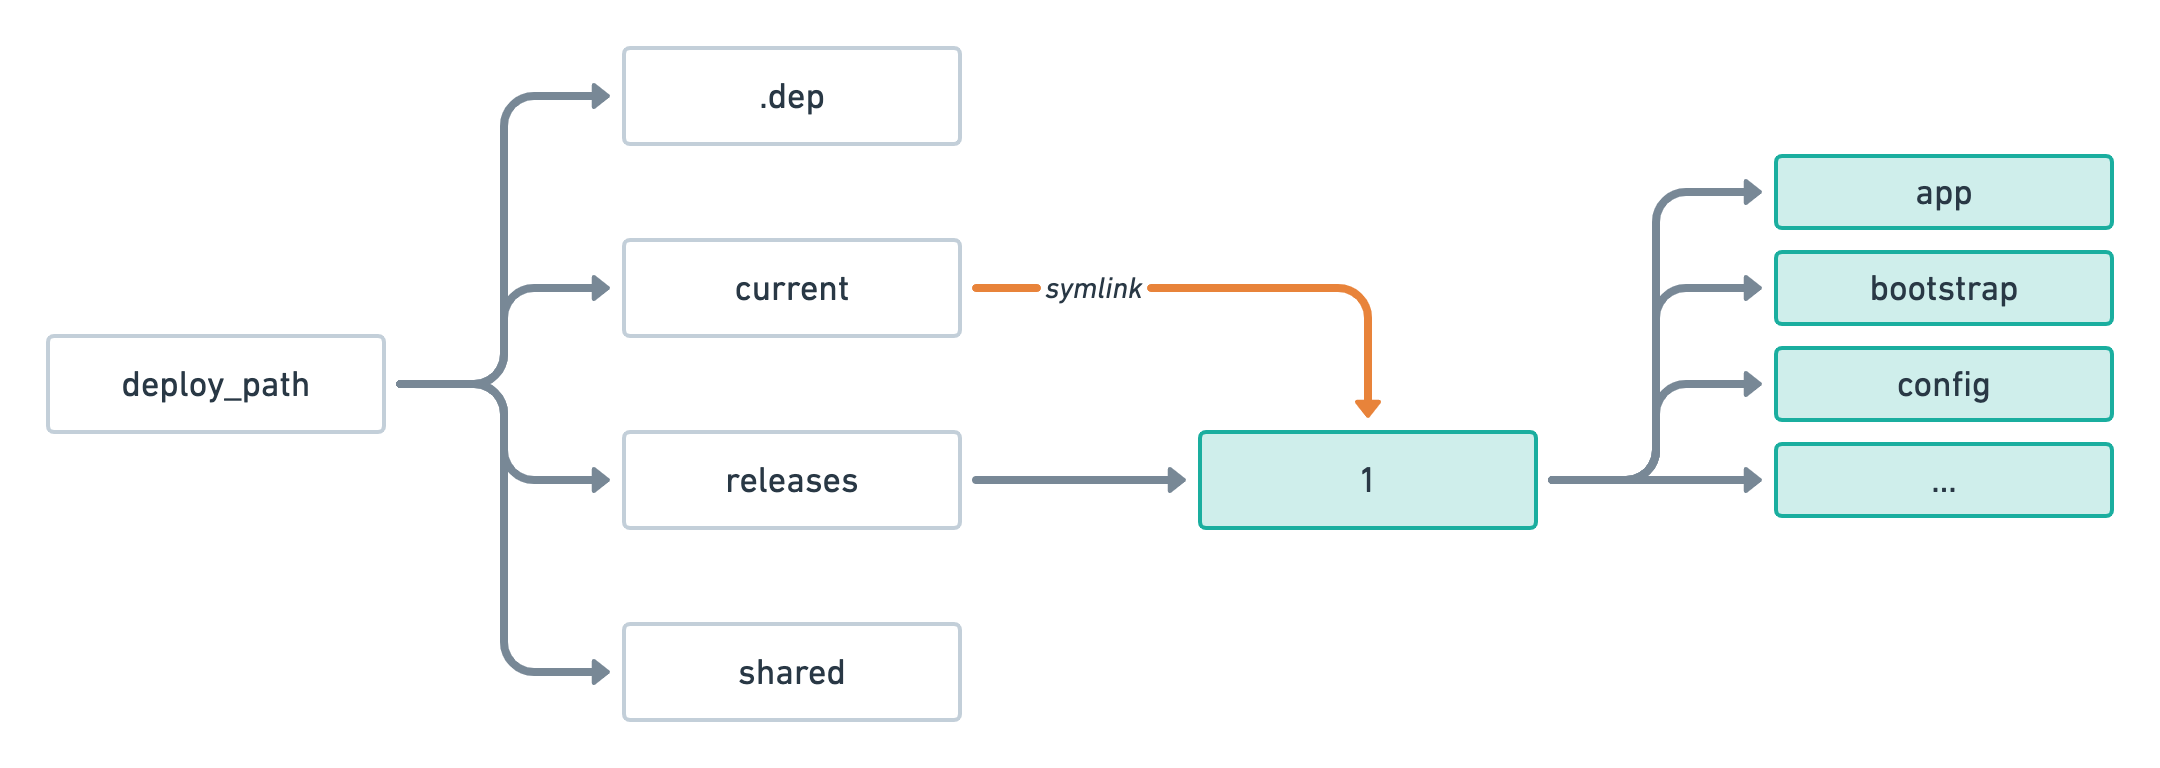
As you can see our current folder which is responsible for representing the active release is pointing to the releases/1 folder — our very first release 🎉.
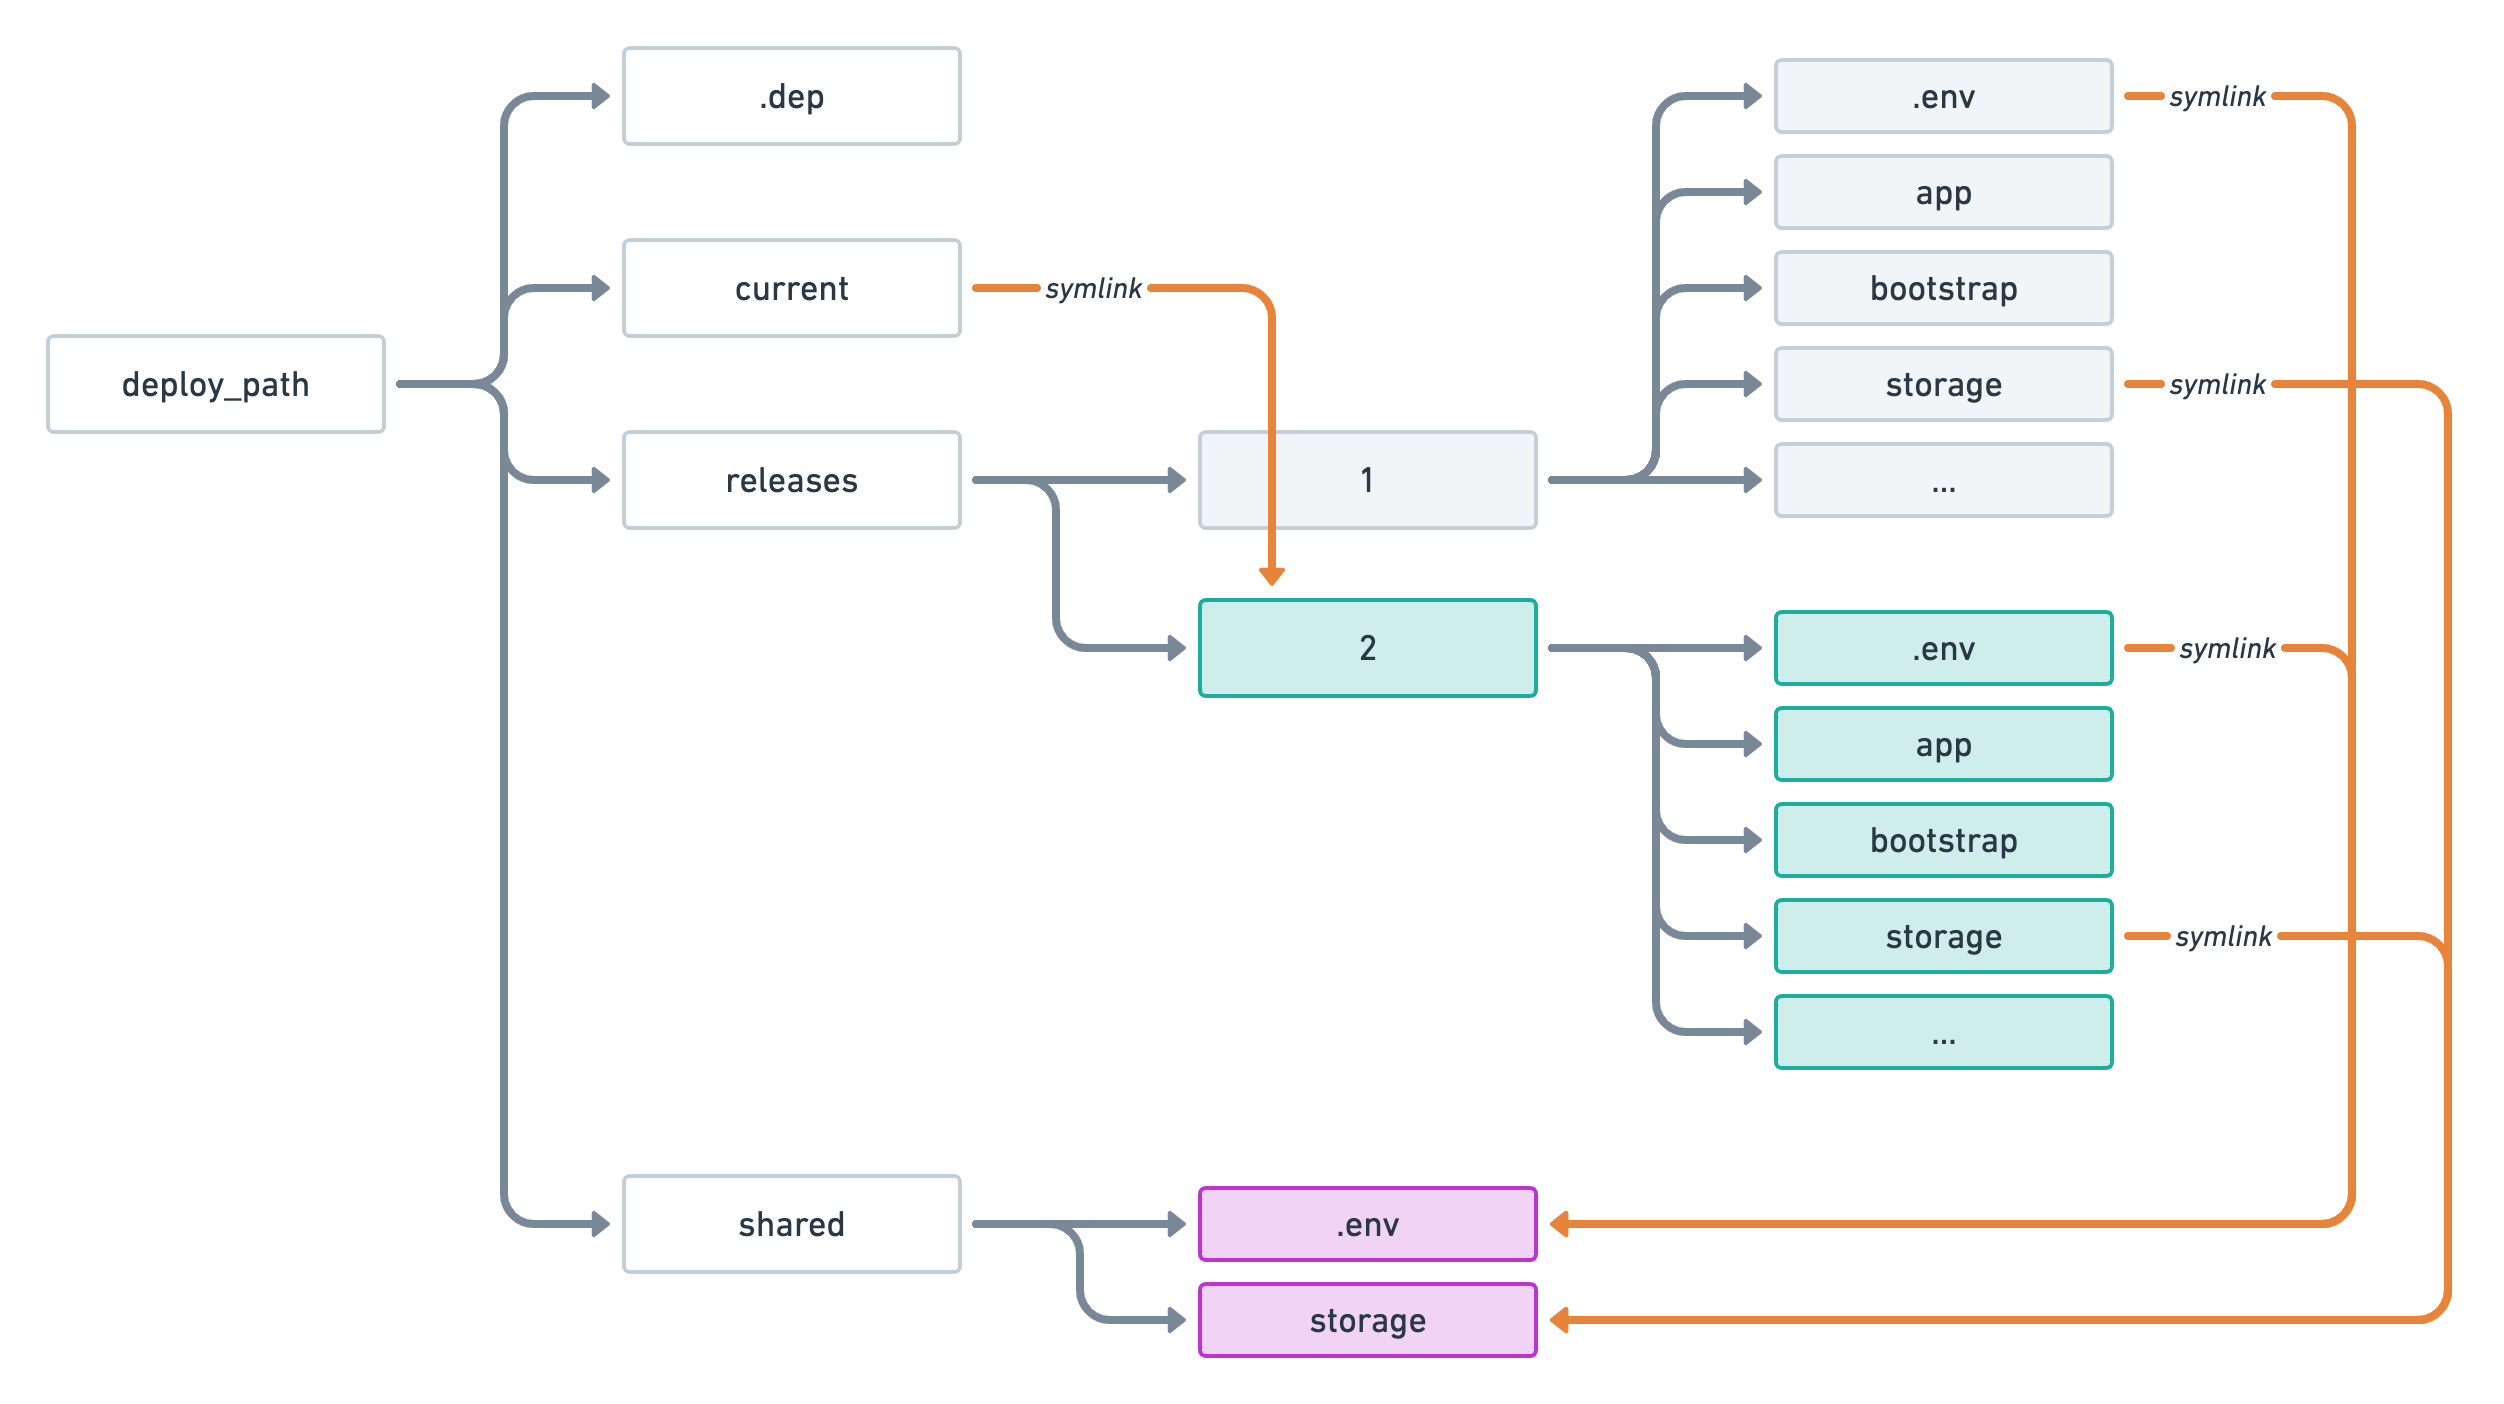
If we were to deploy again, then we would see the following folder structure during the deployment process.
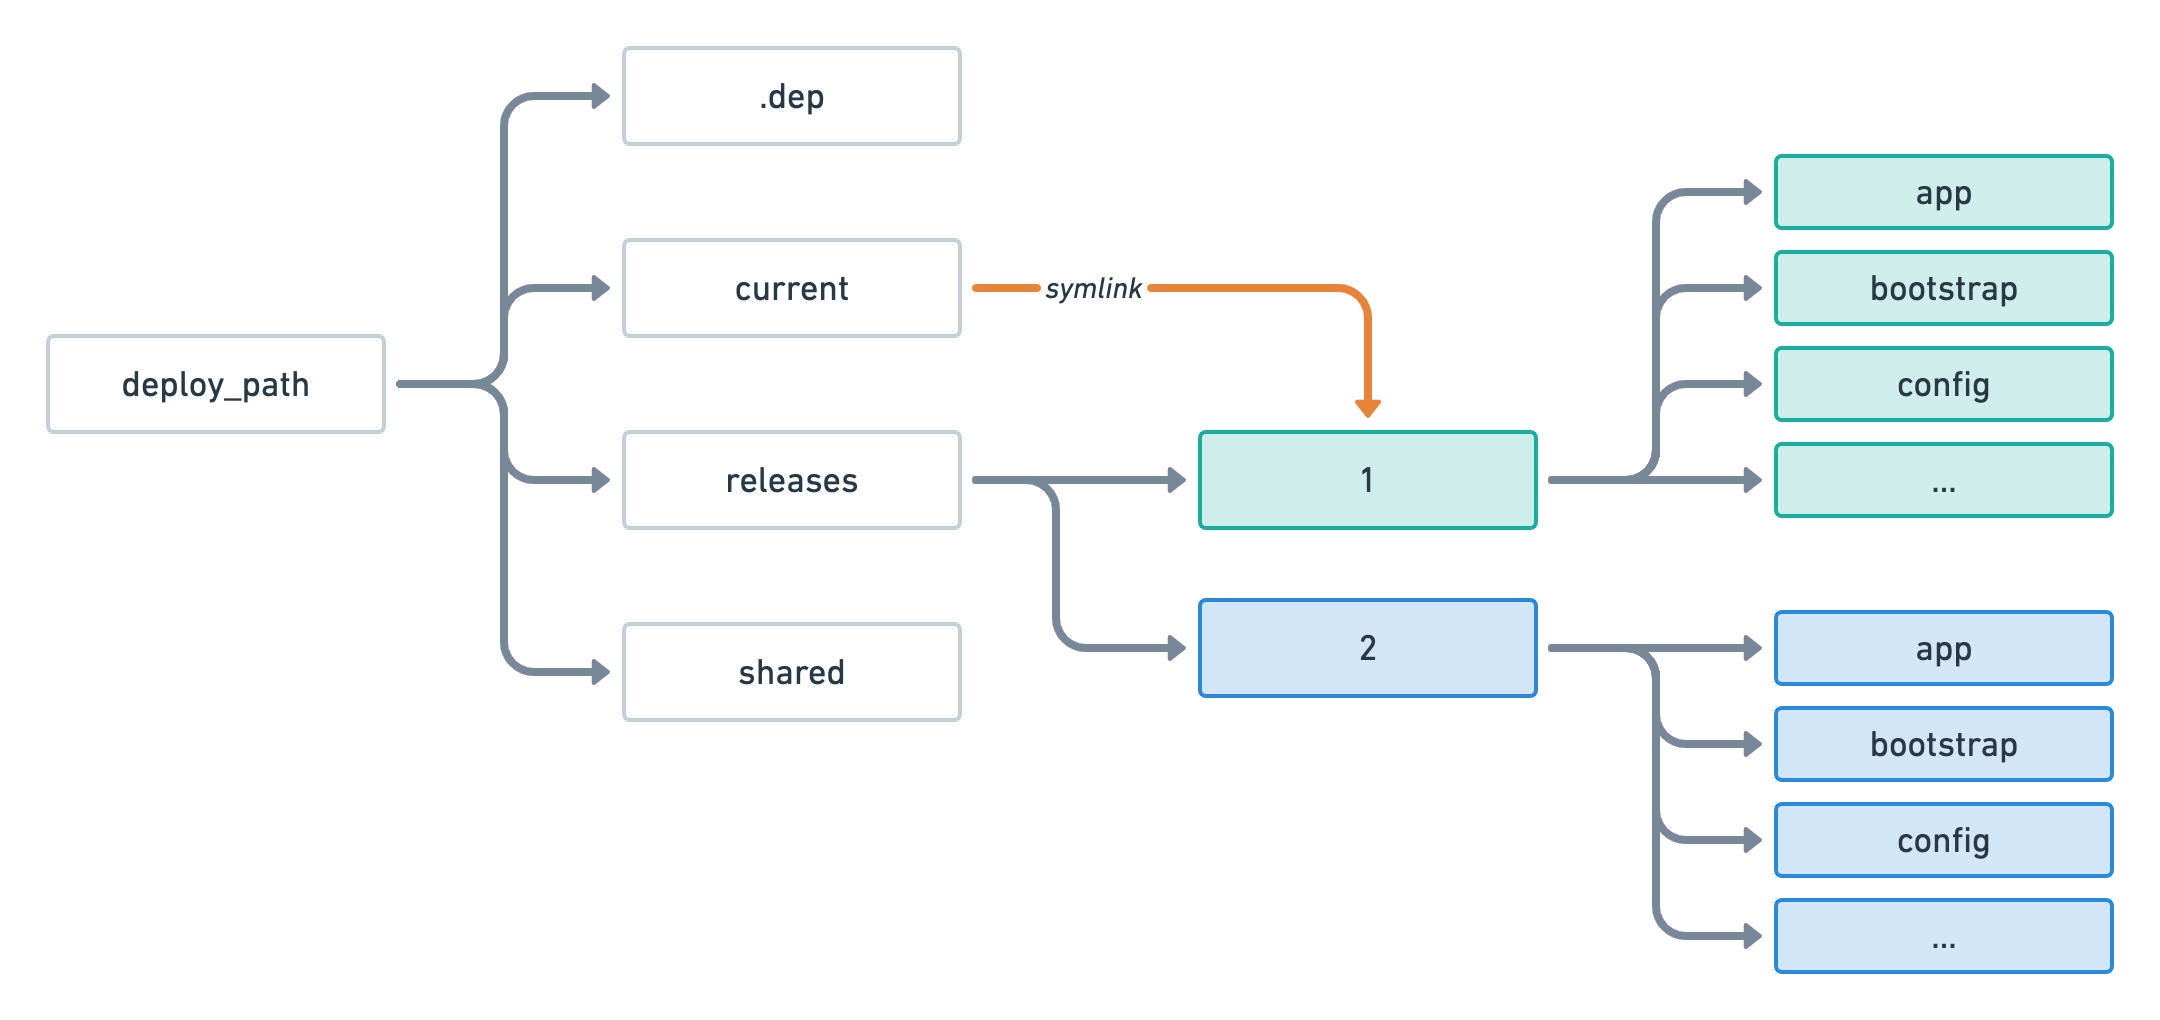
At this point, the second release — located in releases/2 — is being built but any user accessing our application will still be using releases/1.
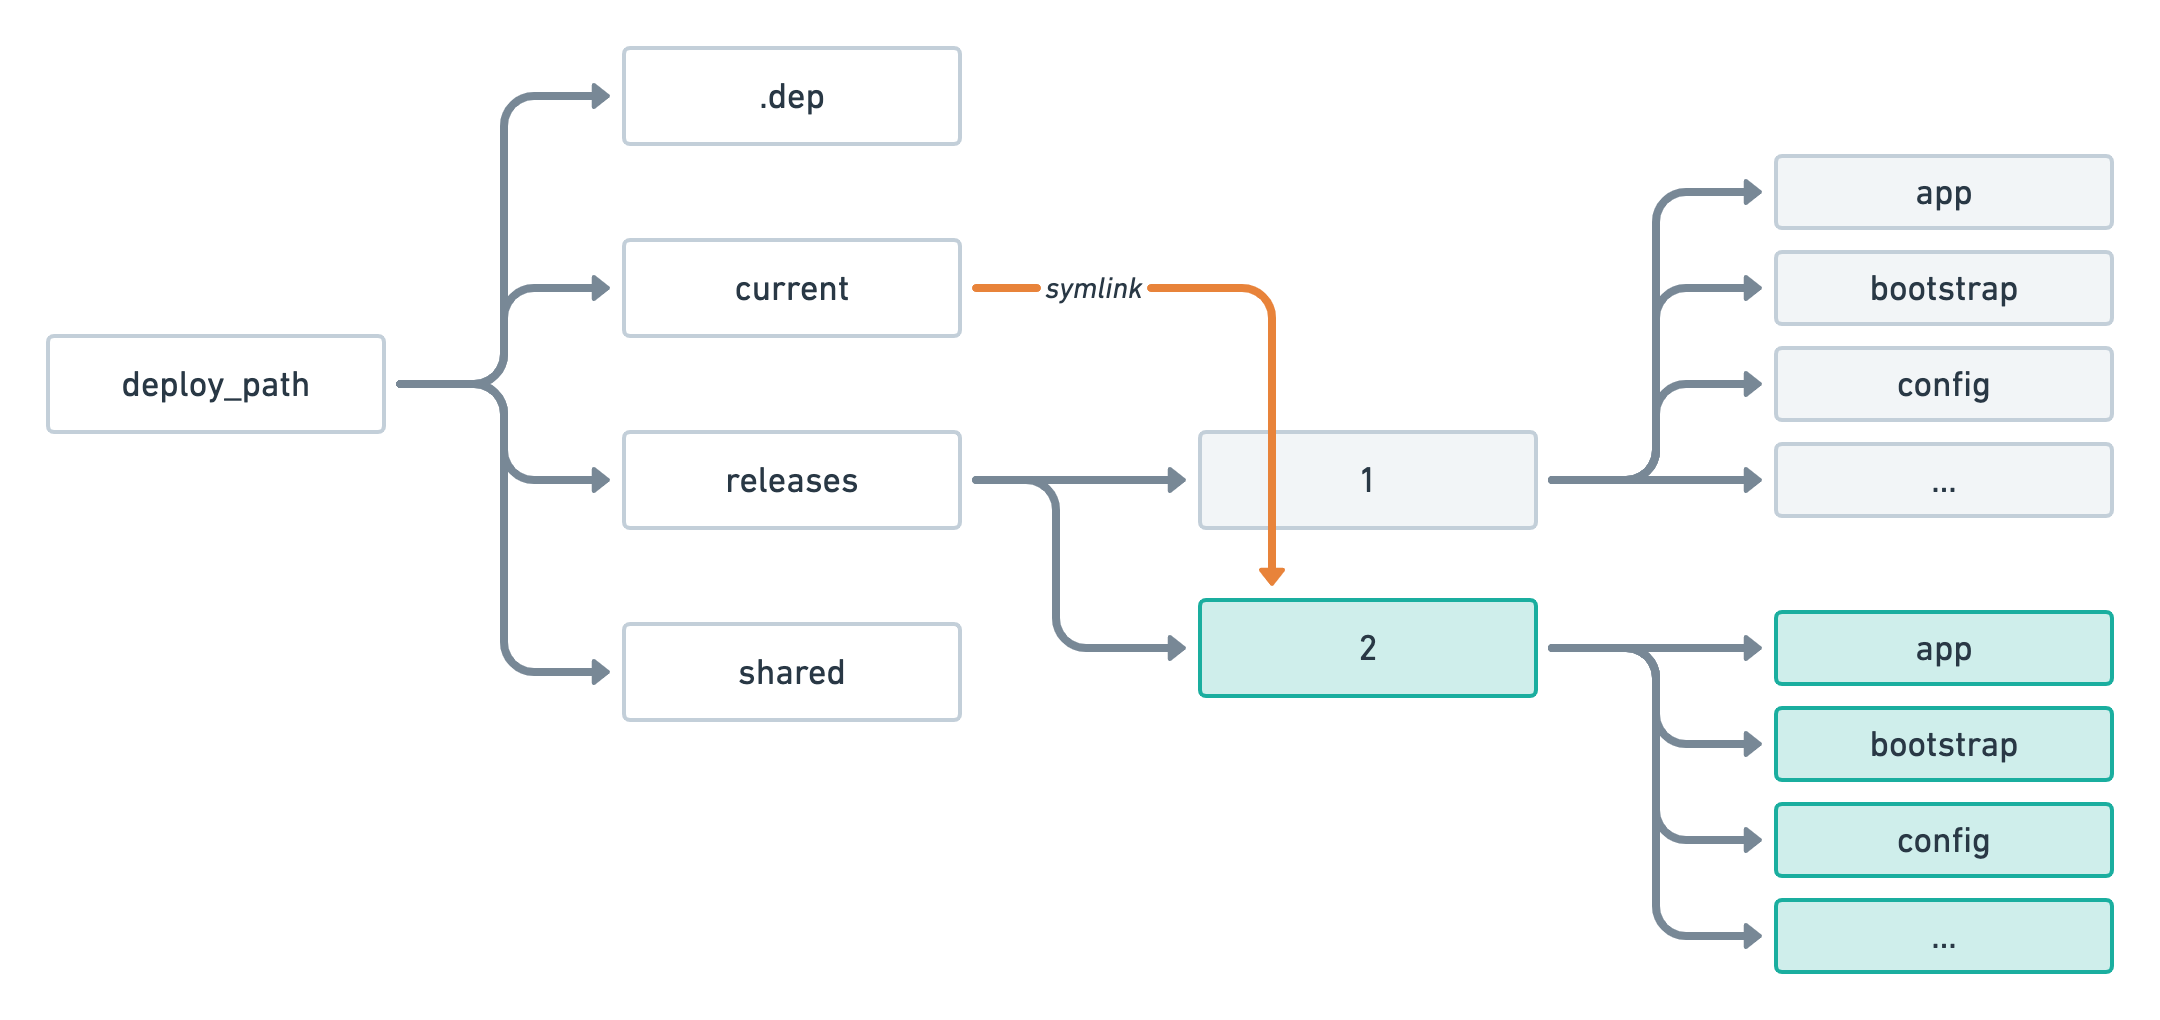
Once all tasks have been successfully executed, the current symlink is updated to point to that new release.
In case you're wondering, the .dep folder exists for internal usage of the Deployer library. It is used to store some metadata and cache things such as our git repository so we don't clone it from scratch at every deployment.
If anything goes wrong during the deployment process, the user is none the wiser as they will continue to use the first release until we are sure the deployment was a success.
On top of that, if the deployment was successful but we later find out there is a bug in the latest release, we can roll back to a previous release by simply updating the current symlink again. Deployer allows you to do this via the dep rollback command.
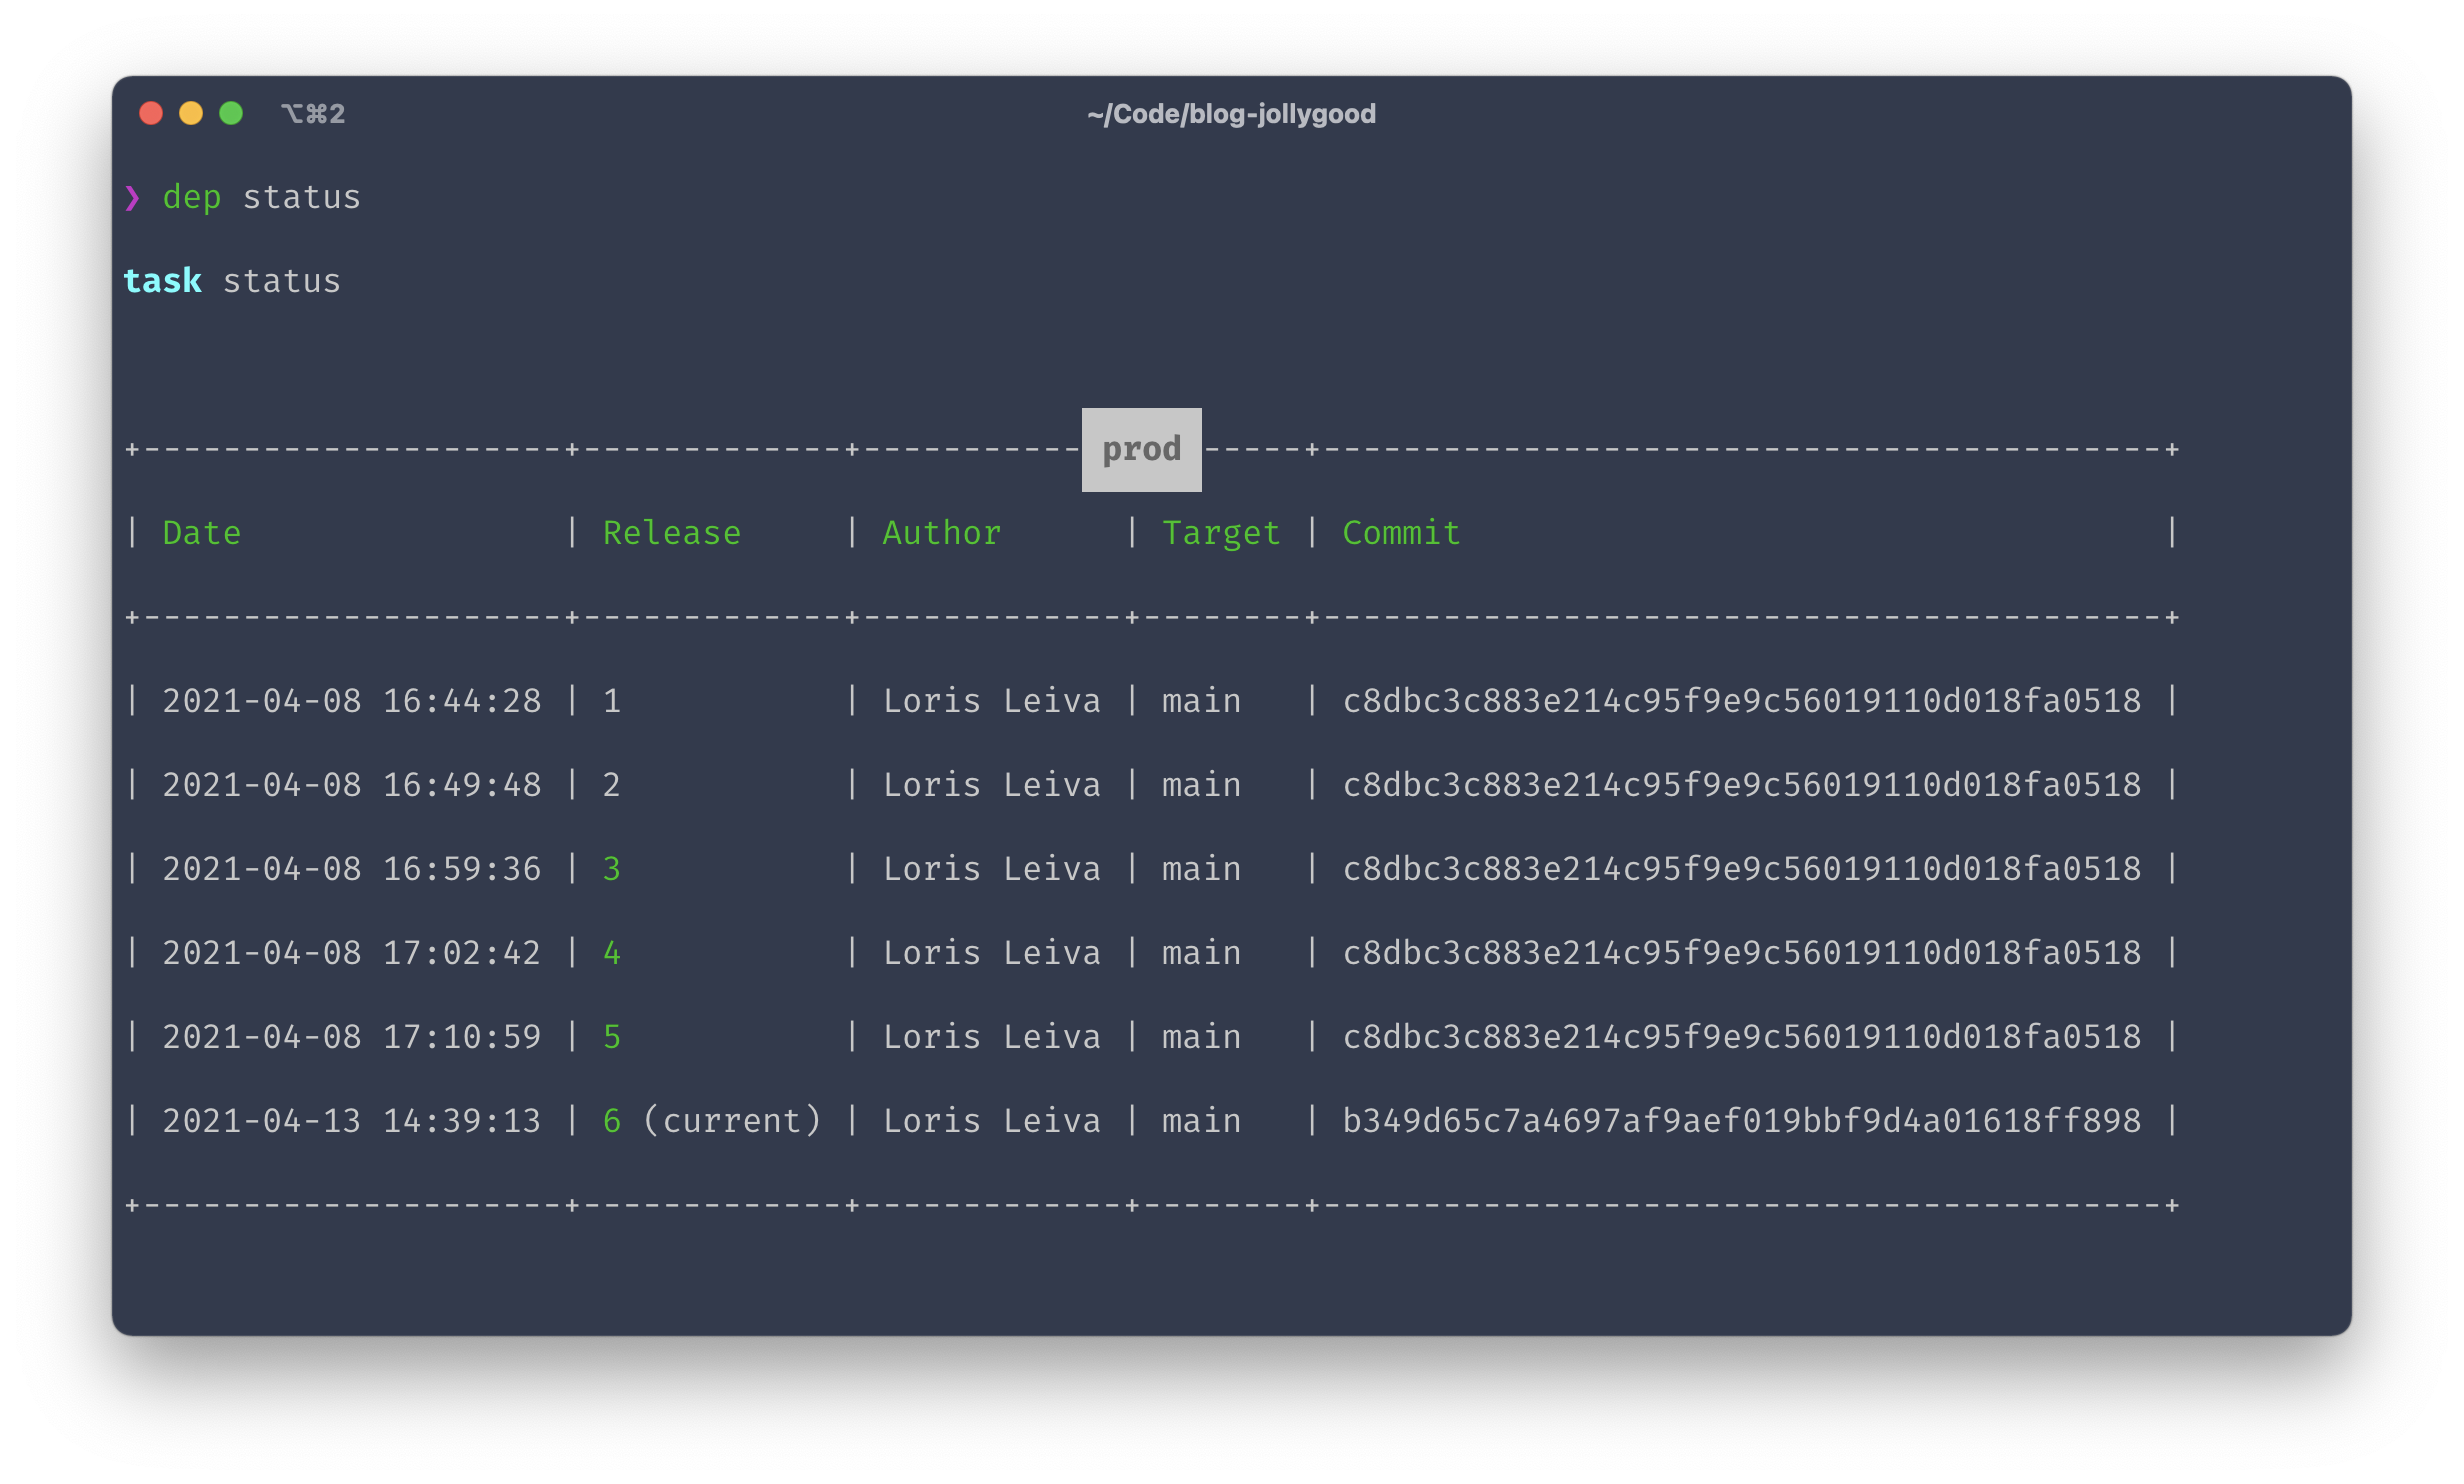
Additionally, you may use the dep status command to list your latest available releases and their status — i.e. if they were successful or not and which one is the current release.
Now you might be wondering: what about our .env file and our storage directory? Do they also get created from scratch after each deployment?
Thankfully not. Instead, they are put in a special shared folder. During the deployment of each release, we create symlinks that point inside that shared folder so that every release uses the same .env file and the same storage directory.
By default, only .env and storage are configured as shared by the Laravel recipe but you may explicitly configure which files and folders should be shared via the shared_files and shared_dirs options respectively.
However, on the very first deployment, we don’t have a .env file on our repository. Therefore, a brand new empty one is created and added to our shared folder.
This is why, if you remember the output of our first deployment, we were not able to migrate our database.
Additionally, without a .env file, our application is lacking the mandatory APP_KEY environment variable which is why, if you try to visit your application, you’ll see a 500 error.
So let’s fix that.
Setting up our environment
We’ll start by running the following command to SSH into our server.
dep ssh
Now that we have deployed our application, we arrive directly in the current release.
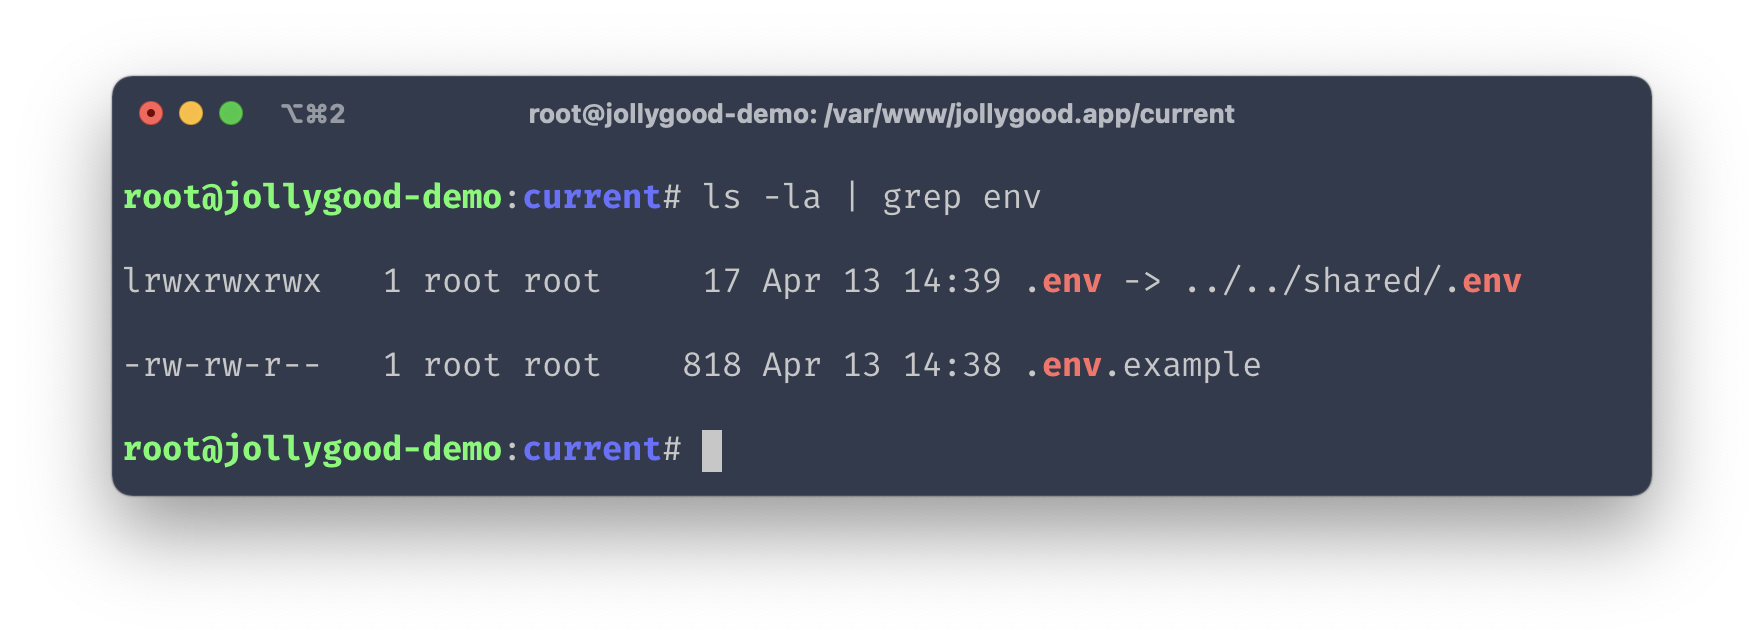
Now, if we run ls -la, you’ll notice that the .env file exists and is symlinked to a .env file on our shared folder as we’ve mentioned above.
However, that file is empty so let’s fill it. We’ll run the following commands to start from our .env.example file and to generate the APP_KEY environment variable randomly.
cp .env.example .env
php artisan key:generate
Note that running the cp command will keep the symlink to the shared folder which is exactly what we want.
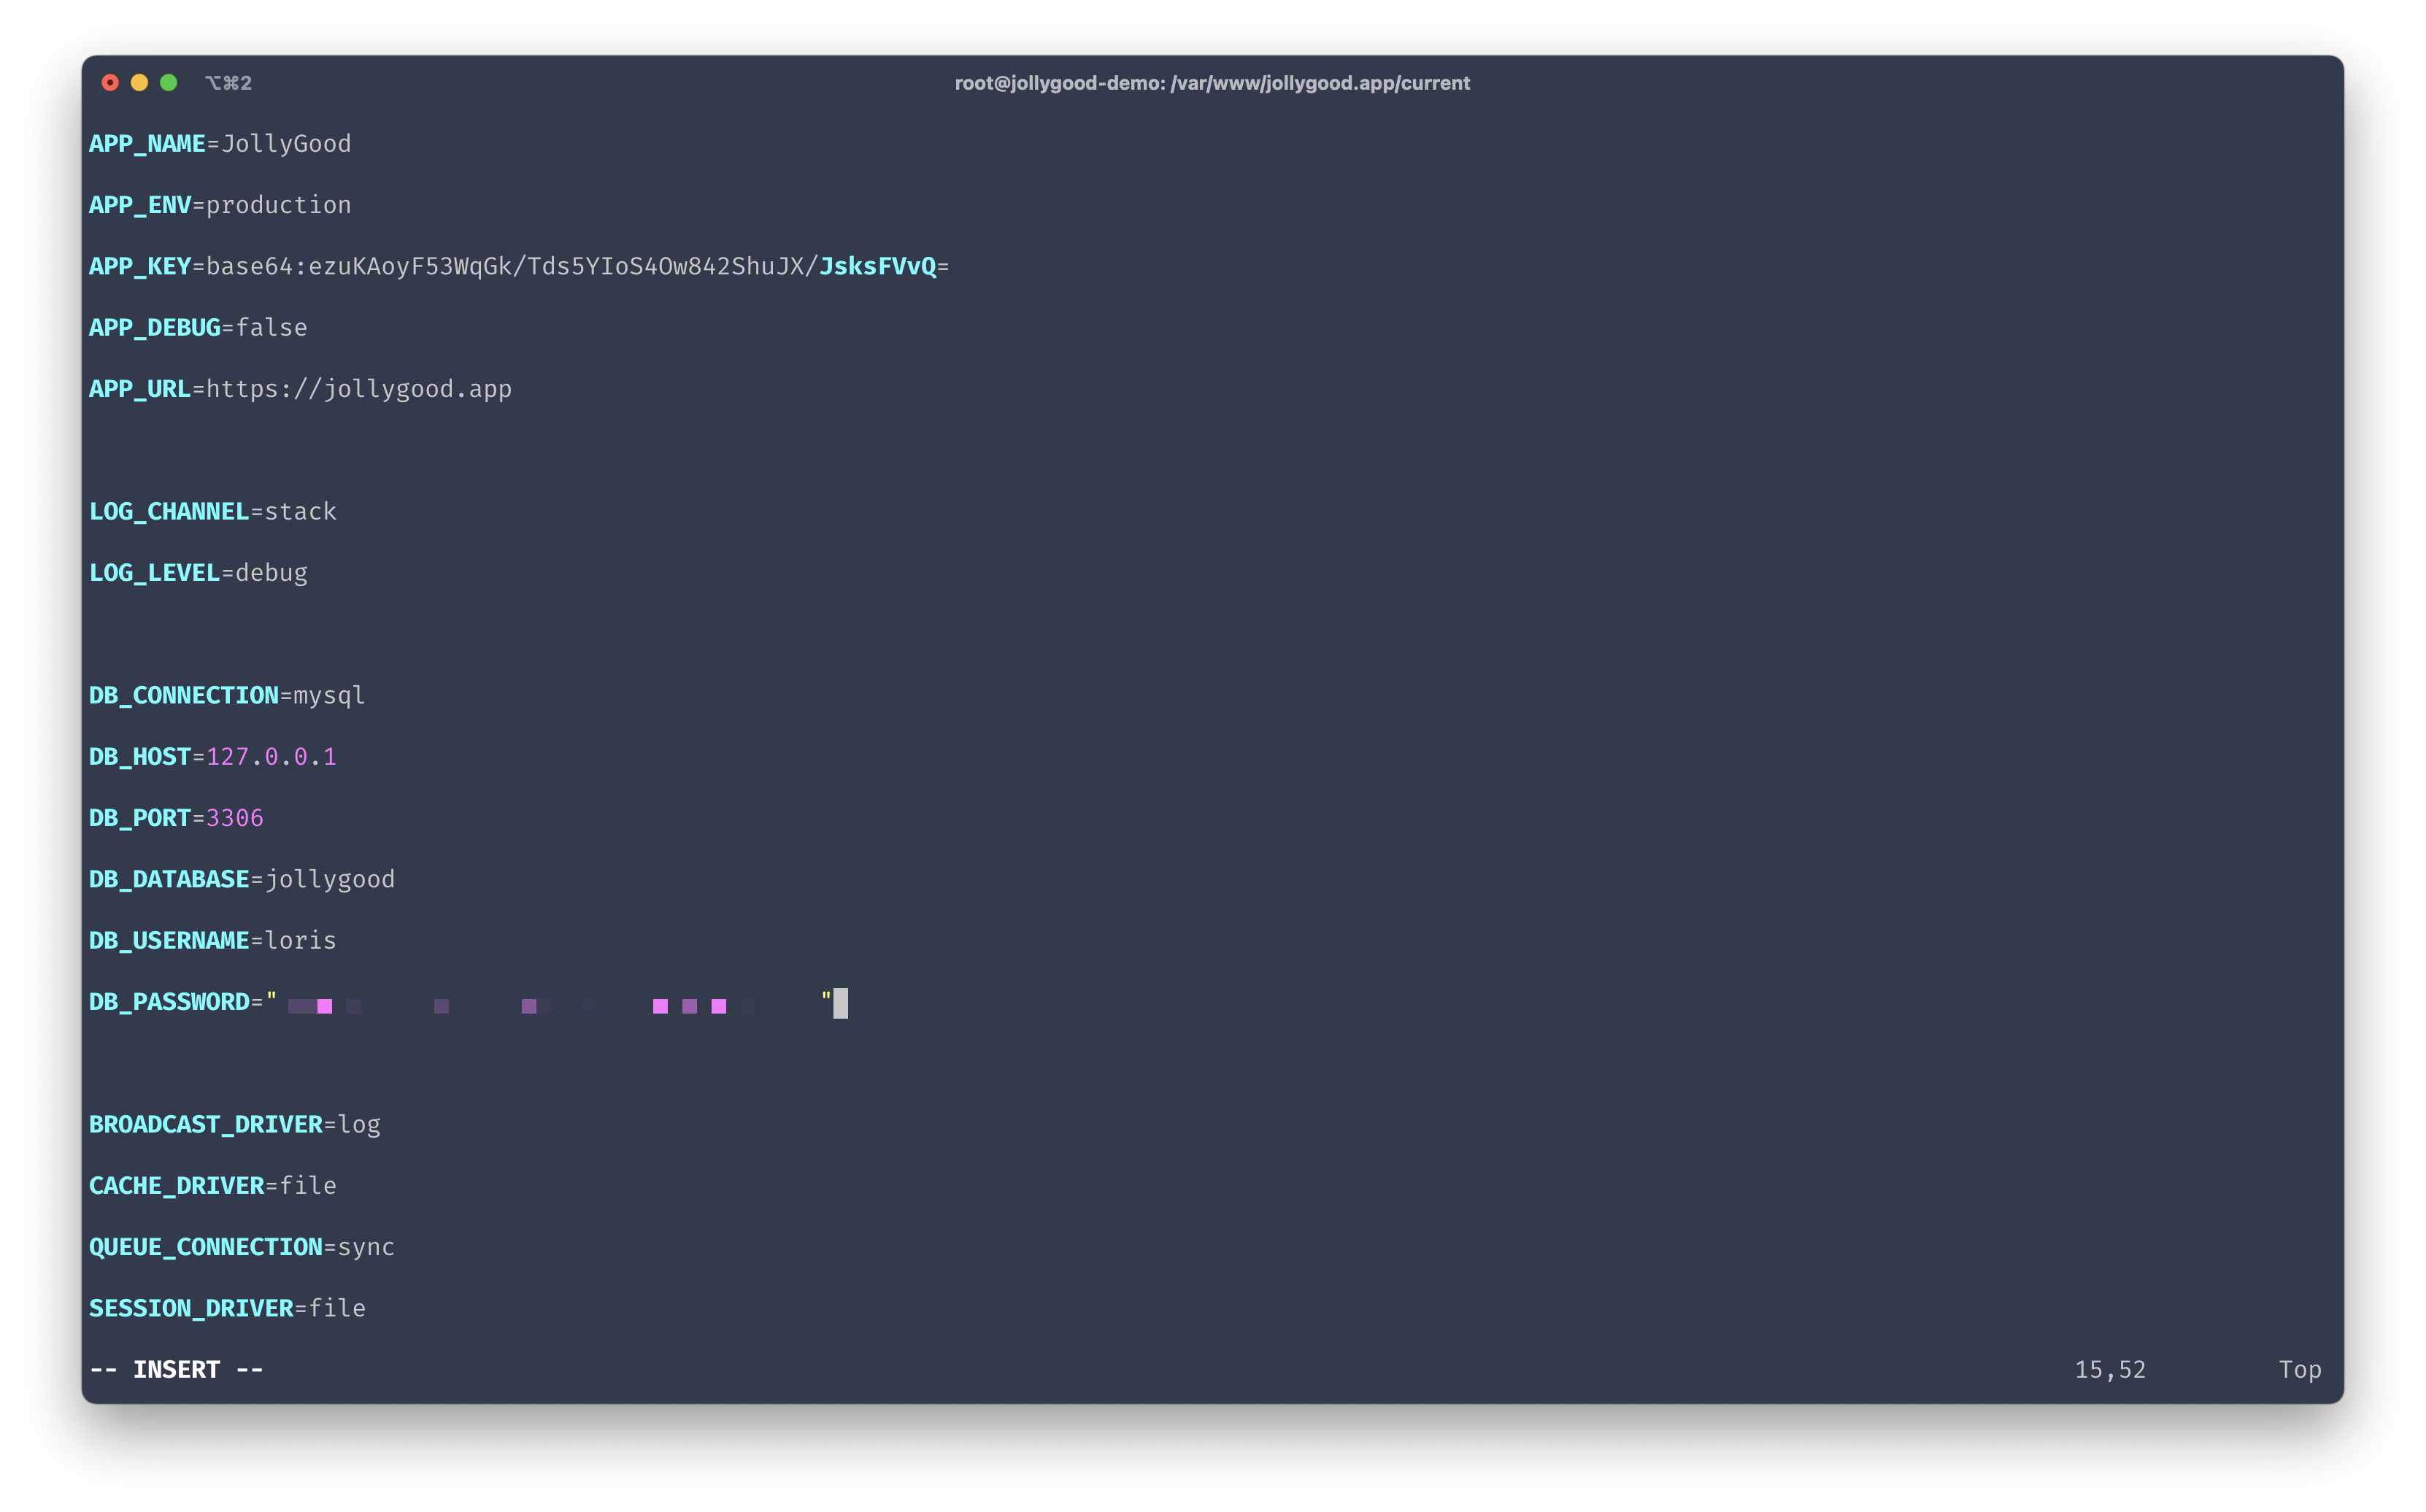
Next, vim into your .env file to configure your production environment variables.
- Ensure
APP_NAMEis set to your application name. - Ensure
APP_ENV=productionin production - Ensure
DEBUG=falsein production - Ensure
APP_URLis set to your production base URL — usinghttps://if you set up a SSL certificate as we did in episode 2. - Ensure your
DB_*variables are pointing to your production database otherwise theartisan:migratetask will fail on our next deployment.
Now, if you save and exit — :wq — you’ll still see a 500 when you try to view your application. That’s because we included the following task on our deployment flow: artisan:config:cache. Caching our configuration is good for performance but we’ve got to remember to regenerate the cache after manually editing the .env file.
If you’re already inside your server, simply run php artisan config:cache, otherwise, you may run dep artisan:config:cache to run this on your server from your local machine.
# Inside the current release.
php artisan config:cache

# In your local machine.
dep artisan:config:cache
If you're still seeing a 500 at this point, it could either be a cache issue from PHP-FPM or it could be that the page you're requesting requires access to the database which we haven't yet migrated at this point. Both of these will be automatically fixed by our next deployment so bear with me before entering panic mode. 😊
Finally, let’s start a brand new deployment. This will ensure our deployment flow works properly and that the database is migrated now that we’ve set up our .env file. Back to your local machine run dep deploy again. You should now see the following console output.
And that’s it! You’re now fully equipped to deploy your application at any time with two simple words!
Okay now you can start to panic if you're still seeing a 500. 😅 Check the logs using dep logs or by manually checking the log files on your server. Feel free to comment your problem below so others can help you and so you can help others facing the same issue in the future.
Running tasks after deploying
Now that we have a better understanding of "zero-downtime", there's one last thing I'd like to mention before wrapping up this article.
You might have noticed that tasks can be executed both during and after a deployment. For example, if you want to regenerate your configuration cache after updating your .env file, you can run:
dep artisan:config:cache
Since we are not in the middle of a deployment, the task will be executed directly inside the current directory — as opposed to inside the release that is being built.
When creating custom tasks in Deployer you have access to many paths but here are the most important ones you’ll want to know:
-
current_path. This is the path of the active release. The one that users interact with when they go on your application. -
release_path. This is the path of the release which is being built. It has not yet been symlinked so users do not see it yet but at the end of the deployment flow — if everything goes well — it will become the newcurrent_path. -
release_or_current_path. This will always be equal to therelease_pathunless it does not exist — meaning we are not deploying. In this case, it will equal thecurrent_pathinstead. This path represents the "best of both worlds" and I recommend using this one when possible.
Therefore, we could update our npm:run:prod custom task inside our deploy.yaml file to make sure it can also be executed outside a deployment if we need to.
  tasks:
    ...
    npm:run:prod:
-     - run: 'cd {{release_path}} && npm run prod'
+     - run: 'cd {{release_or_current_path}} && npm run prod'
All artisan commands provided by the Laravel recipe are using this release_or_current_path variable which means you can use them inside and outside deployments.
The only exceptions to this rule are the artisan:up and artisan:down tasks which will always use the current_path even when they are inside a deployment. This is by design since, even when deploying, we’ll want maintenance mode changes to apply to our active release.
Conclusion
Congratulations, We did it! 🥳
It took us 4 episodes but we went from nothing to having our Laravel application deployed in a fully configured server using only 2 words: dep deploy.
You can find the updated deploy.yaml for this episode here — or the equivalent deploy.php here.
Where do we go from here? Well, having a set of predefined recipes and tasks is super helpful but there's no doubt you'll want to add more custom logic to your deployment flow either now or in the future. Fortunately, Deployer allows great flexibility by letting us code our own recipes in PHP which is exactly what we'll do in the next episode. See you there!
Install and configure Deployer
Create your own Deployer recipes