In a previous article, we saw how NFTs unlock new ways of owning data. Now let’s take a look at how NFTs actually work in Solana.
Since the Solana blockchain structures data differently than other blockchains, it may be confusing at first but, in my opinion, its model makes a lot of sense and is closer to how we represent things in the real world.
Thus, we’ll first start by looking at how we do things in the real world and gradually move our way towards the representation of an NFT.
Bear with me, we’re going on a little journey.
❡Not your typical program
This article is not about coding but it’s worth noting that, if you’re used to other blockchains such as Ethereum, then you’ll have a bit of unlearning to do.
In these blockchains or any typical piece of code, you add variables within your program, and your logic updates these variables. In Ethereum, a deployed “Smart Contract”, contains both the logic and the data needed for that contract to do its job.
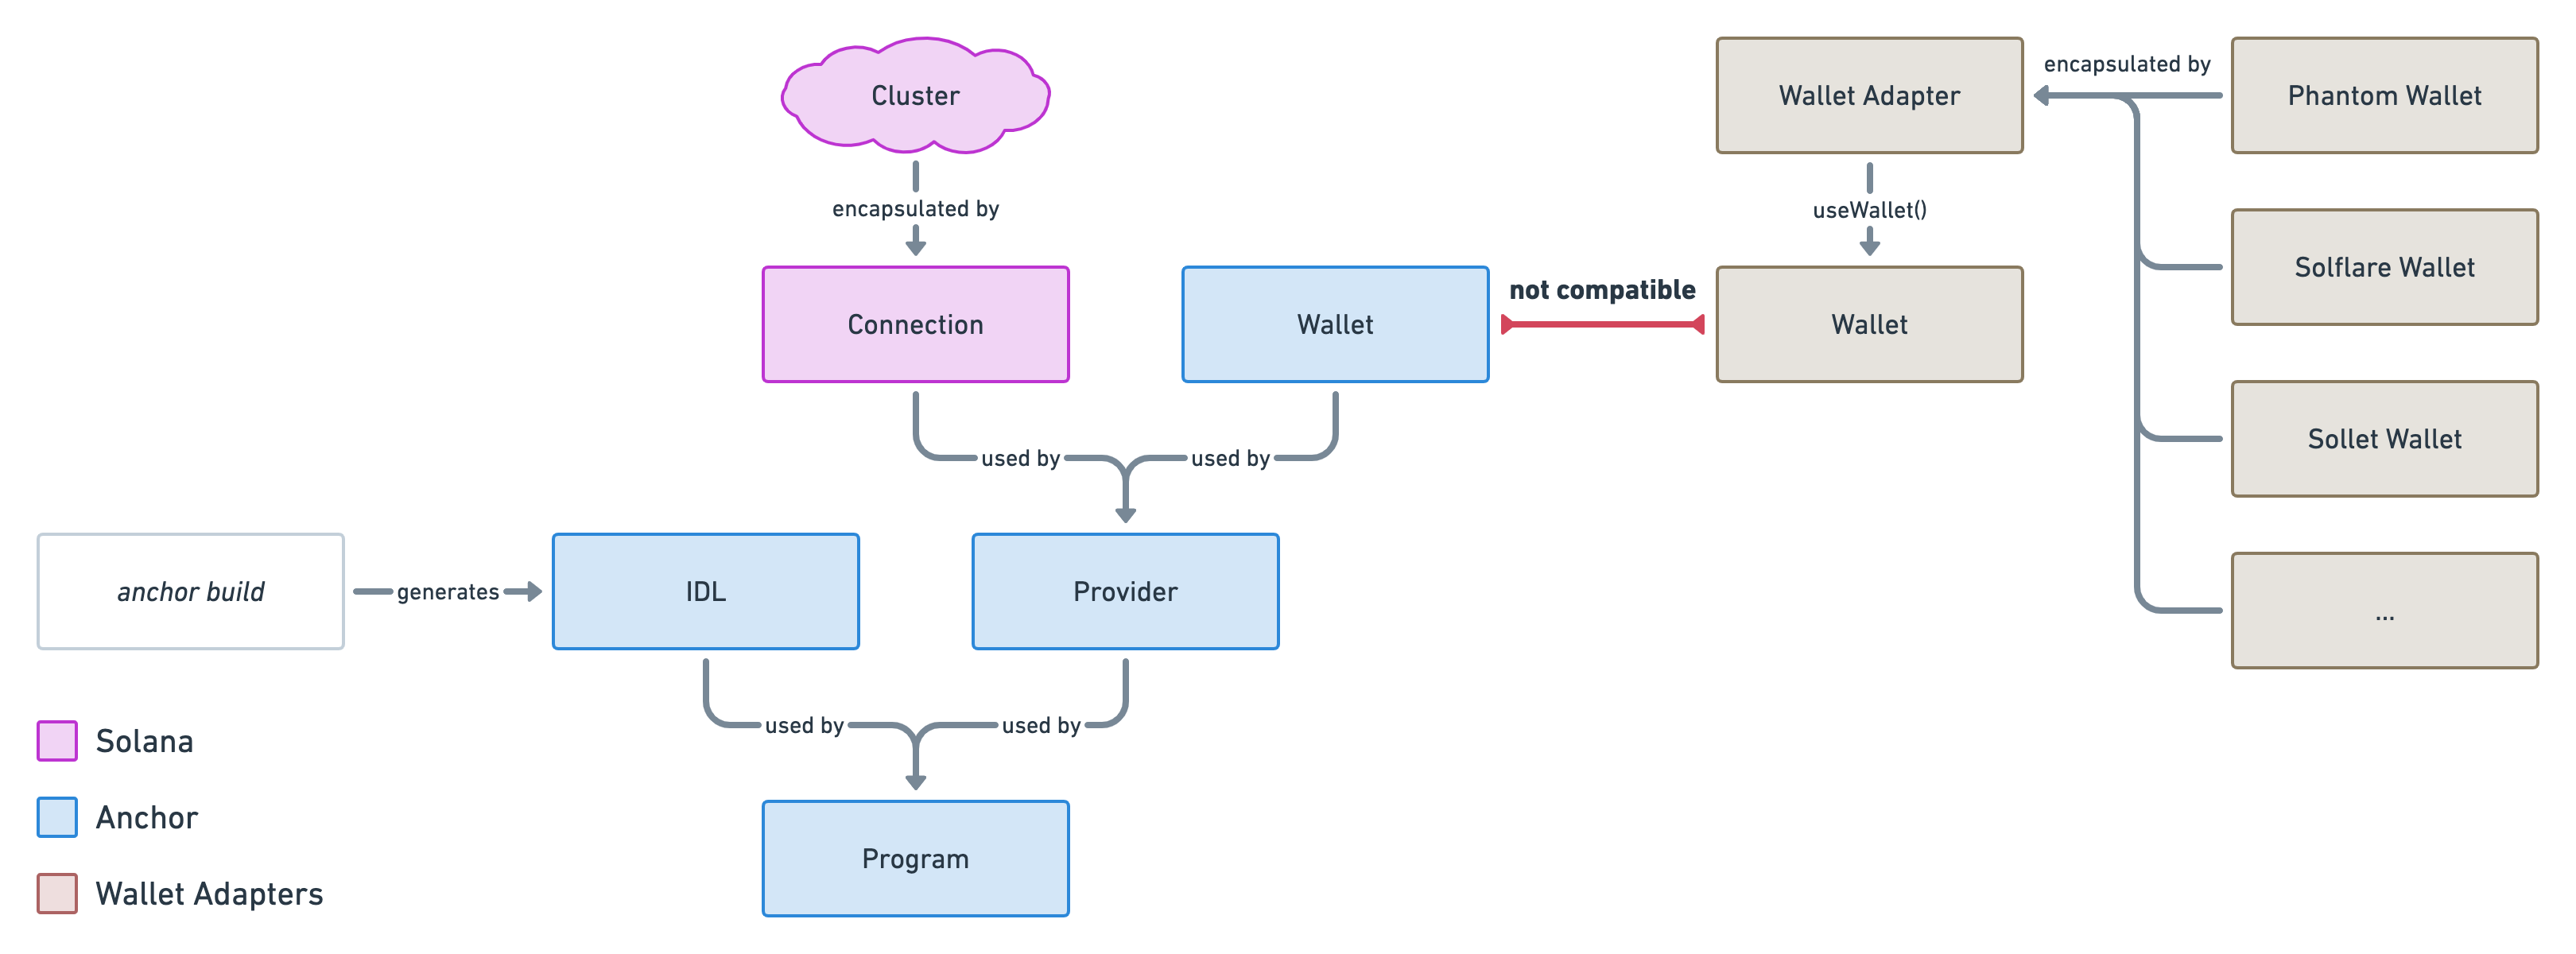
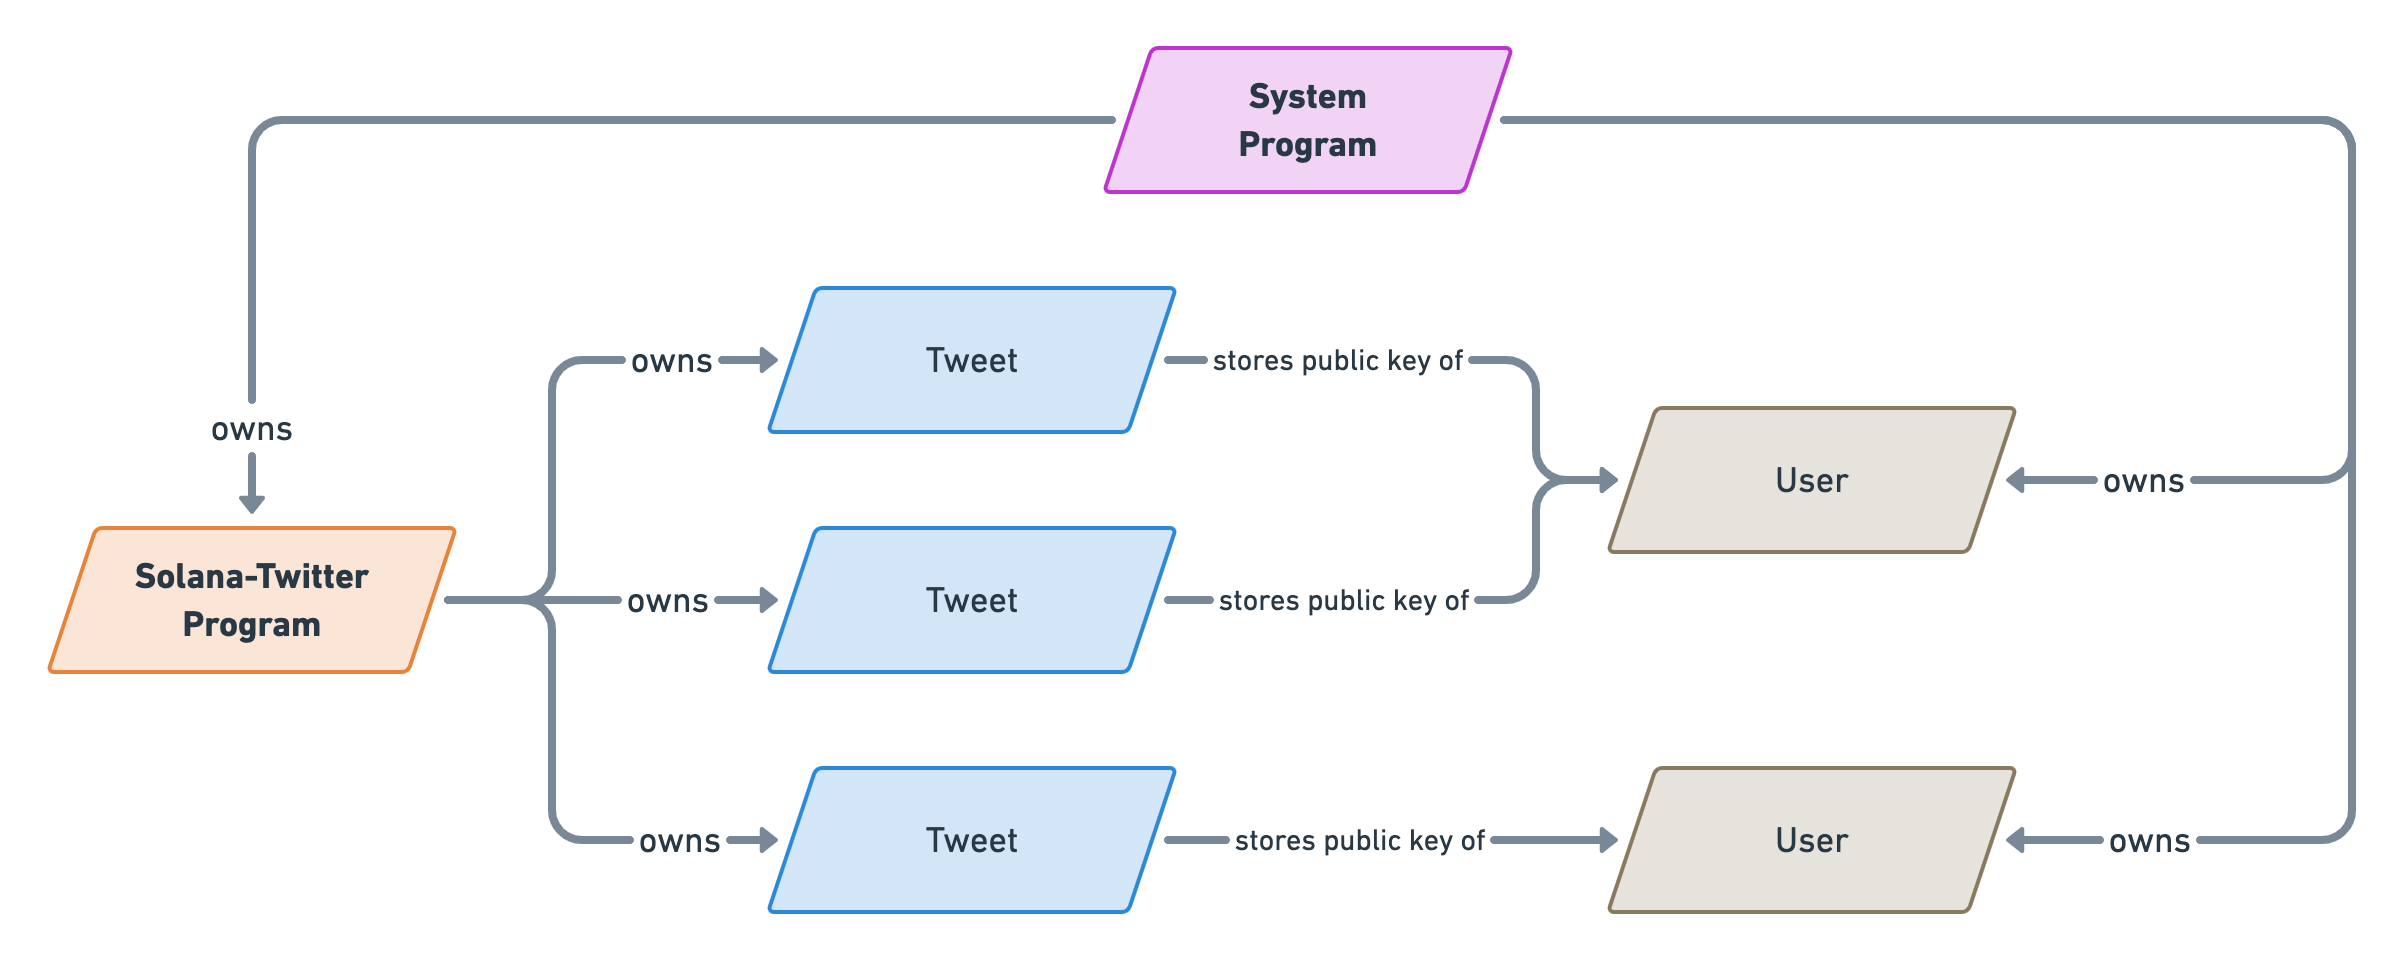
That’s not the case for Solana. In Solana, a “Program” (the equivalent of a Smart Contract) interacts with “Accounts” that are stored outside of the program. This enables us to create more generic logic that can scale to new orders of magnitude since the data is no longer bound by the size of the program. Additionally, it enables the blockchain to run more efficiently since it can run the same program in parallel with different accounts.
The TL;DR; here is: Data in Solana is stored outside of programs, in reusable and scalable models called “Accounts”.
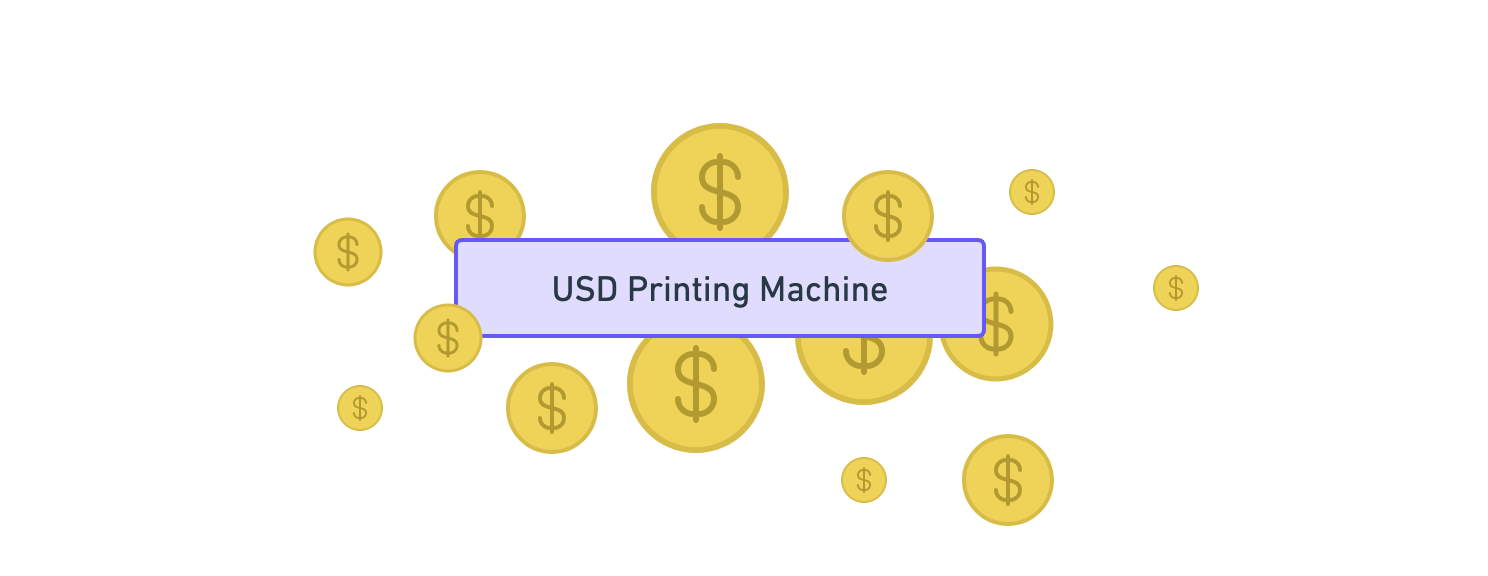
❡The USD printing machine
Alright, let’s step back into the real world for a minute and reflect on what makes us own the money that we own in a given currency.
Finance is a complex subject and there are many different ways to own money: cash, banks, assets, etc. To get closer to how we model things in Solana, we need to simplify our real-world model.
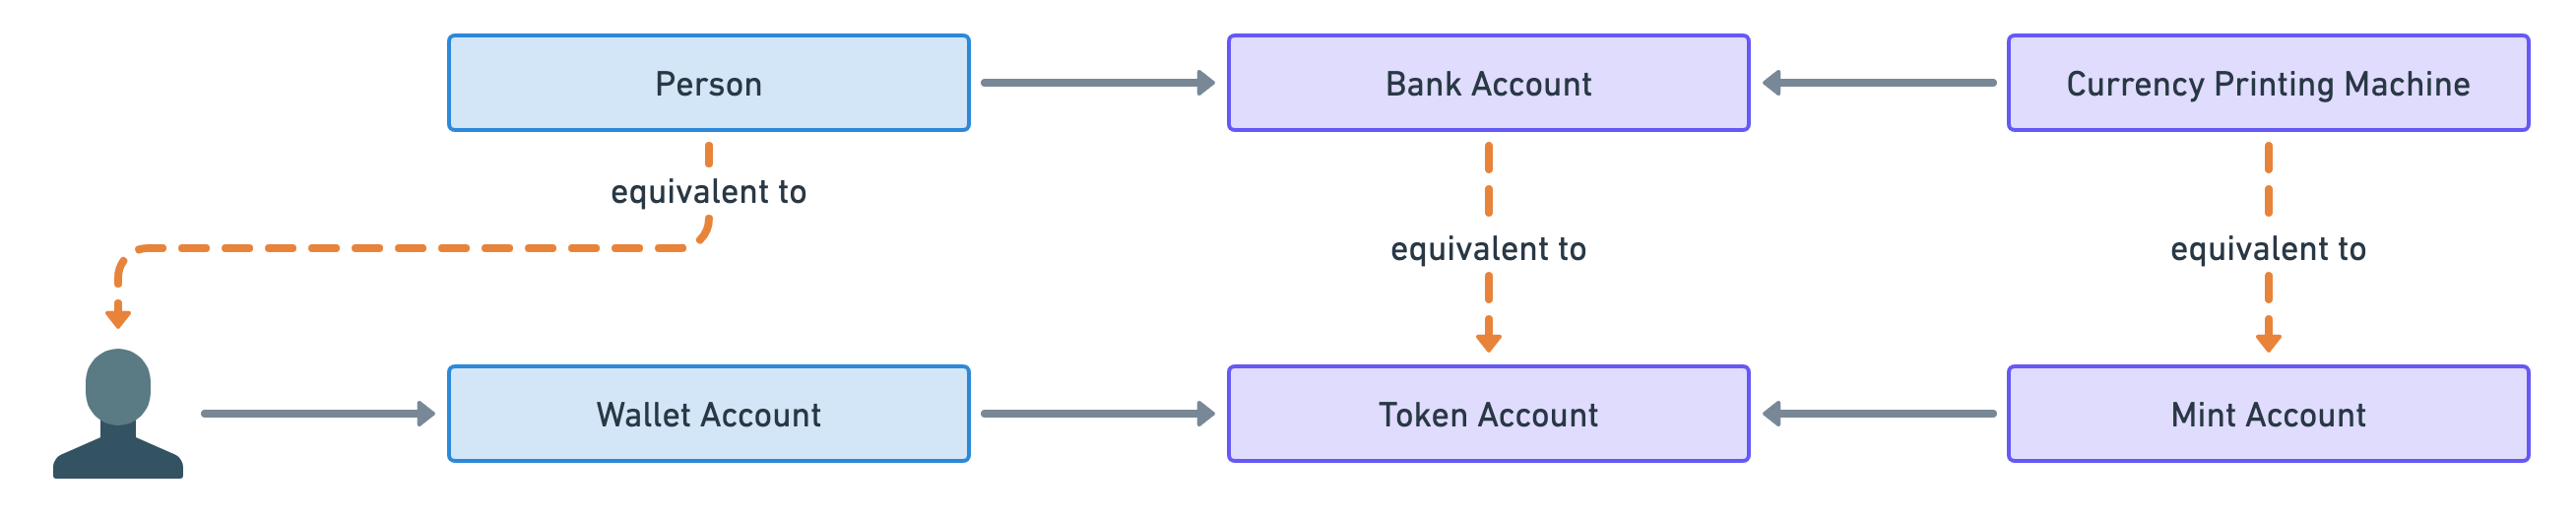
Imagine all of the money in the world for a given currency is generated by one bank and one bank only. Let’s call them “Printing Machines” since they would literally be able to control how much of that currency is in circulation. For instance, the “USD Printing Machine” would be responsible for managing all the US dollars in the world. Nice and simple.
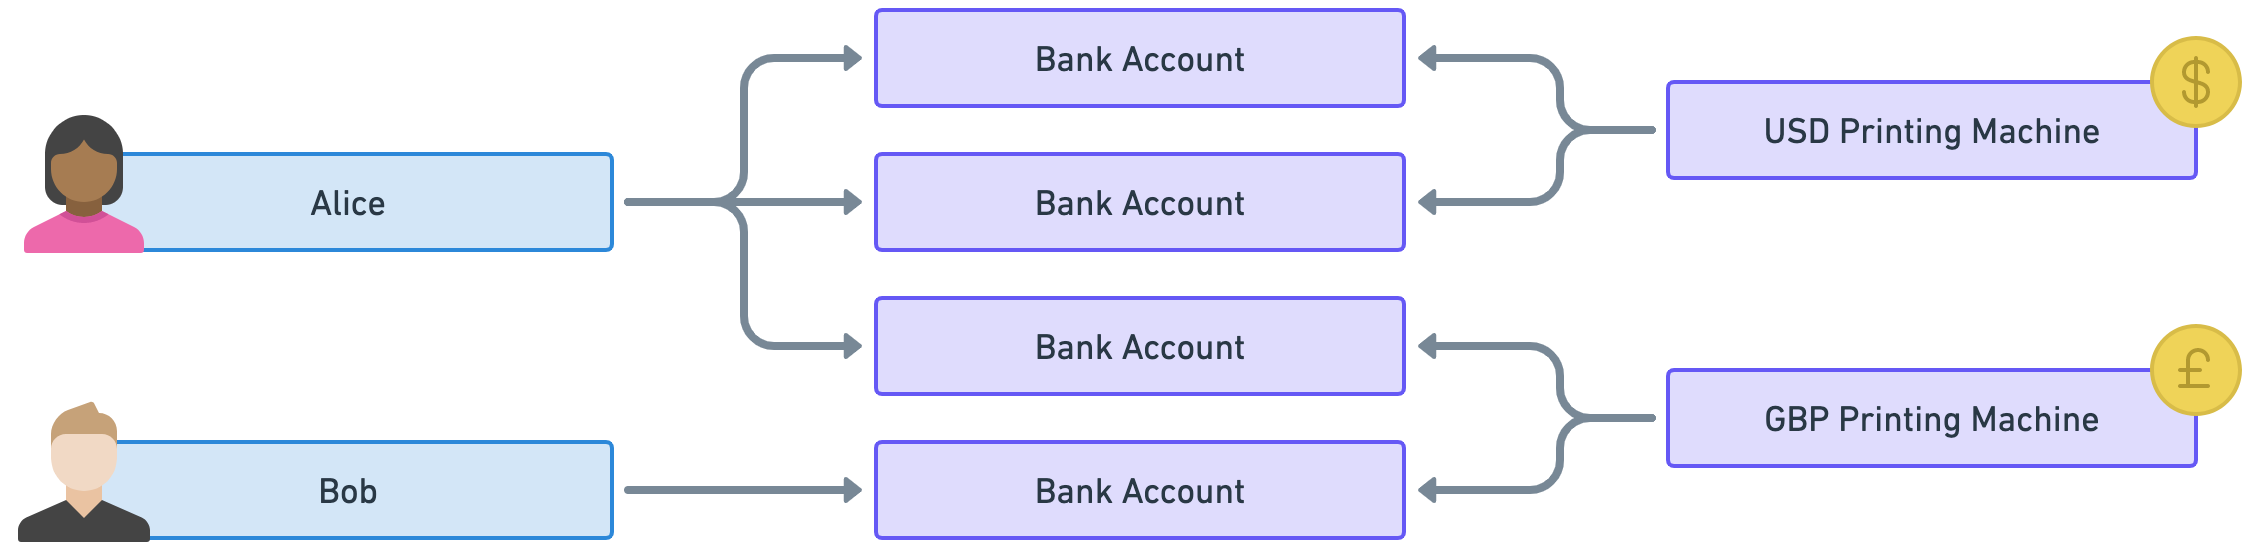
These “Printing Machines” would then allow individuals to own money via “Bank Accounts” where each individual can have as many bank accounts as they want. That way bank accounts act as many-to-many relationships between individuals and currencies.
In the example below, Alice owns US dollars and British pounds via three different bank accounts (two for USD and one for GBP) whereas Bob only owns British pounds via one bank account.
Good, with that model in mind, let’s enter the world of tokens!
❡Mints and tokens
In the previous section, we created a simple model where people use bank accounts to access money in a given currency.

Well, surprise surprise, that model is analogous to how tokens are represented in Solana. You can think of a token as a decentralised currency that lives on a blockchain.
Each type of token is defined by what we call a “Mint Account”. That account is analogous to a “Printing Machine” because it can literally be used to “mint tokens” which is equivalent to printing money.
Then, individuals can own tokens via “Token Accounts” which store the number of tokens owned.
Finally, there’s no such thing as individuals in blockchains since people interact with them through cryptographic key pairs called wallets. The public key of each wallet points to an account in Solana that stores the amount of SOL owned by the wallet. For that reason, I will refer to these accounts as “Wallet Accounts”.
So that leads us to the following analogy.

Note that it is common for individuals to have multiple wallets — usually for security purposes. Therefore, the following analogy is more accurate.
Before we move on to the next section, let’s take a quick example of token ownership in Solana.
Instead of US dollars and British pounds, we’ll use the tokens USDC and AVDO. These are real tokens in Solana. USDC is a stablecoin pegged to the US dollar and AVDO is a cryptocurrency backed by the avocado industry (because why not).
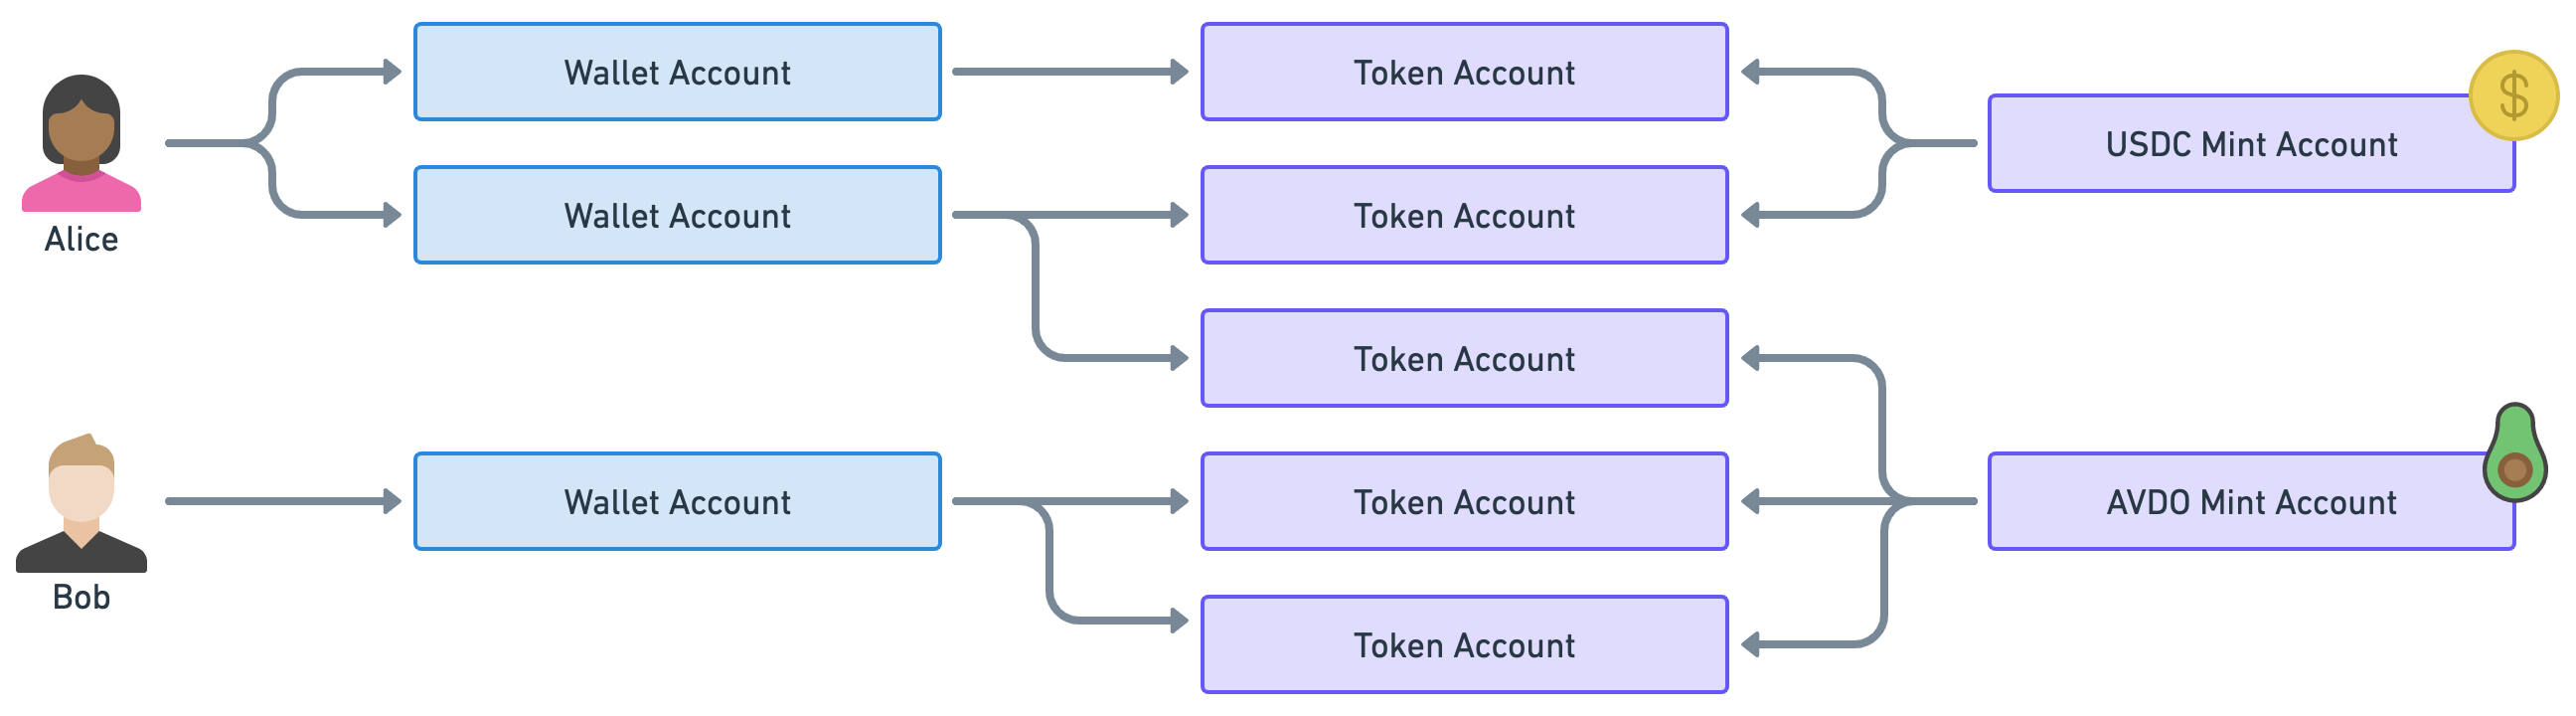
As you can see Alice owns some USDC and some AVDO via two wallets and three token accounts. On the other hand, Bob only owns AVDO through one wallet and two token accounts.
❡What’s your IBAN?
Now, there’s one big inconvenience with the model described so far.
To illustrate the issue, imagine that Alice, in our previous example, wanted to send some AVDO tokens to Bob.
Since Bob has two token accounts for his AVDO tokens, which token account should Alice choose to deposit her tokens? Should she ask Bob to send her the public key of the token account of his choice? Even worse, imagine Alice now wants to send some USDC tokens to Bob when Bob doesn’t currently have any USDC token accounts. Should she create a new token account for Bob and then send him its public key?
None of these issues makes it impossible to send tokens but they make our life harder than it should be.
When sending tokens to someone, you usually only have the public key of their wallet and you really don’t want to worry about which token account to use or if it even exists.
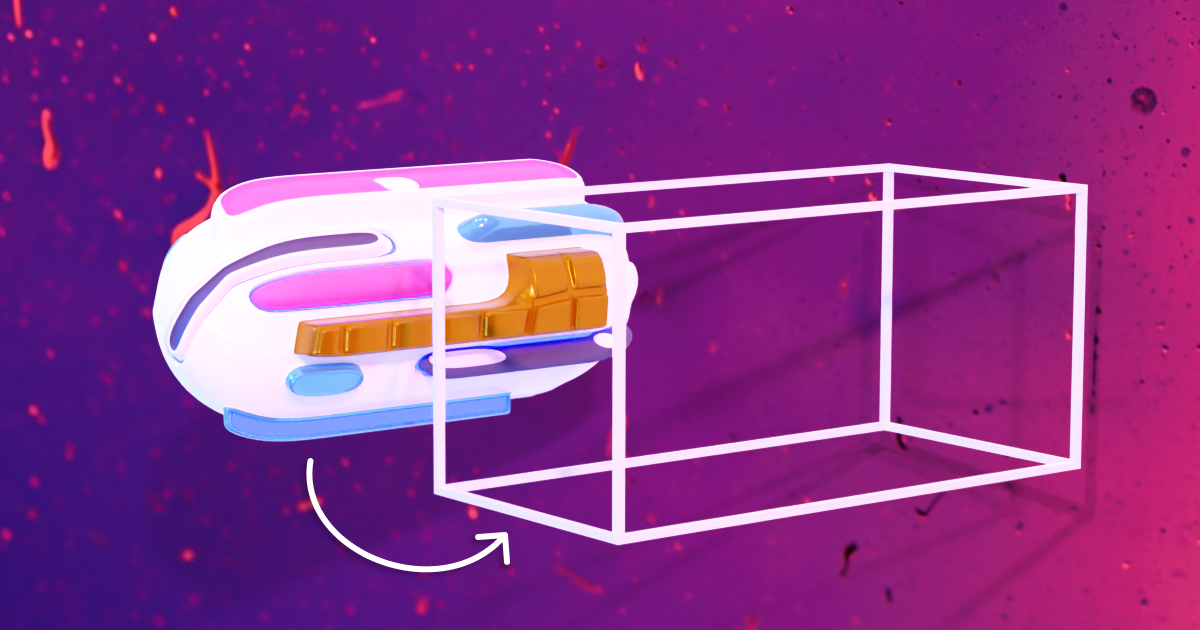
The solution to that problem is called “Program Derived Addresses” or PDA for short. These are public keys that are derived from other public keys using a special algorithm.
What that means for us is, given a “Wallet Account” and a “Mint Account”, we can deterministically find the associated Token Account. In fact, these accounts are called “Associated Token Accounts” (ATA for short) and they are managed by the “Associated Token Account Program”.
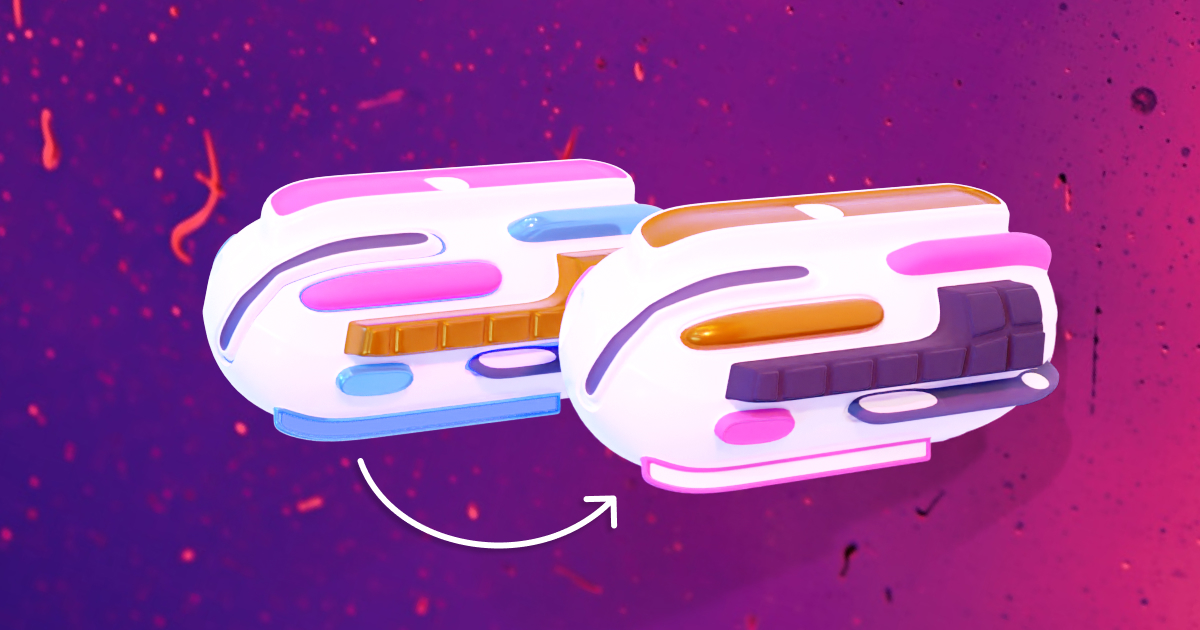
Therefore, we end up with two ways of creating and using token accounts: One that’s deterministic (using PDAs) and one that’s not (using normal token accounts).
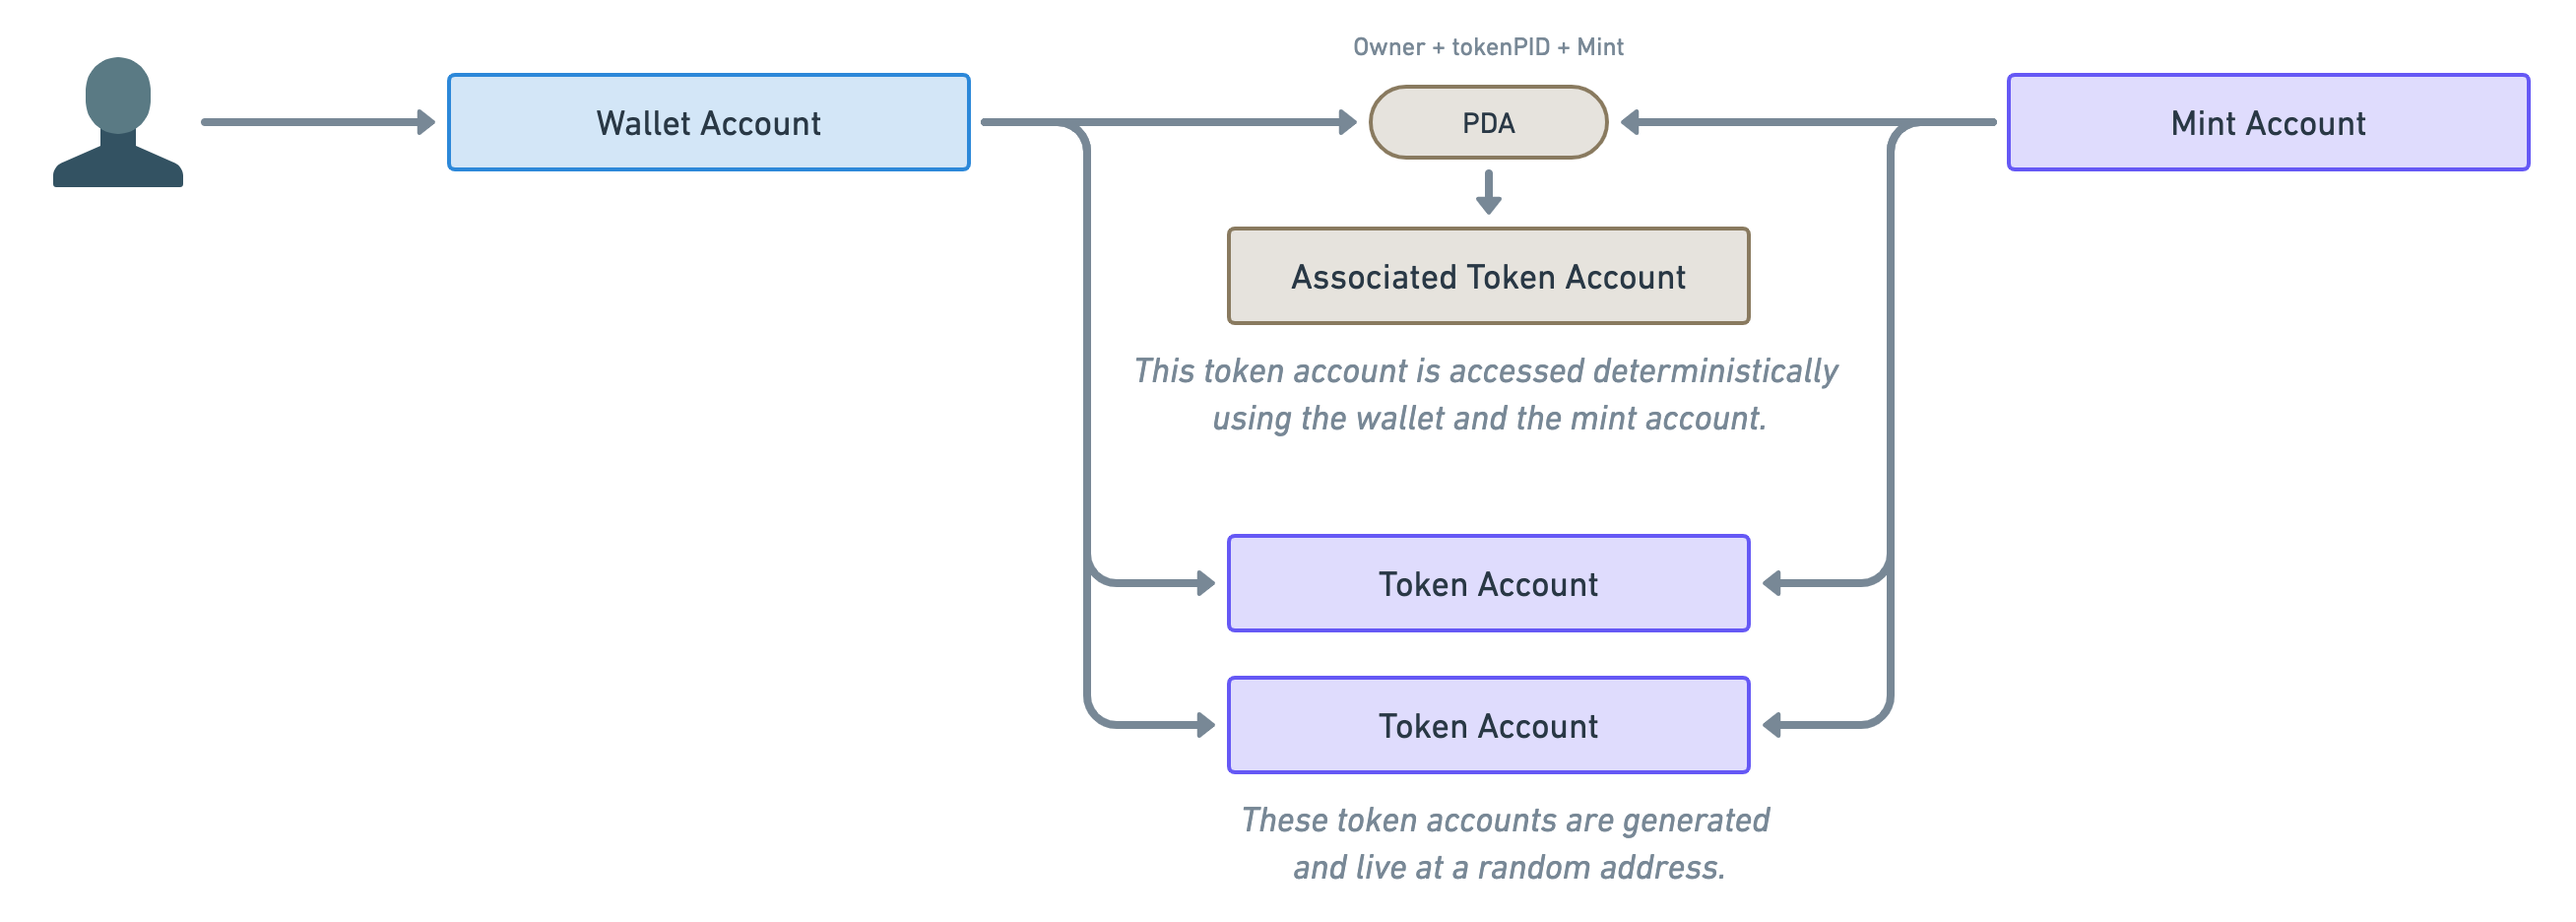
Note the annotation above the PDA. These are the parameters required to derive the address of the associated token account. If you’d like to read more about PDAs, the Solana Cookbook is a good place to start.
Since we’re going to use this diagram a lot in this article, let’s shorten its representation slightly. We’ll use the following diagram to represent the generic connection between wallets and mint accounts. They could be using PDAs or they could not.

Before we move on from this important PDA parenthesis, let’s take a quick look at our previous example using only associated token accounts.
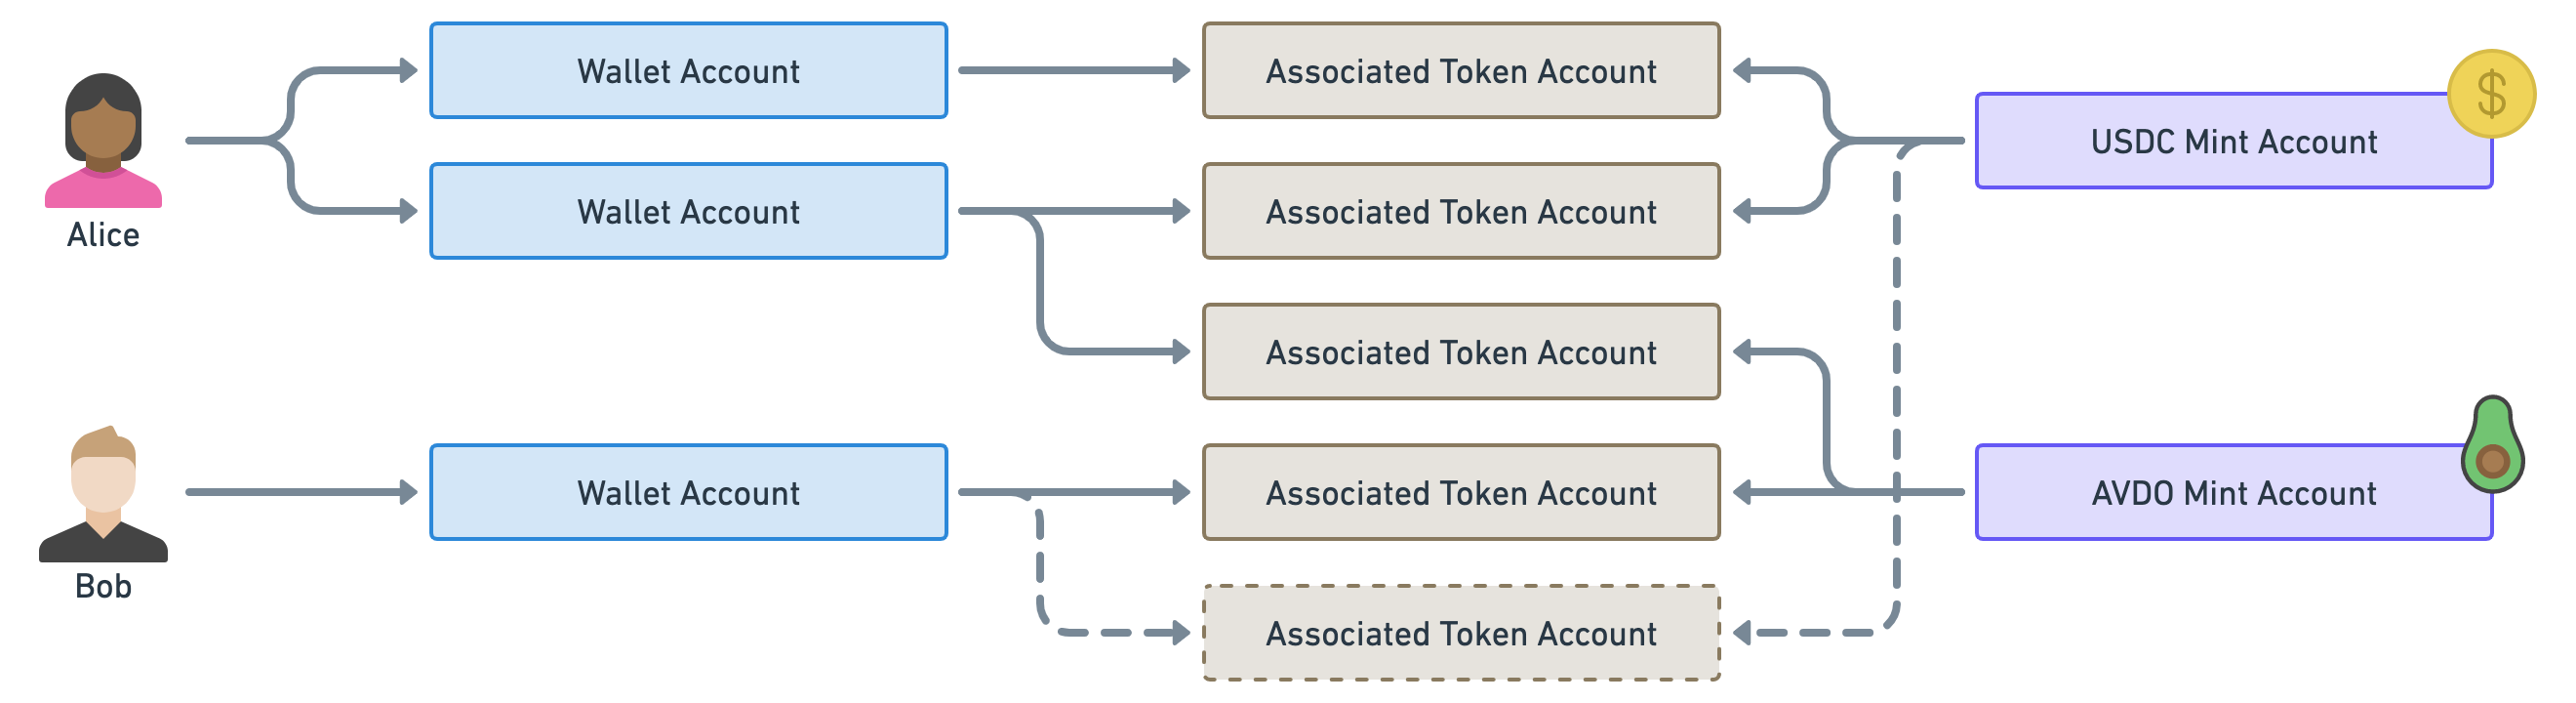
Notice how we’ve now only got one token account per wallet per mint which means Alice knows where to send the AVDO tokens to Bob. Additionally, Alice knows where to send Bob some USDC even though the account does not exist yet.
Okay, let’s move on!
❡Data on mints and tokens
I appreciate your patience but you might be thinking: “Loris, what does that have anything to do with NFTs?”.
I promise we’re getting there! But to answer that, we first need to understand what data is stored in both the token accounts and the mint accounts.
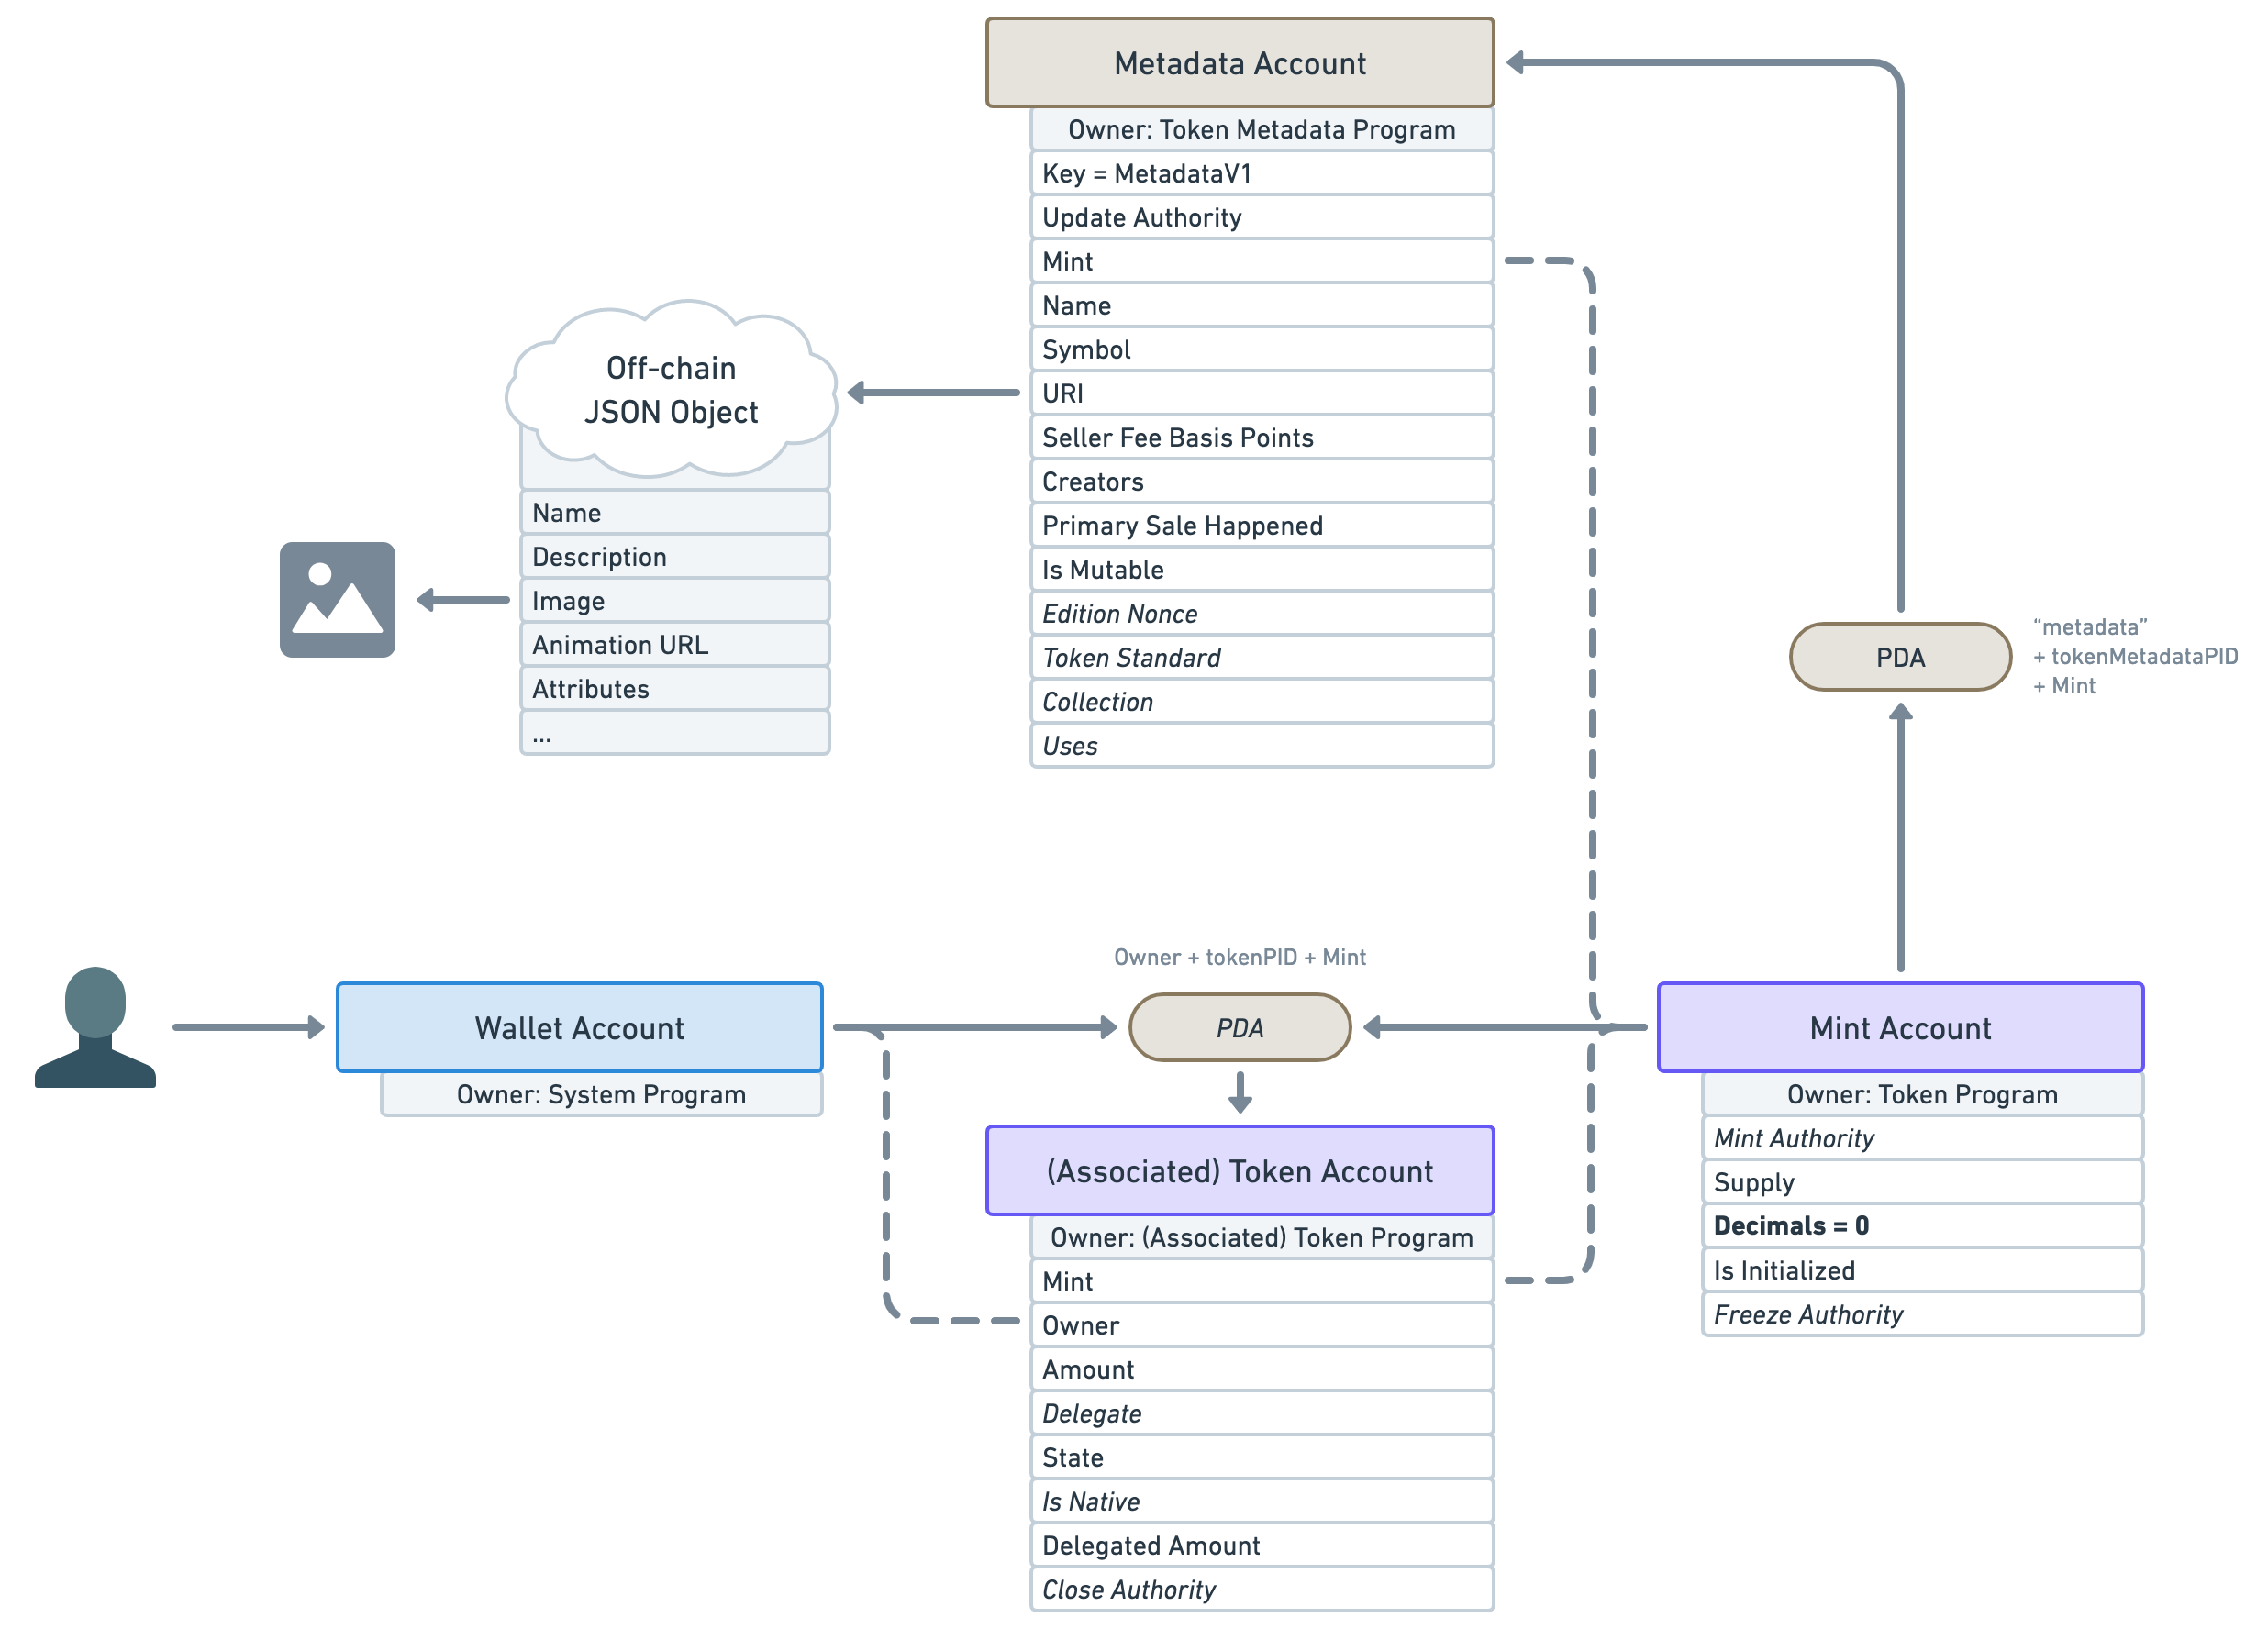
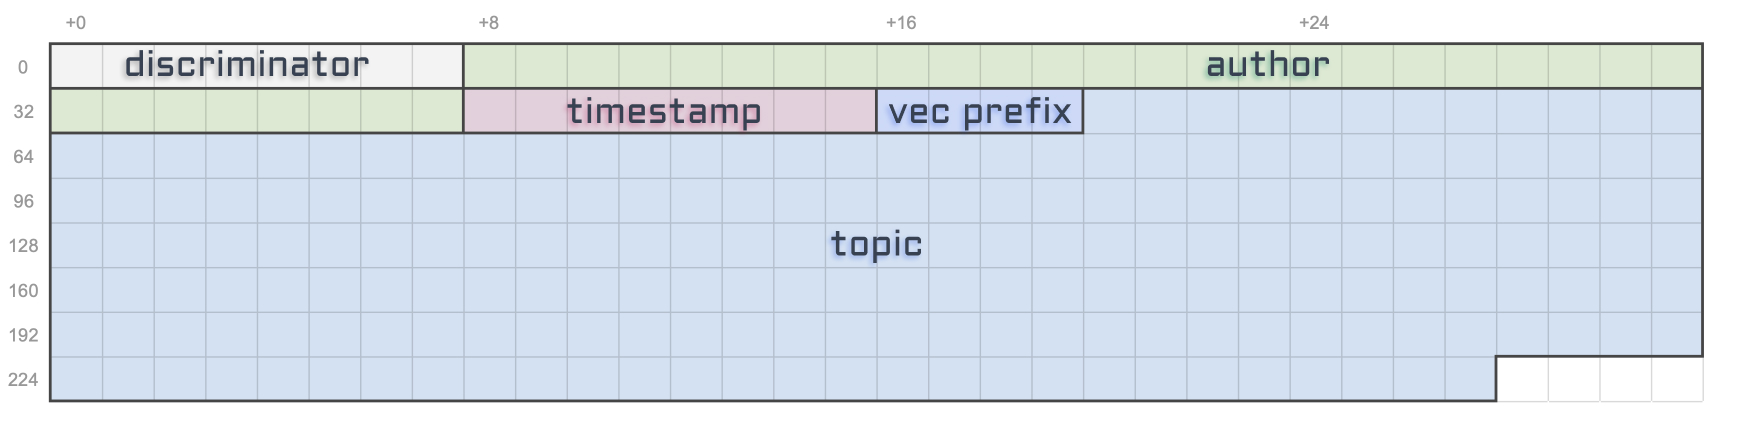
To that end, let’s update our diagram to show all of the data available under each account and, whilst we’re at it, let’s also display the owner of the account — i.e. the Solana program responsible for creating it.
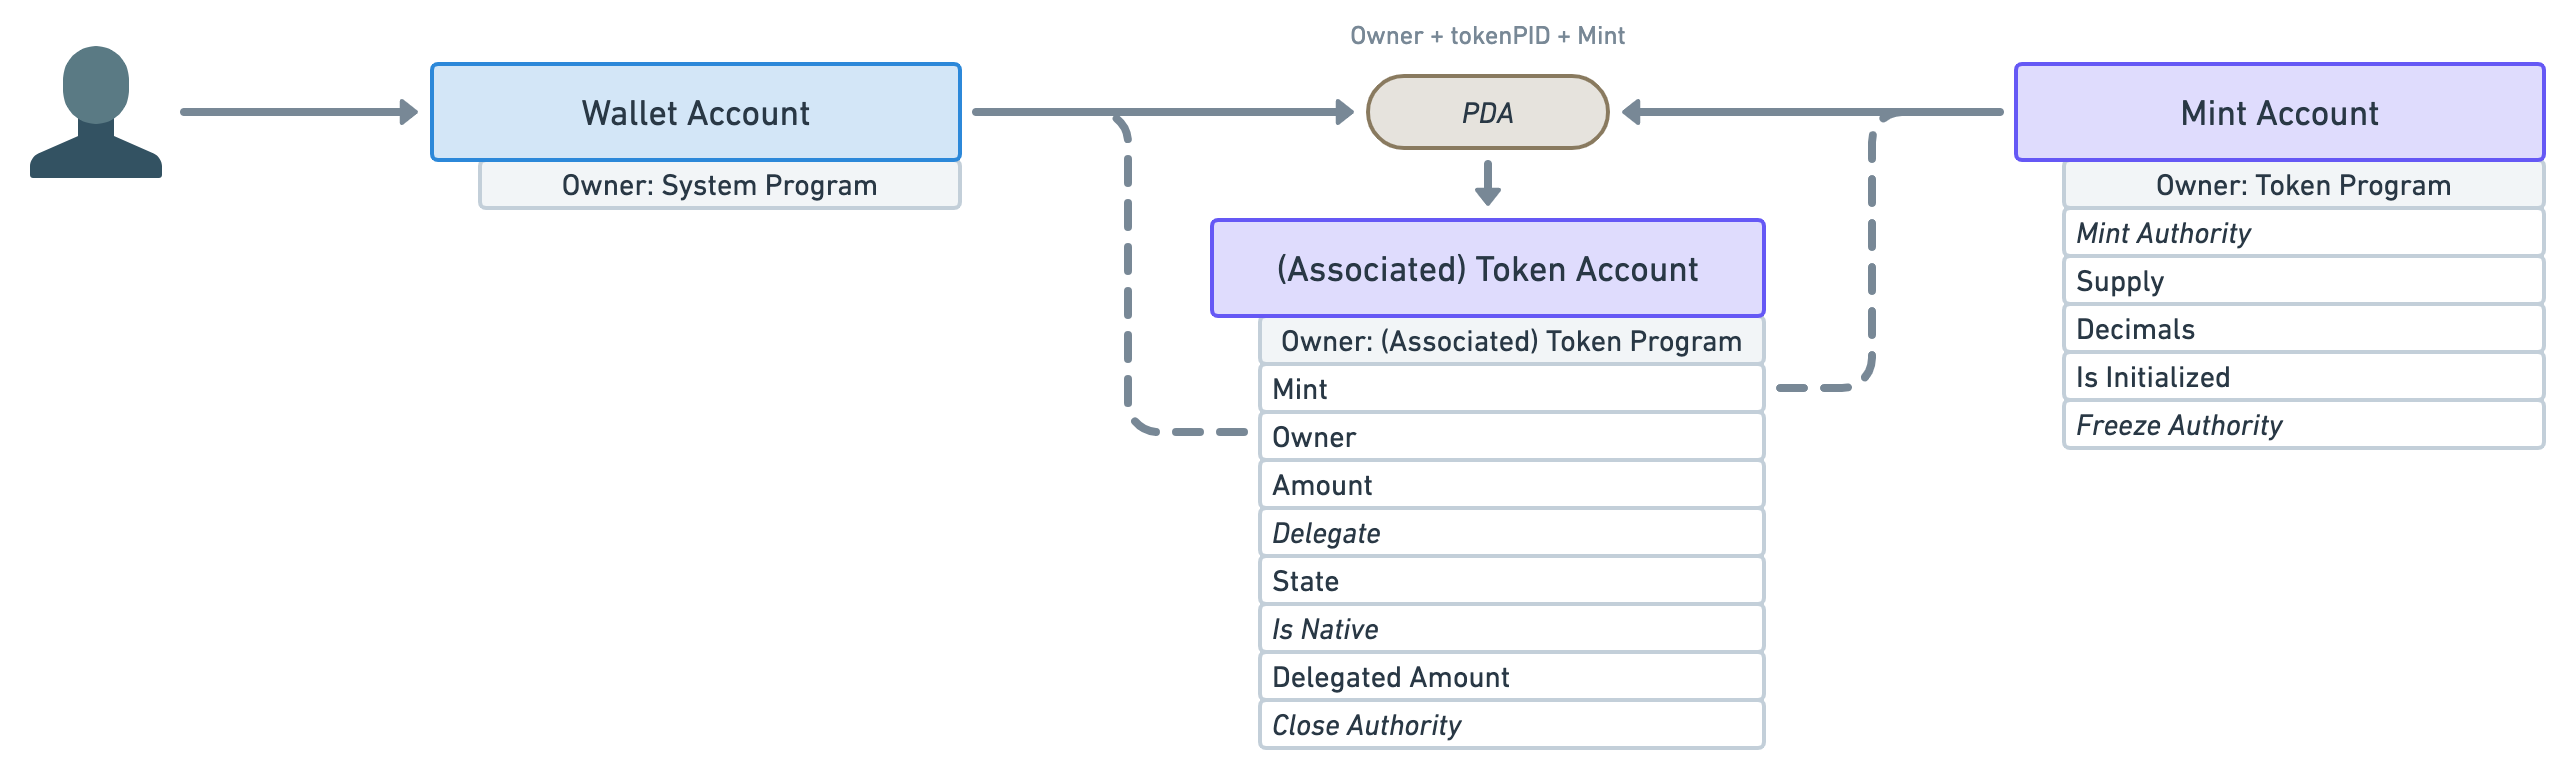
Okay, we have a few things to notice here.
- First, notice how the token account (associated or not) keeps track of both the mint and the wallet accounts. I’ve highlighted these connections using dashed lines.
- The next important piece of data on the token account is “Amount”. It stores the number of tokens available in the account.
- The rest of the data is also important but out of scope for this article so I won’t be going through them. I’ll just say that when you see an italic attribute, that means it is optional.
- Moving on to the mint account’s data. The first attribute is the optional “Mint Authority”. This represents the account that can mint more tokens — i.e. print more money. It is usually the wallet account that created it. It is optional because a mint authority can revoke its own right, therefore, making the mint account immutable — i.e. the number of tokens in circulation will never increase.
- Speaking of, the next attribute — “Supply” — tells us the total amount of tokens currently in circulation. This attribute cannot be manually updated and is automatically kept up-to-date by the program.
- Next, the “Decimals” attribute dictates how many decimal places we should use for that token. For instance, if a token account has
Amount = 250and the mint account hasDecimals = 2, that means the token account actually owns2.50of that token. That way, all monetary values can be stored using integers. - We’ll also skip the rest of the attributes since they are out of scope for this article.
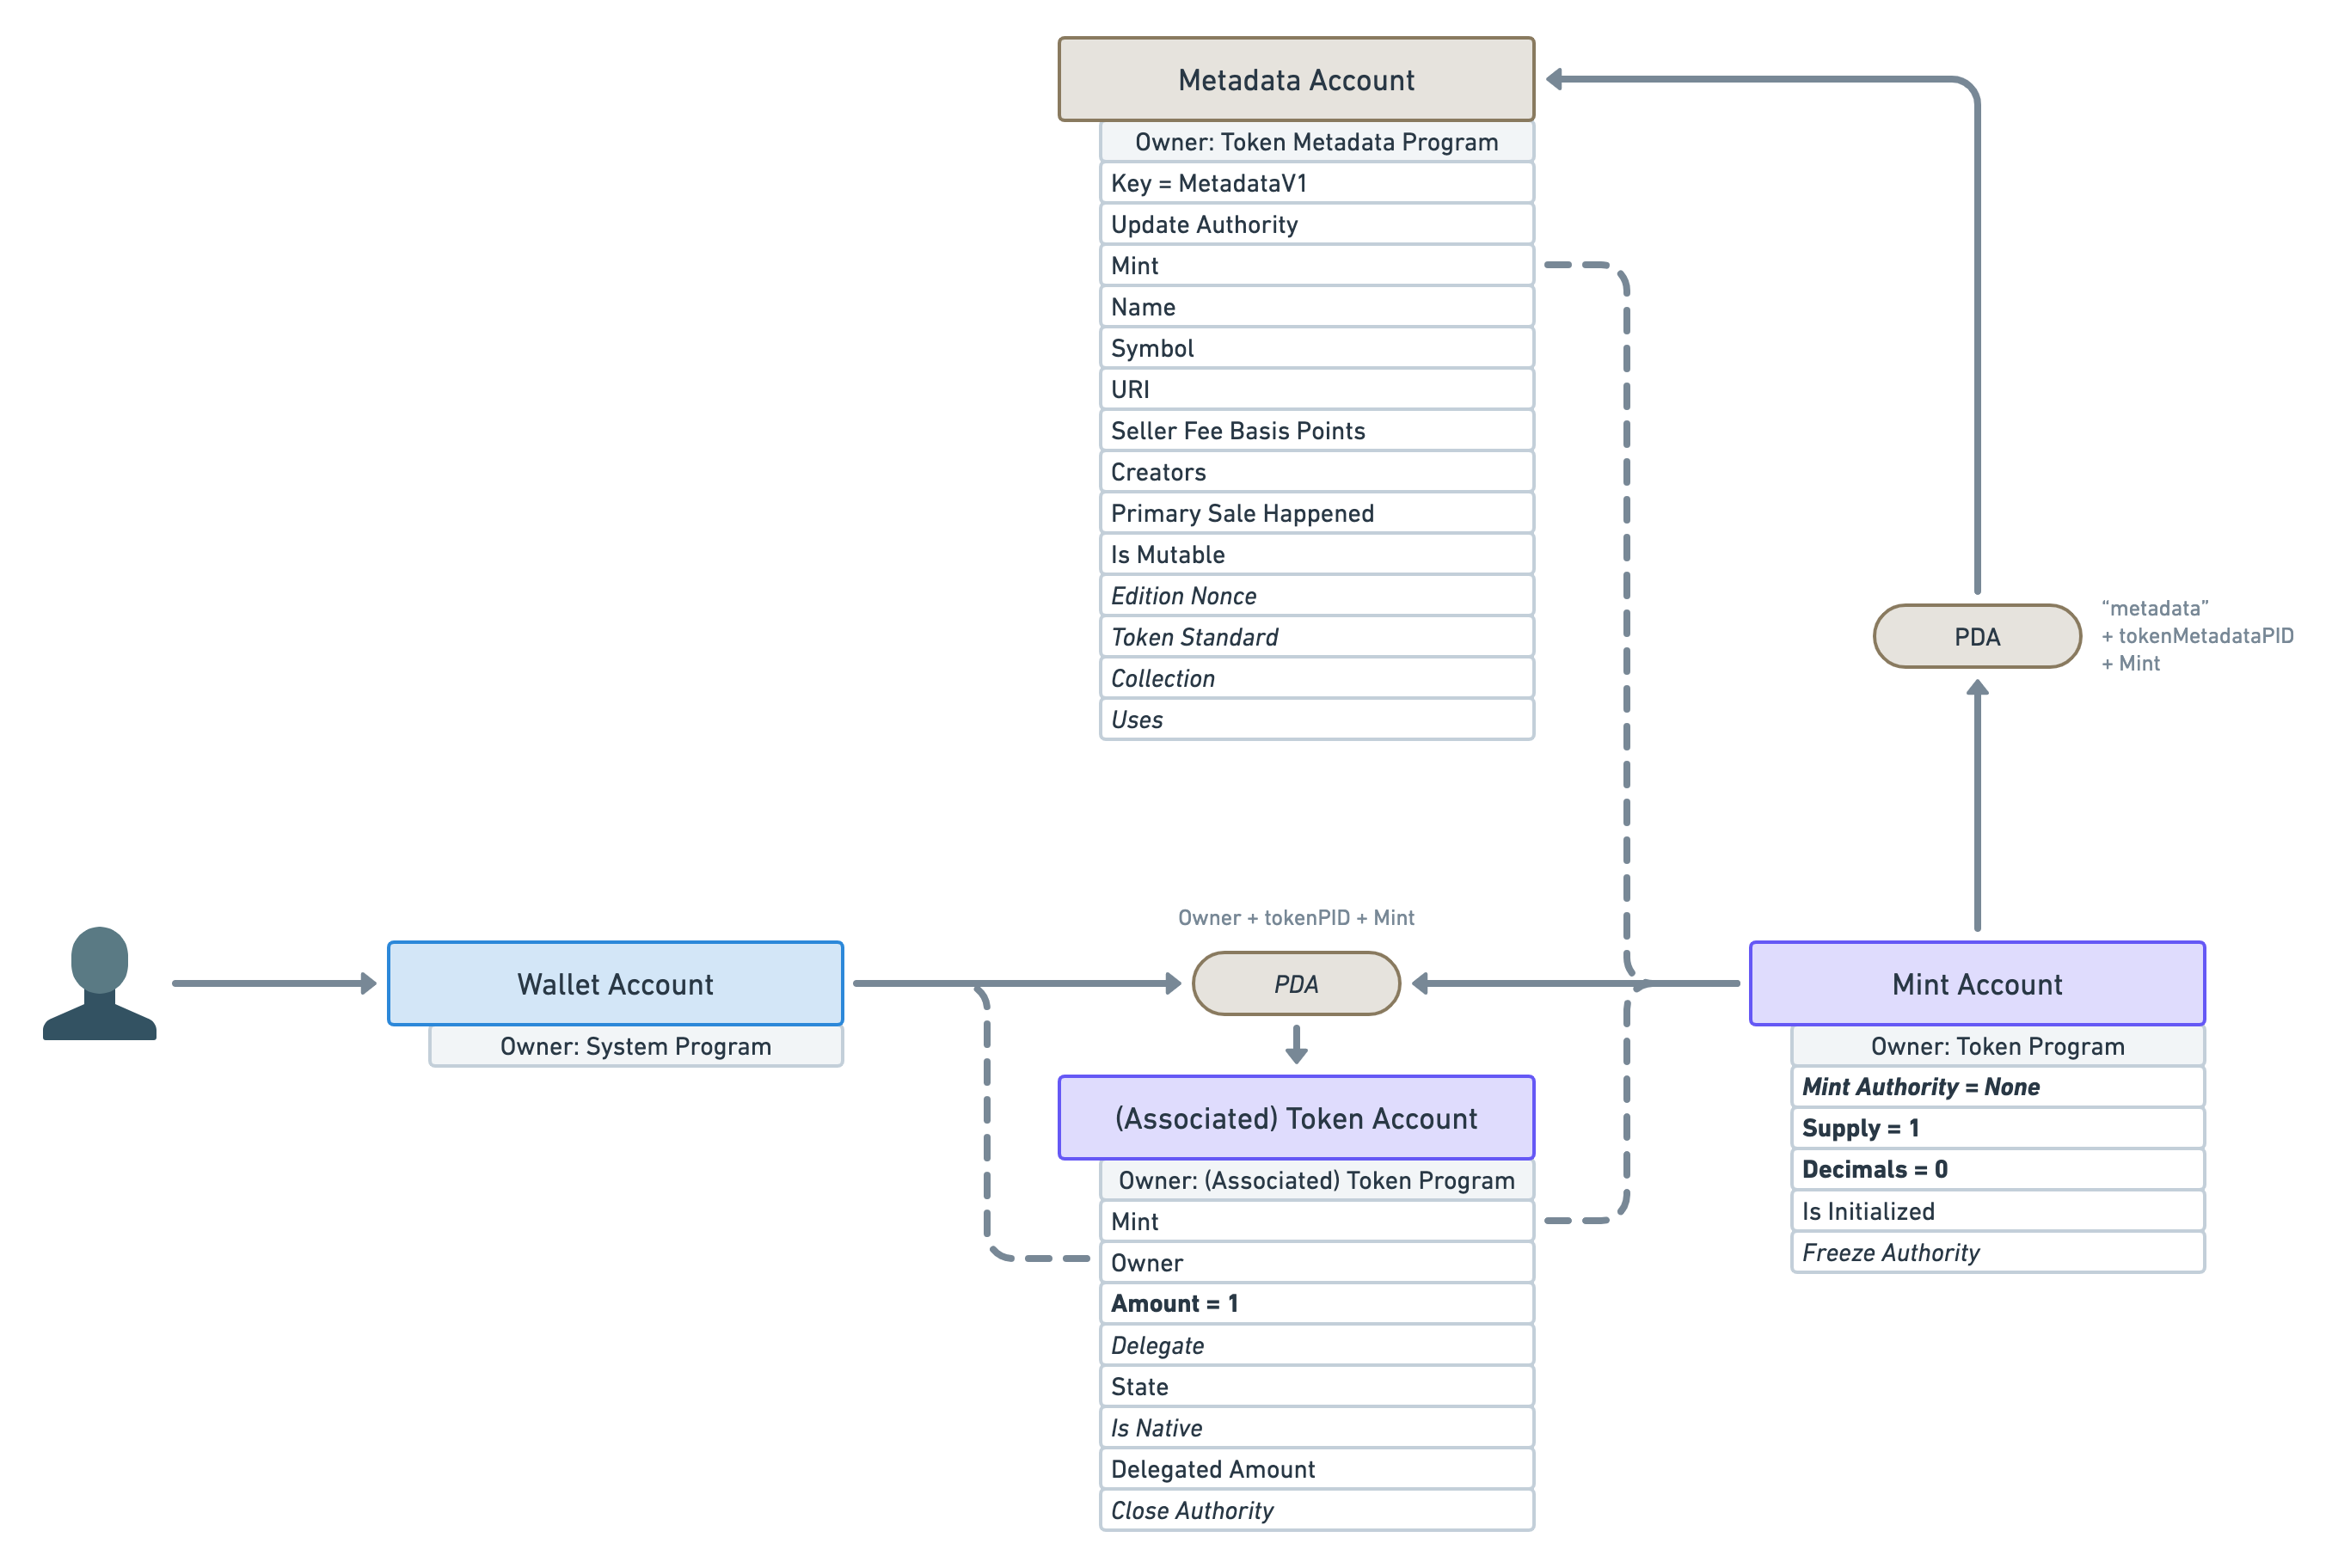
In order to move closer to the representation of an NFT, let’s play with these attributes a little.
What if we created a mint account with zero decimals and immediately minted one token to a wallet account?
The result would be a mint account with only one token in circulation that cannot be broken down into smaller units — e.g. Alice and Bob cannot both have 0.5 of that token.

The only issue with that is nothing stops the “Mint Authority” to continue minting more tokens in the future. If they did, we’d suddenly have more than one token in circulation and, thus, more than one wallet could own them.
To prevent that, the mint authority needs to revoke its right to mint more tokens immediately after minting the first one.

What we end up with is a mint account whose supply will never go above one and whose token cannot be shared or divided.
Thus, there can only be one token holder for that mint at any given time.
❡An NFT is just a special Mint
And that, my frens, is a Non-Fungible Token! 🥳
The definition of a “Fungible” is:
Being of such nature or kind as to be freely exchangeable or replaceable, in whole or in part, for another of like nature or kind.
In other words, it can be replaced by something else of the same kind. For instance, olive oil is fungible. One litre of olive can be replaced with another litre of olive oil and we’ve not lost any value. The same goes for currencies: replace a 10 USD note with another 10 USD note and you’ve still got 10 dollars.
Therefore, for a token to be non-fungible, it needs to have such characteristics that it cannot be traded with something of the same kind. We have managed to achieve this by creating a mint account that will never have more than one token holder. Whoever owns this token, owns the mint account and therefore, owns the NFT.
To recap: An NFT is a mint account with zero decimals and whose supply will never exceed one.
I’d also like to take a second to appreciate how elegant that model is. Not only is its representation inlined with its definition, but by relying on token accounts and mint accounts, we can interact with NFTs the same way we can interact with tokens. Sending an NFT to someone is as simple as giving them your only token for that mint account.
❡Where’s the picture?
Okay, I’ll be honest we haven’t completely finished our journey in explaining NFTs in Solana. What we’ve explained so far is indeed an NFT by definition but not a very useful one. All it’s telling us is that we own a token and that no one else can own that token. Great! But what’s that token called? What is its purpose? Where’s the picture?!
Well, it sounds like we need to attach more data to our NFT to make it useful. That’s where Metaplex comes in!
Metaplex is a company that creates and maintains Solana programs. Their most popular program is called the “Token Metadata Program”. You guessed it, it adds metadata to our tokens!
It does that by using Program Derived Addresses (PDAs). If you remember, PDAs allow us to deterministically find an address using other addresses.
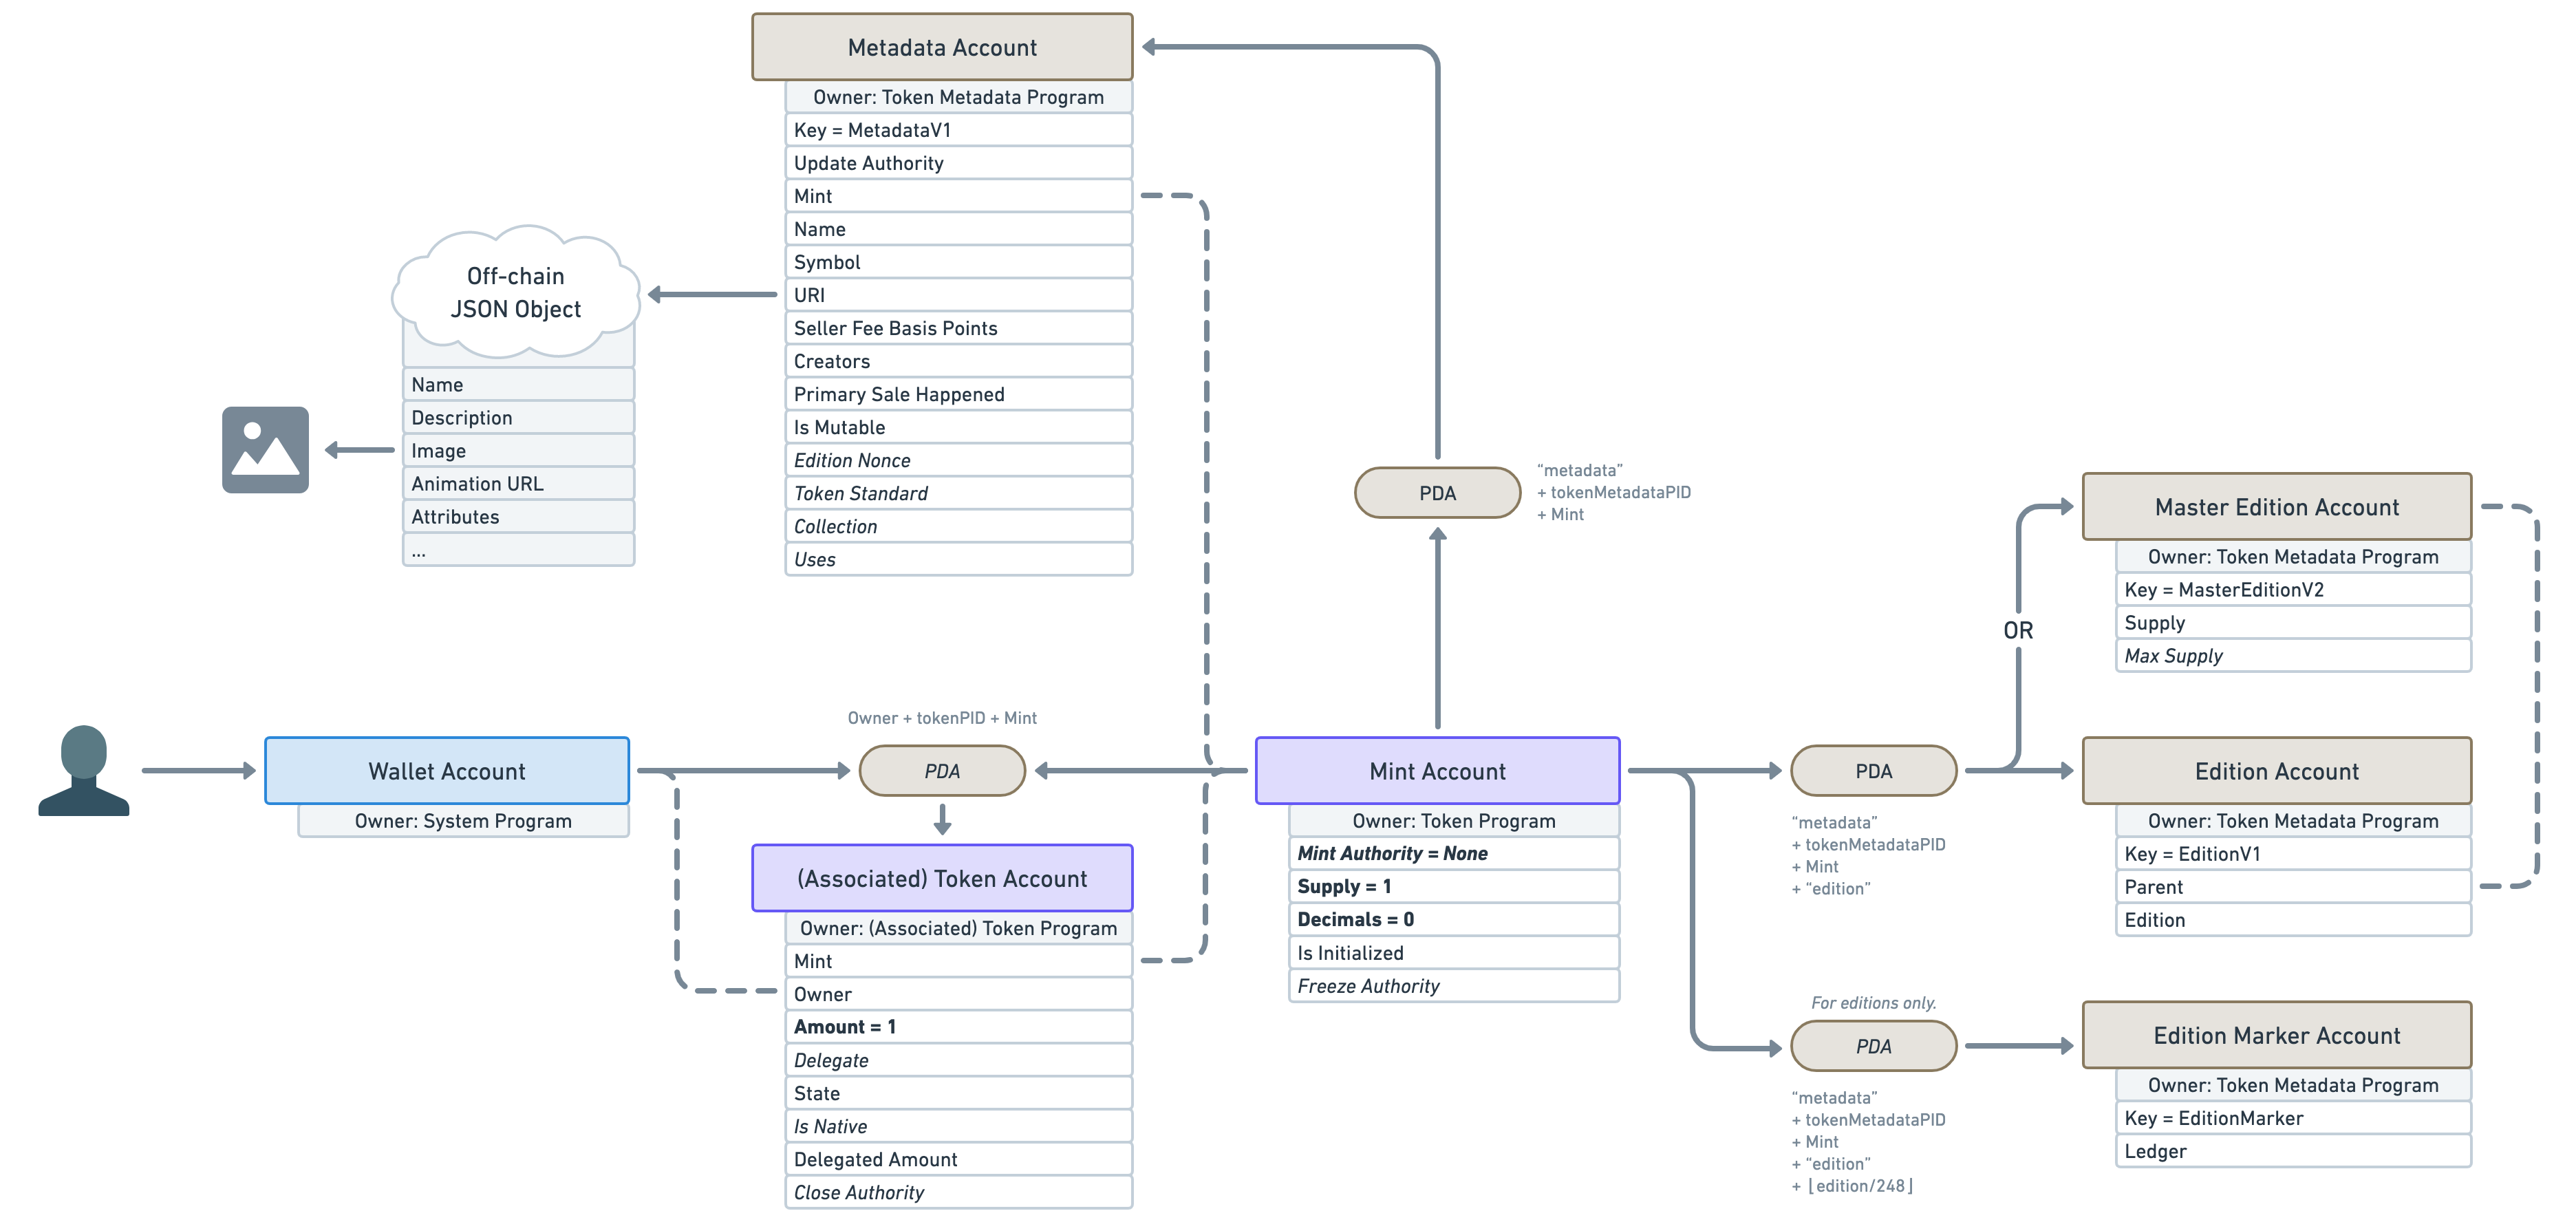
In this case, the Token Metadata program will create a new “Metadata Account” attached to that NFT. But can you guess which address it uses to derive its own address? Is it the mint account or the token account?

The answer is: the mint account! The mint account is the most important account for an NFT. A token account is a relationship between an NFT and a wallet. If we attached a PDA to a token account and then sold our NFT, the new owner will lose all of that data. Therefore, the mint account is the main entry point of an NFT.
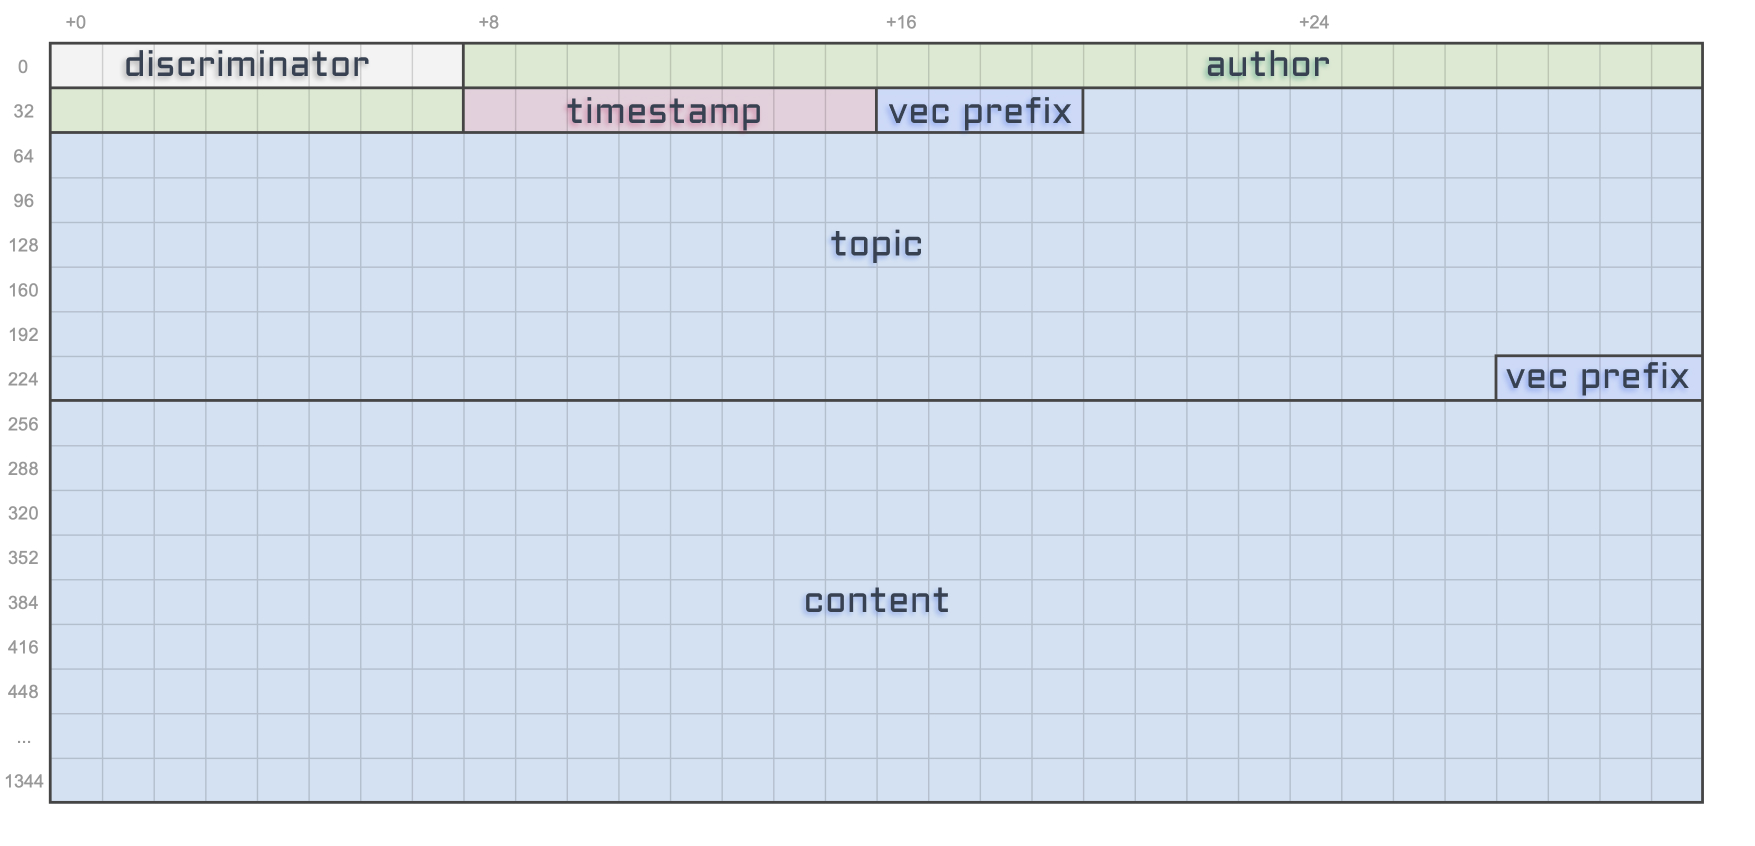
Alright, let’s see what sort of data Metaplex has blessed us with on the “Metadata Account”.
Let’s go through all of these attributes one by one.
-
Key: This attribute is what we call a discriminator. Because Metaplex has many different types of account within the Token Metadata Program, this tells us which account we are dealing with. Here, the “Metadata Account” is identified by theMetadataV1key. Note that the Token Program uses the size of the account instead of a discriminator to figure this out, which is more performant but less flexible. -
Update Authority: This is the account that can update the “Metadata Account”. -
Mint: This points back to the mint account. -
Name: The on-chain name of the NFT – limited to 32 bytes. -
Symbol: The on-chain symbol of the NFT – limited to 10 bytes. This is often left as an empty string but can be useful if you want your NFT collection to have a shared symbol. For instance, your “Banana Blossom” NFT drop could have the symbol “BNBL”. -
URI: The URI of the NFT– limited to 200 bytes. This is one of the most important attributes. It contains a URI that points to a JSON file off-chain. This JSON file can either be stored in a traditional server (e.g. using AWS) or it can be stored using a permanent storage solution on another chain (e.g. using Arweave). We’ll talk more about this JSON file in a minute. -
Seller Fee Basis Points: The royalties shared by the creators in basis points — i.e.550means5.5%. -
Creators: An array of creators and their share of the royalties. This array is limited to 5 creators. Averifiedattribute exists on each creator to ensure they signed the NFT to prove its authenticity. -
Primary Sale Happened: A boolean keeping track of whether the NFT has been sold before or not. This affects the royalties. -
Is Mutable: A boolean indicating if the on-chain metadata of the NFT can be modified. Once flipped tofalse, it cannot be reverted. -
Edition Nonce: This optional attribute is slightly out of scope but it is used to verify the edition number of limited edition NFTs. -
Token Standard: This optional attribute captures the fungibility of the token. We’ll talk more about this in this article. -
Collection: This optional attribute links to the mint address of another NFT that acts as a Collection NFT. This is helpful for marketplaces to group NFTs together and safely verify these collections. -
Uses: This optional attribute can make NFTs usable. Meaning you can load it with a certain amount of “uses” and use it until it has run out. You can even make it so the NFT destroys itself when it’s been completely used out.
Phew! As you can see, lot’s of cool features. I’m not going to go through them all here but I’m hoping to add more articles to this series on that subject. In the meantime, feel free to check the official Metaplex documentation for more information.
❡Again, where’s the picture?
So many attributes, yet, still no picture or digital asset? Isn’t that a big part of what an NFT is?
Yes! Worry not, we do have a place to store that information.
Remember that URI attribute that points to an off-chain JSON object? Well, that JSON object follows a certain standard in order to store even more data.
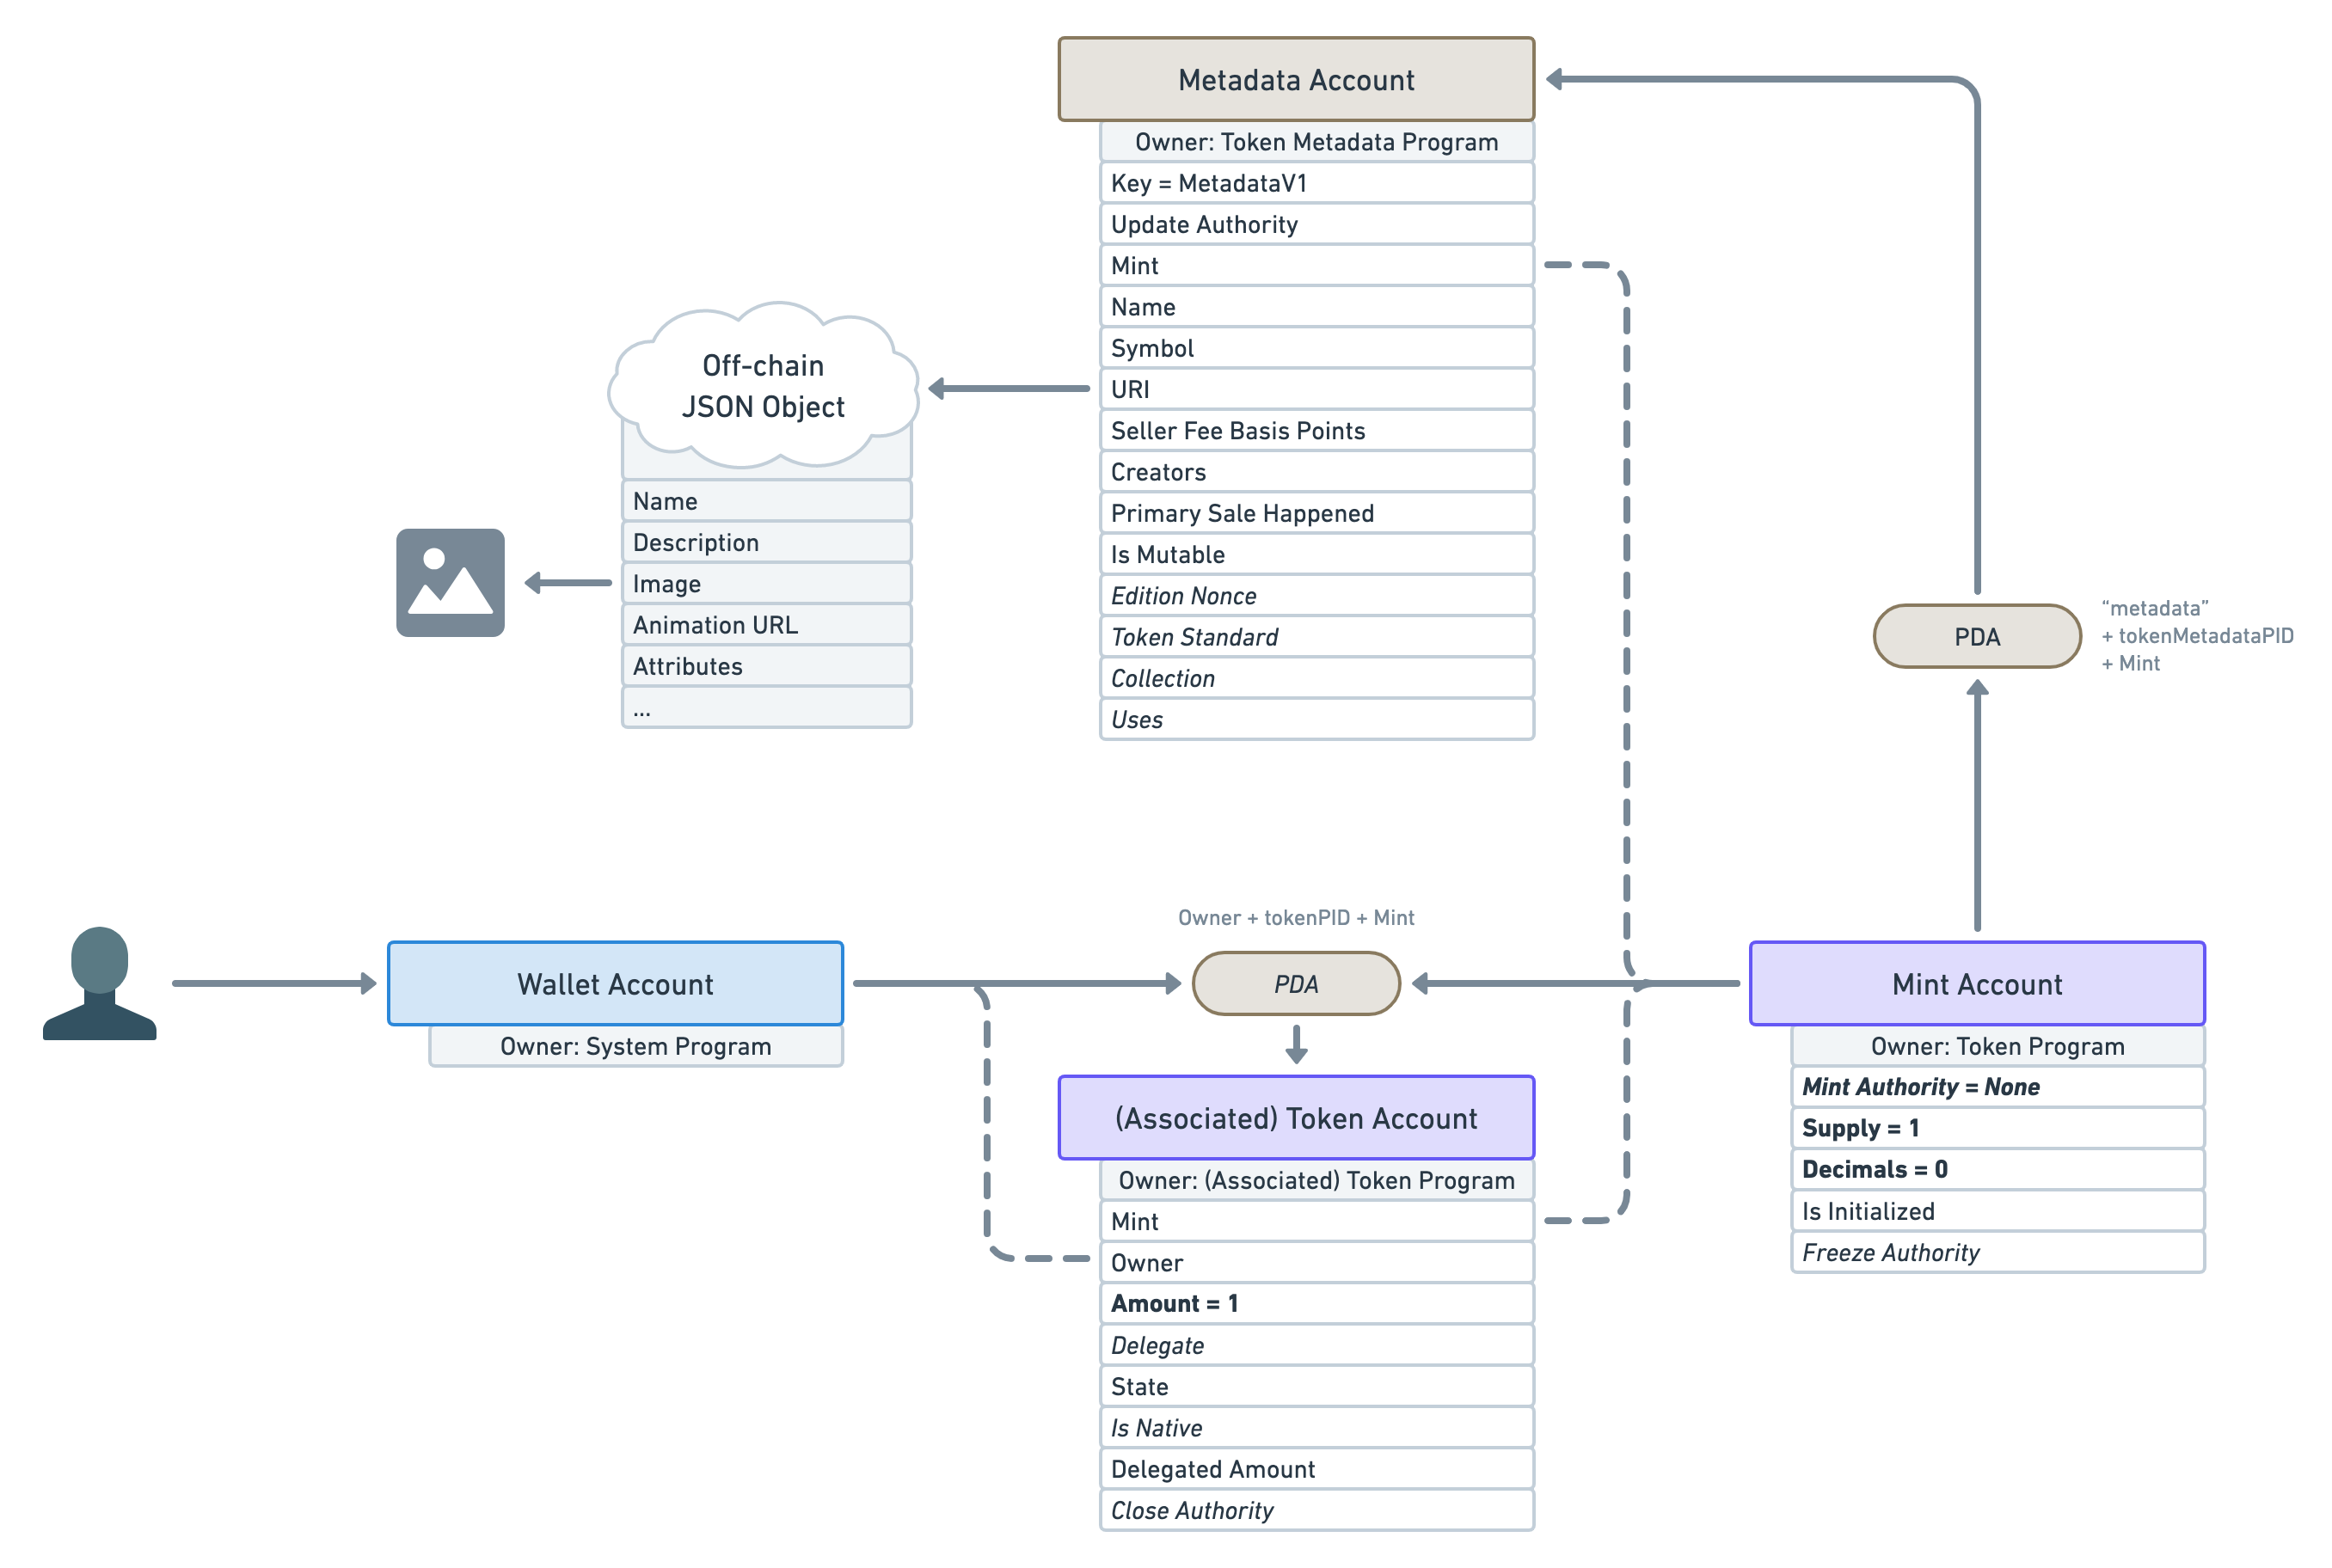
As you can see, we can provide, amongst other things, a name, a description and, finally, an image! Similarly to the URI attribute of the Metadata Account, that image attribute should be a URI that can be used to download the digital asset. There’s also an animation_url attribute and a files array for NFTs that have more custom needs. All of these assets could be either stored off-chain (in a traditional server) or using a permanent storage solution (in another blockchain such as Arweave). Be sure to check out the Metaplex documentation for more information on its NFT standard.
It is worth mentioning that you can add anything you want within that JSON object. If you’re planning on building an app that recognises your own NFTs that can be useful. But be aware that other applications and marketplaces will not be aware that this data exists and therefore will not be using it.
❡Why two metadata storage?
You might be wondering, why do we need two places to store the data of our NFT? Couldn’t we just store everything on the Metadata Account?
There are several issues with that.
- First, it costs money to store data on-chain. When designing accounts used by thousands of people, you want to be mindful of the price it will cost to create them.
- Second, on-chain data is much less flexible. Once an account is created using a certain structure, it cannot easily be changed. Therefore, if we had to store everything on-chain, we would greatly limit the amount of data that can be attached to an NFT.
As a result, we need to cleverly and safely split the data into two categories: on-chain and off-chain. For instance, the Creators array is on-chain because we need a trustless way of knowing if an NFT has truly been offered and signed by a given artist. The Is Mutable attribute is on-chain because we need to ensure that, once flipped to false it can never be reverted.
The bottom line is: the Token Metadata Program can create guarantees and expectations for on-chain data but cannot do that for off-chain data.
However, that doesn’t necessarily mean the off-chain JSON file is insecure and never to be trusted. Permanent storage blockchains such as Arweave are commonly used to store both the digital assets and the JSON metadata that references them, ensuring the immutability of the off-chain data. Additionally, NFTs can be made immutable ensuring that the URI attribute of the Metadata Account will never point elsewhere. This is the most secure configuration of an NFT as it is guaranteed nothing could even be done to alter it.
Also, note that some NFT projects might need their data to be mutable in ways that will benefit the NFT owners. For instance, if you’re planning on creating an NFT of a baby monkey that gradually grows into an adult monkey, you need the JSON metadata stored on a server you control in order to make these gradual changes. Next time, the NFT owners open up their wallets they will see another image but they will be delighted rather than outraged. My point is, as long as you trust the creators of your NFT — which are guaranteed by the Verified flag of the on-chain Creators attribute — mutable off-chain data can be genuine. But of course, always do your own research.
❡Printing multiple editions
Okay, surely we’ve now reached the final representation of an NFT in Solana?
For the most part, yes, but not quite.
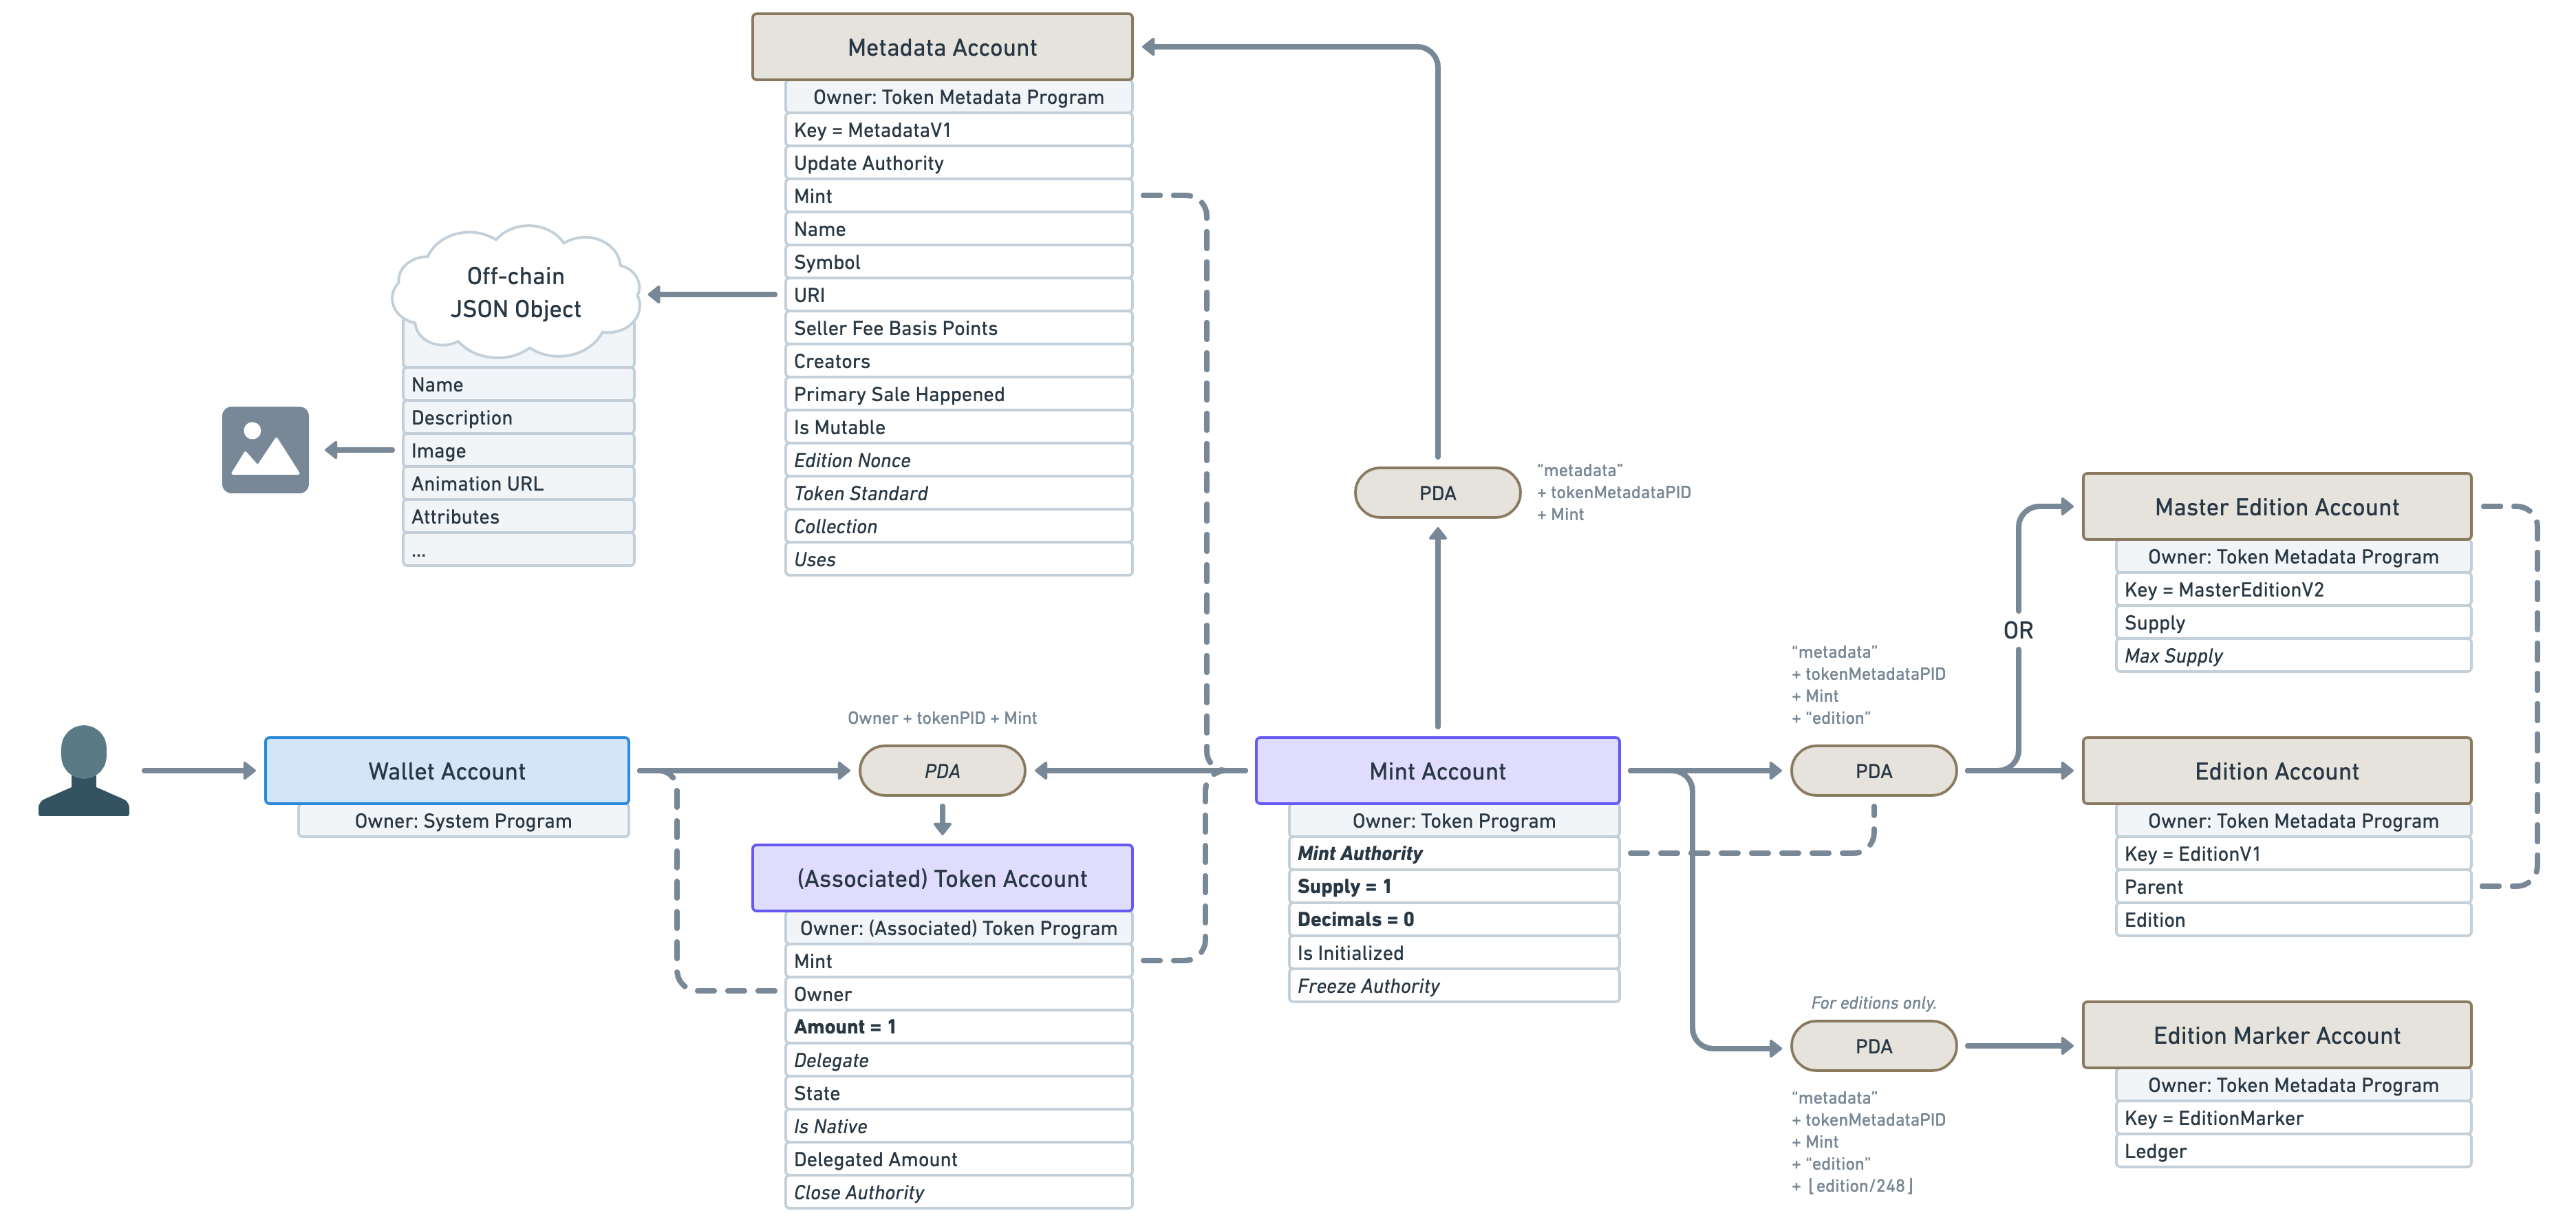
There is another important account offered by the Token Metadata Program, derived from the mint account (using a PDA).
In fact, the account located inside that PDA can be one of two different types. It can either be a “Master Edition” or an “Edition”.
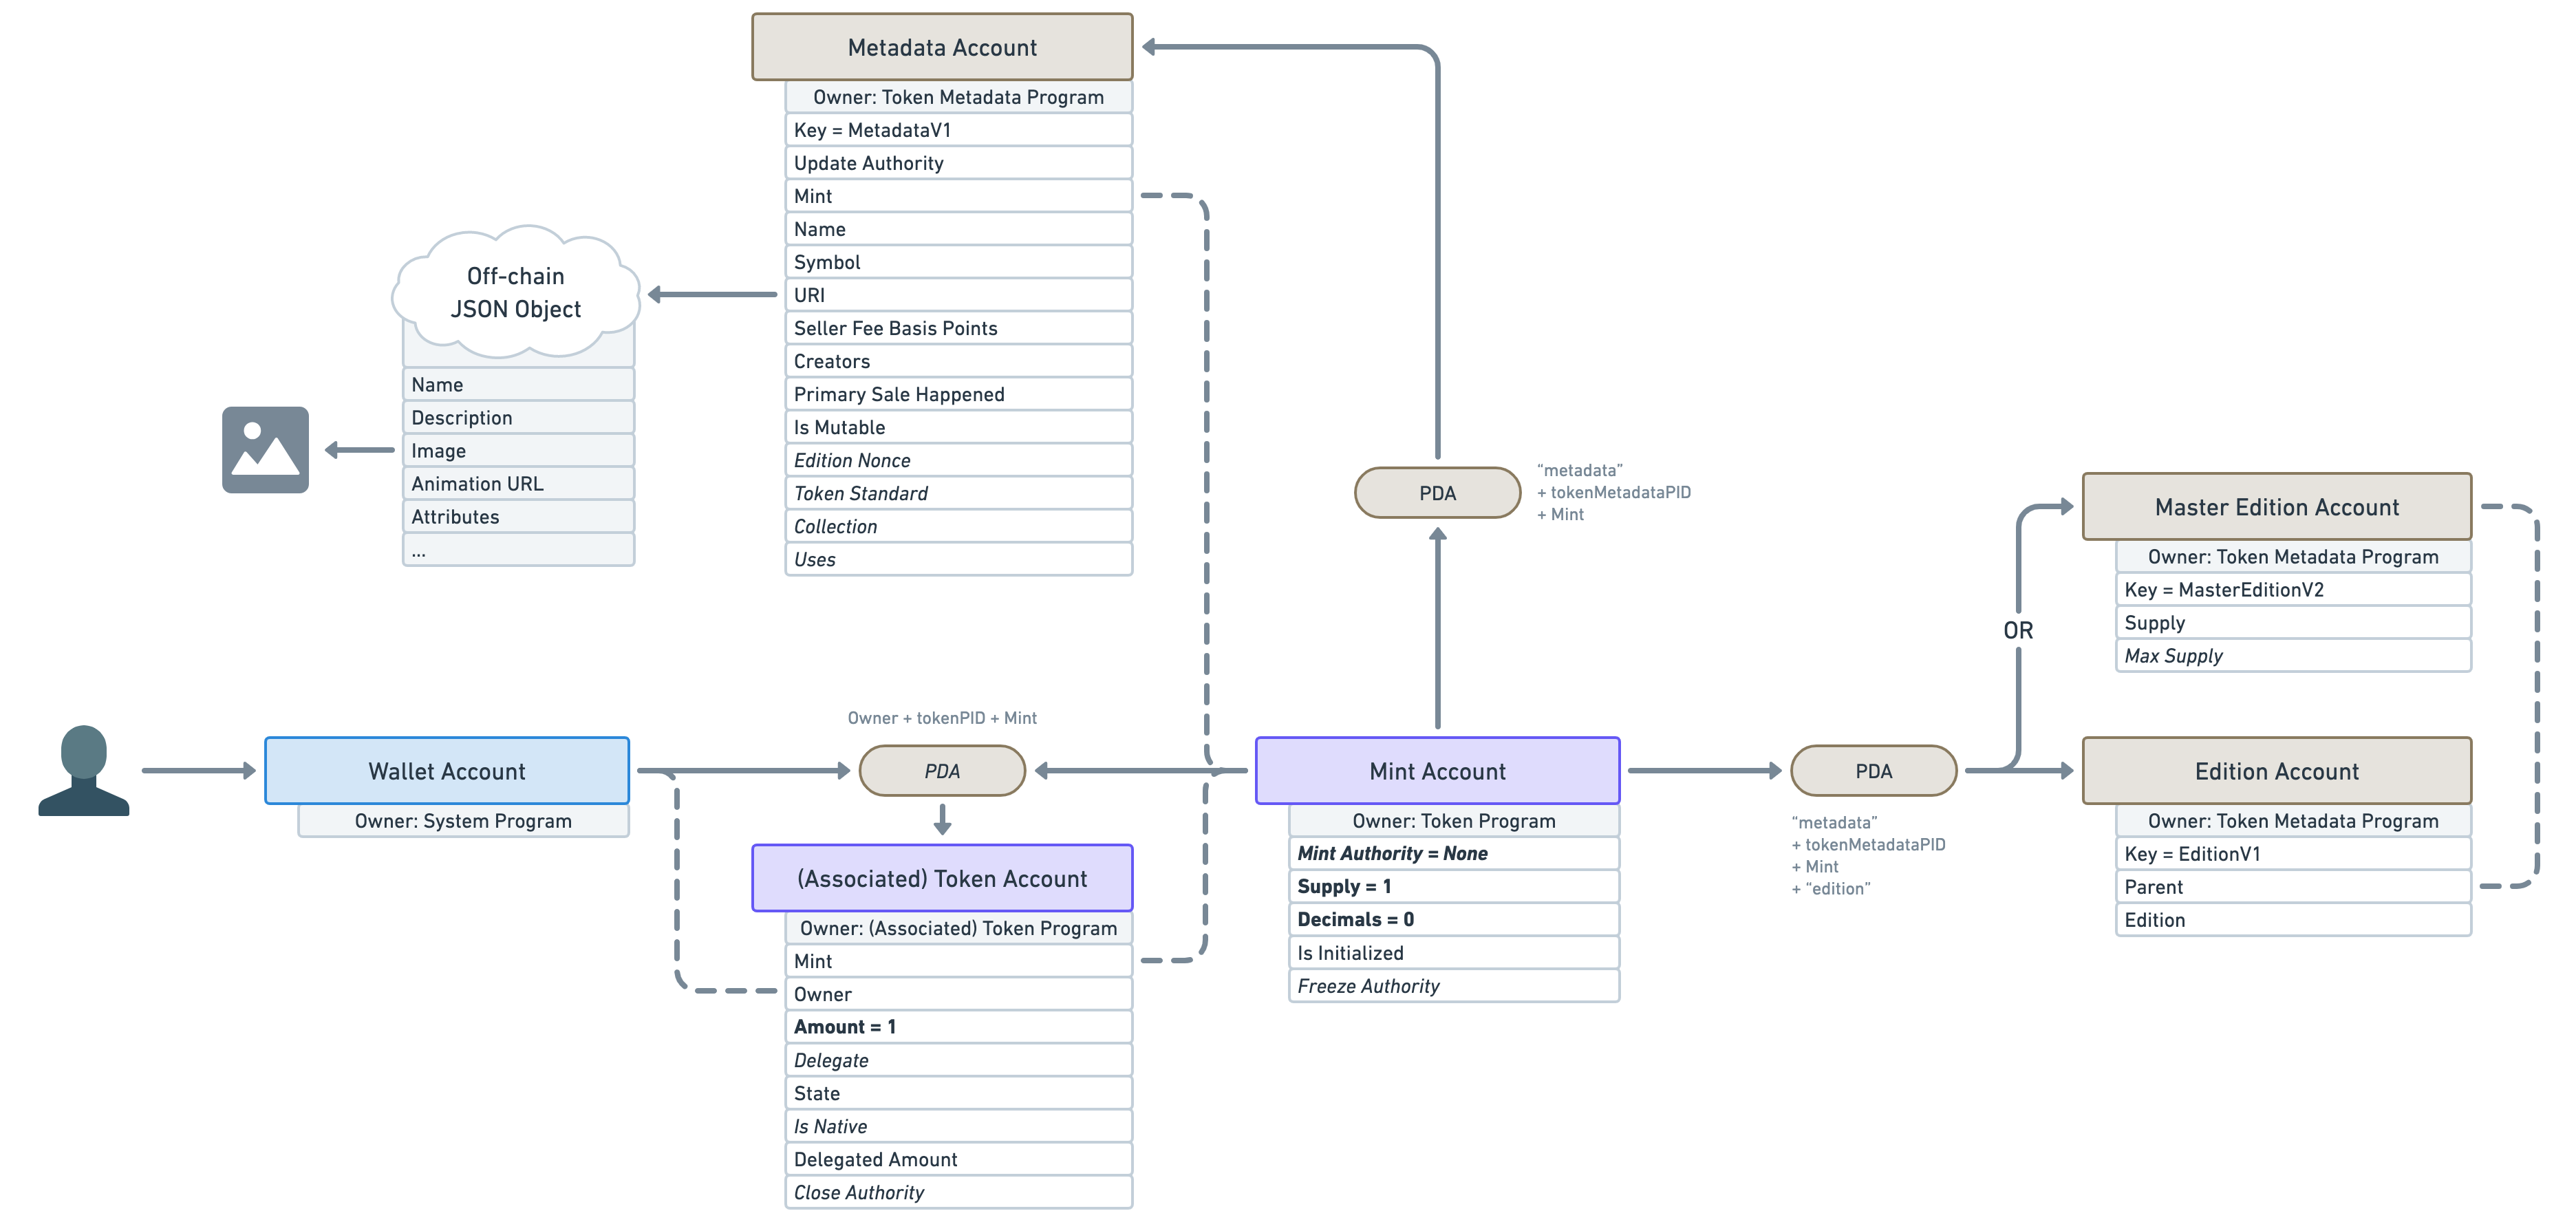
A “Master Edition” also known as an “Original Edition” is an NFT that can be duplicated by its owner a certain amount of times dictated by the “Max Supply” attribute.
An “Edition” also known as a “Print Edition” is an NFT that was duplicated from a “Master Edition”. Whenever a new “Edition” is created, it keeps track of its parent "Master Edition" and its edition number. It also increases the supply of its parent “Master Edition”. Once the supply reaches the max supply, no more NFTs can be printed that way. Note that the “Max Supply” of a “Master Edition” can be null, which means an unlimited amount of NFT can be printed from it.
Also note that another — lesser-known — PDA Account called “Edition Marker” exists on “Edition” NFTs to ensure there is no overlap between the edition numbers of a given “Master Edition”.
One use-case for this feature is to allow artists to sell more than one copy of their art. For instance, they can release 100 limited editions of their 1/1 NFT and each of them will keep track of their edition number on-chain.
It is worth noting that printing multiple editions of an NFT is totally optional and most NFTs out there will set their “Max Supply” to 0 to prevent using it.
So why did I decide to mention ”Master Editions” and “Editions” in this — rather long — article? Because, whilst printing editions is their primary purpose, they are responsible for more than just that.
If you remember, we said earlier that for a “Mint Account” to be an NFT, it needed to:
- Have zero decimals.
- Have minted exactly one token to a wallet.
- Have revoked its right to mint additional tokens via the “Mint Authority” attribute.
Well, the Token Metadata Program uses the edition PDA to guarantee these properties. When creating the edition PDA account (whether it’s a “Master Edition” or an “Edition”) it will check that the mint account has got zero decimals and a supply of exactly one. If either of these conditions fails, it will refuse to create the account. If they succeed, it will transfer the “Mint Authority” to that new edition PDA ensuring no wallet can ever mint additional tokens. What that means is, the simple fact that a “Master Edition” or “Edition” account exists on a mint account, is proof of its non-fungibility.
This is why “Master Edition” and “Edition” accounts are important in Solana NFTs and are worth mentioning in this article.
Here’s a little update on our NFT diagram. As you can see the “Mint Authority” is no longer null but points to the edition PDA which can only be controlled by the open-sourced and audited Token Metadata Program.
❡Token Standard and Semi-Fungible Tokens
We now have the full picture of what makes a mint account an NFT in Solana!
However, this article wouldn’t be complete if I didn’t mention that the Token Metadata Program also supports what we call “Semi-Fungible Tokens” or SFT for short.
SFTs are basically the same as NFTs but without the non-fungible guarantees, we talked about earlier.
“But why?”, you might ask, “I thought non-fungibility was the whole point?”.
Well, it is for NFTs but, when you think about it, the core purpose of the “Metadata Account” is to add data to tokens. Why should we only restrict that feature to non-fungible tokens?
Why couldn’t our fungible Avocado token (AVDO) from earlier add on-chain data to its mint account? It could use that data to let decentralised exchanges know which symbol to use, which external links to list, which logo to display and so on.
Another use case for this would be creating a gaming asset as a zero-decimal token. For instance, you could create a token for the “Wood” resource in your game. Since players should be able to own and trade more than one wood, it makes little sense to have to create one single NFT for every single piece of wood in your game. That’s why making game resources fungible assets whilst still benefiting from on-chain data is super valuable.
As such, the Token Metadata Program allows us to create Metadata Accounts for mint accounts that are fungible. This is why, it is the responsibility of the edition PDA to guarantee non-fungibility.
To make our life easier, the Metadata Account keeps track of “how fungible” a token is via the “Token Standard” attribute. It can be one of the following values.
❡NonFungible
If the token standard is NonFungible, we know we are dealing with an NFT. This standard is applied if and only if a “Master Edition” or “Edition” account was created for that mint.
That means, we have the following guarantees:
- Mint supply is one.
- Mint decimals are zero.
- An account exists under the edition PDA.
- Mint authority has been transferred to the edition PDA.
❡FungibleAsset
If the token standard is FungibleAsset, we know we are dealing with a non-decimal SFT. For instance, our “Wood” resource example would be marked as a FungibleAsset.
That means we have the following guarantees:
- Mint decimals are zero.
- No account exists under the edition PDA.
❡Fungible
If the token standard is Fungible, we know we are dealing with a decimal SFT. For instance, the Avocado token or the USDC token would both fit in this category.
That means we have the following guarantees:
- Mint decimals are strictly greater than zero.
- No account exists under the edition PDA.

It is worth noting that the off-chain JSON metadata standard varies based on the “Token Standard” we’ve just discussed. You can find the JSON standard definition for each token type below.
- JSON standard for Non Fungible tokens
- JSON standard for Fungible Asset tokens
- JSON standard for Fungible tokens
❡Conclusion
Phew, what a journey!
Not only do we now have a full picture of what an NFT and an SFT look like in Solana, but we also understand why things are structured the way they are and how they compare to other models we are used to.
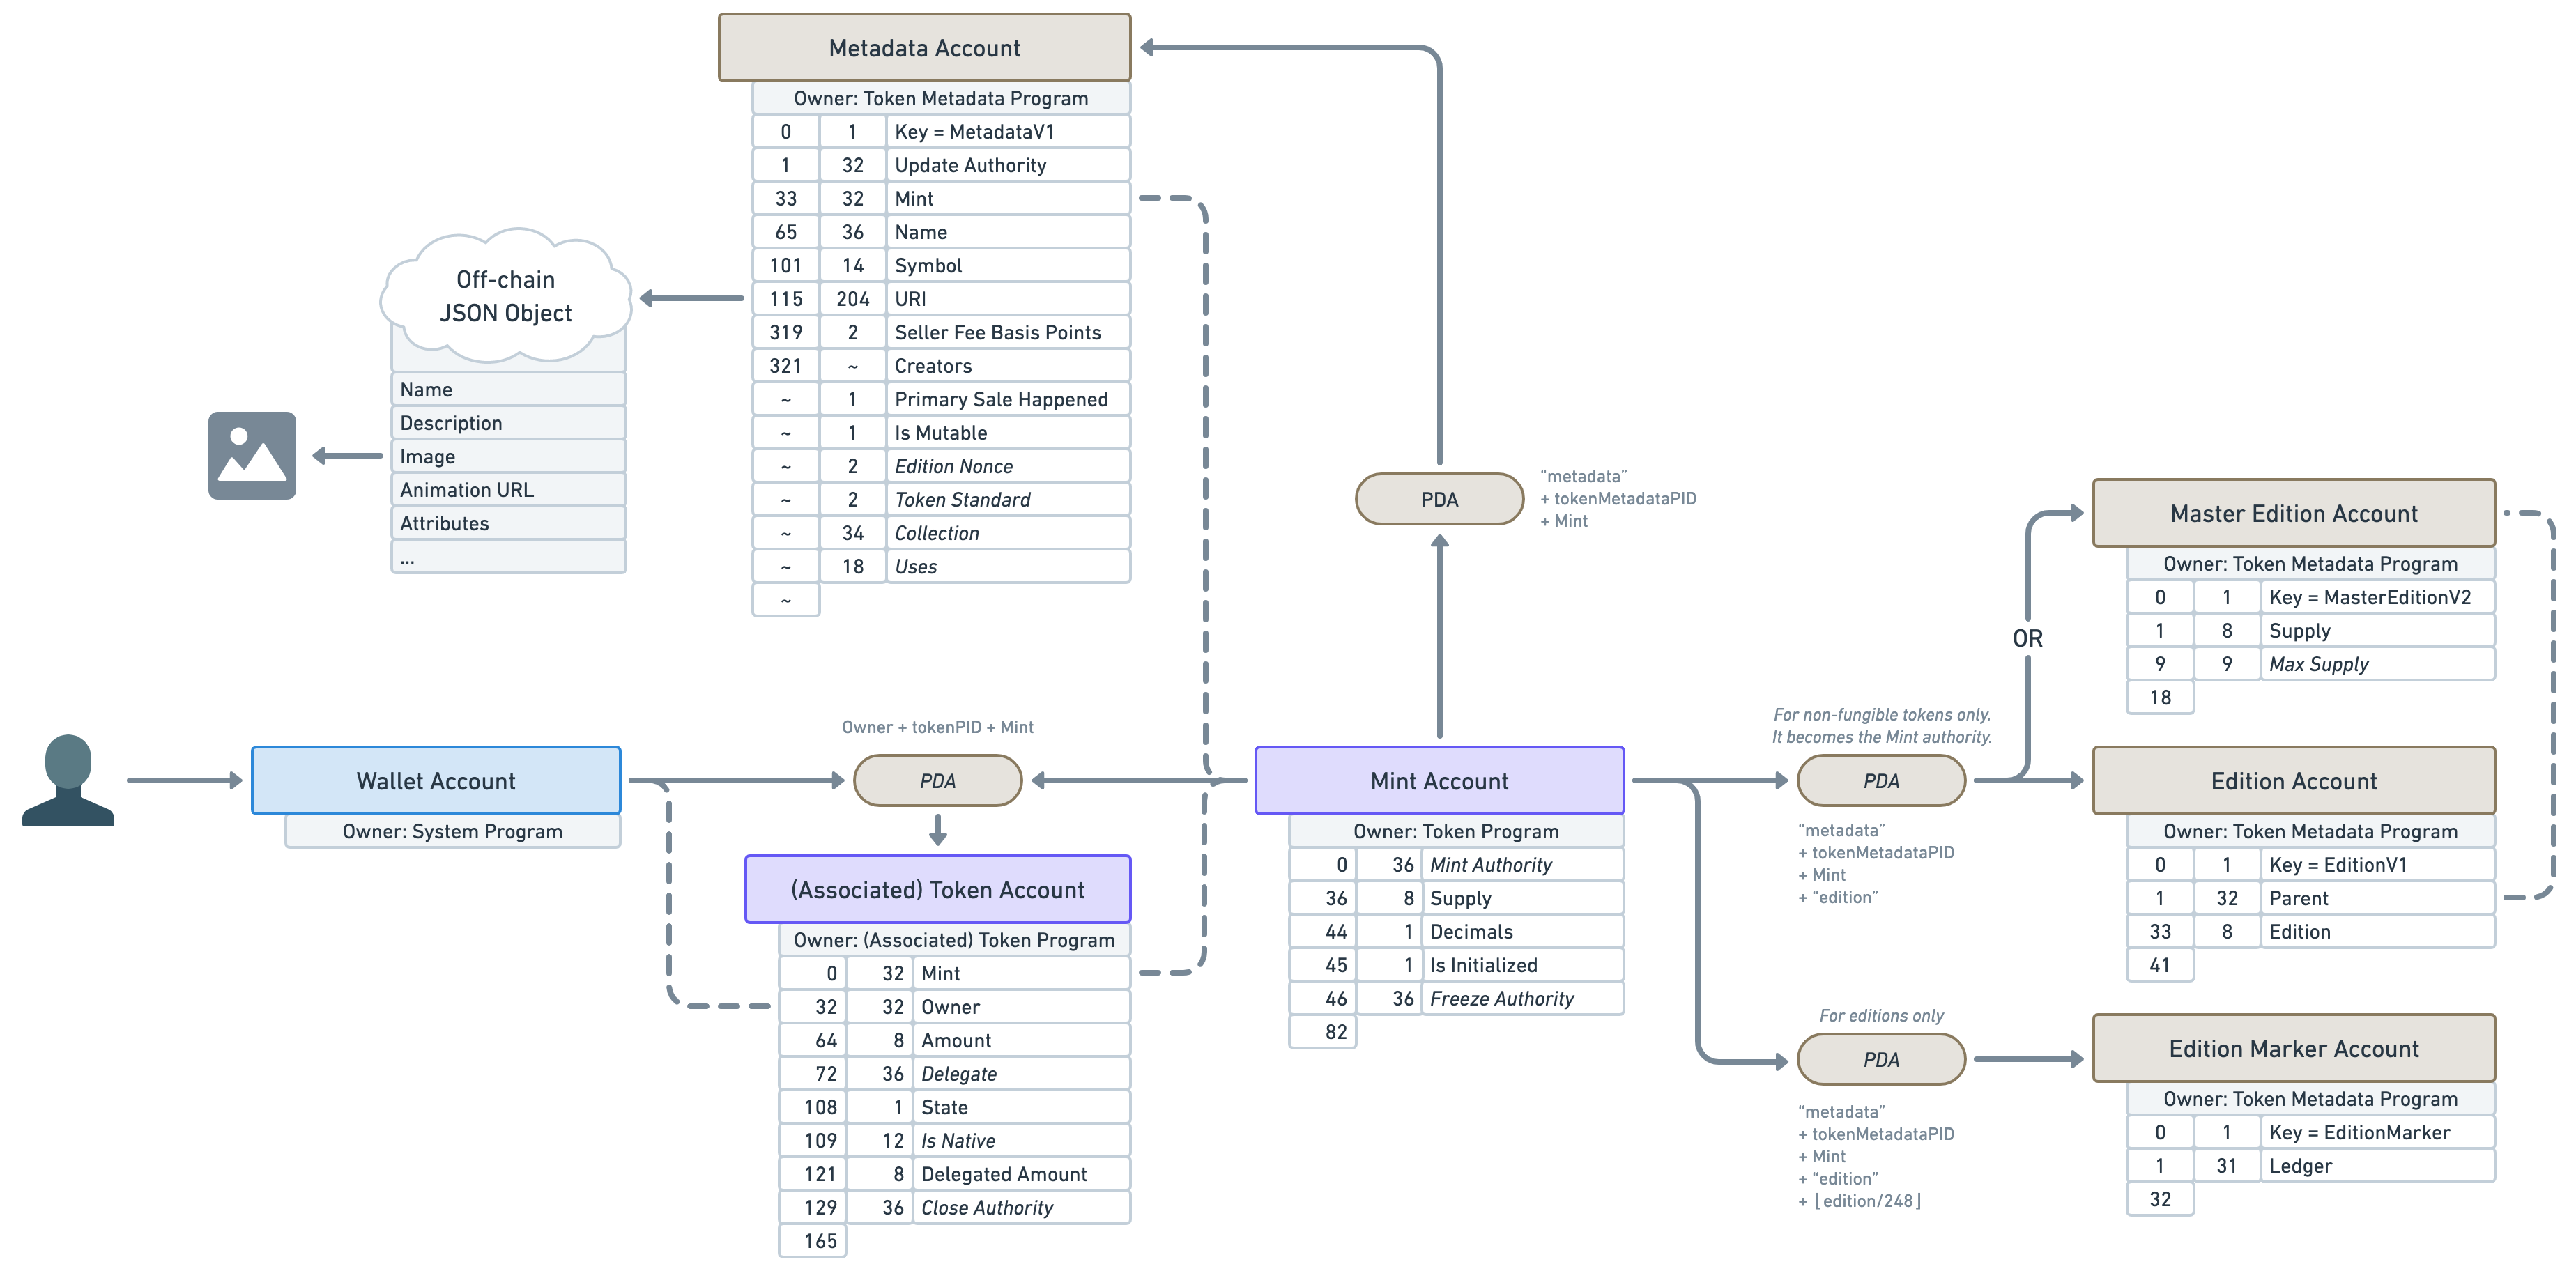
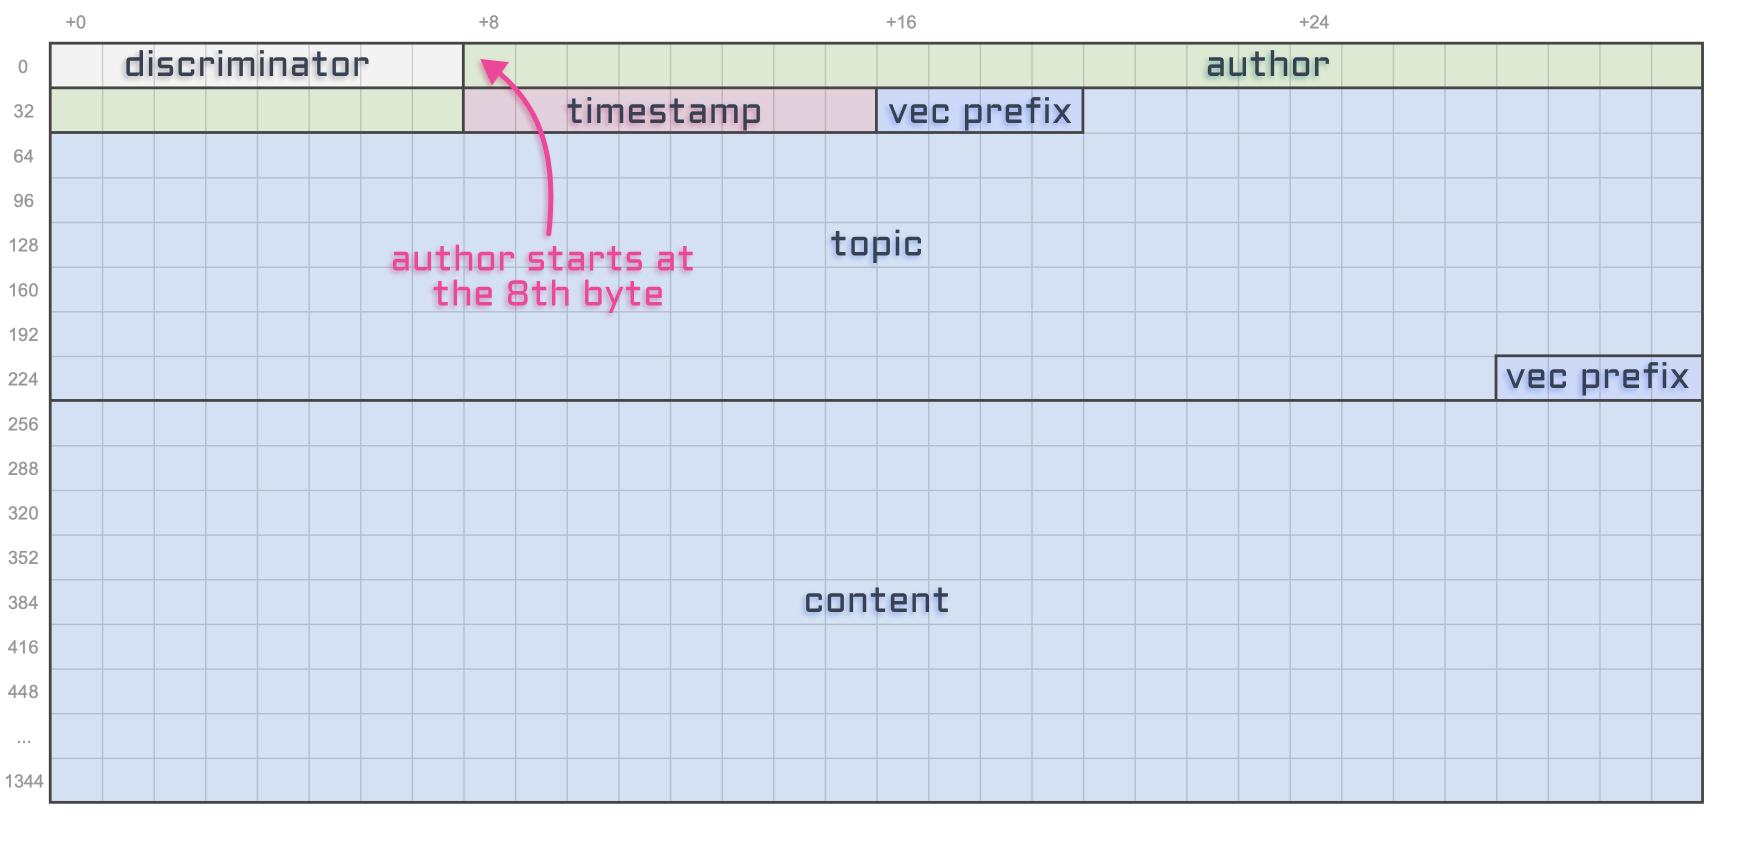
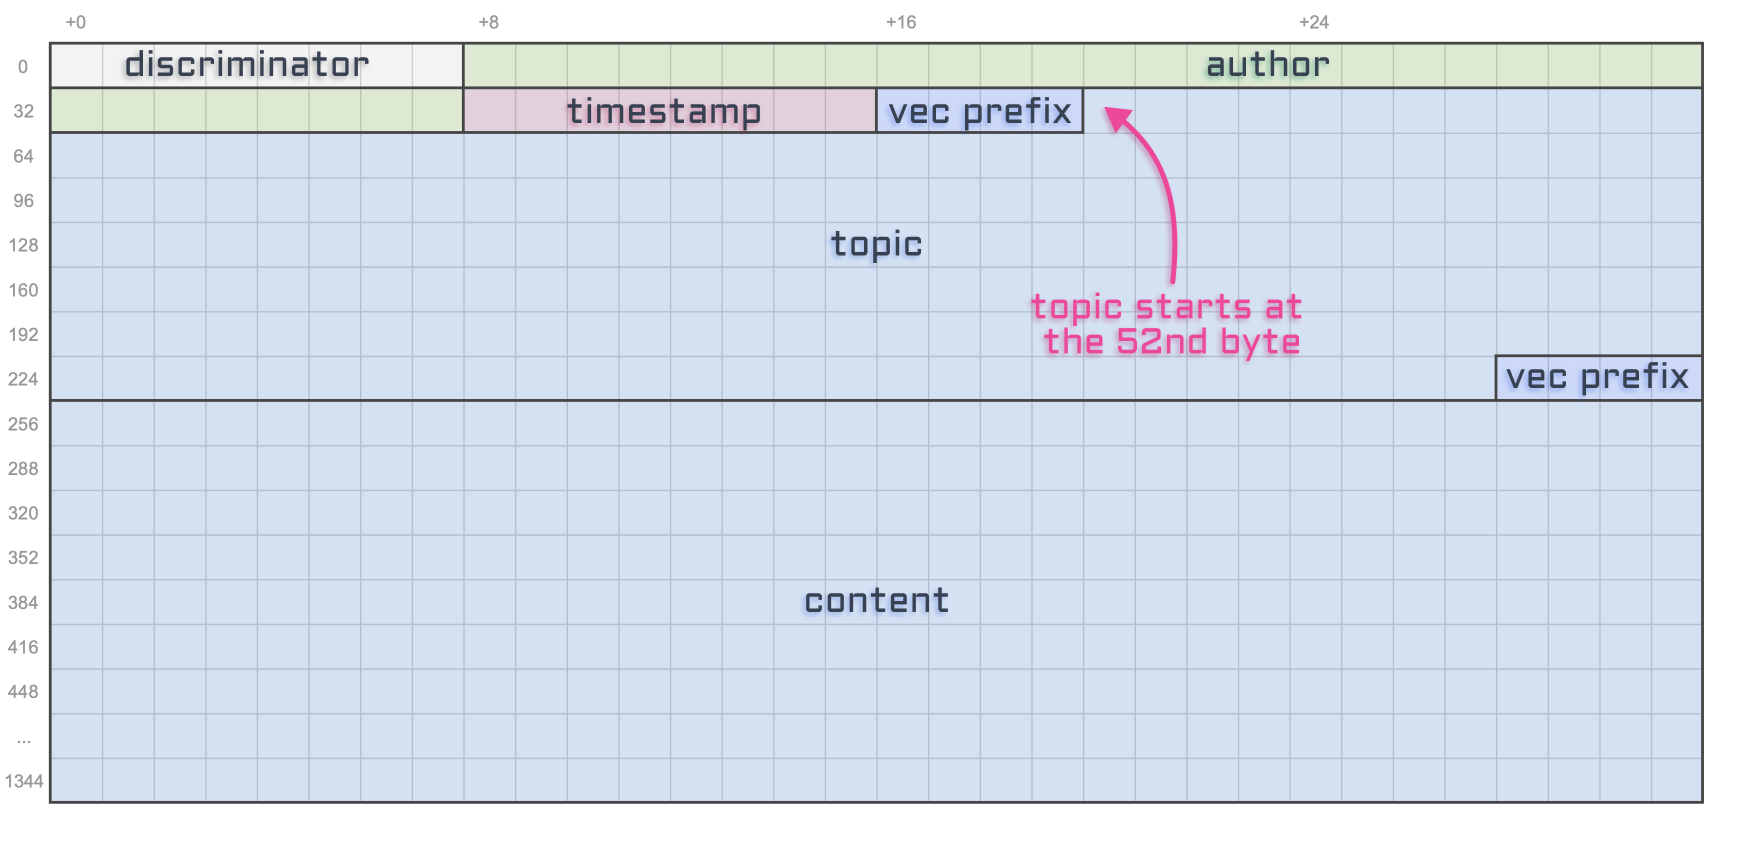
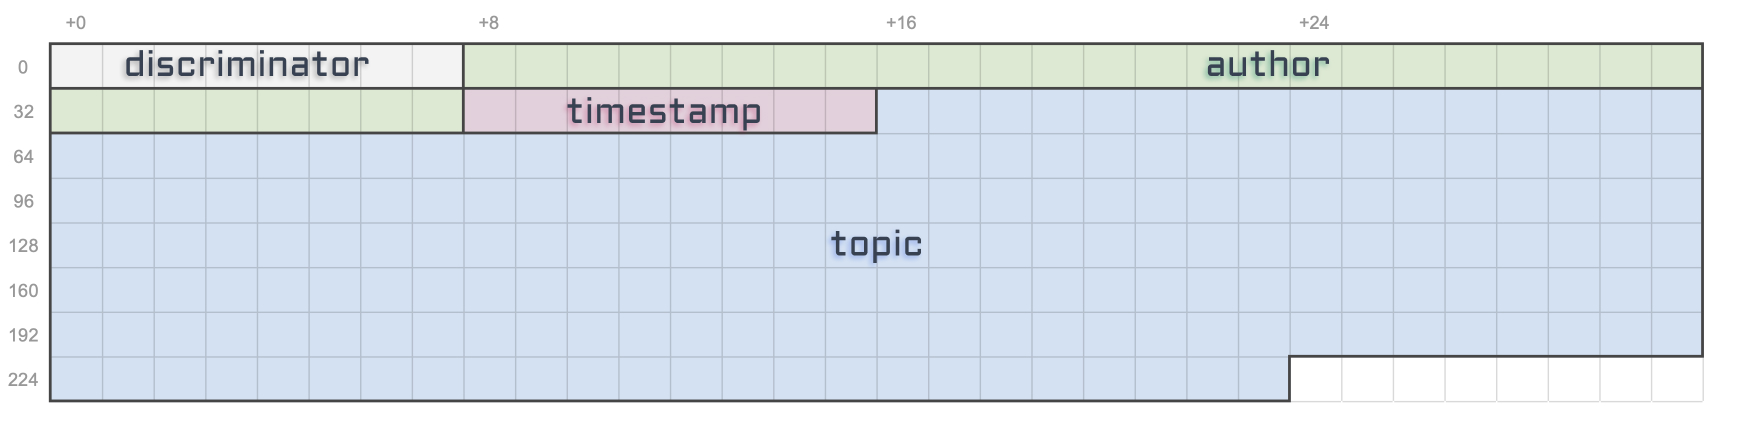
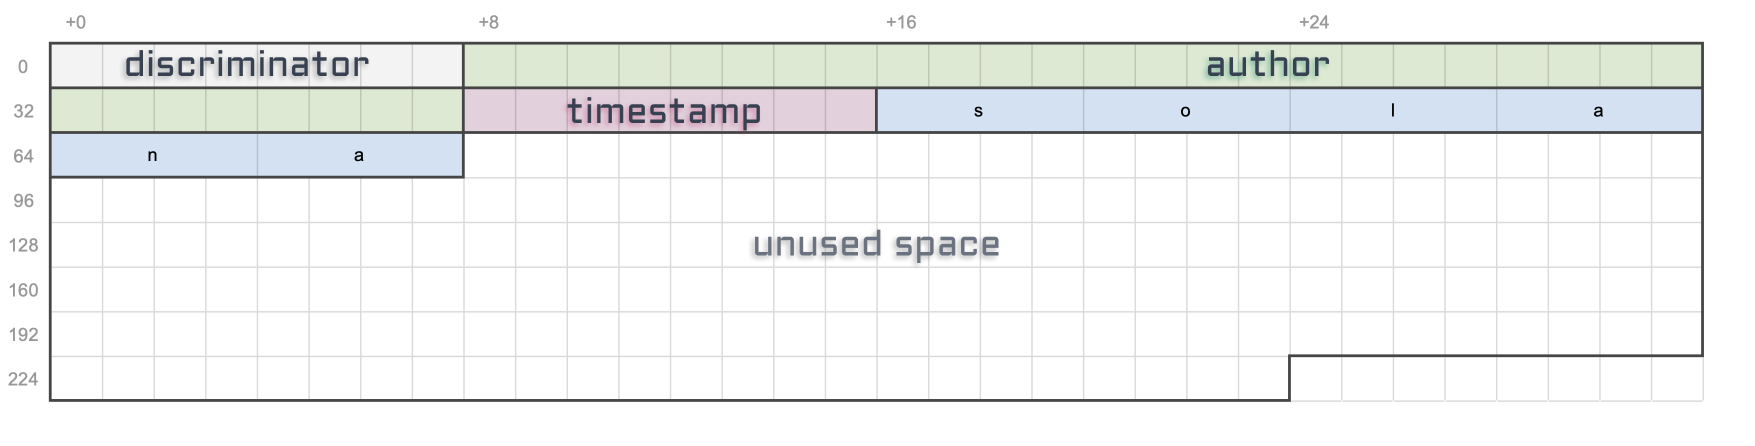
This article wouldn’t be complete without a final diagram resuming what we’ve learned here.

And for the sake of making this diagram even more useful for developers out there, let’s also add the offset and the size of each account attribute in bytes. I’ll use a tilde ~ for variable account sizes.
Alright, I hope you’ve enjoyed this article and I’ll see you soon for more Solana and Metaplex adventures! ⛵️
]]>
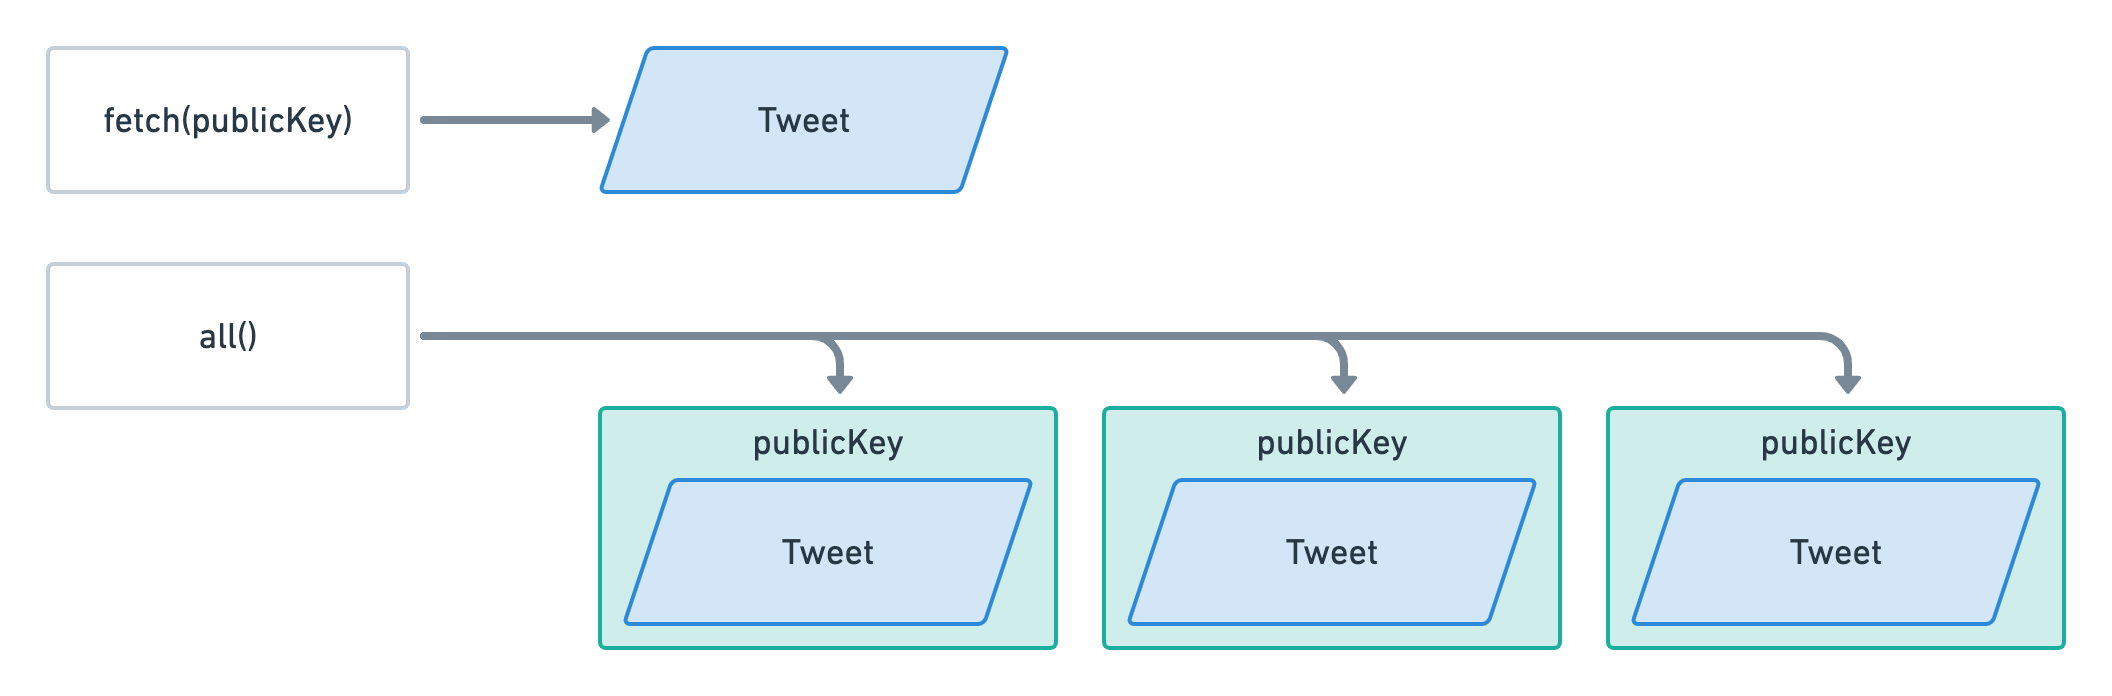
 When a program starts getting lots of accounts, it can be tricky to retrieve them whilst keeping a decent user experience. In this episode, we use tricks to paginate and order accounts from our program.

 Now that we know how to create, read and update accounts in Solana, let's see how to delete them.
 Let's continue to improve our dApp feature by feature. In this episode, we'll create a new instruction allowing users to update their own tweets.


 We've learned and set up a lot of things in the series. This article act as a complete checklist of this series organised by topics. The perfect article to come back to when you get your hands dirty.