Set up a server for Laravel applications
On paper, setting up a server should be just like receiving a brand new computer and installing all the things we need to work and entertain ourselves.
However, unless you set up and manage servers regularly, the amount of stuff to remember to install and configure can be overwhelming without a step-by-step guide.
This is precisely why this article will provide all the steps necessary to create a Laravel server from scratch. It will use Nginx, have MySQL installed, provide SSL certificates for HTTPS, you name it.
As a result, it will be a rather long episode with lots of screenshots and code snippets along the way. Feel free to pause this article and come back later if it becomes too overwhelming.
Alright, let’s do it!
EDIT 2021-11-07: Deployer recently implemented their own version of server provisioning. What that means is, once you've created your server (see the section below), you can run a special command that should install everything you need to deploy your application onto your new server. You can learn more about it in the Deployer documentation.
Create a droplet
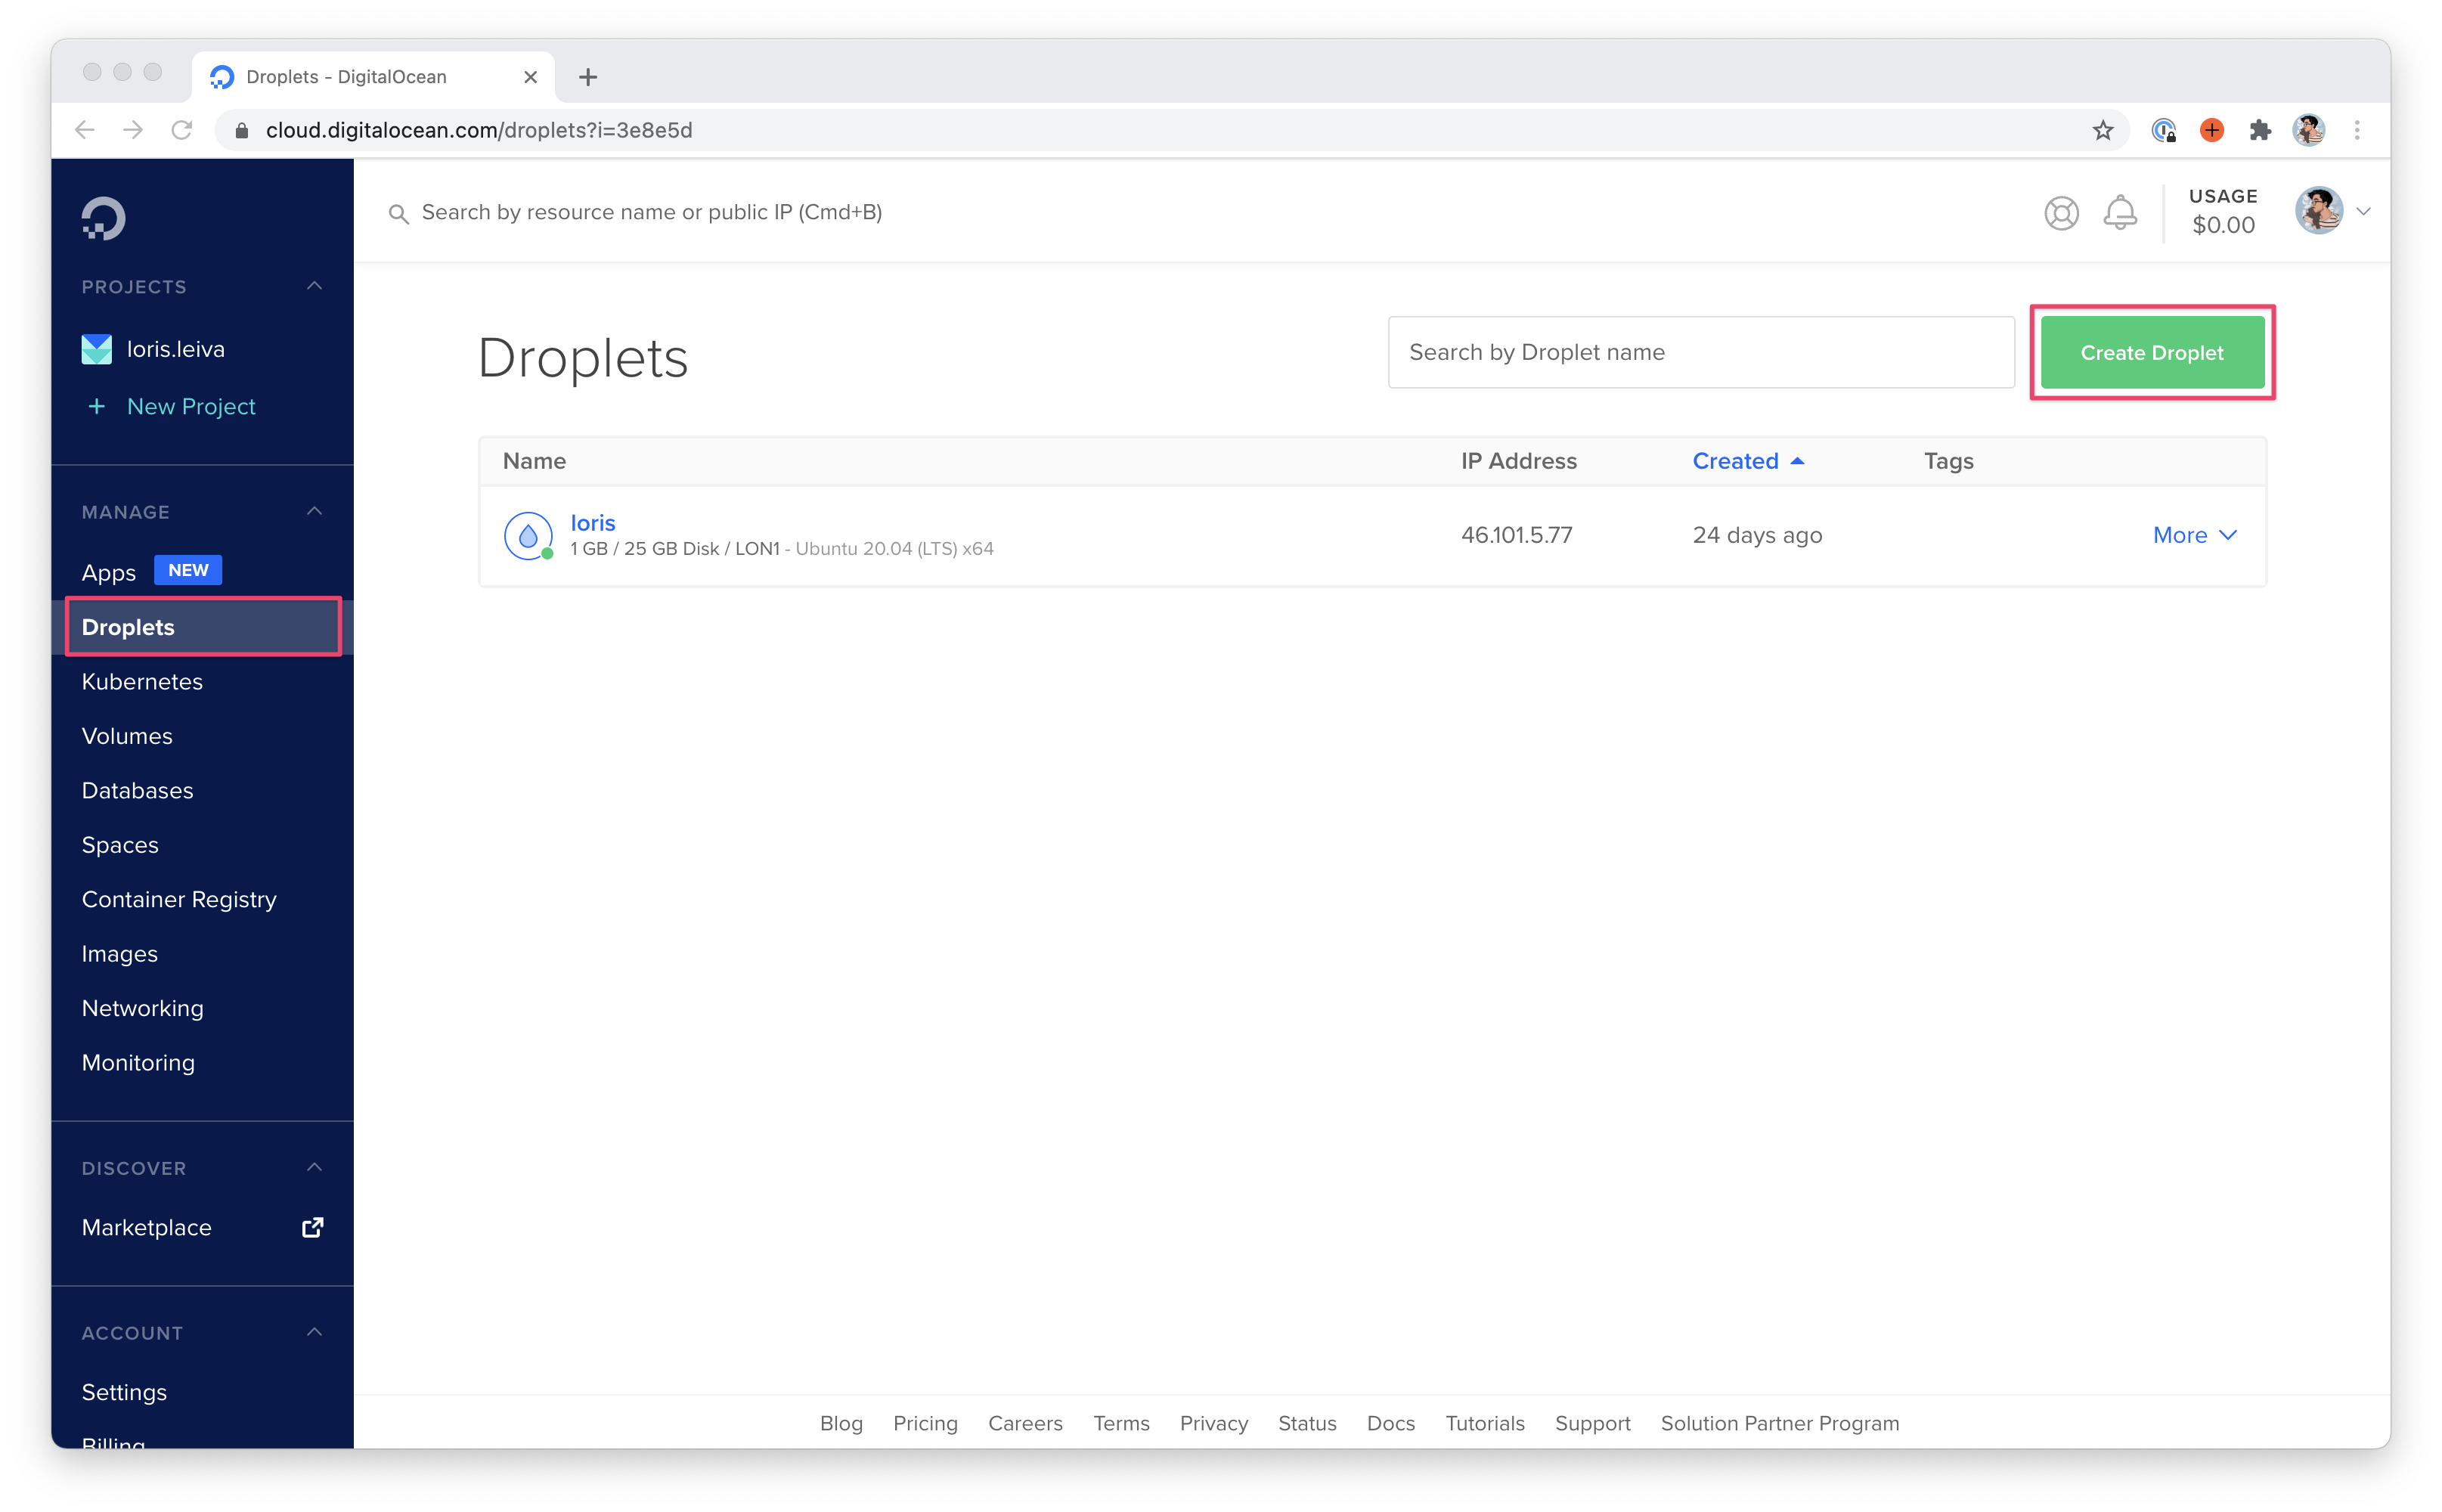
Let’s start by creating our server on Digital Ocean — or as they call them: “Droplets”.
I highly recommend using Digital Ocean over something like AWS if you’re getting started with servers because the interface is much more intuitive on Digital Ocean. Honestly, I had to work with AWS once for a client and I still have nightmares about it.
If you don’t have a Digital Ocean account yet, feel free to use my referral link here. The referral system here is miles ahead of Hover’s since you’ll be receiving $100 of credits in your account allowing you to go months without paying for your server. On my side, I will receive $25 of credits. It’s a win-win situation but you’re winning a bit more. 😅
Anyway, once you’ve created your account, go to “Droplets” and “Create Droplet” to start creating your server.
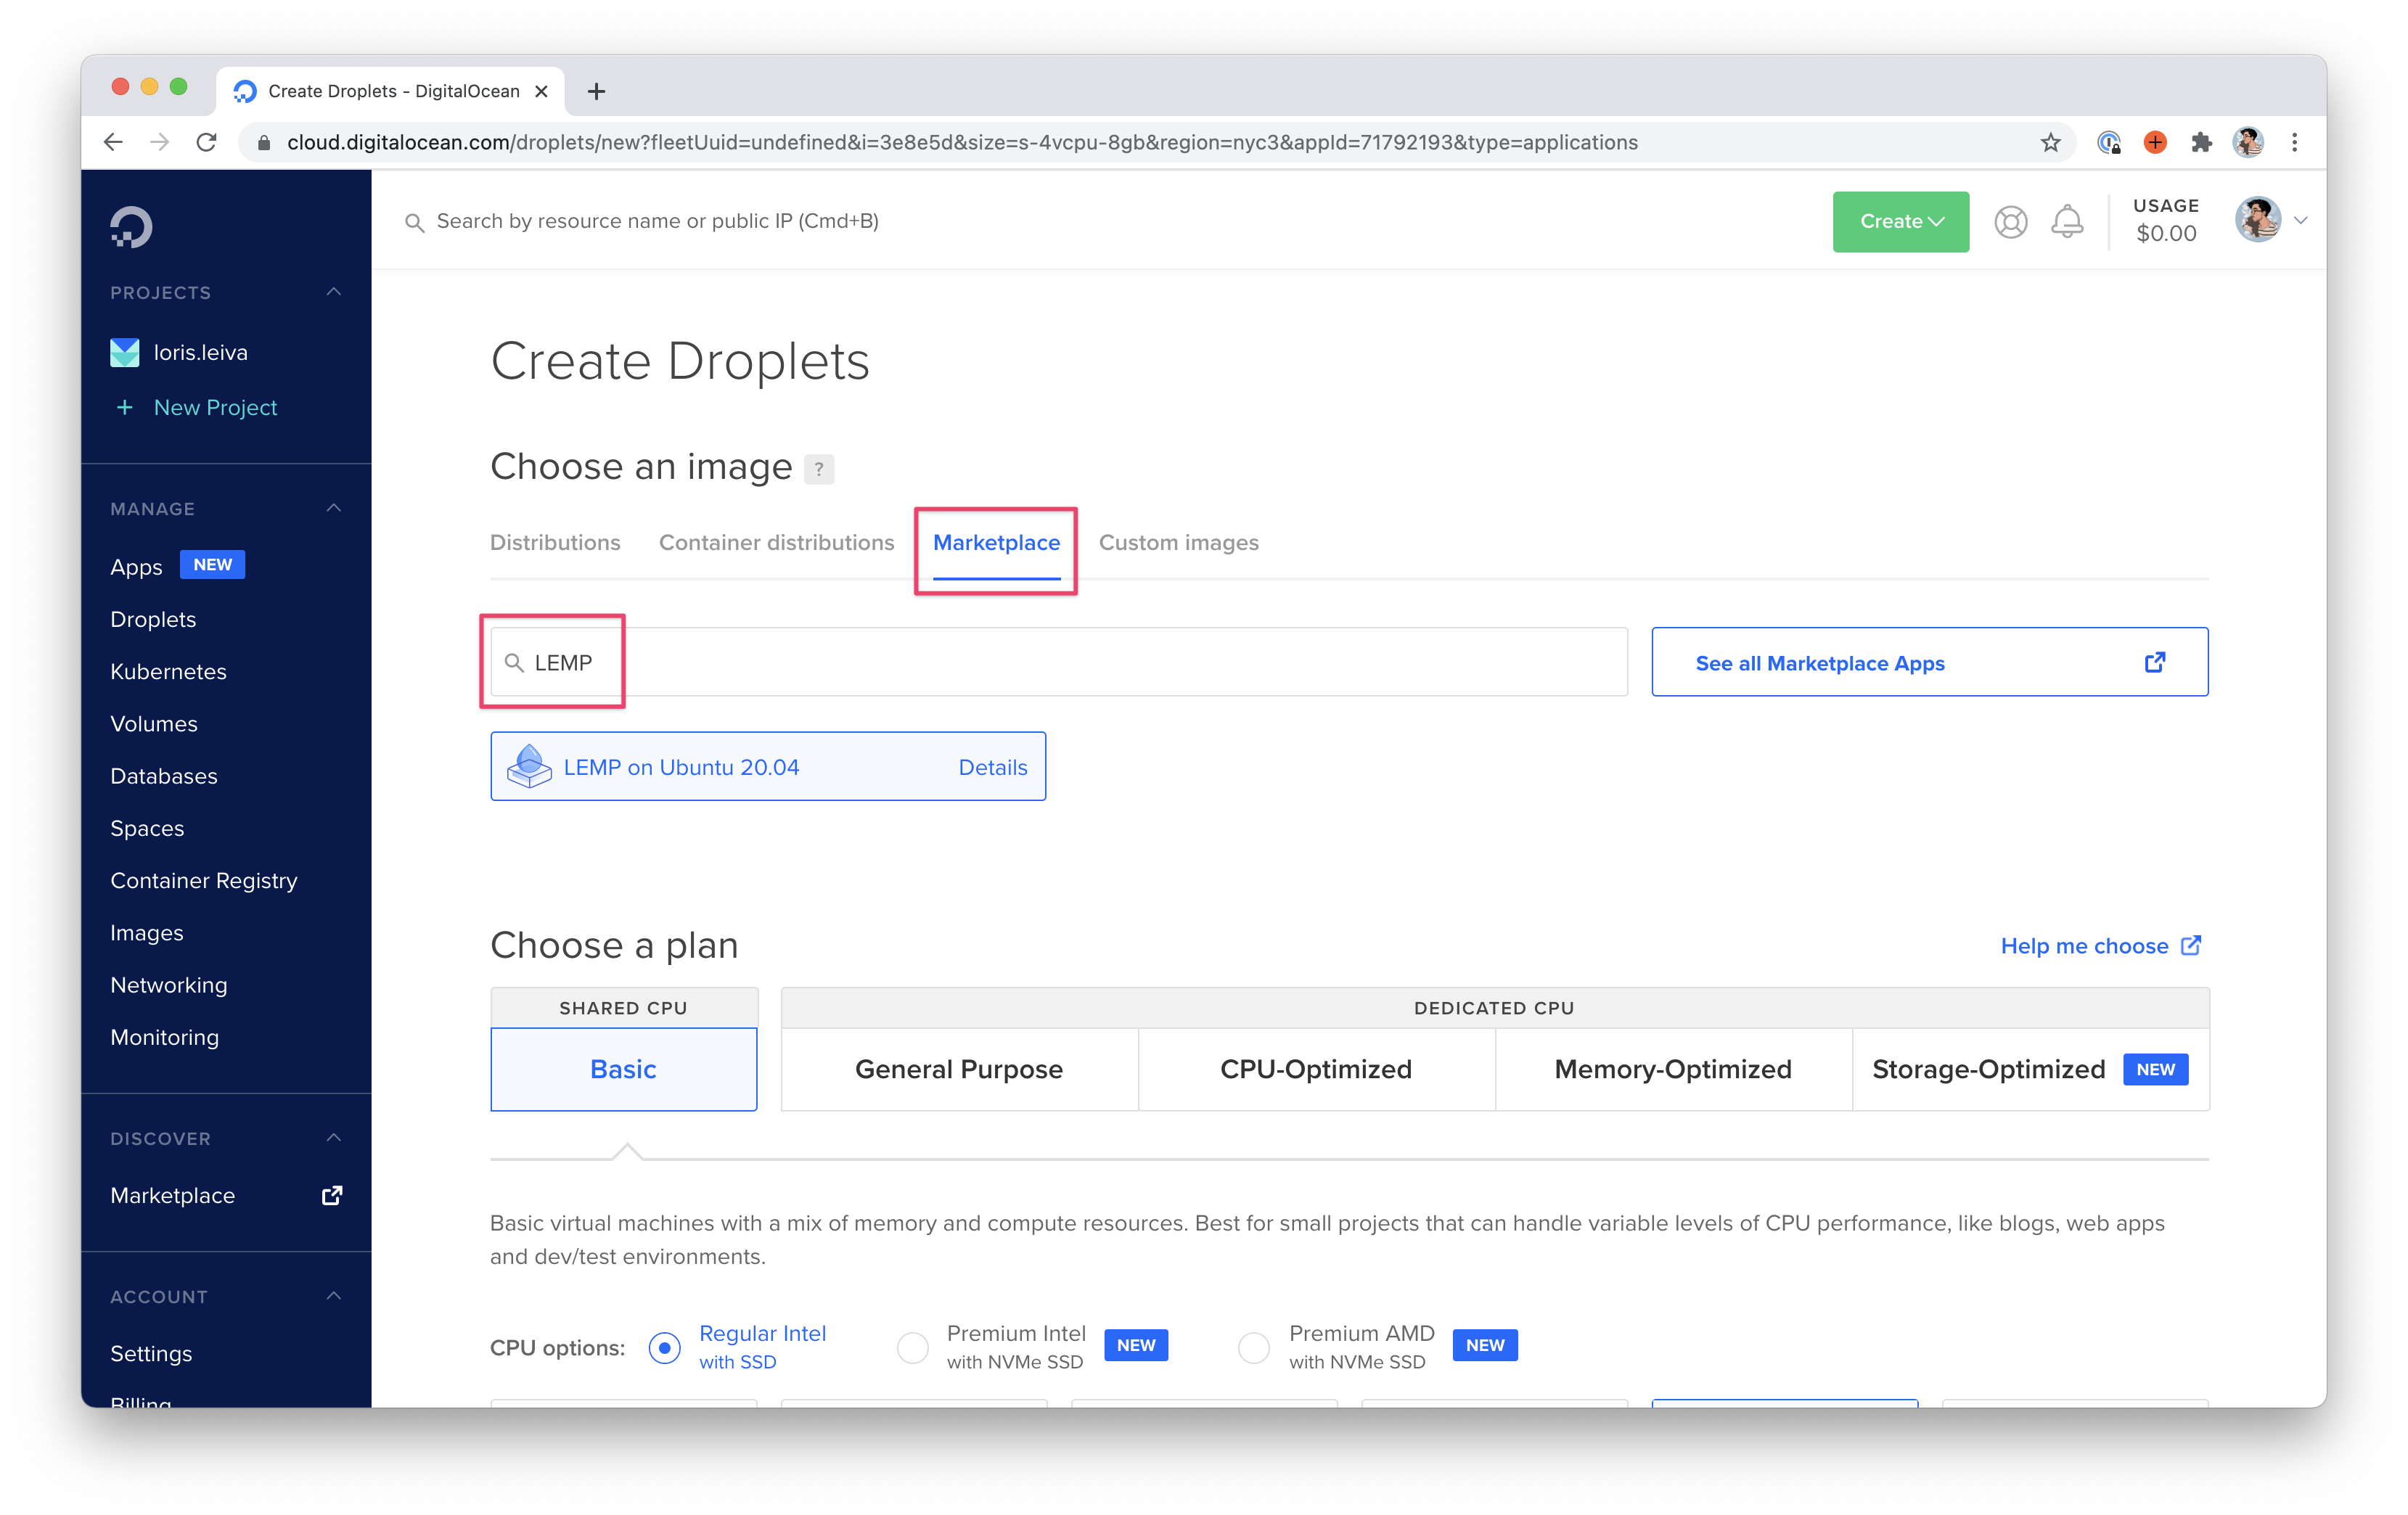
We’ve now entered a page where we can configure our server specs before creating it.
First of all, under "Choose an image", choose the "Marketplace" tab. Instead of starting with an empty Ubuntu server, we’ll select an image that comes with lots of useful things installed such as PHP and MySQL. Here, we’ll be using the “LEMP” image which stands for “Linux, Nginx, MySQL and PHP”.
Thus, we need to enter and select "LEMP" on the search bar. Be careful to select “LEMP” and not “LAMP” since we will be using Nginx and not Apache to configure our PHP server.
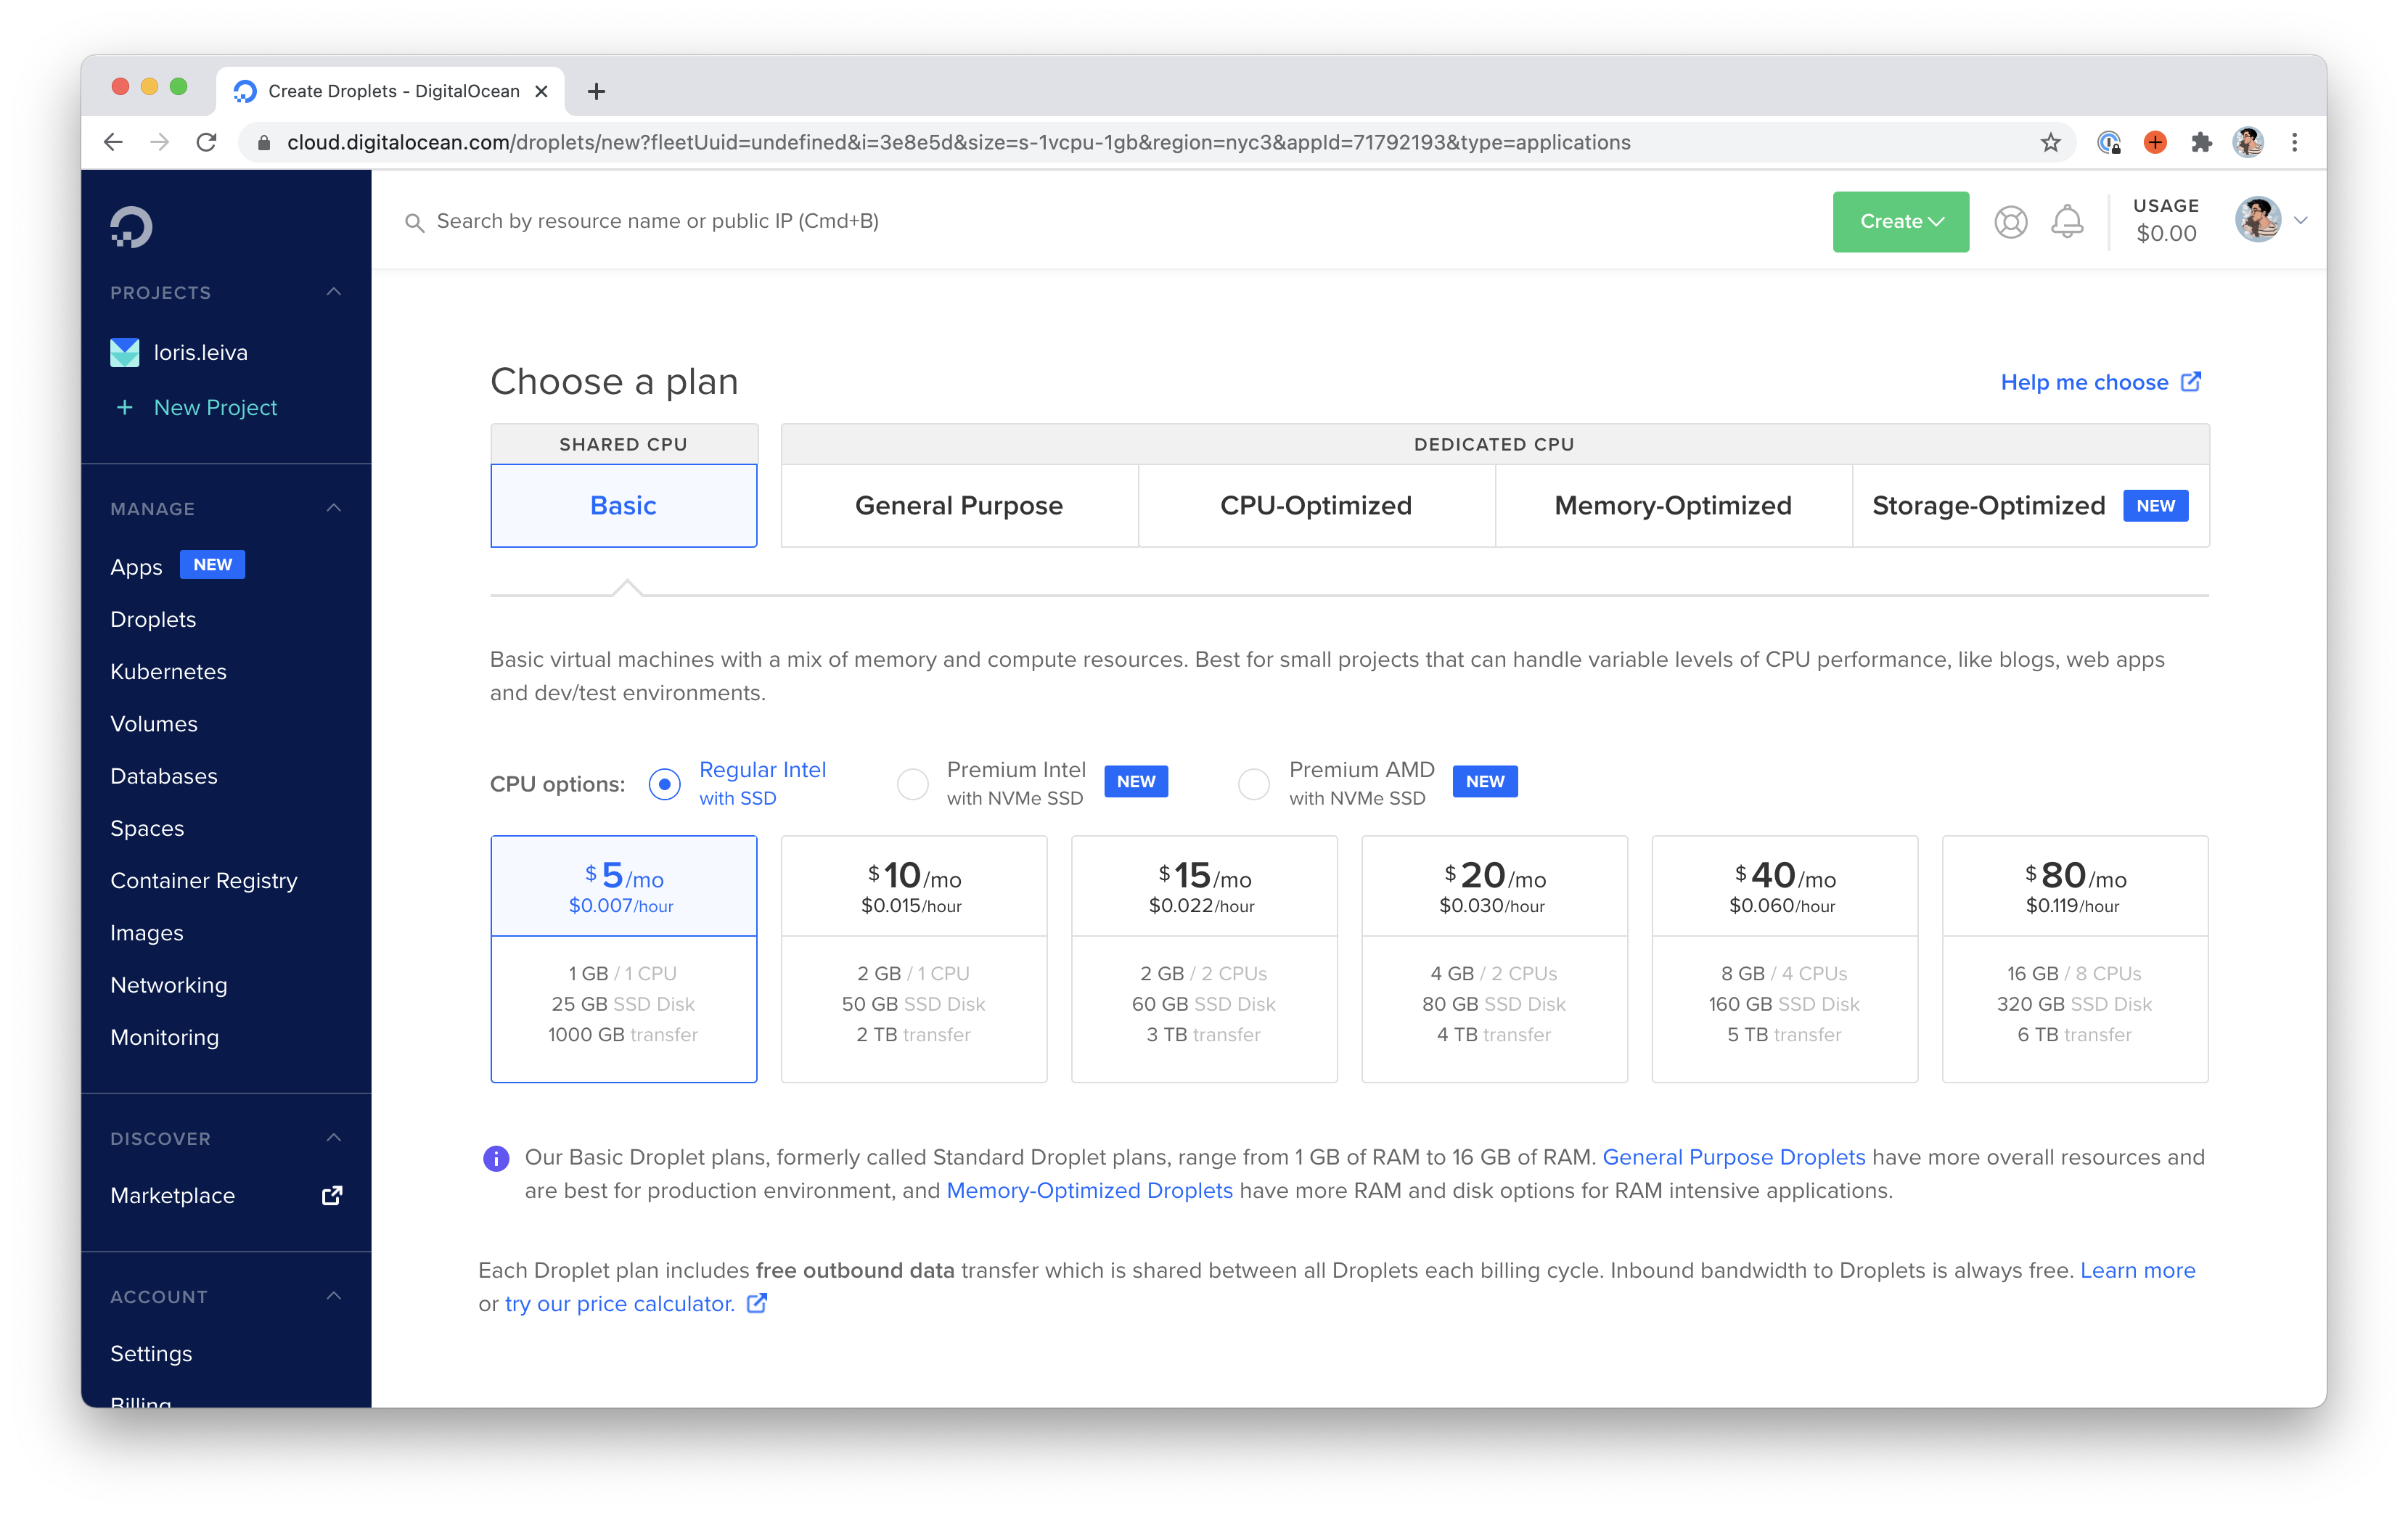
After that, select a plan of your choice based on the specs you need from your server. If you’re just getting started, the cheapest plan — $5/month — will do just fine for now. You can always upgrade your droplets at any time with only a few clicks.
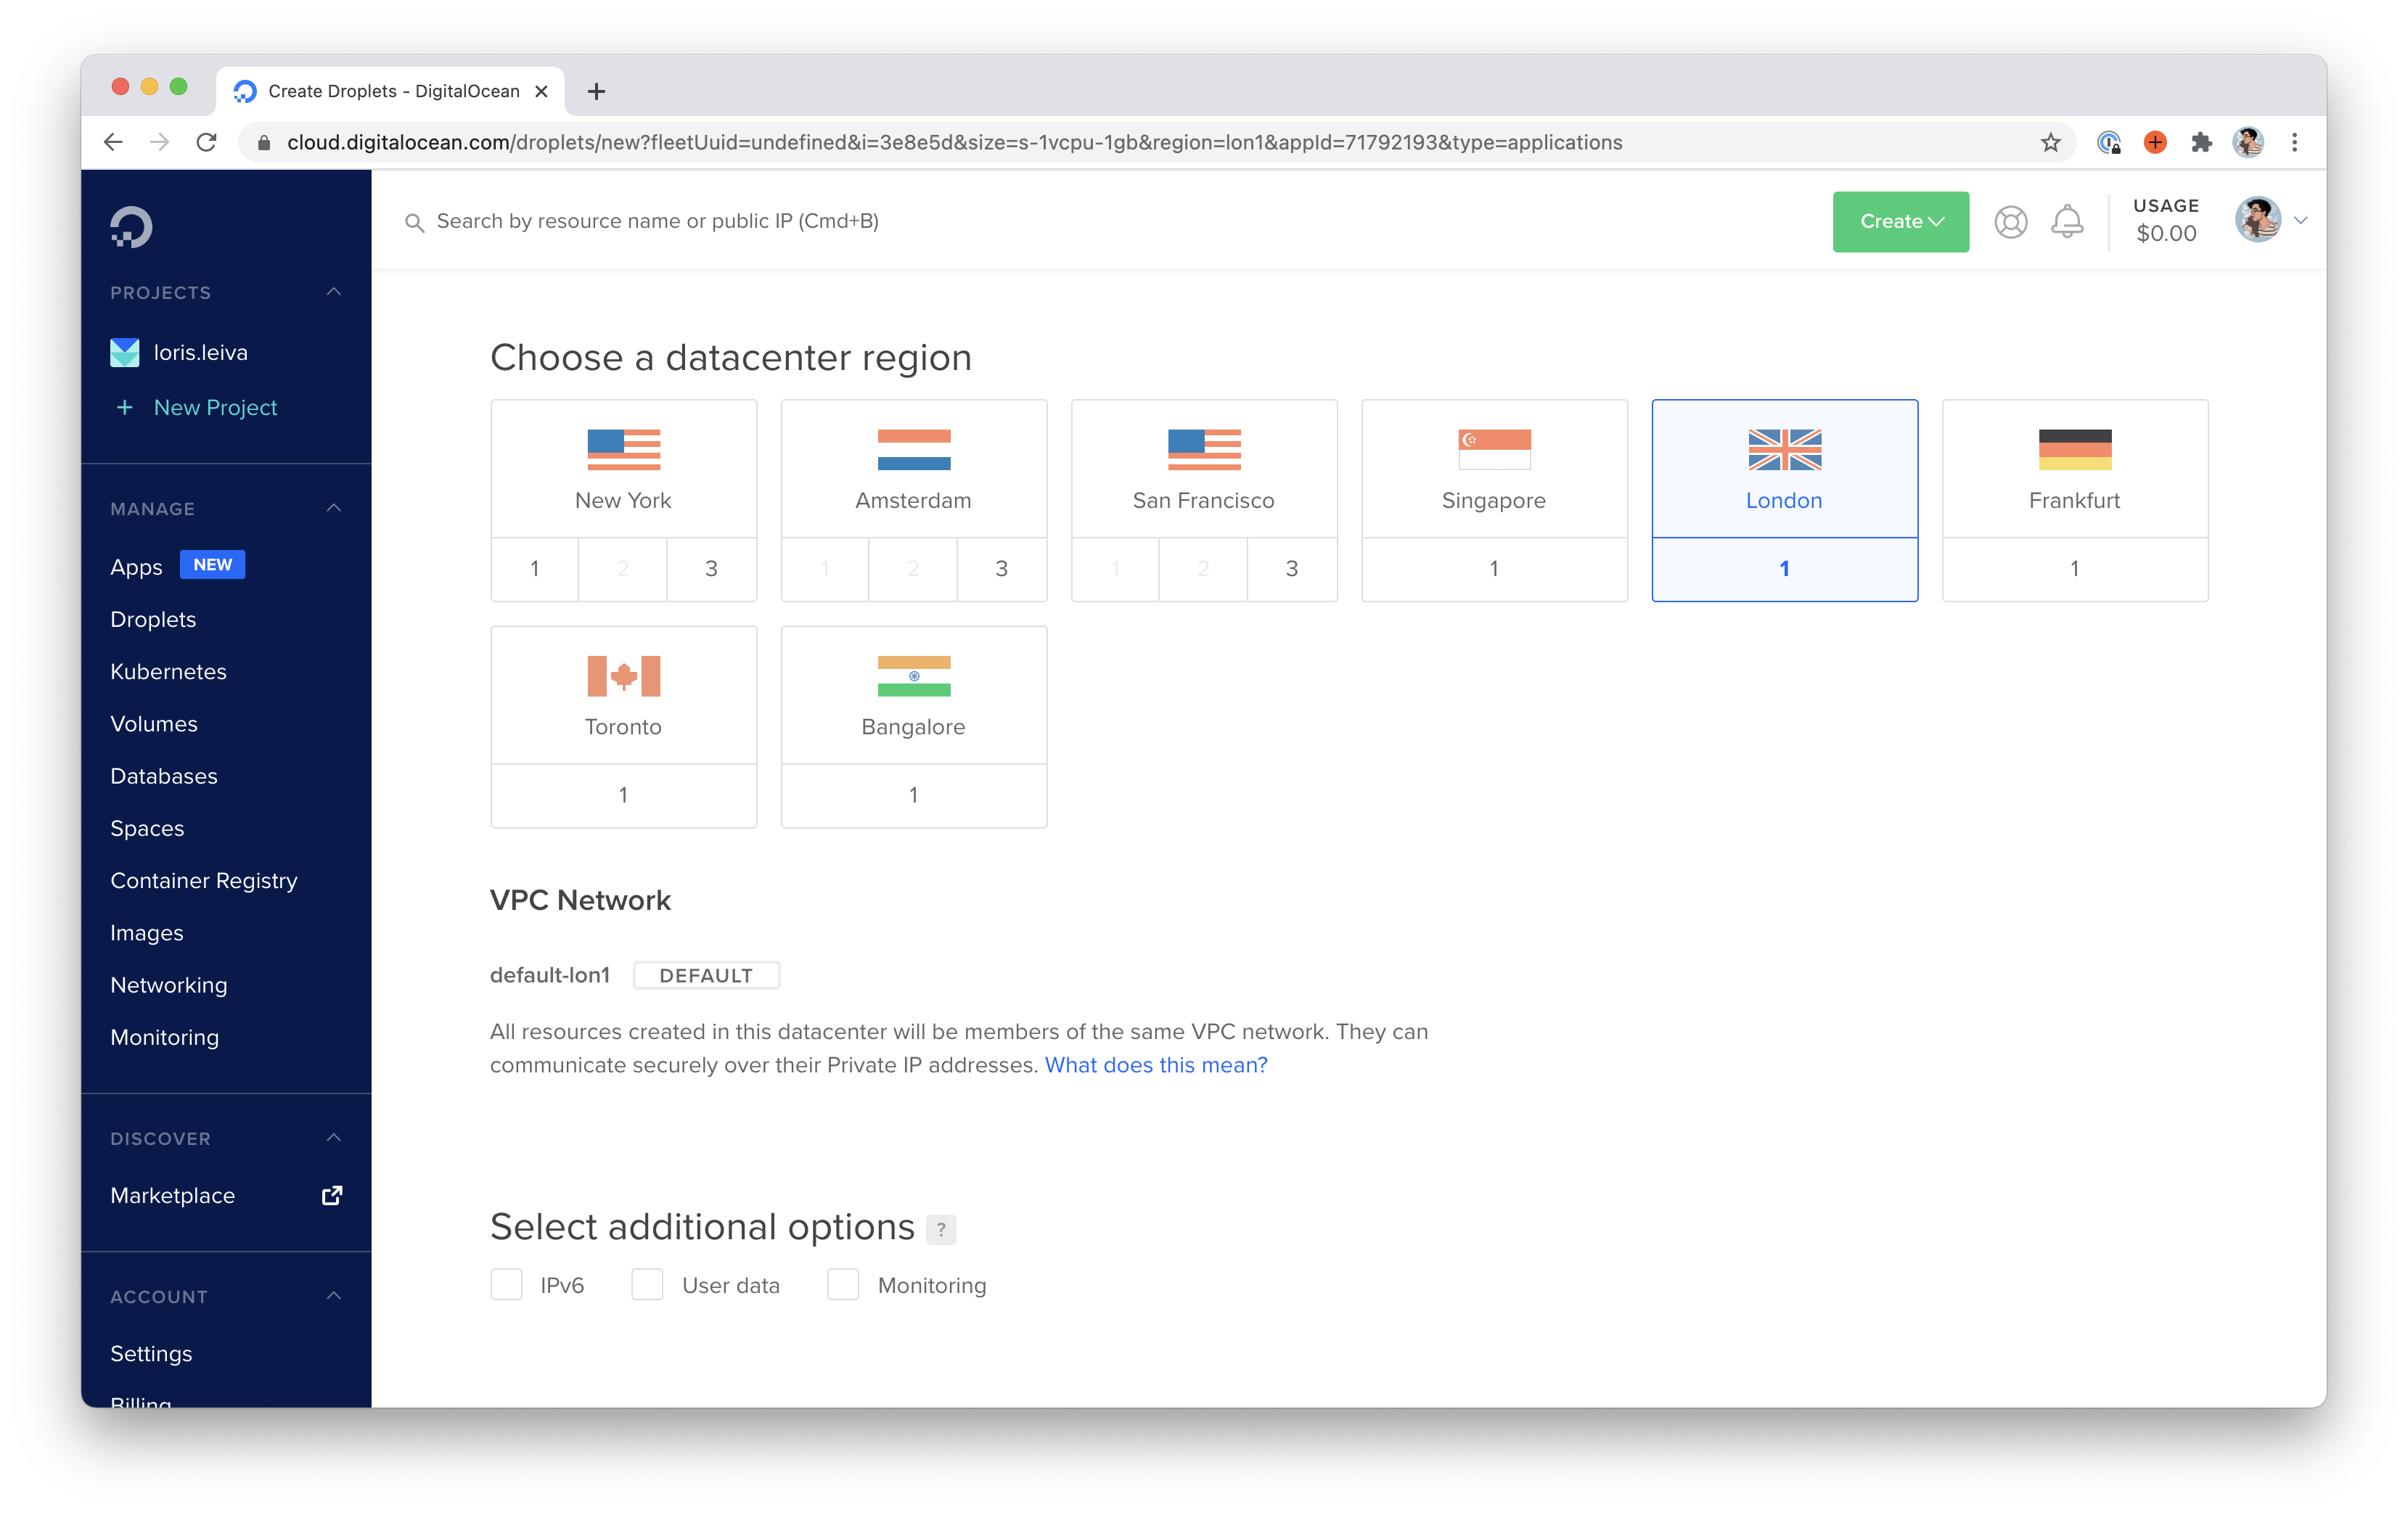
Next, choose a location for your server. It’s best to choose a location that is closest to most of your users. If you’re hosting a website for a shop in London, then maybe don’t choose San Francisco. Otherwise, it’s a bit of a guessing game. Since our app is named jollygood.app, let’s give it a British location.
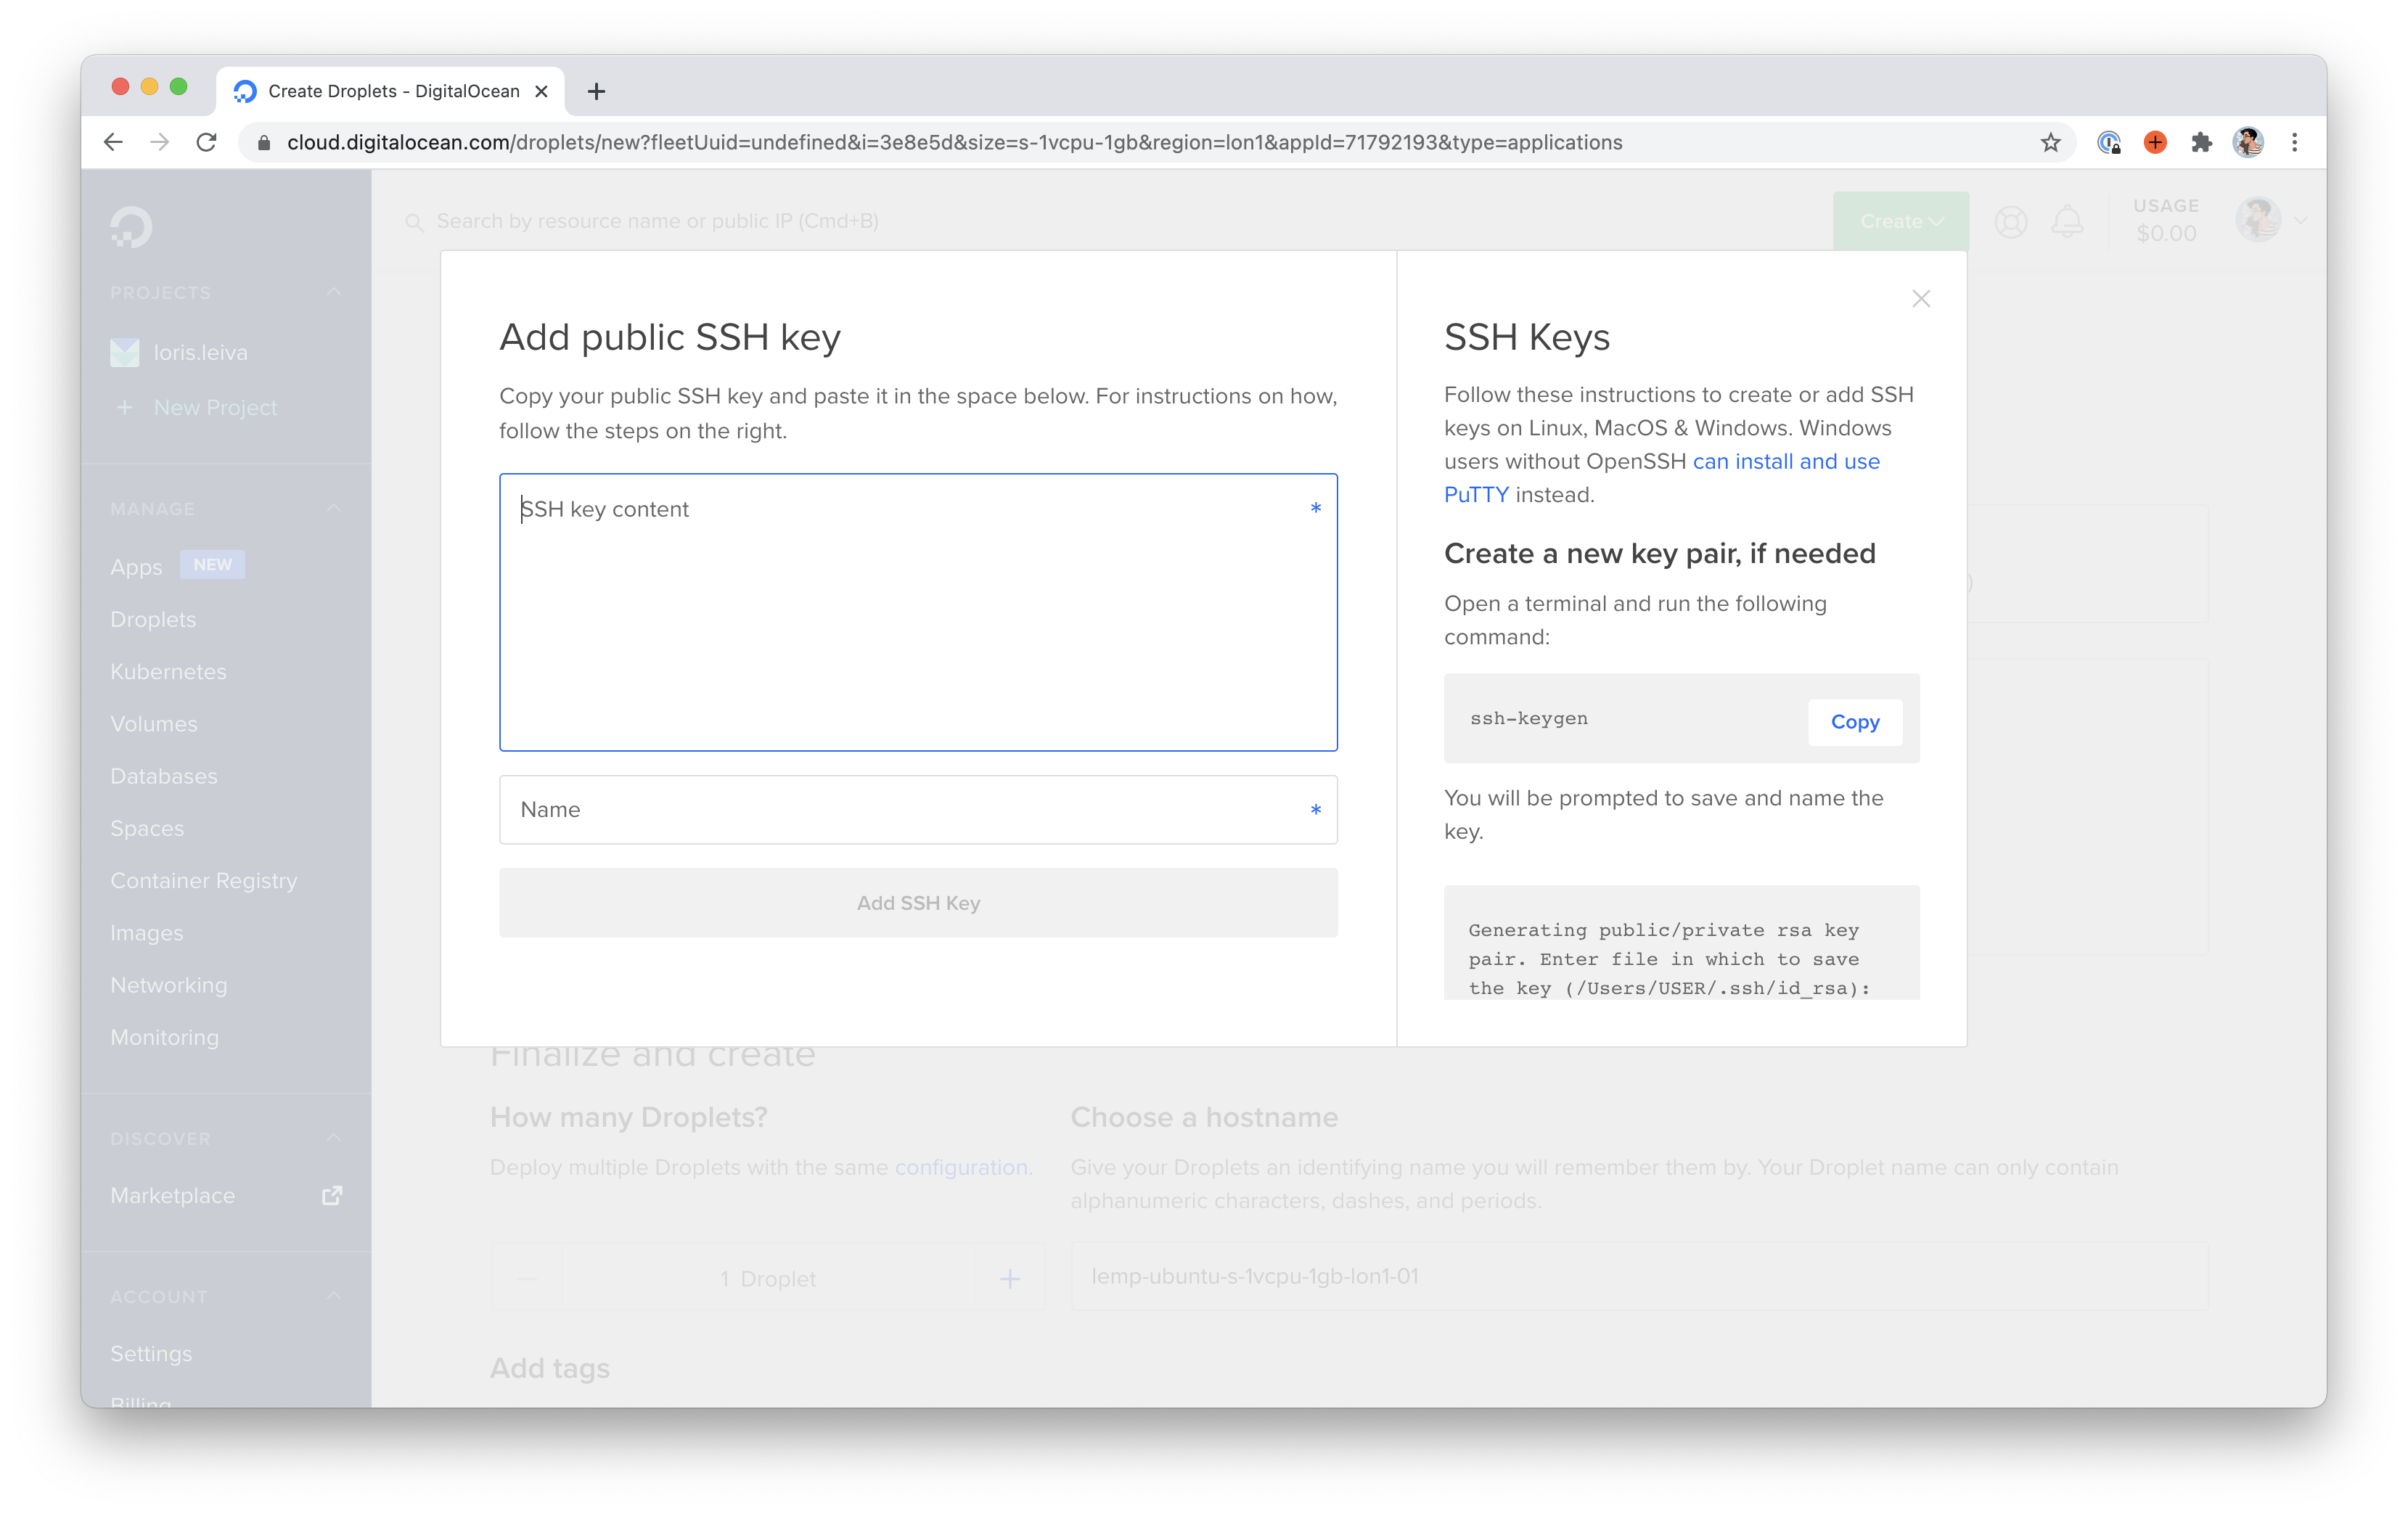
Now we’re going to need to copy the public SSH key we’ve prepared on the previous episode. Under "Authentication", ensure "SSH keys" is selected.
Then either select an existing key...
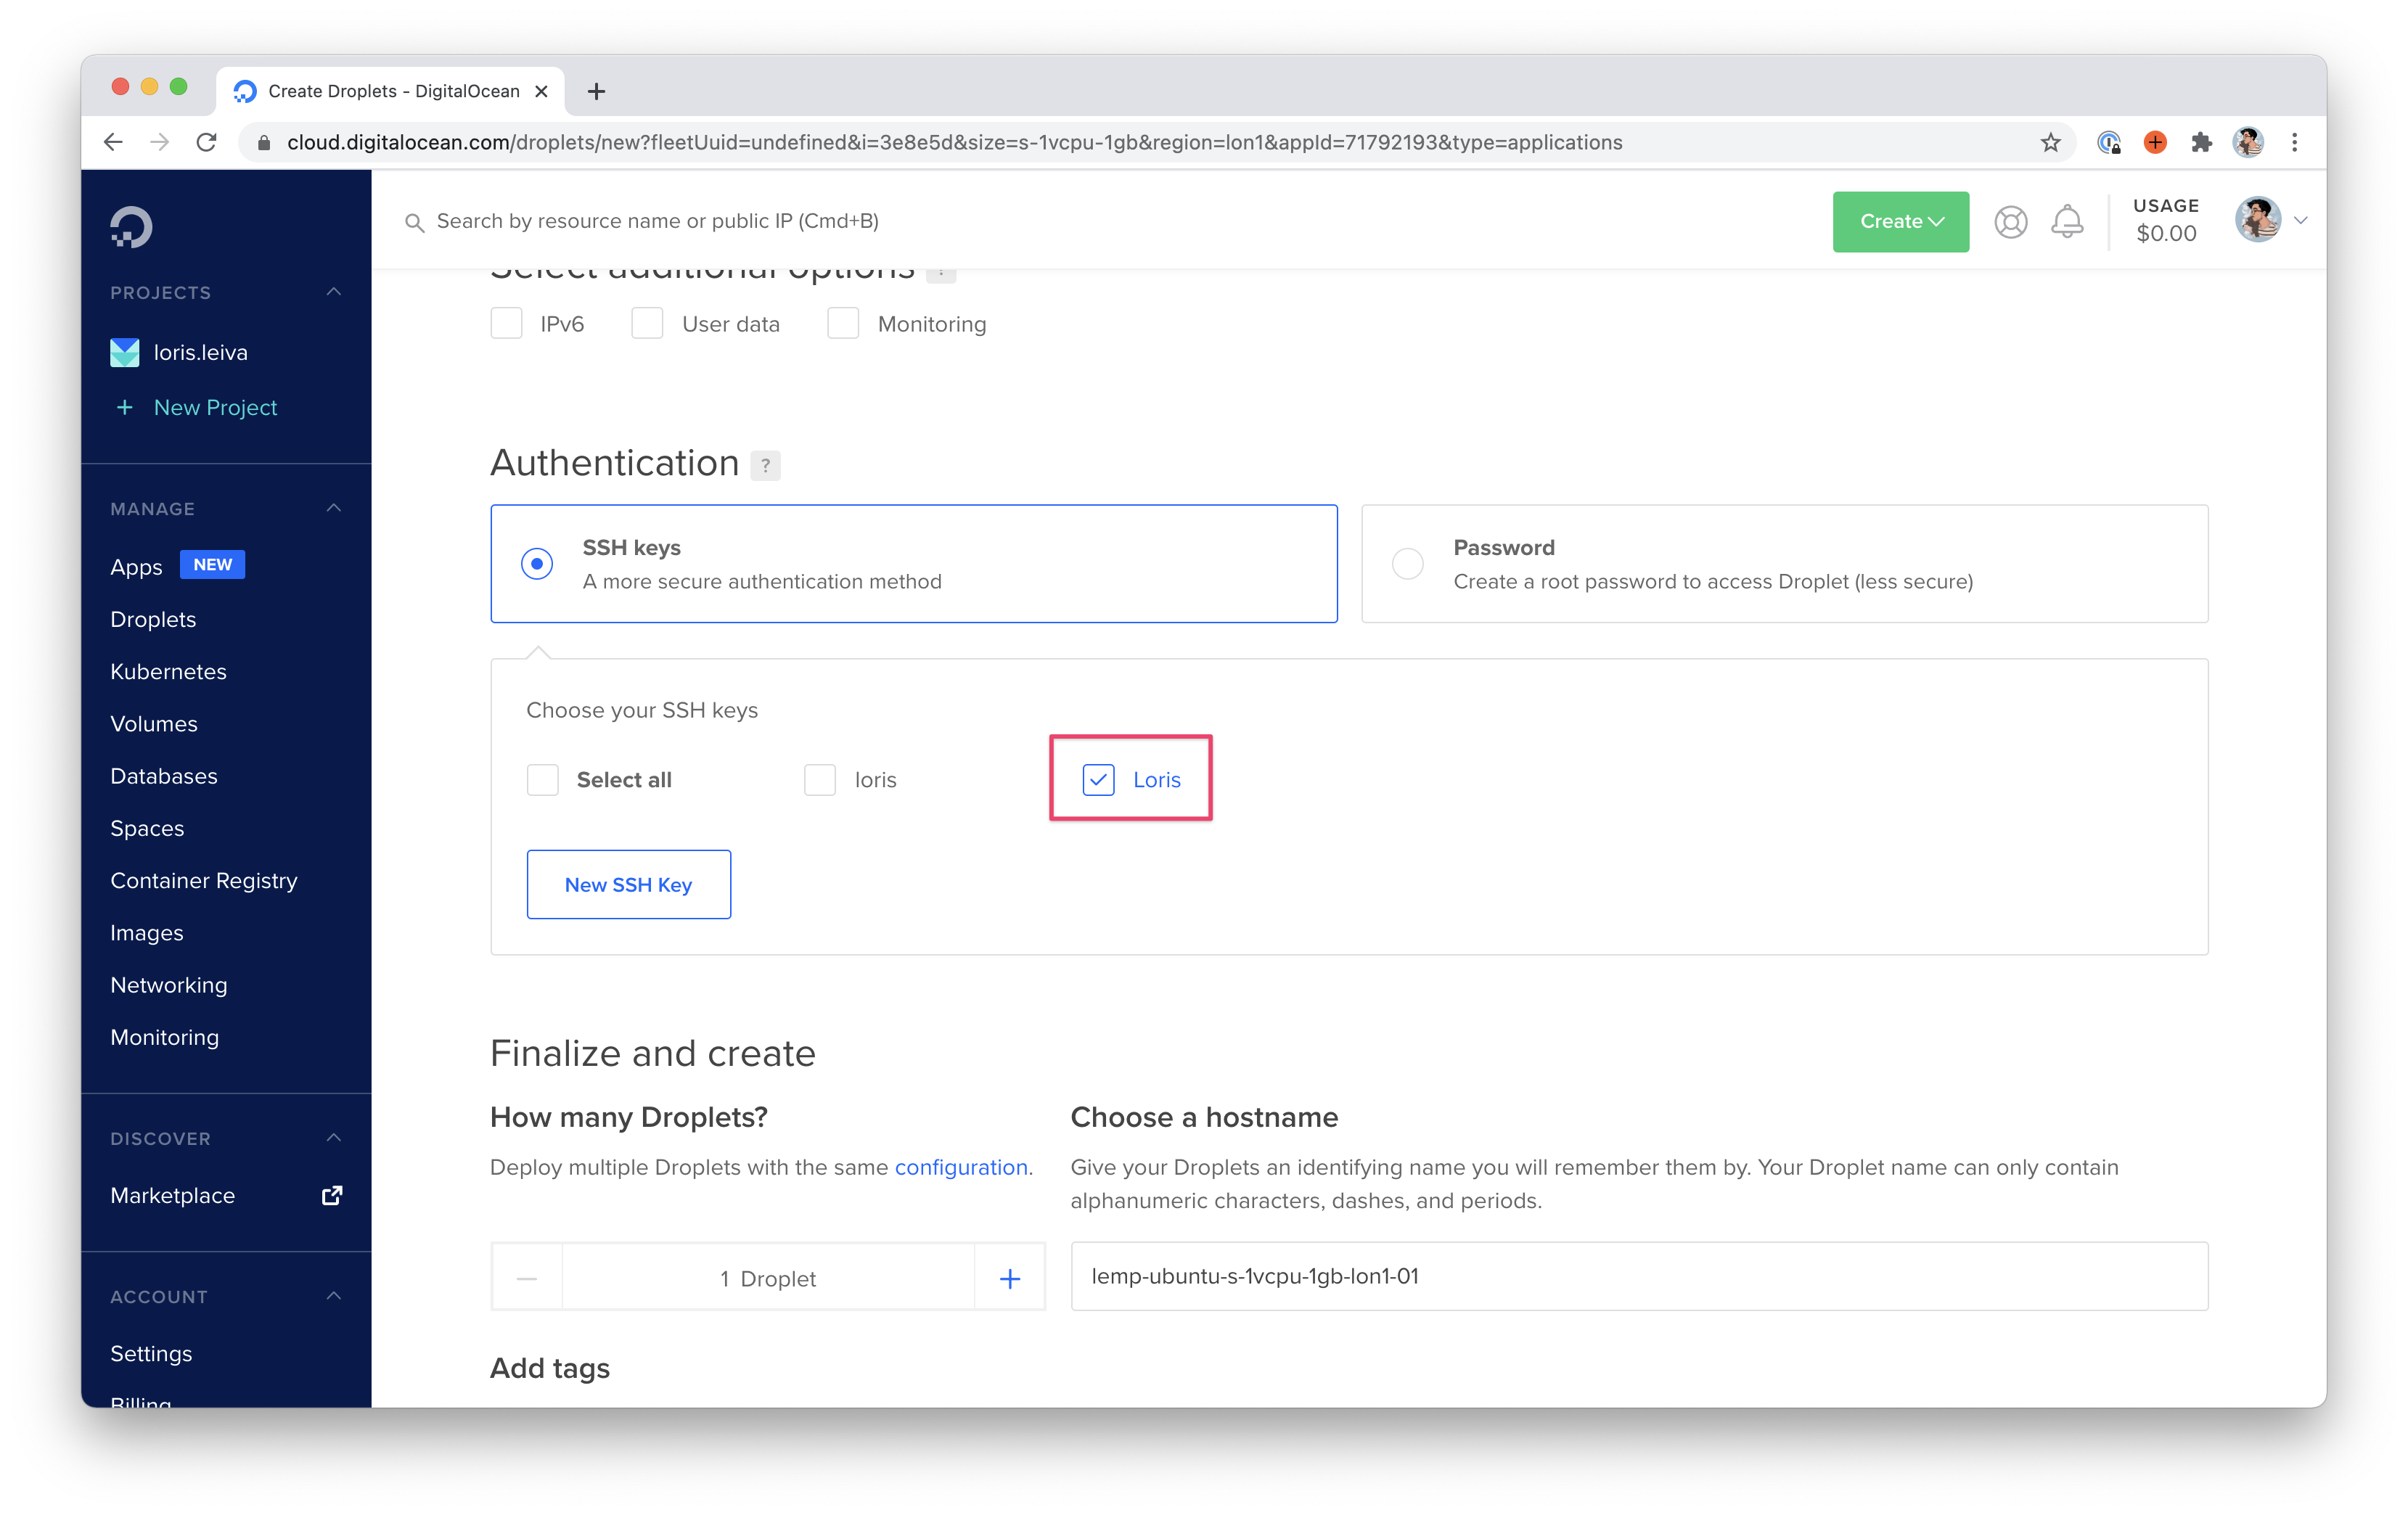
... or click "New SSH Key" and copy/paste your public SSH key here.
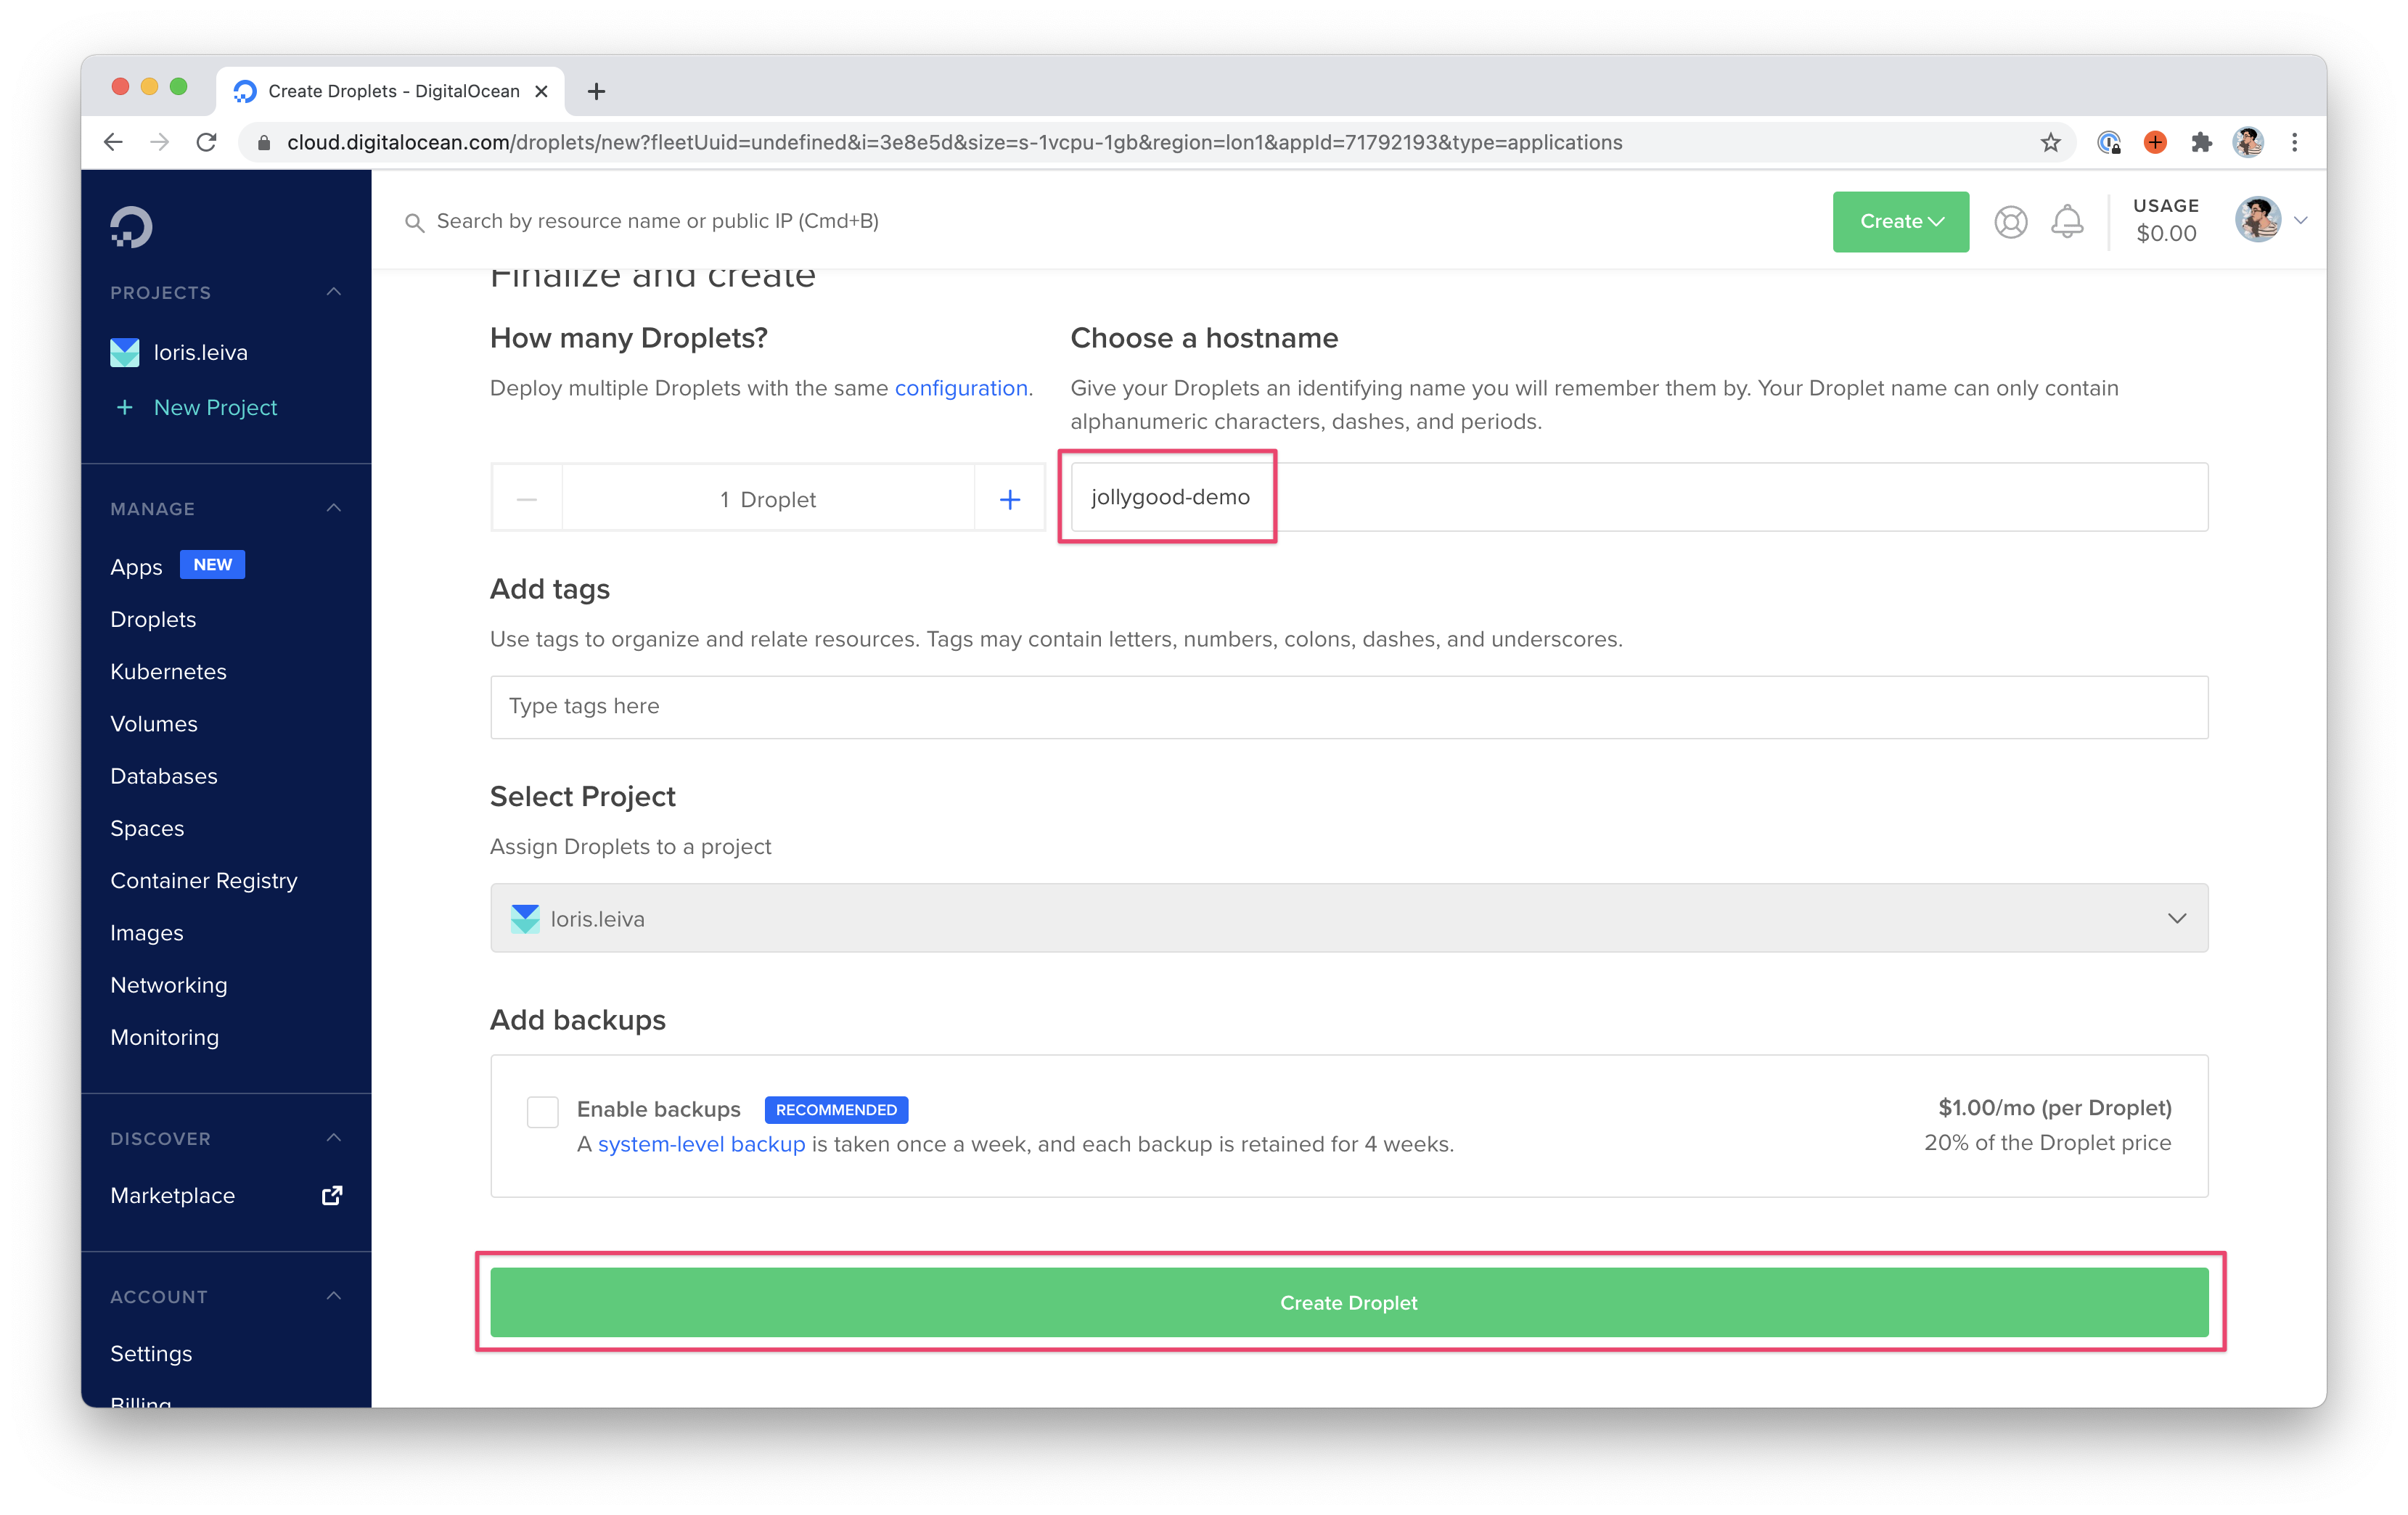
Finally, give your droplet a more human-friendly name and hit the “Create Droplet” button!
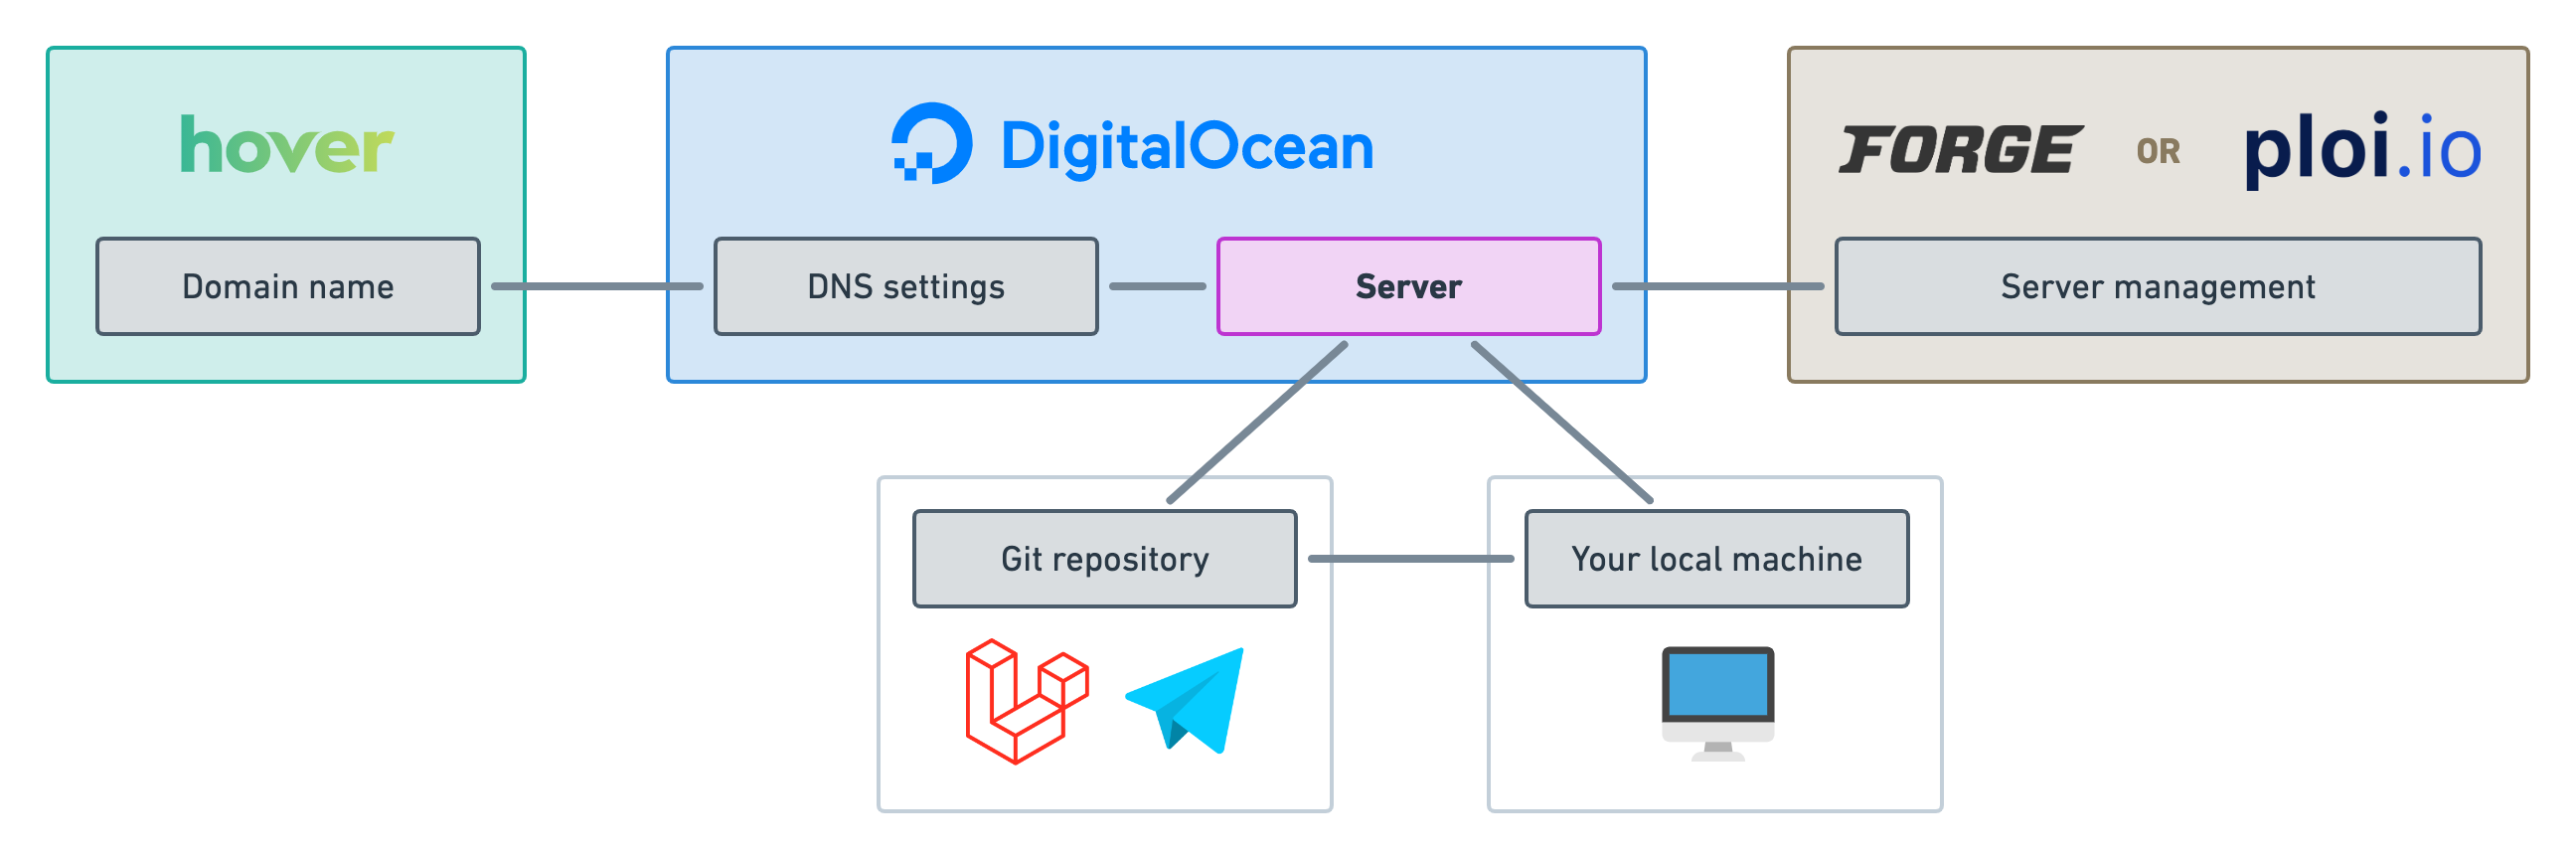
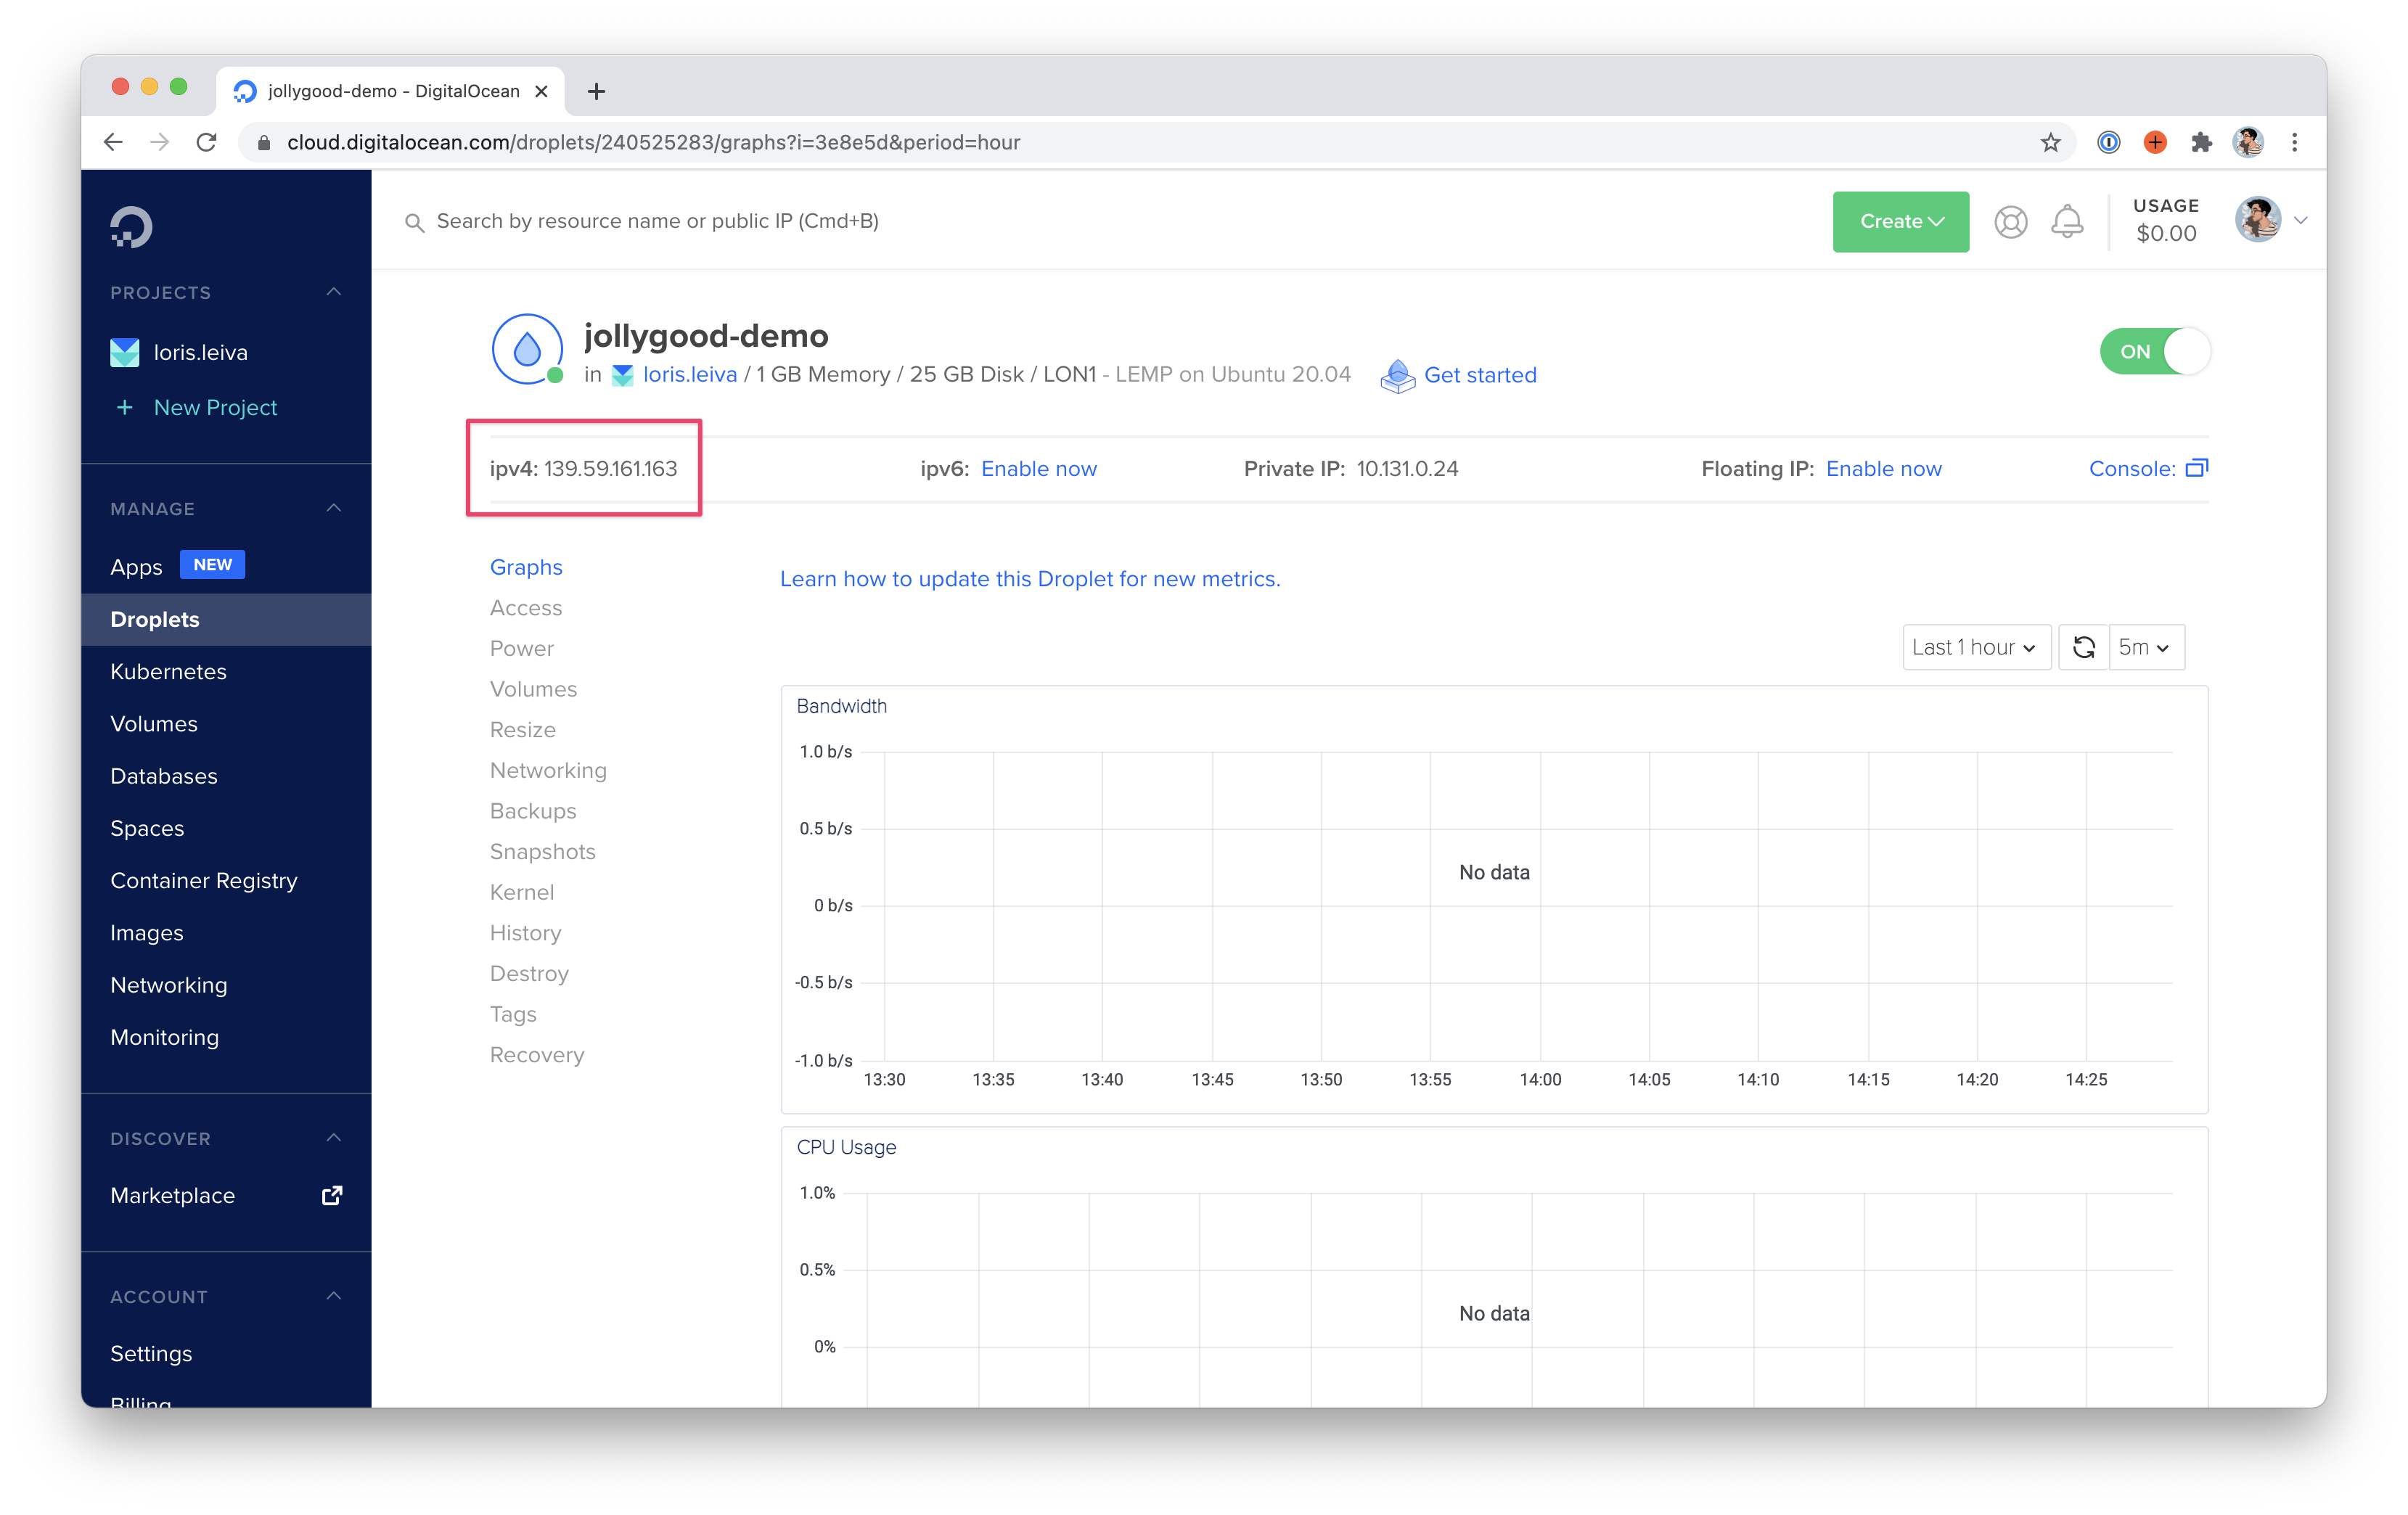
From jollygood.app to 139.59.161.163
Now that we have a server, we have an IP address. Which means we can finally point our domain name to it.
You can find out the IP address of your server by going to its detail page on Digital Ocean.
Next, let’s go to the "Networking" section on the sidebar and click on the "Domains" tab. This is where we manage our DNS settings on Digital Ocean.
Now, under "Add a domain", enter your domain name — for example jollygood.app — and click "Add Domain".
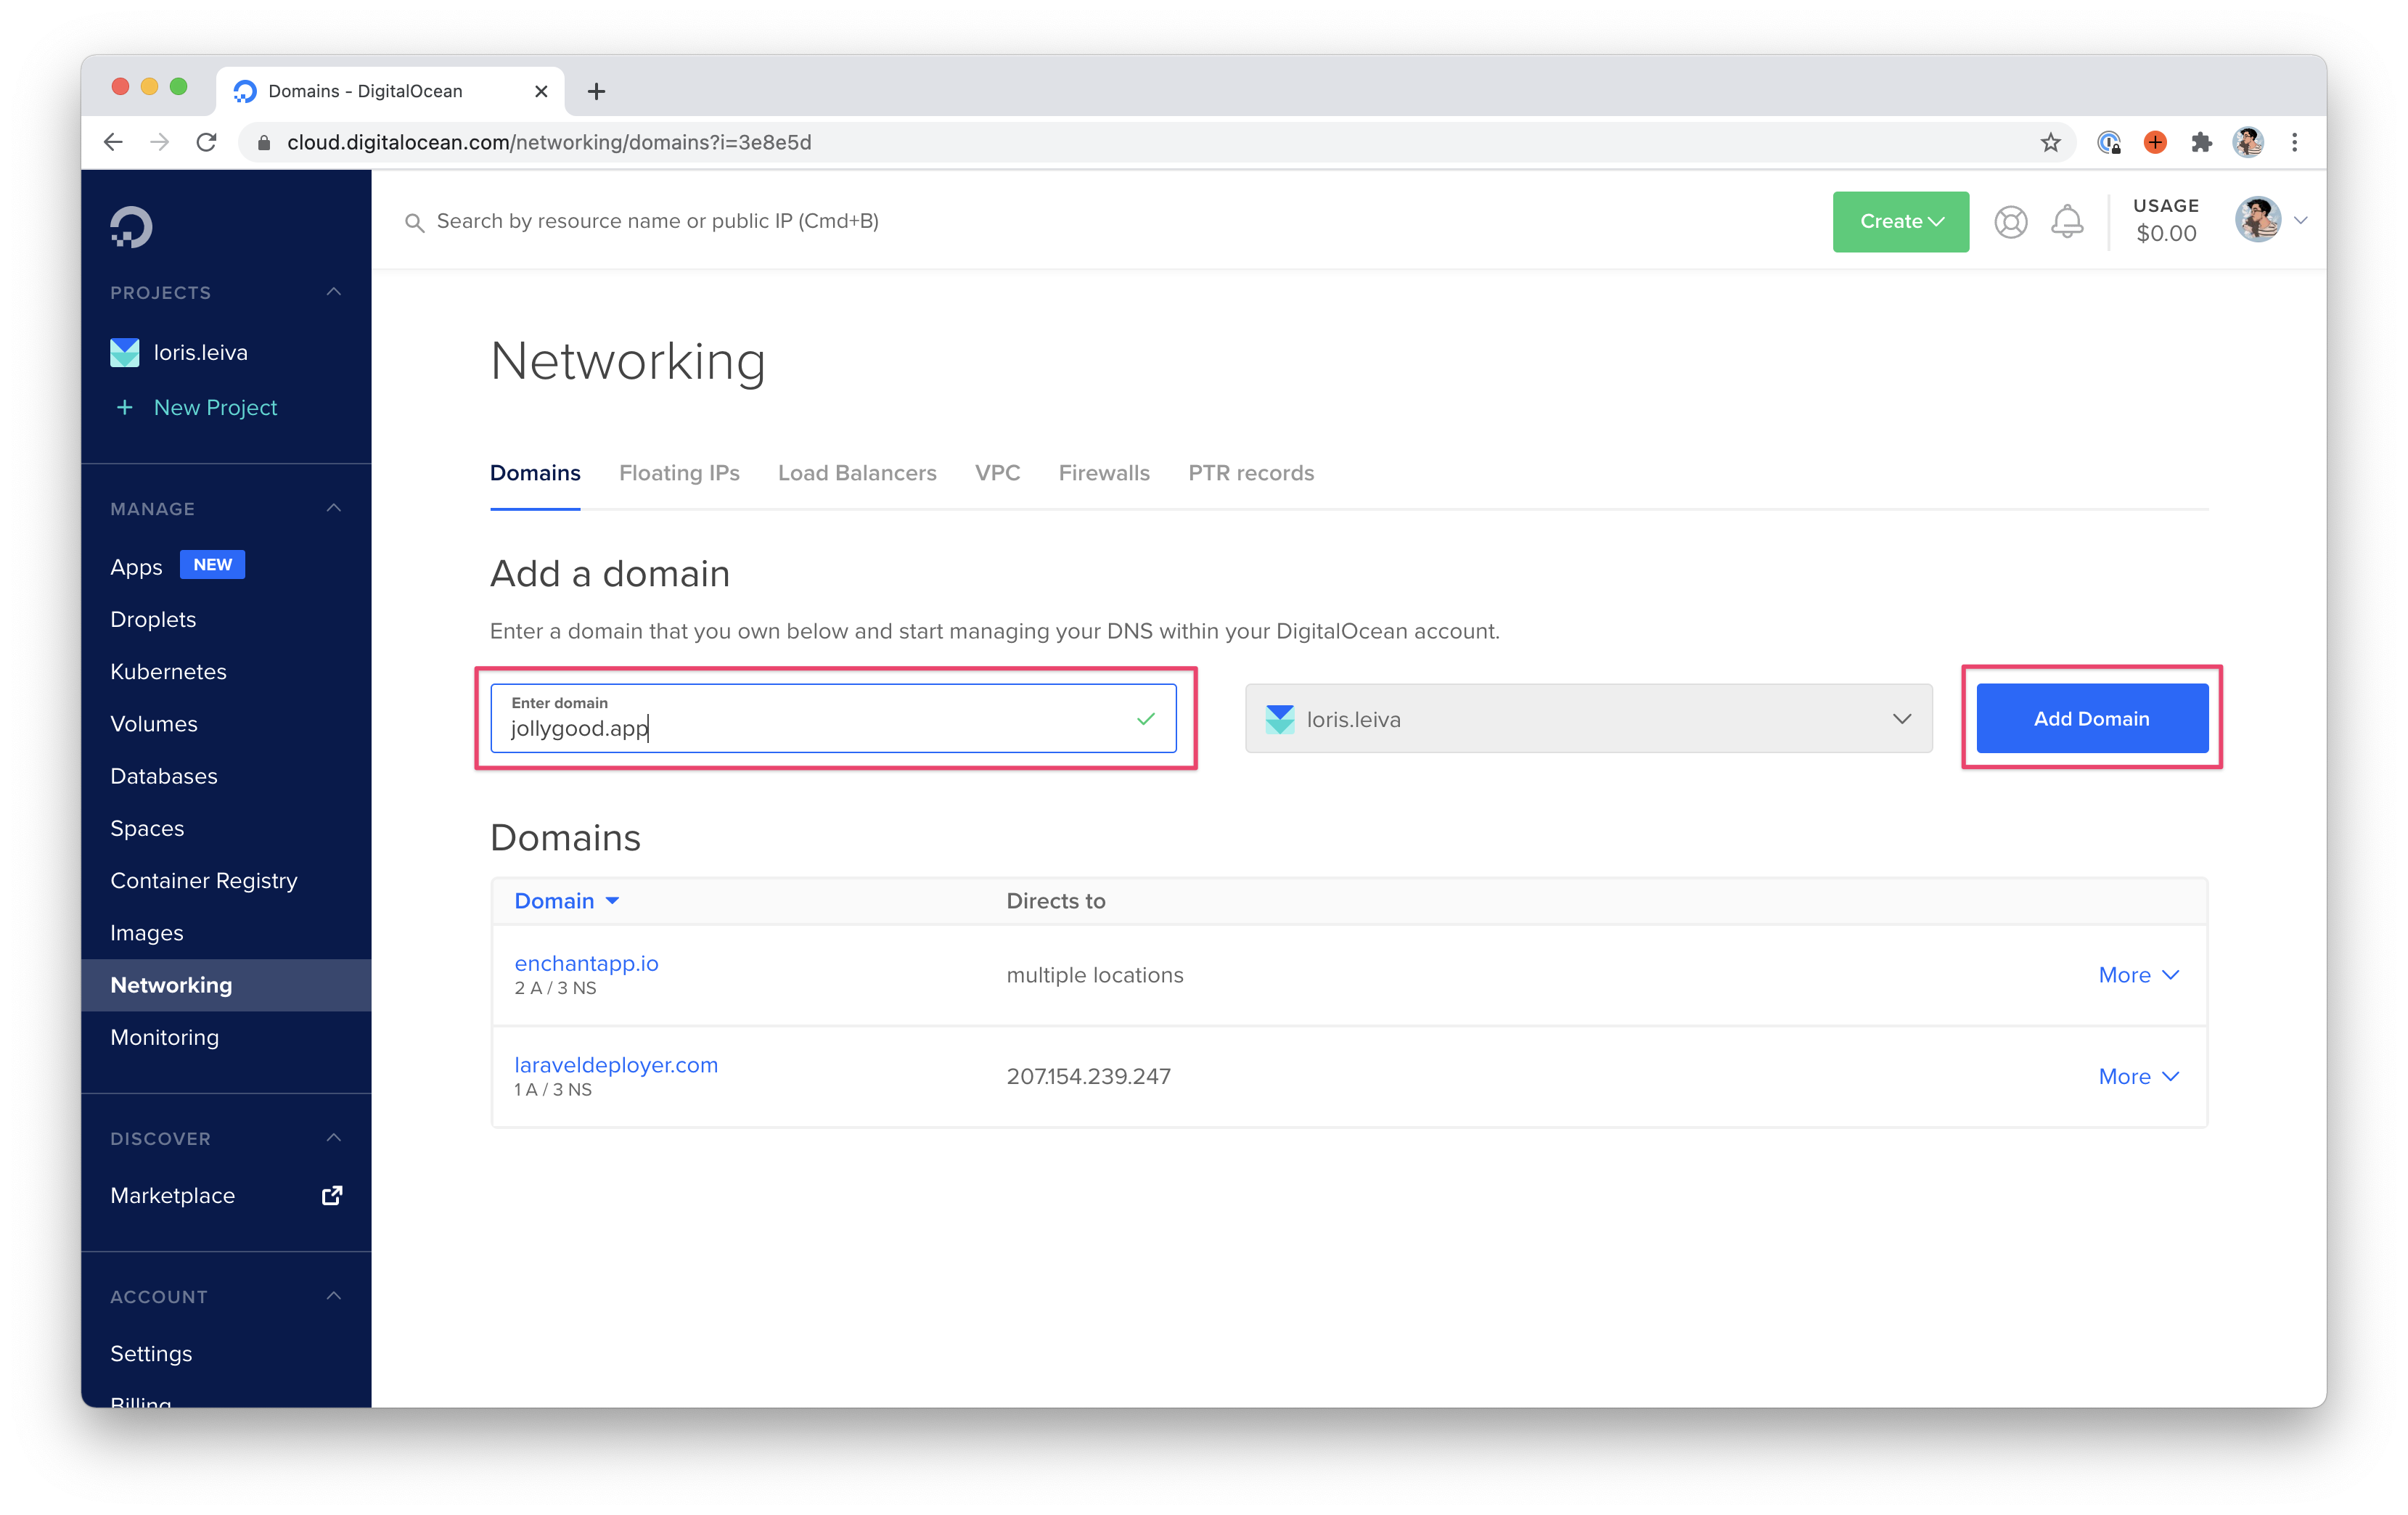
This will automatically add all the Digital Ocean Nameservers for that domain.
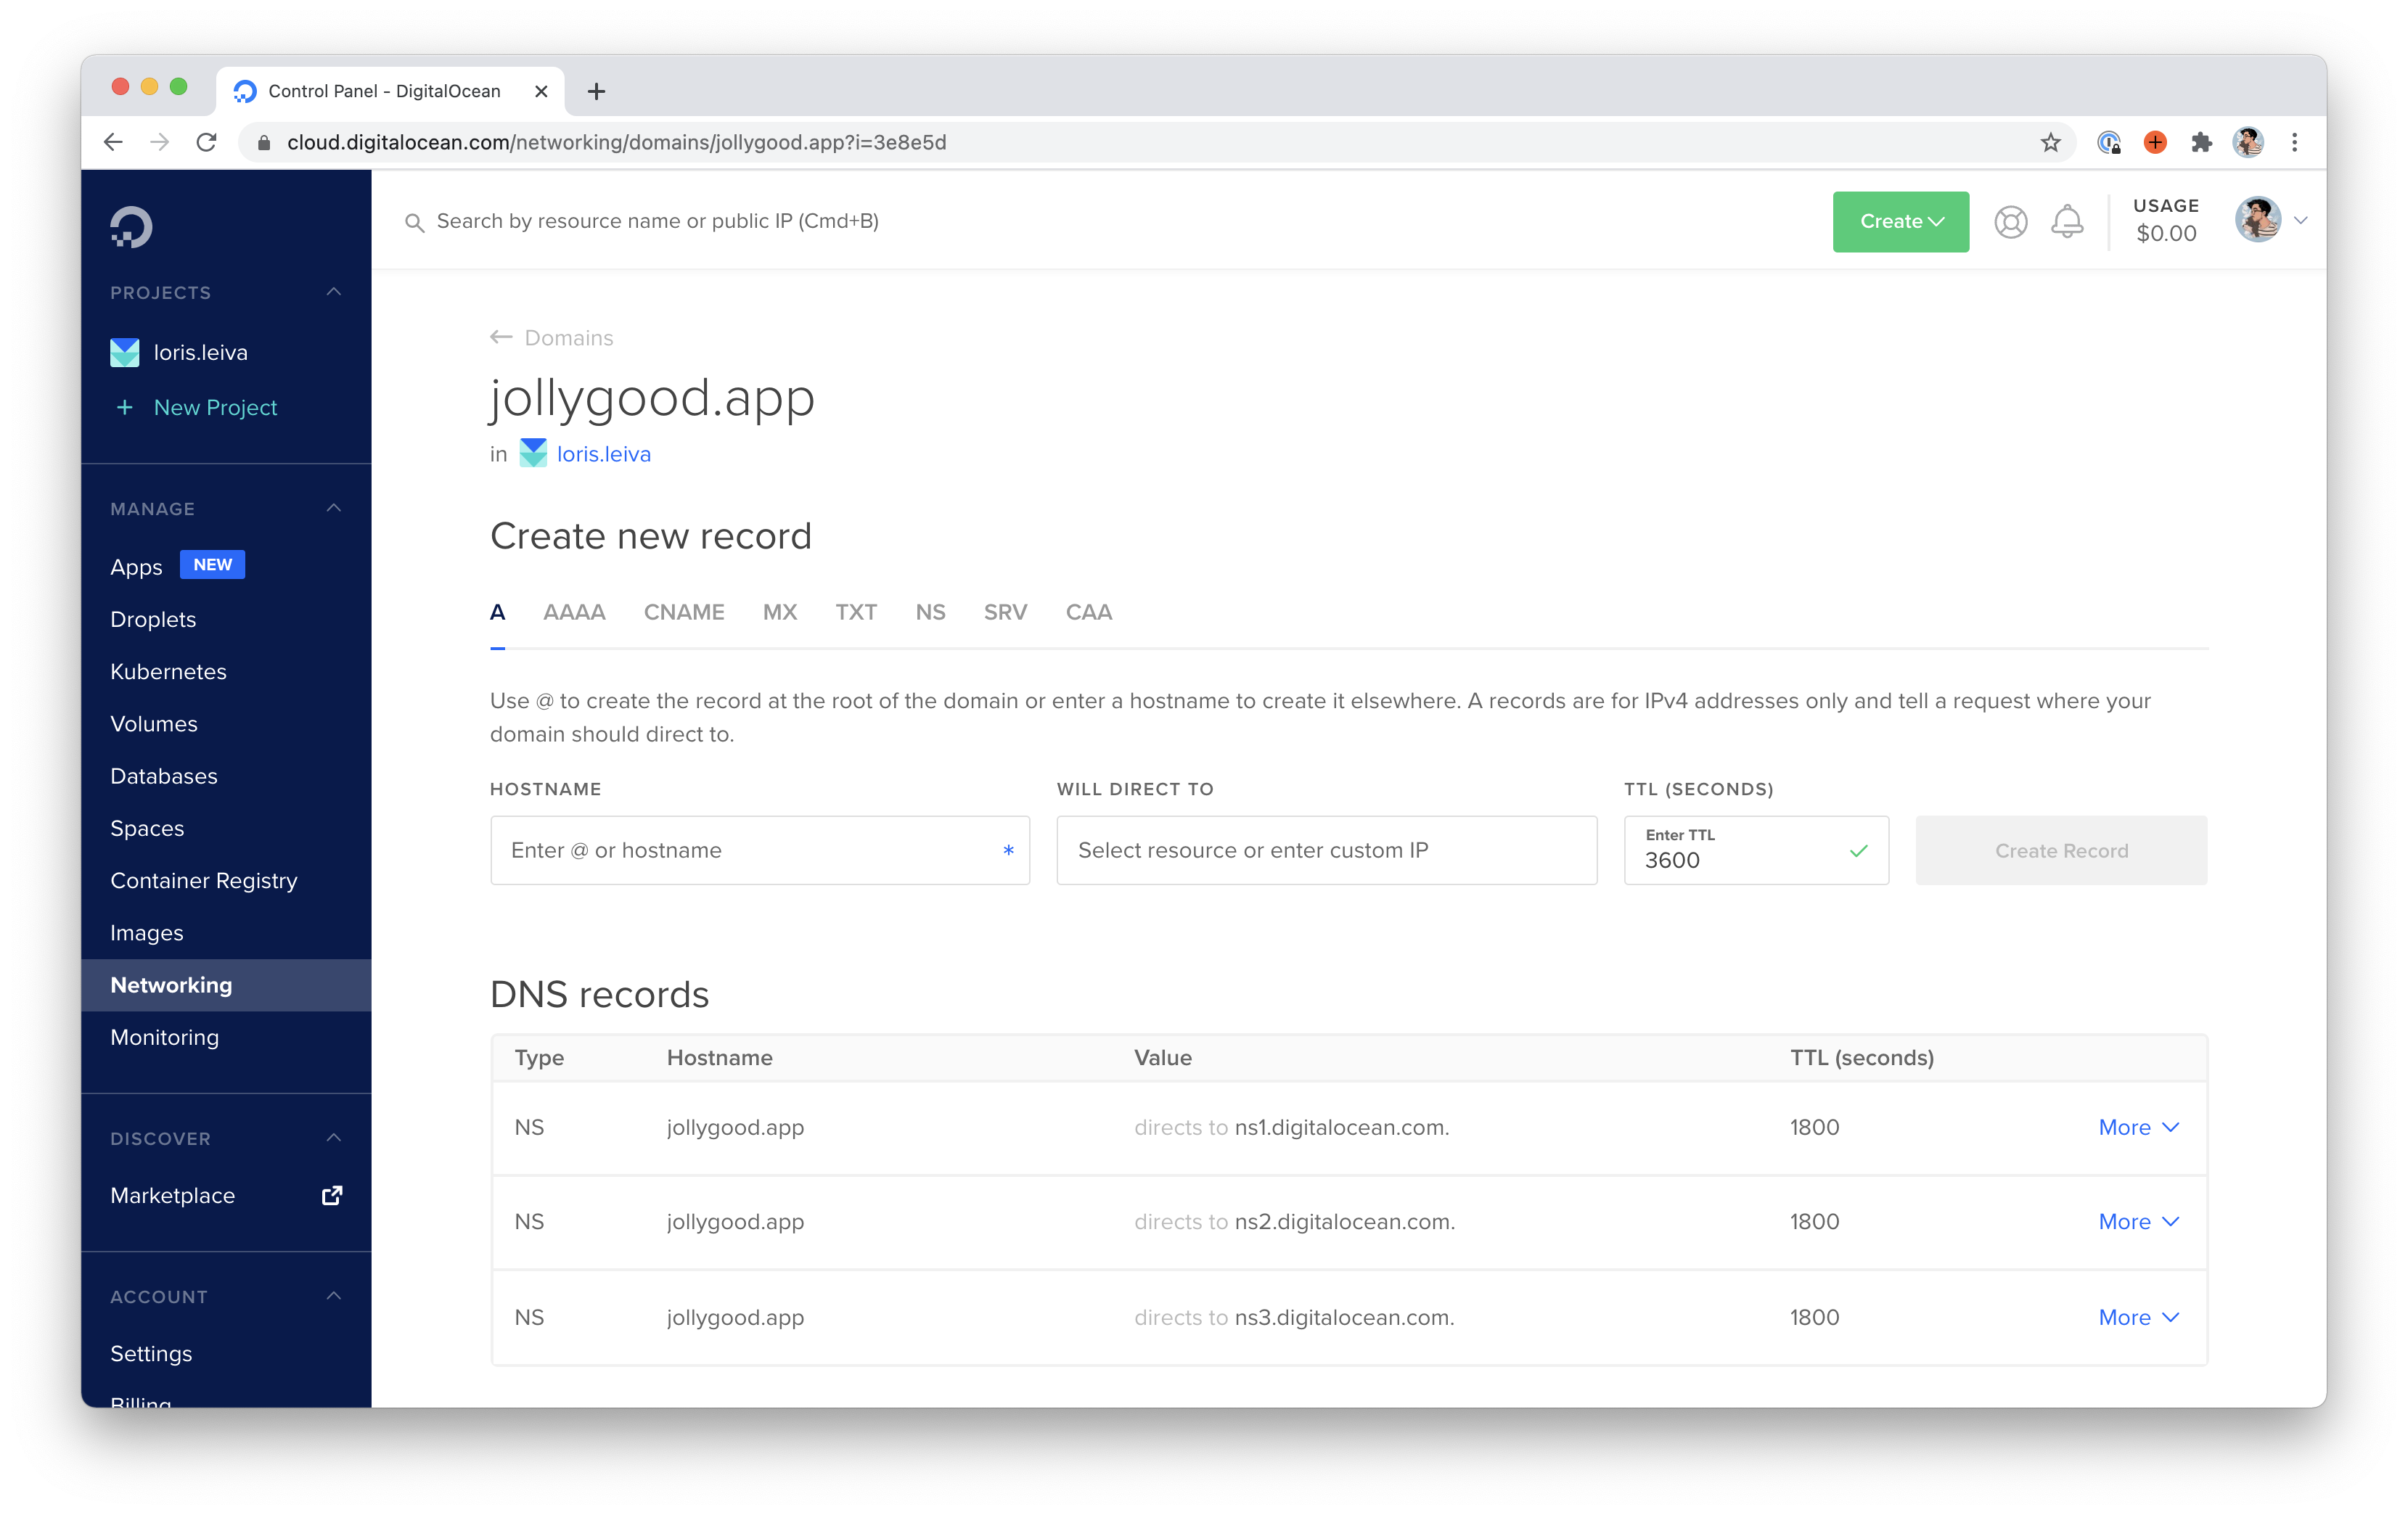
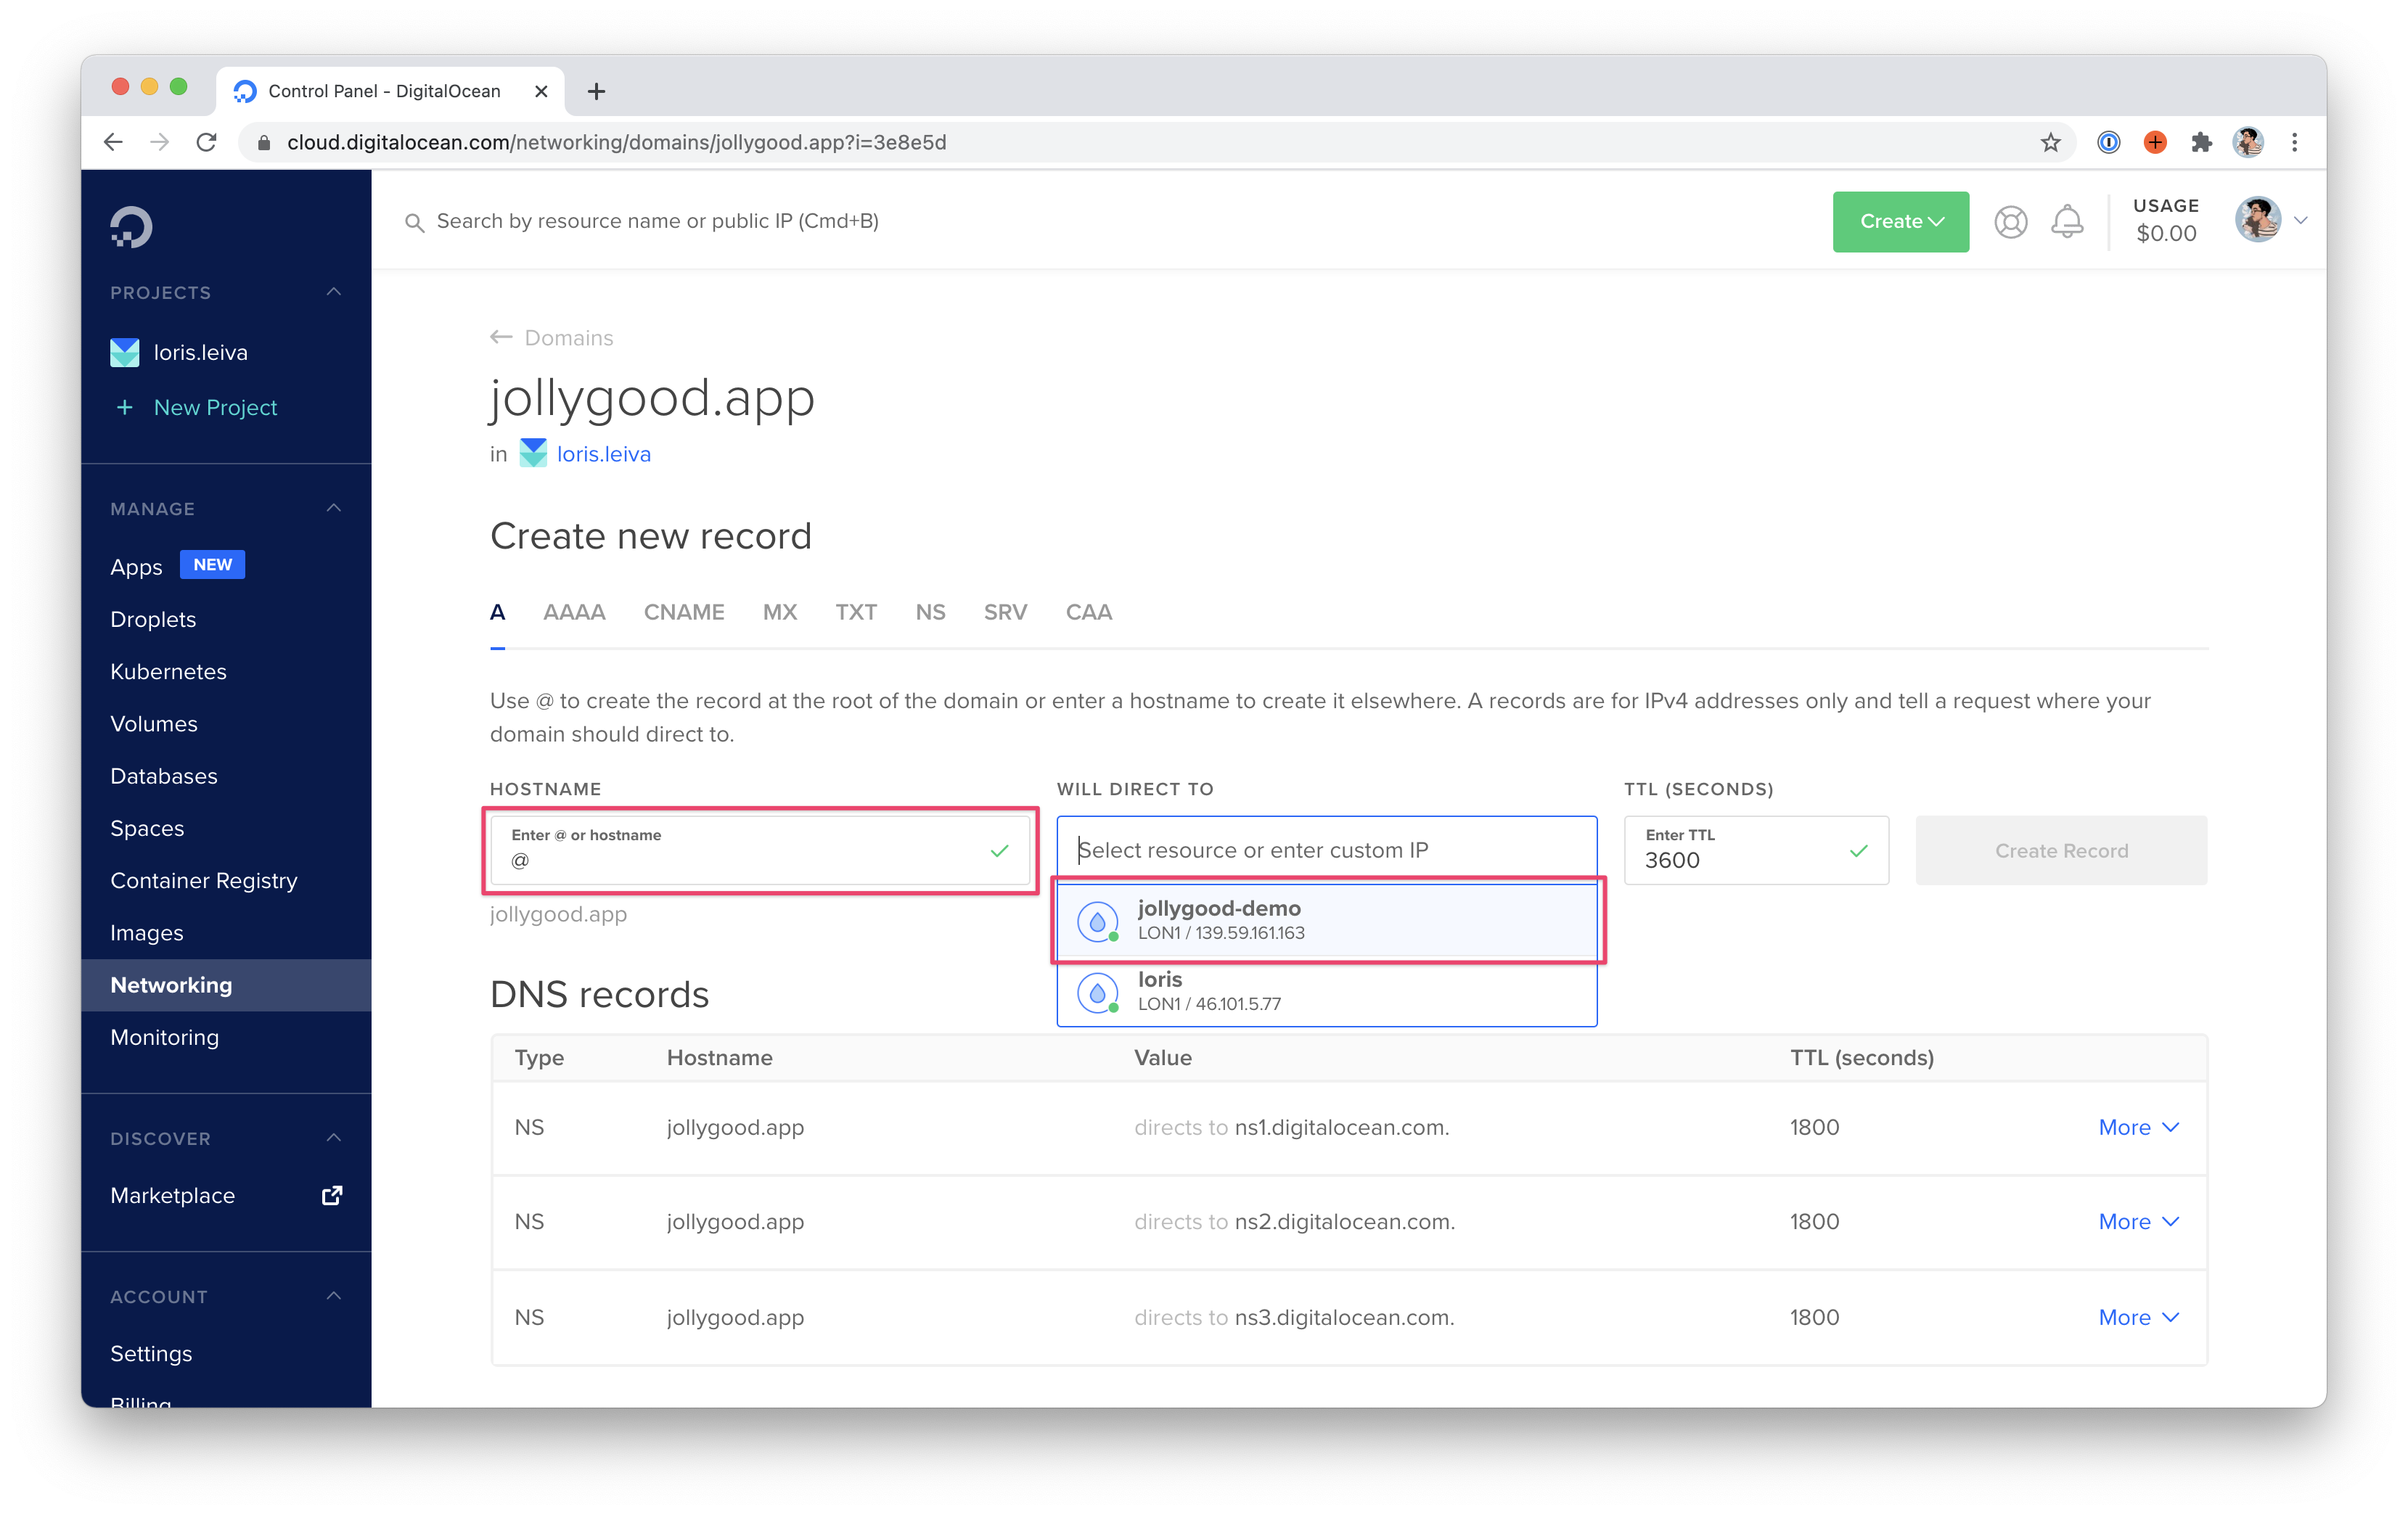
This is where we’re going to add the record that links our domain name to our server. Under "Create new record", select the "A" tab. Then, enter "@" inside the "Hostname" field and select our newly created droplet inside the "Will direct to" field before hitting "Create Record".
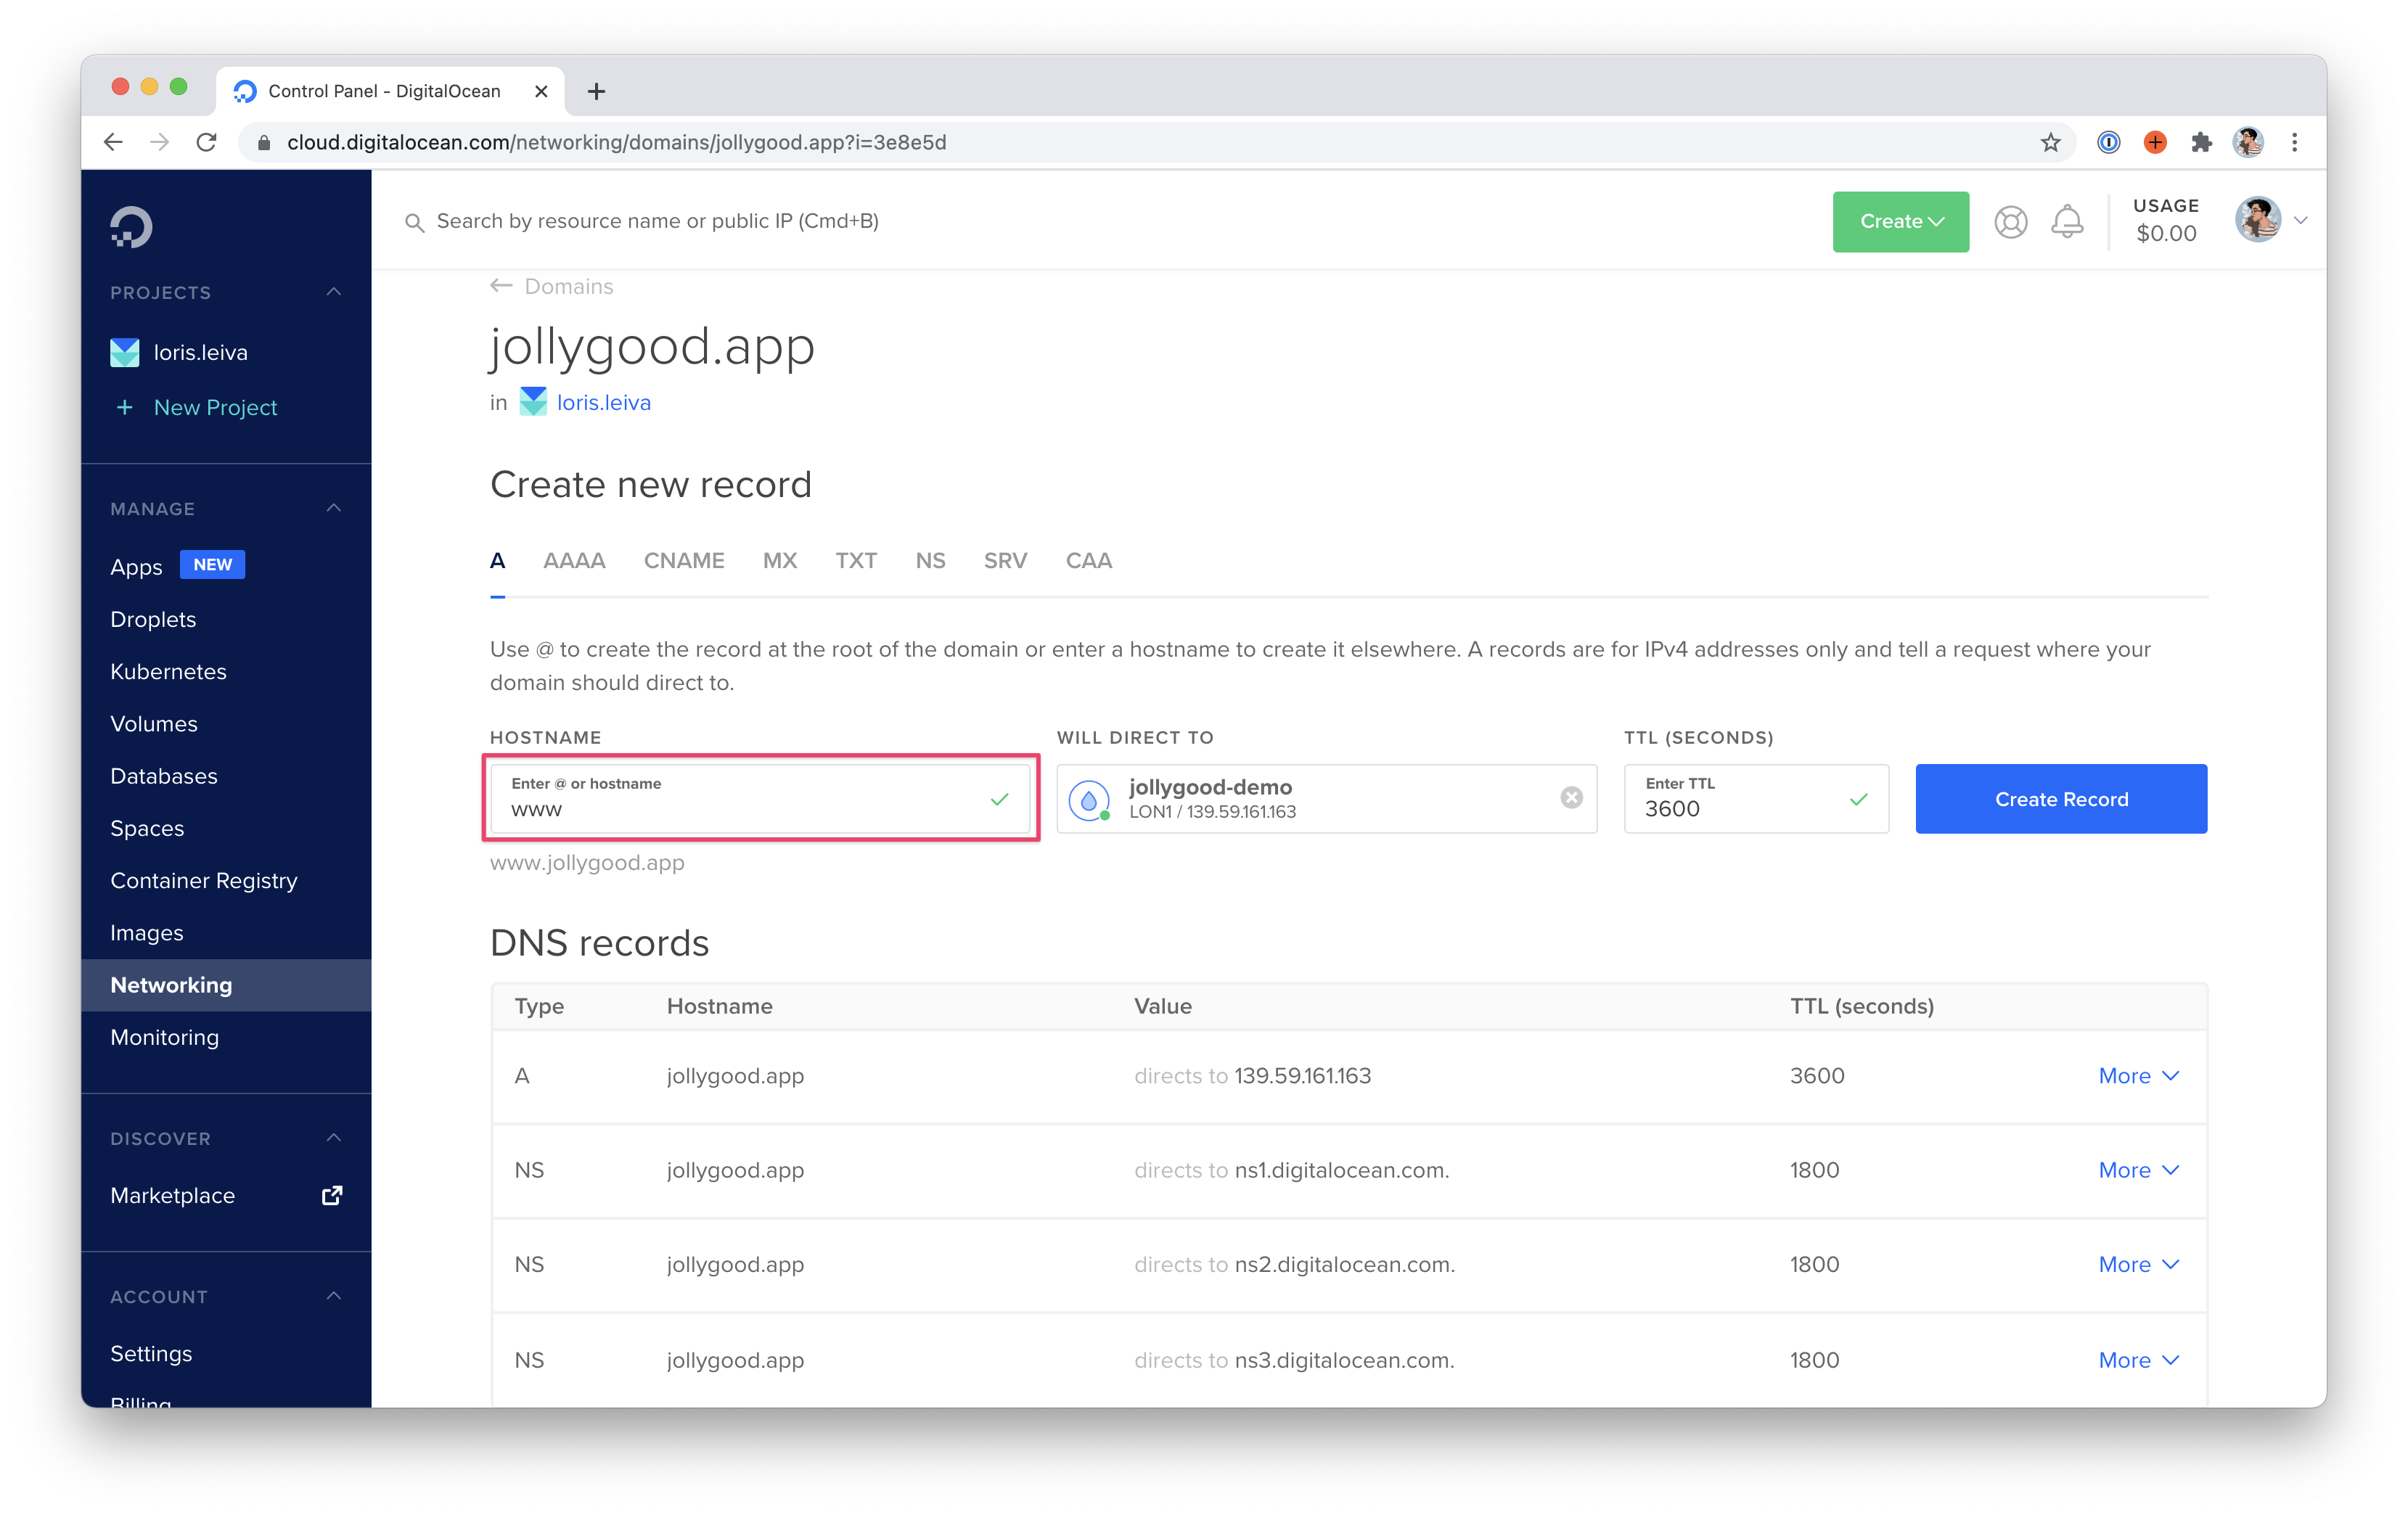
We may repeat the same process for redirecting any subdomain to either the same server or another server altogether. We do this by replacing “@“ with the subdomain itself — for example, www.
Speaking of, let’s create a record for the www subdomain so that it points to the same server. You never know when your grandma might decide to visit your website.
And that’s it for our DNS settings. Now we just need to wait a bit for our changes to be live. In the meantime, let’s configure our server.
Connect to the server
Since we’ve already provided our SSH key to Digital Ocean when creating the server, all we need to do to connect to our server is run: ssh root@IP_ADDRESS.
If we’re lucky enough and the DNS changes are already live, we may even run ssh [email protected].
If your private SSH key is not located under ~/.ssh/id_rsa, you may use the -i option to provide the path of your private key like this: ssh -i path/to/private_key root@IPADDRESS.
Alternatively, you can also configure this in your ~/.ssh/config file so you don’t have to use the -i option every time you want to connect to your server.
Also note that, on the very first connection, you will need to answer yes to add the IP address and/or the domain name to your local machine’s known hosts.
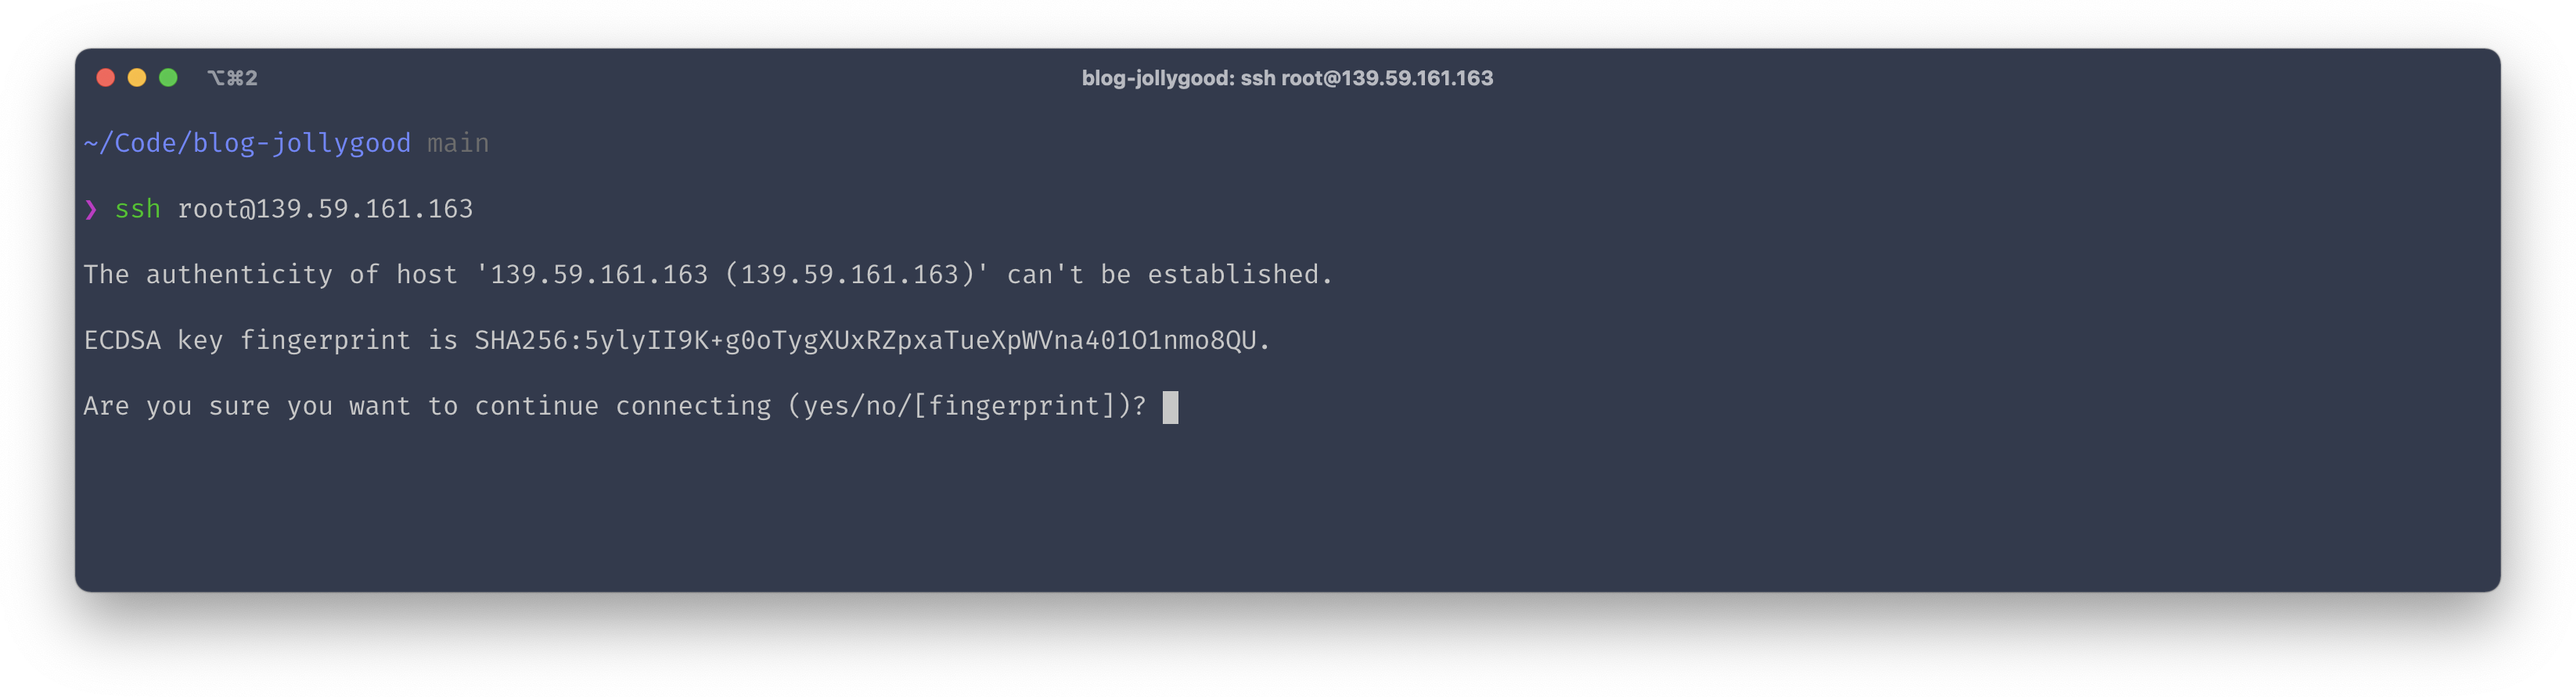
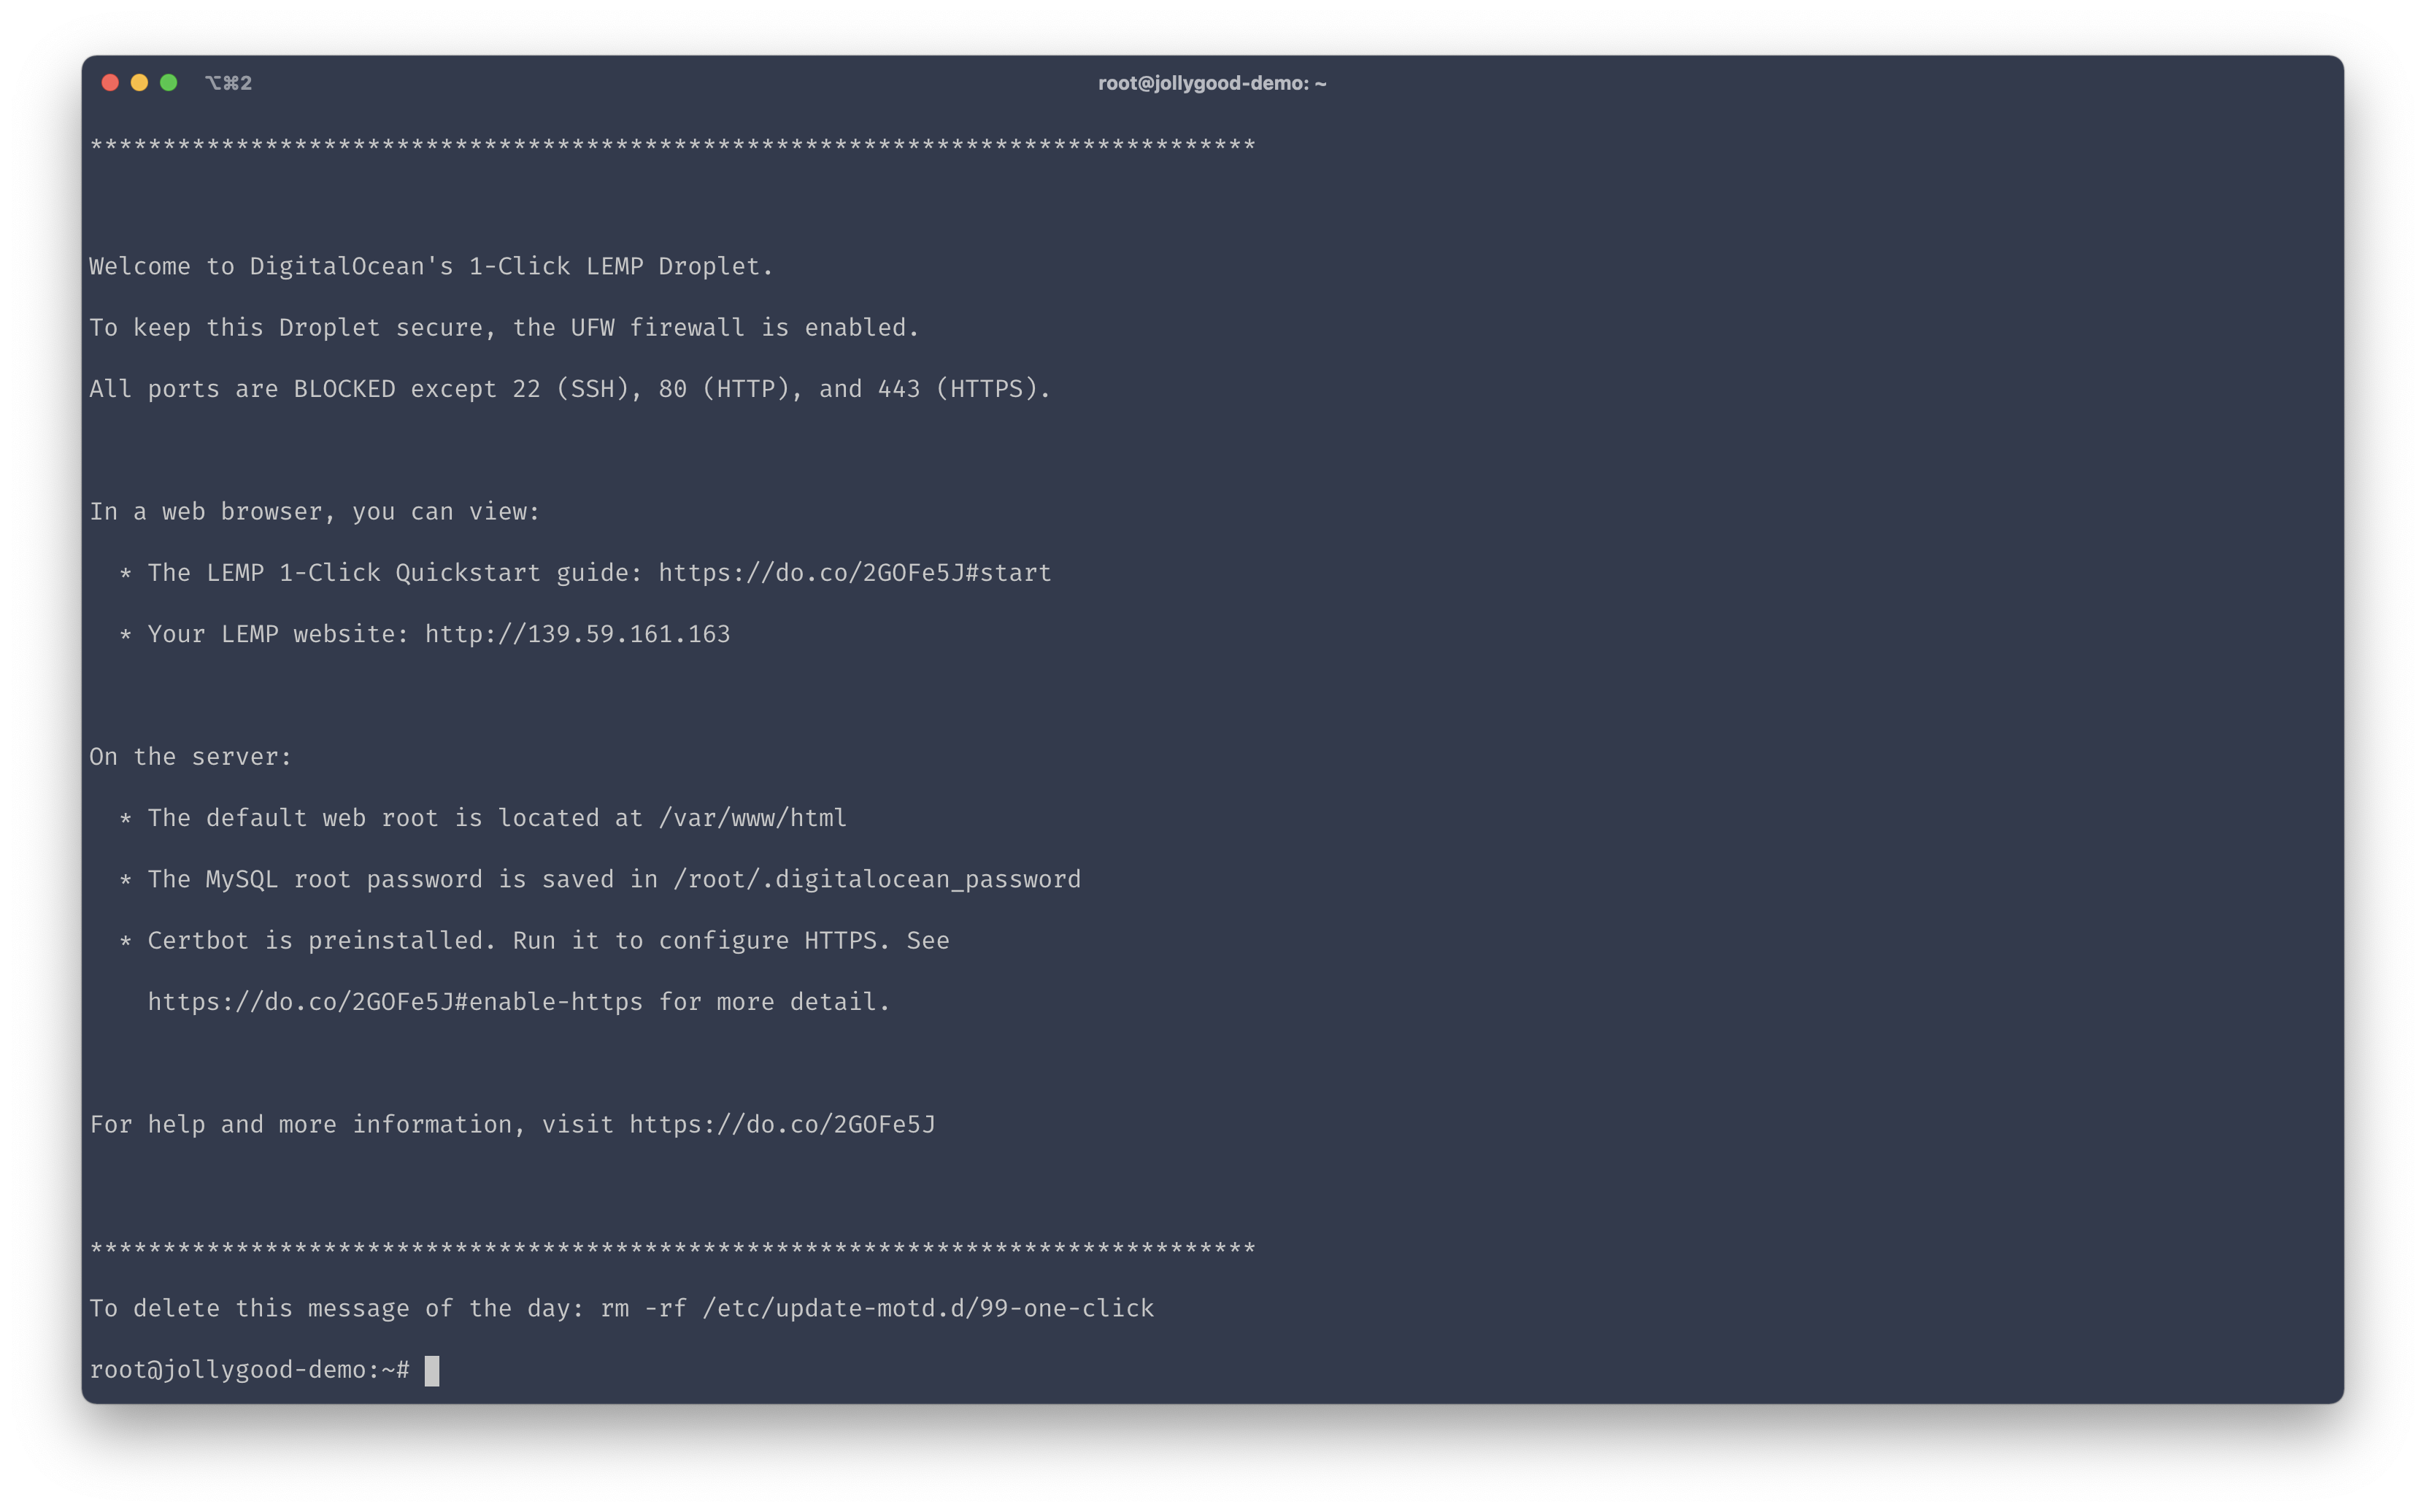
And with any luck, after all of that, you should be logged in inside your server!
Adding extra dependencies
Most of what we need to host a Laravel application has been installed as part of the “LEMP” image we selected when creating our server. However, there are a couple of extra things we’ll need for our deployment process.
We’ll need the acl package for Deployer to handle permissions. Alternatively, we could change that setting on Deployer so it uses something else like chmod but I prefer to stick with the default permission system.
During our deployment process, we will compile our assets using npm install and npm run prod. This will ensure we always have minified assets in production. Additionally, if you have special MIX_* environment variables, compiling on your server becomes a necessity. Since our “LEMP” image does not come with node and npm installed, we’ll do it ourselves.
And before we do all that, we’ll make sure our dependencies are up-to-date. Here are the commands to achieve all this.
# Update dependencies.
apt update -y

# Install acl and npm.
apt install -y acl nodejs npm
Upgrade PHP version (Optional)
Now this part is optional but it might come in handy to you — and me — either now or in the future, so I’m gonna go ahead and document it anyway.
At the time of this article, the “LEMP” image ships with PHP 7.4 whereas the latest stable version is 8.0. I’m not sure if it’s on purpose but I often find that these images are a bit late to update to the latest PHP version and so we often have to do it ourselves.
Even if we were happy to use PHP 7.4 right now, it wouldn’t be long until it’s no longer supported and we’ll need to upgrade anyway.
So, whether it’s for now or for the future, here’s how we do this. I’m going to copy the commands first and explain afterwards. Just make sure to replace 8.0 with the PHP version you want to install.
# Add the PHP repository.
add-apt-repository -y ppa:ondrej/php

# Ensure dependencies are up-to-date.
apt update -y

# Install PHP CLI and FPM with extensions.
apt install -y php8.0 php8.0-common php8.0-gd php8.0-intl php8.0-zip php8.0-sqlite3 php8.0-mysql php8.0-fpm php8.0-mbstring php8.0-xml php8.0-curl php8.0-memcached unzip zip composer
- First, we add the PHP repository to our server. This ensures our server knows where to get the PHP packages from.
- Then, we ensure our dependencies are up-to-date.
- Finally, we install PHP, PHP-FPM and various PHP extensions we need to run our Laravel application.
If there’s any additional extension your application requires, simply run apt install php8.0-extention-name to install it.
When that’s all done, you can run php -v to check the version and php -m to check the installed modules of the current PHP that runs in your terminal.
To check the PHP that will serve HTTP requests (PHP-FPM), check that you have a service called php8.0-fpm running. You may do this by listing all services like so: service --status-all.
If you’re doing this from the future and you’ve already got an application running when upgrading your PHP version, be sure to also update the PHP-FPM version in your deploy.yaml file and in your Nginx configuration. Don’t worry if you don’t understand what I mean by that yet. This is a conversation between future-you and me.
Prettify our server’s bash (Optional)
Whilst we’re on the topic of optional things to do, let’s improve our SSH terminal slightly. Everyone is obsessed with making their local terminal nice and shinny but you rarely see people making their server’s terminal look decent.
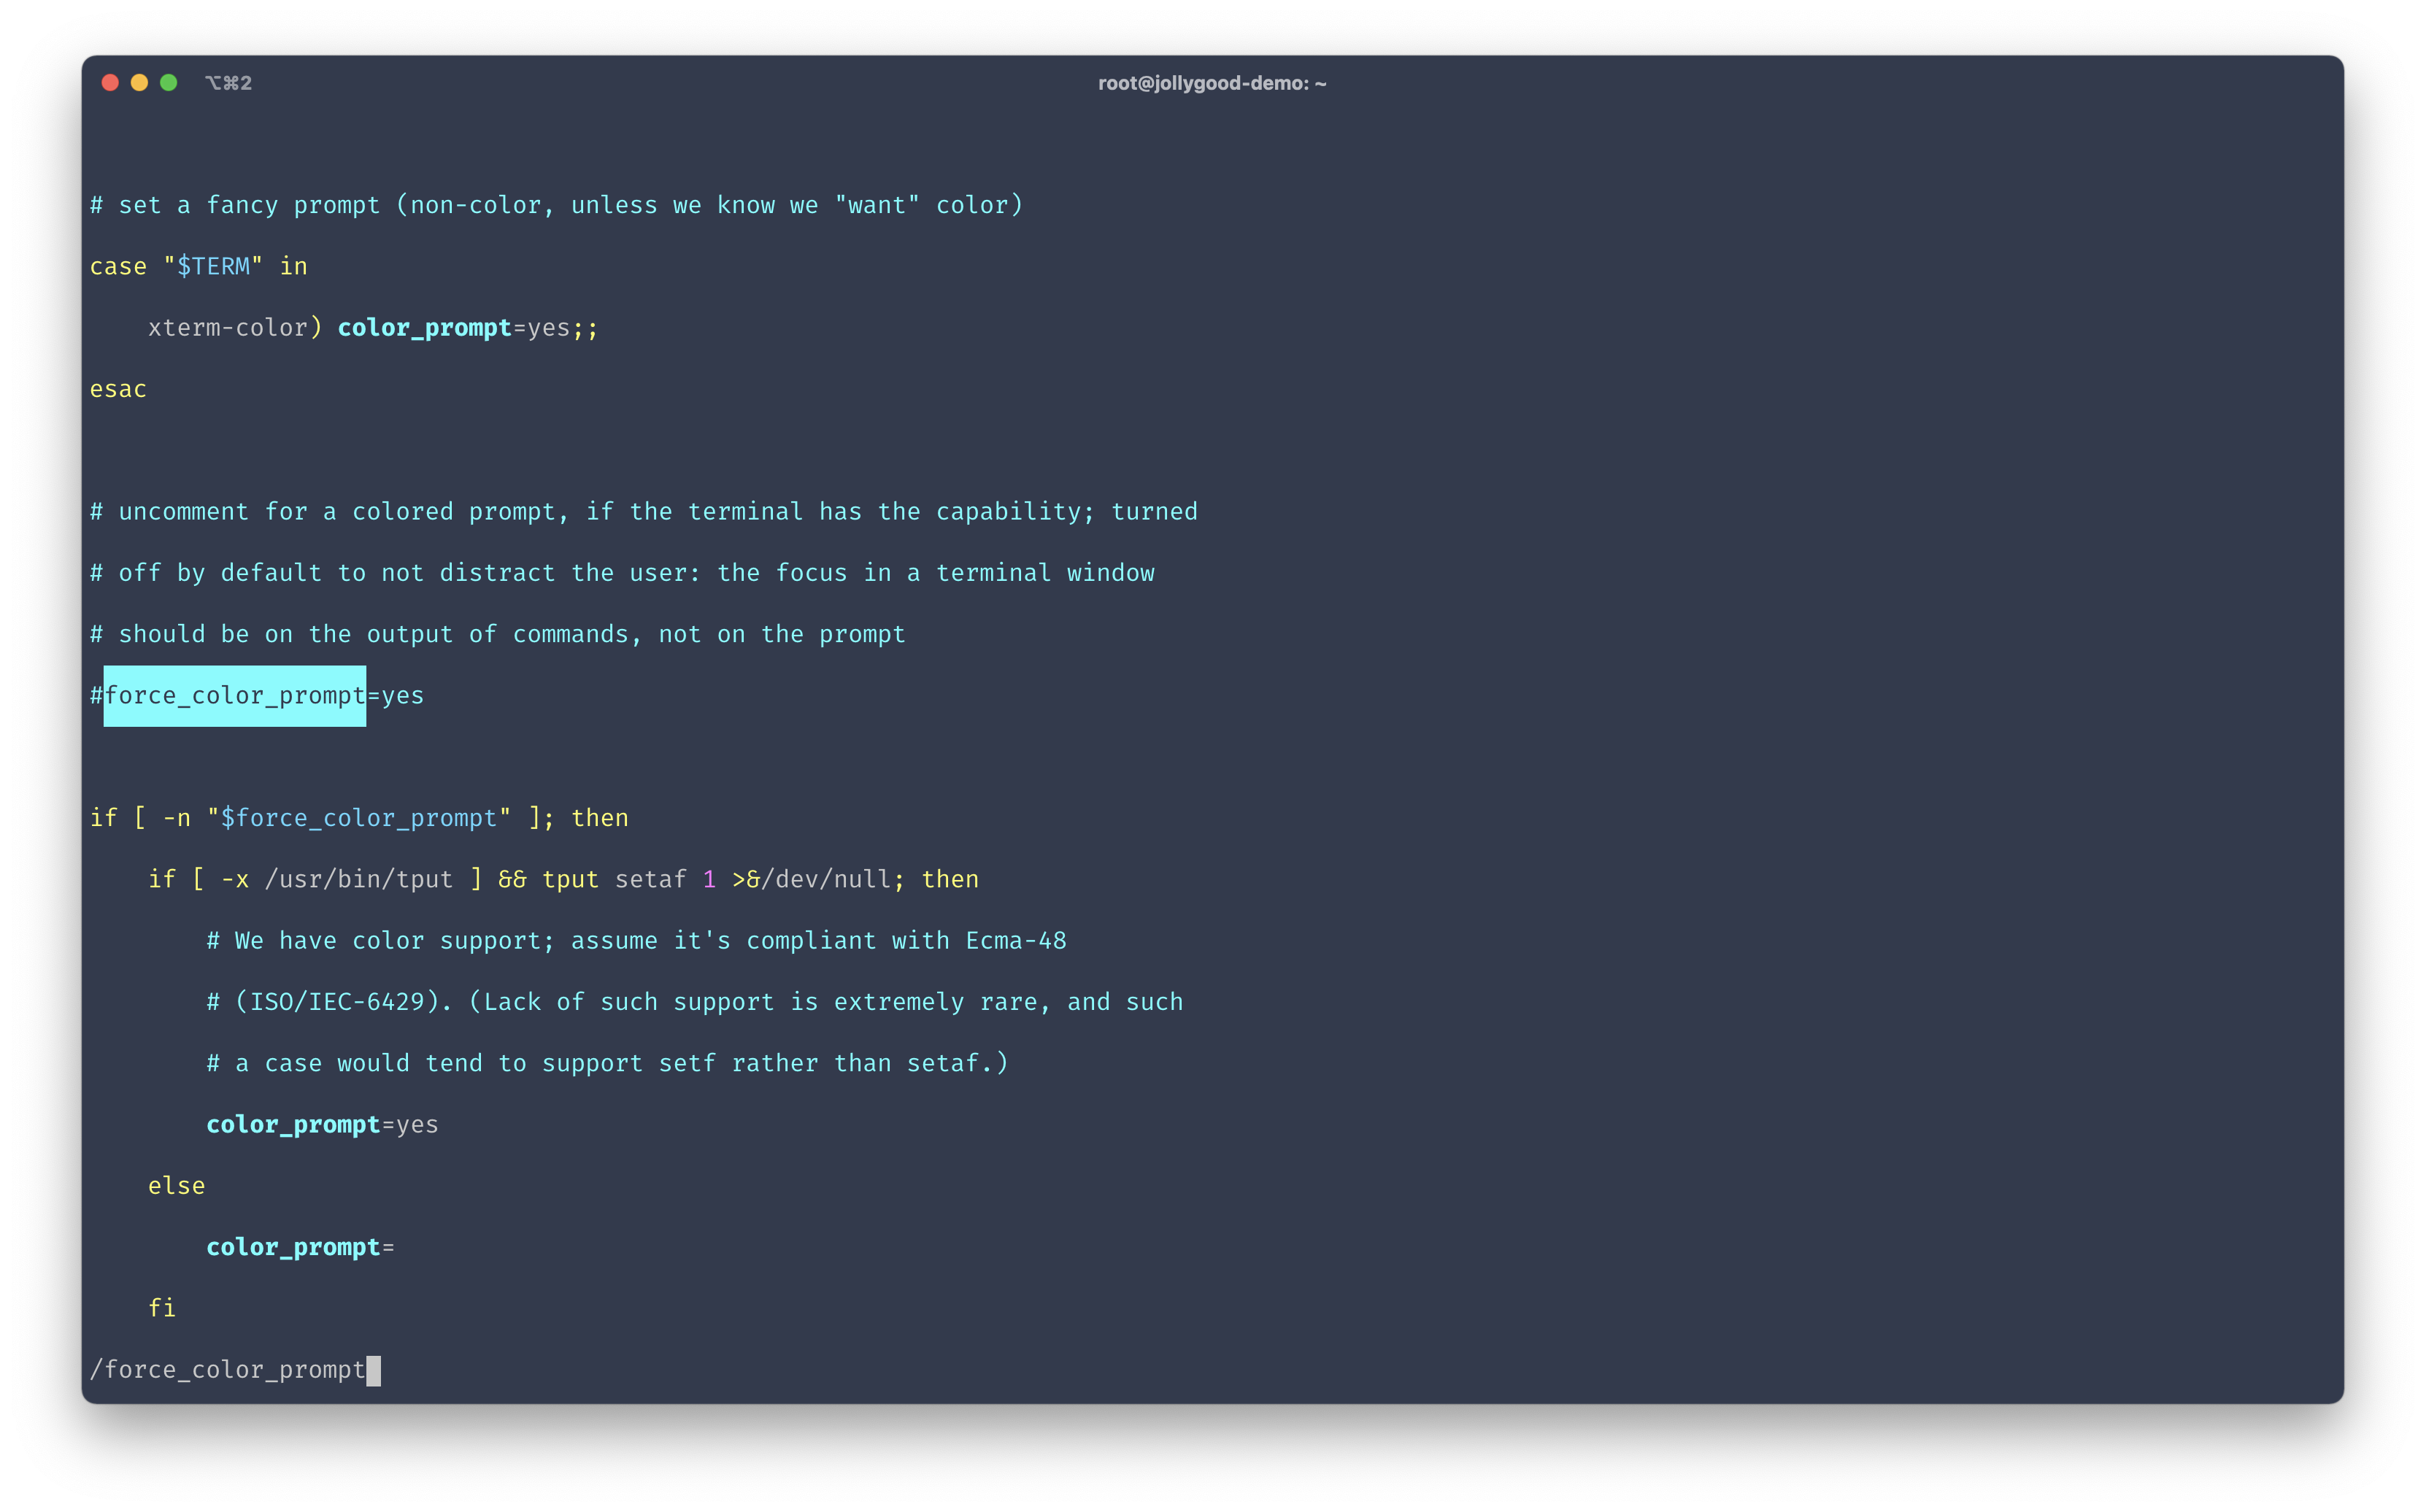
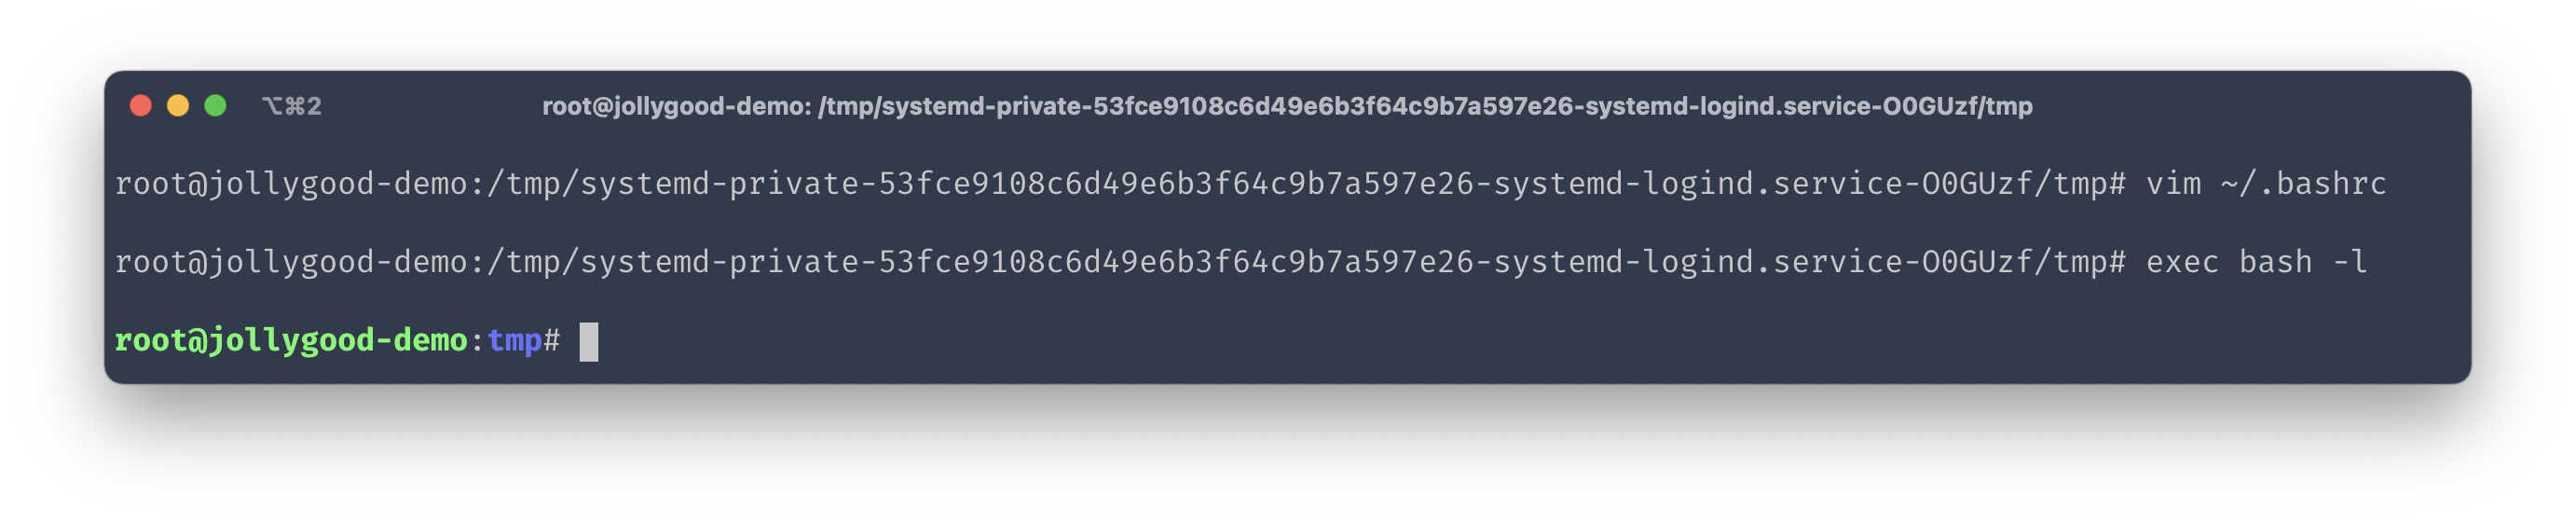
We’ll just do two little changes that can all be configured in our ~/.bashrc file. So open that file by running vim ~/.bashrc and let’s go!
First, let’s add some colours. Search for /force_color_prompt and uncomment that line.
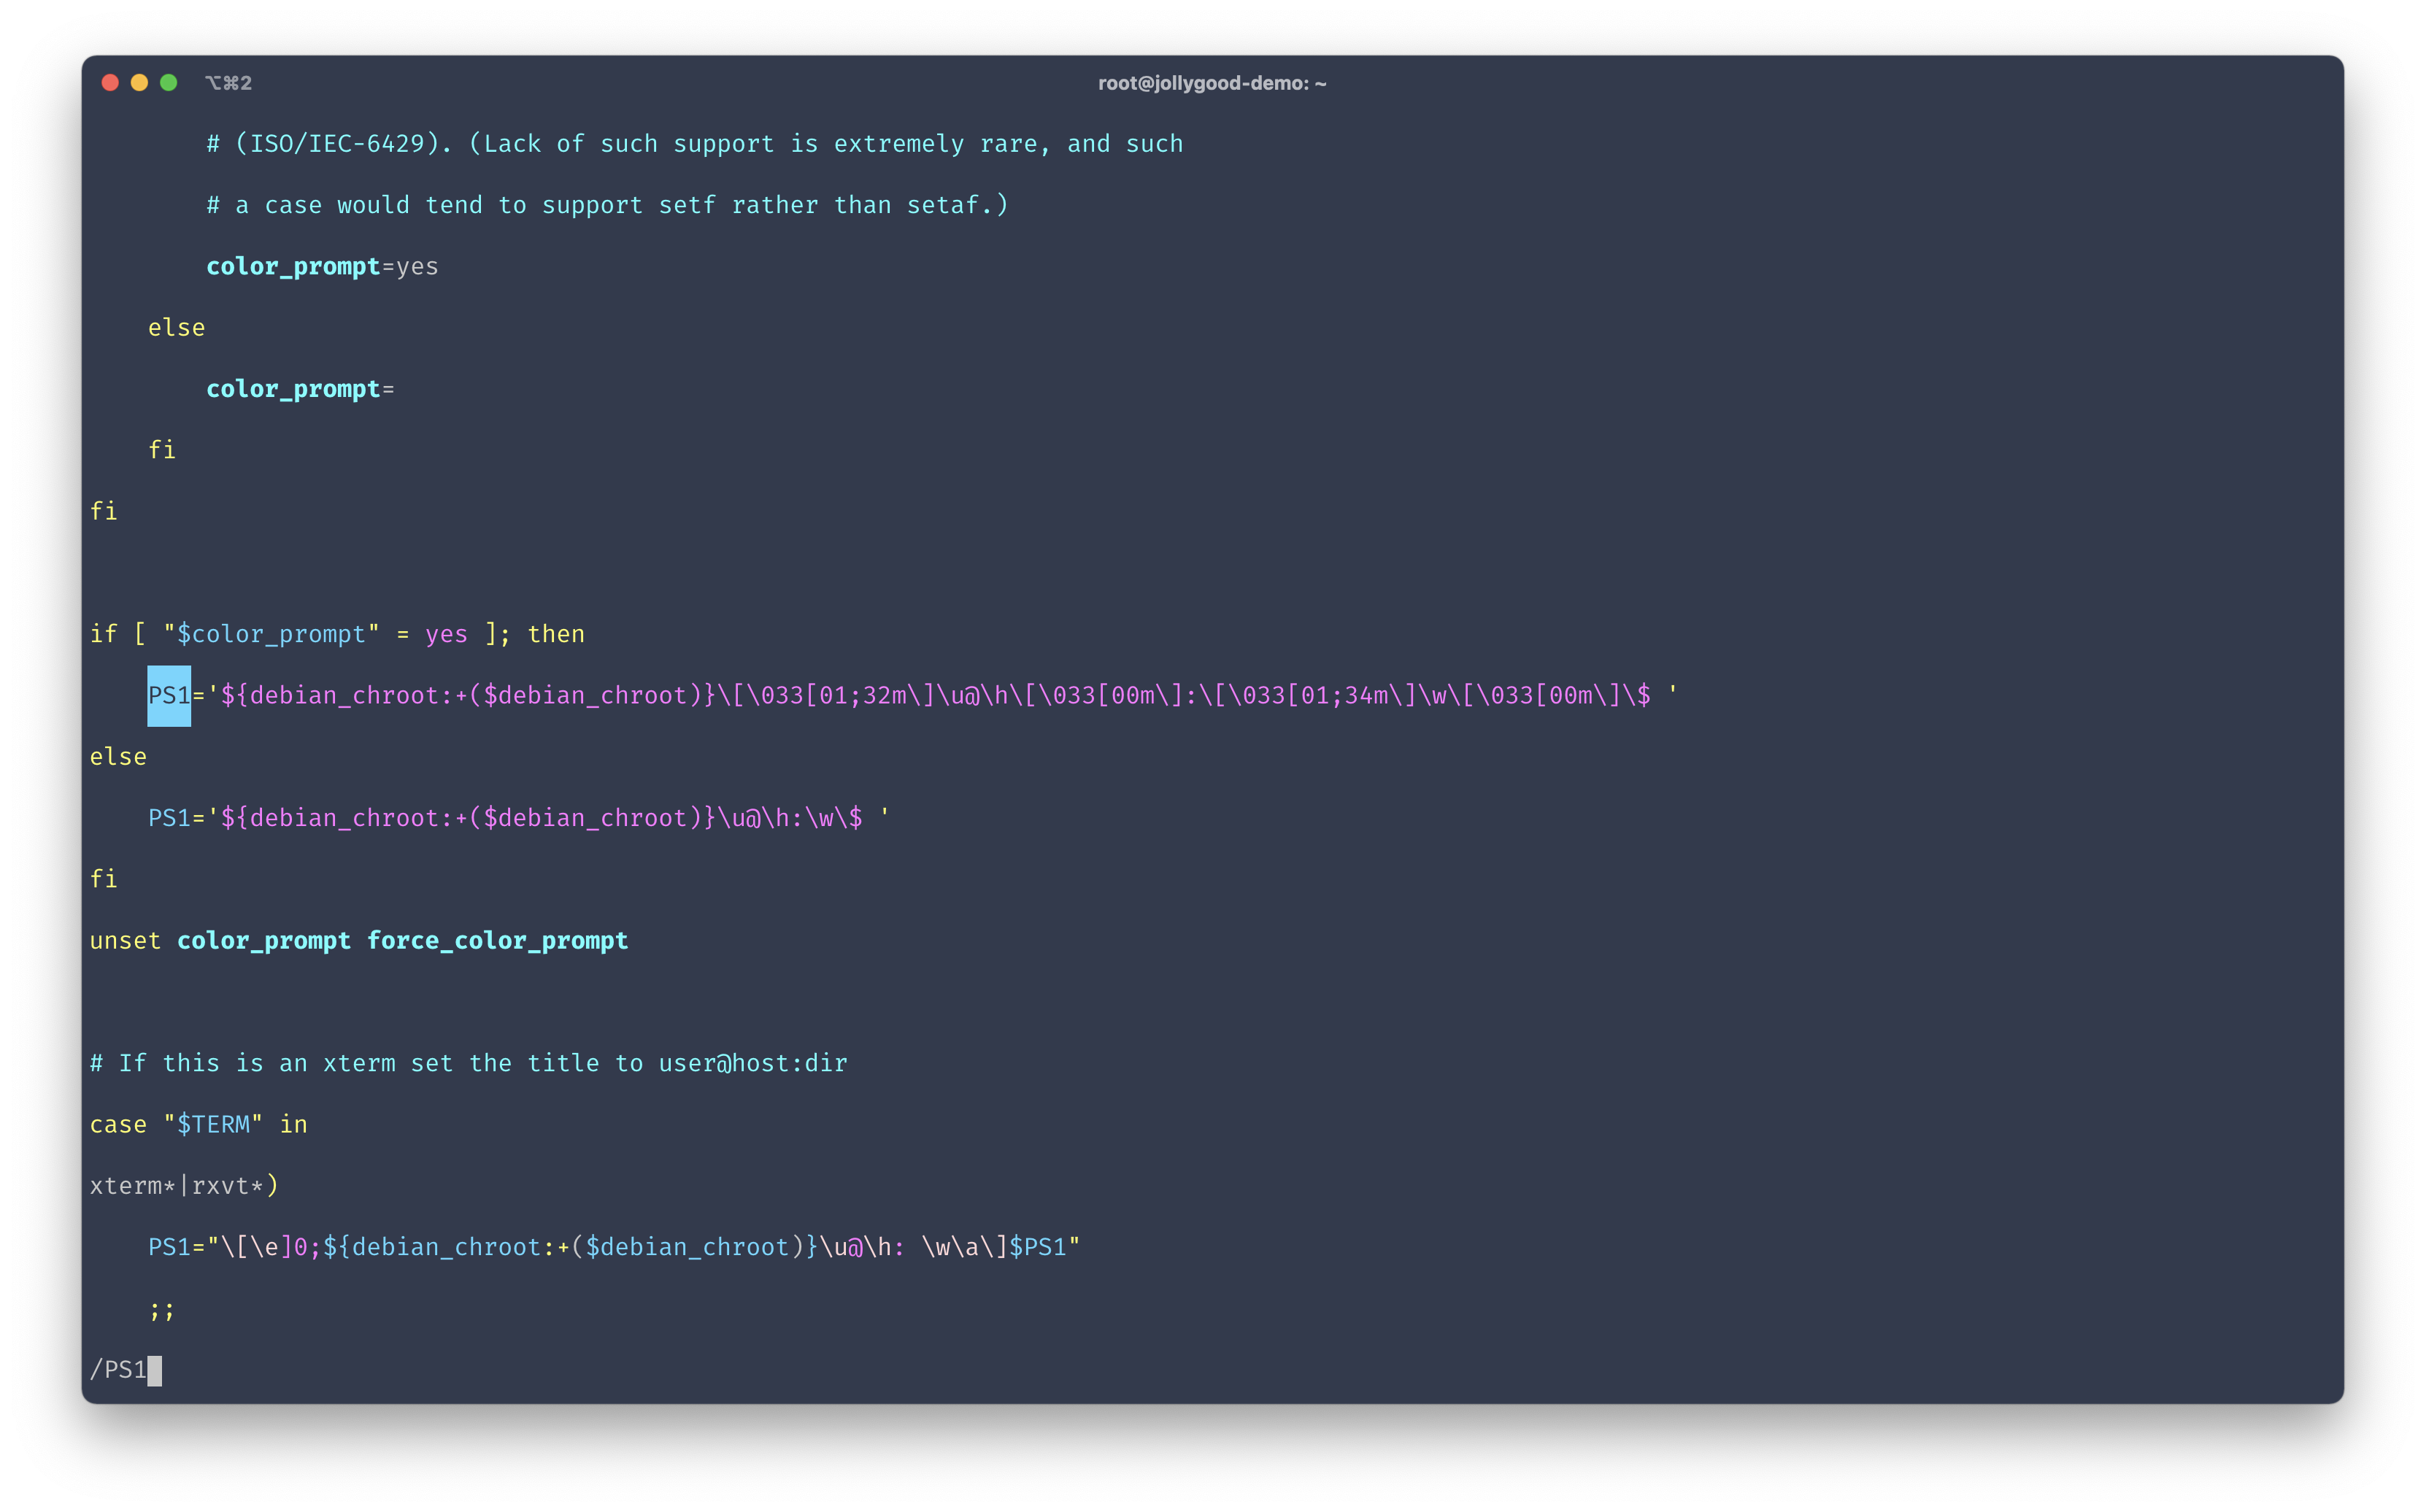
Then let’s make our PS1 a bit smaller. The PS1 is the text that appears before your blinking cursor at every new row on the terminal. By default it shows the full path of the current directory which can sometimes be really long, leaving you with about 10% of the space of your terminal to type your commands. So instead we’ll be showing the current directory only.
To do that, search for /PS1 in your ~/.bashrc file. Inside that long line and the one below, replace \w (lowercase) with \W (uppercase).
Now you won’t be able to see any changes until you reload your current bash session. You may do this by running: exec bash -l.
And that’s it! There’s probably still room for improvement but at least we now have a decent looking terminal whenever we connect to our server.
Configure Nginx
Okay back to important business! Setting up Nginx is crucial since, without it, the HTTP requests will never hit your Laravel application.
Configuring Nginx can be very overwhelming at first since it uses its own syntax but don’t worry I’ll provide an Nginx template you can use for your Laravel applications. Once you get used to it though, I promise the syntax starts to make more and more sense.
Okay, let’s start! First, we’ll go to our Nginx directory by running: cd /etc/nginx.
From there, if we run ls -la sites-* you will see there‘s already a bunch of site configurations available.
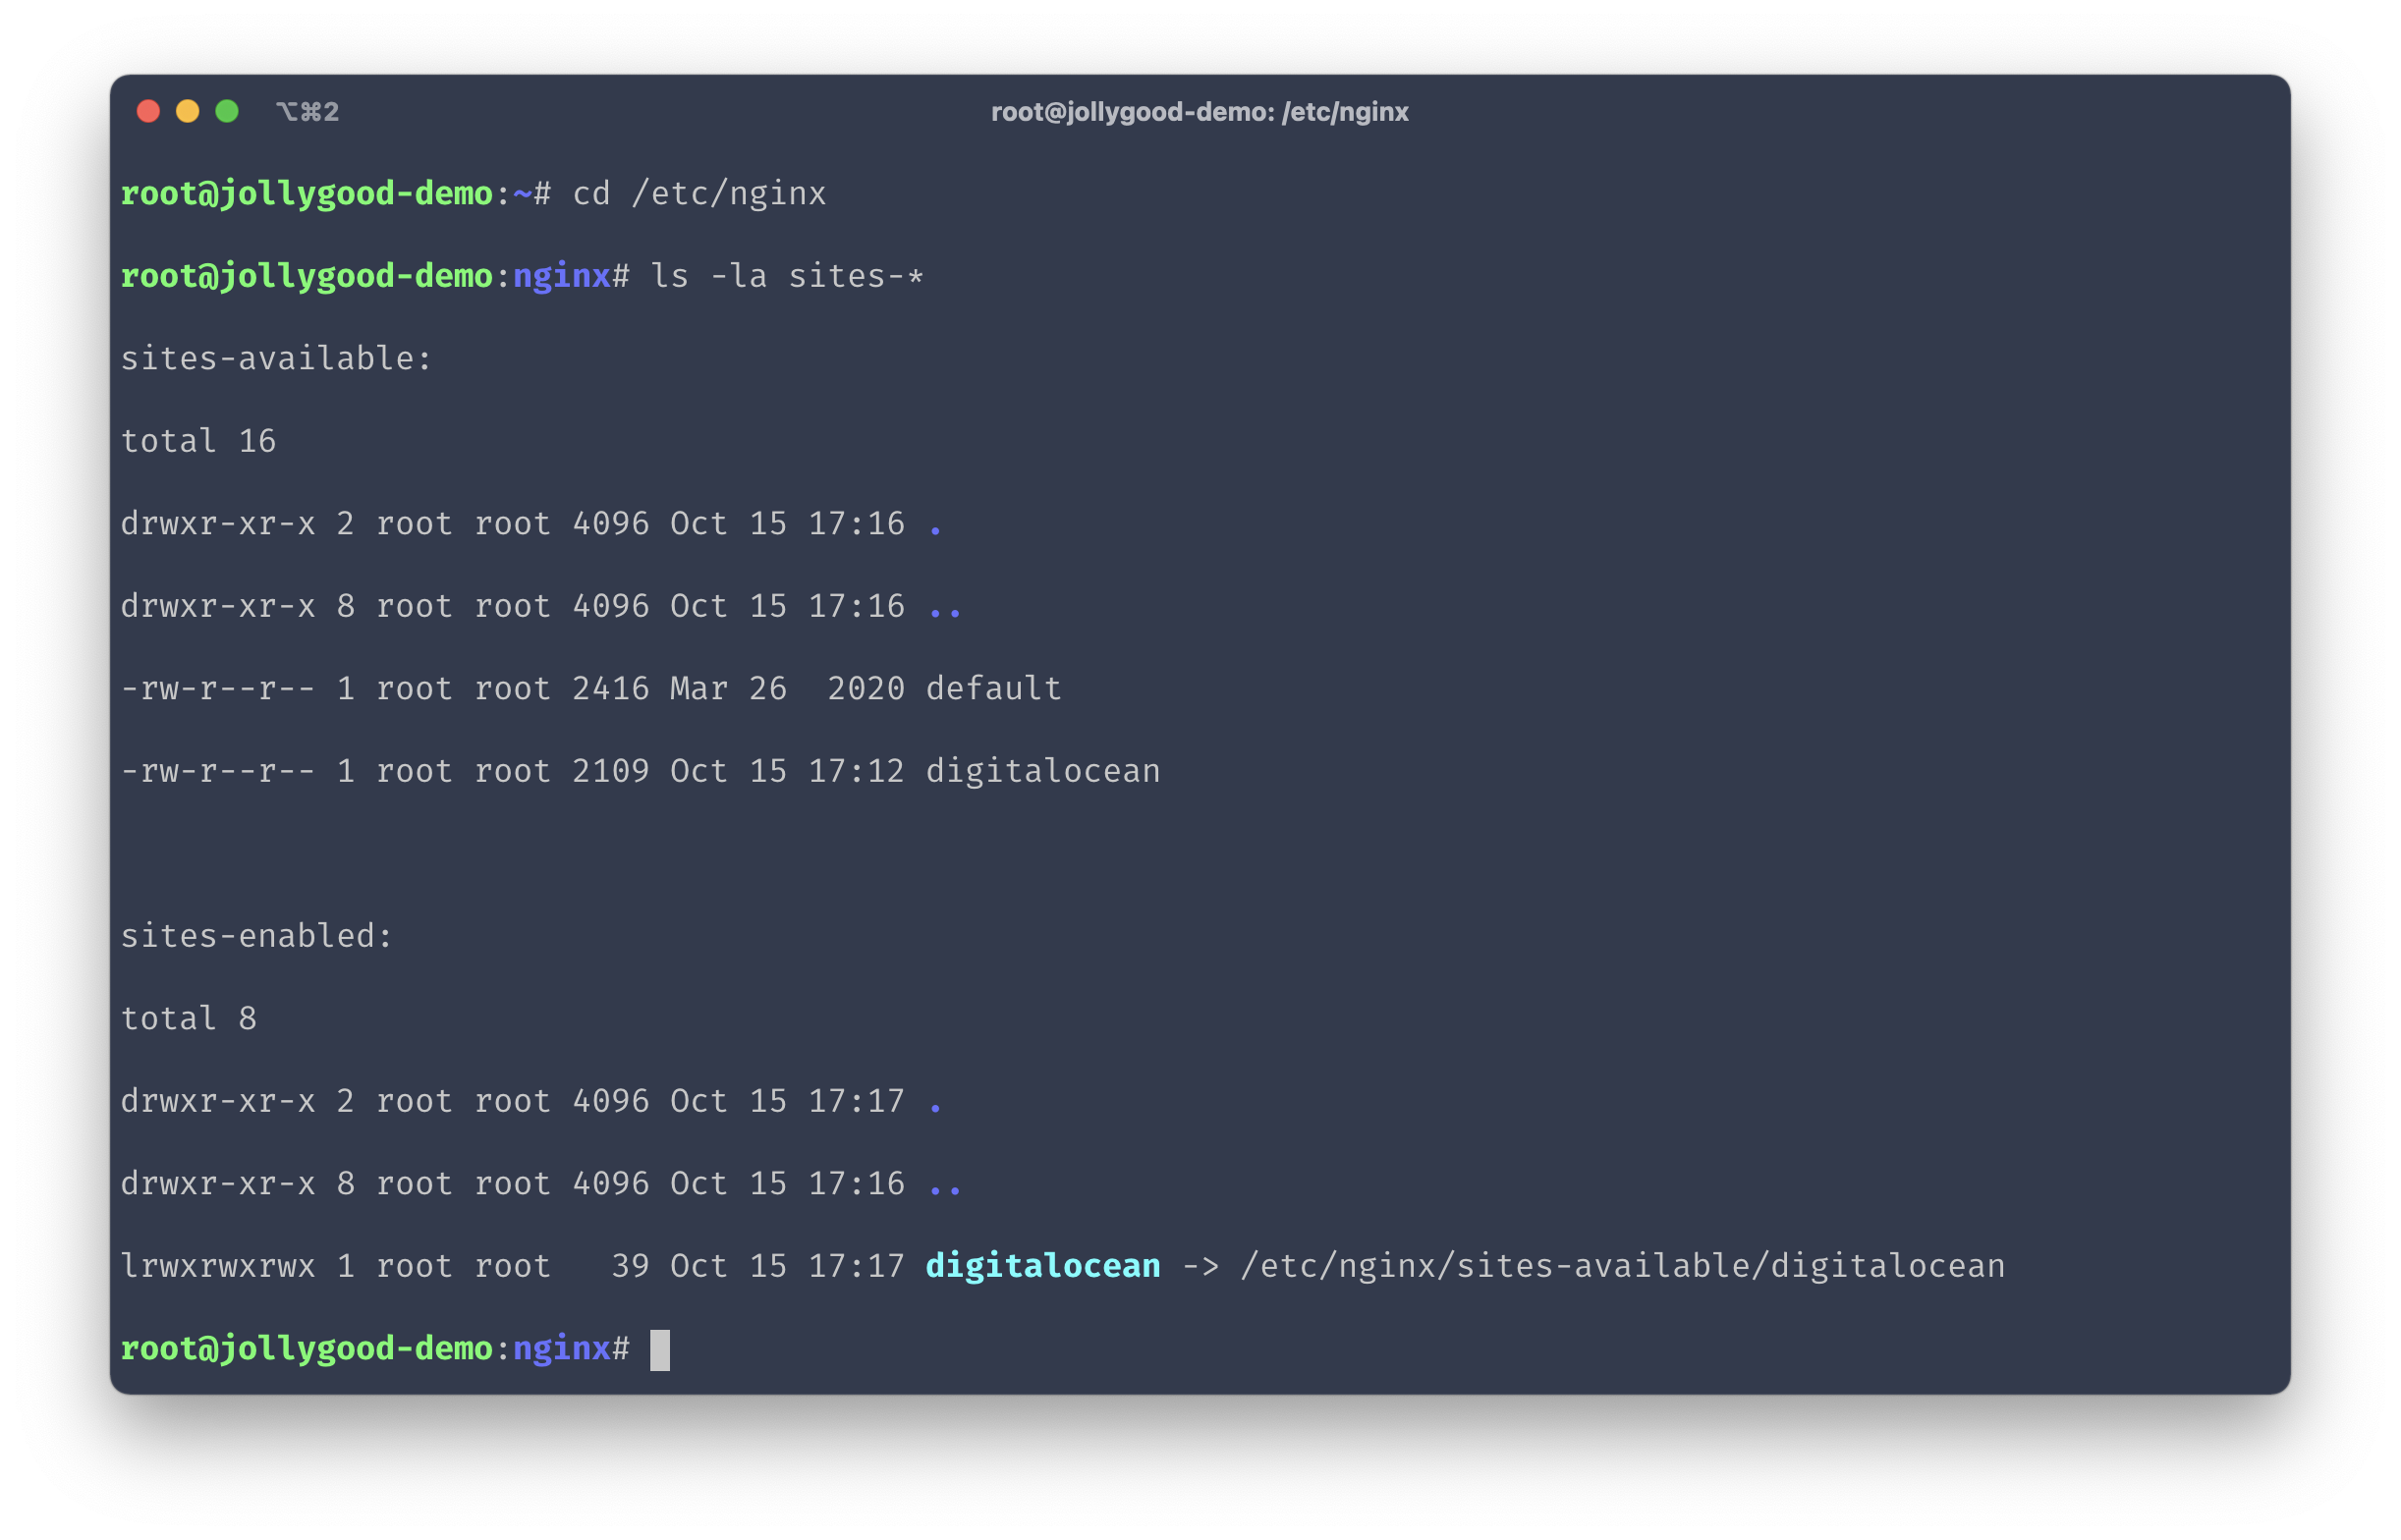
As you can see from the result of this command, the way we add a site is by:
- Creating a new configuration file inside
sites-available. - Enabling that site by creating a symlink of the same name inside
sites-enabledpointing to our configuration file.
Since we’ll be creating our own site configuration from scratch, let’s remove any pre-installed sites by running:
rm -rf sites-available/* sites-enabled/*.
A common convention when creating Nginx sites is to give them the same name as their domain name. Therefore, let’s run vim sites-available/jollygood.app to create our new Nginx configuration.
Next, let’s copy/paste the following template inside that file. Just make sure you replace jollygood.app with your actual domain name and php8.0-fpm with your own PHP version. I’ll highlight the lines that require your attention.
server {
    server_name jollygood.app www.jollygood.app;
    root /var/www/jollygood.app/current/public;
    index index.html index.htm index.php;

    charset utf-8;
    add_header X-Frame-Options "SAMEORIGIN";
    add_header X-XSS-Protection "1; mode=block";
    add_header X-Content-Type-Options "nosniff";

    location / {
        try_files $uri $uri/ /index.php?$query_string;
    }

    location = /favicon.ico { access_log off; log_not_found off; }
    location = /robots.txt  { access_log off; log_not_found off; }

    access_log off;
    error_log  /var/log/nginx/jollygood.app-error.log error;

    error_page 404 /index.php;

    location ~ \.php$ {
        include snippets/fastcgi-php.conf;
        fastcgi_param SCRIPT_FILENAME $realpath_root$fastcgi_script_name;
        fastcgi_param DOCUMENT_ROOT $realpath_root;
        fastcgi_pass unix:/run/php/php8.0-fpm.sock;
    }

    location ~ /\.ht {
        deny all;
    }
}
I’m not going to explain this template in detail because this itself could be its own series of articles but I’m going to mention a few points:
- In the
server_nameoption, we provided all domains and subdomains that should point to our Laravel application. In our case, bothjollygood.appandwww.jollygood.app. - In the
rootoption we provided the path/var/www/jollygood.app/current/public. This means our application folder will need to be located at/var/www/jollygood.app. - The
/currentthat follows is due to the folder structure created by the Deployer library upon deploying. It ensures that the/currentdirectory refers to the latest release. We will talk more about this in the episodes dedicated to deploying our application using Deployer. - The
/publicthat follows is because it’s where theindex.phplives in Laravel applications. - The PHP-FPM version was provided in the
fastcgi_passoption. - We’ve overridden the
SCRIPT_FILENAMEandDOCUMENT_ROOTFastCGI parameters so they use the real absolute path. This is because our/currentfolder generated by Deployer is actually a symlink pointing to a release folder and, without explicitly using the real path, we can have strange behaviours of changes not being triggered even after reloading PHP-FPM.
If some of the points above didn’t make much sense to you, don’t worry too much about it. It will make more sense once we start deploying our application with Deployer. Future-you will be more comfortable on the subject and might appreciate having that extra bit of information next to the template it’s about to copy/paste.
Alright, now, all we need to do is enable our site by creating a symlink inside the sites-enabled folder.
Enter that folder — cd sites-enabled — and run the following command — again replacing jollygood.app with your real domain.
ln -s ../sites-available/jollygood.app jollygood.app
And that’s it! You can test that your site configurations are valid by running nginx -t.
Now, for these changes to be applied to our server, we need to restart Nginx and PHP-FPM like so:
# Restart Nginx.
service nginx restart

# Reload PHP-FPM. Replace 8.0 with your PHP version.
service php8.0-fpm reload
Enable HTTPS
Nowadays, using HTTPS instead of HTTP is no longer a Nice-To-Have. So let’s make sure we have this set up by using “Let’s encrypt”.
Luckily, the “LEMP” image already comes equipped with the “Certbot” library which enables us to set up SSL certificates using “Let’s encrypt” in no time.
For this to work, we need to ensure:
- We have all the domains we want to use HTTPS for in the
server_nameoption of our Nginx configuration file. - We have DNS records pointing to our server for all of these domains.
If you’ve followed along then that’s exactly what we’ve done for our jollygood.app and www.jollygood.app domain names.
Thus, we’re now ready to use Certbot. To get started simply run:
certbot --nginx -d jollygood.app —d www.jollygood.app
You may use the -d option as many times as you wish but make sure the domain you enter is valid according to my points above.
This command will ask you a bunch of questions before creating and installing new certificates for the provided domains.
Additionally, Certbot ensures your certificates are automatically renewed via a CRON job — located in /etc/cron.d/certbot. You may run certbot renew --dry-run to ensure the CRON job will work properly next time it needs to renew your certificate.
If everything went well, you should see some special lines marked as # managed by Certbot on your Nginx config file — cat /etc/nginx/sites-available/jollygood.app.
If that’s not the case, then something went wrong with the installation of your certificates. To fix it, simply run certbot and follow the steps to re-install your certificates.
At this point, we should have all requests being successfully and securely directed to our Laravel application. However, we haven’t deployed our application yet so if you enter your domain name in a browser, it will fail. At this point, I suggest creating a very simple index.php file that displays phpinfo(); inside our public folder which — according to our Nginx configurations — should be located at: /var/www/jollygood.app/current/public.
I’ll cross my fingers for you but you should now see the result of that file when you visit your domain name. If not, feel free to create a discussion at the end of this article so others can help you. You might even find your answer in one of the existing discussions. 🍀
Configure MySQL
Phew! We are almost done configuring our server. All we’ve got left to do is configure MySQL so we can create a database for our application.
As we expected, the “LEMP” image installed MySQL for us. It created a root user with a password that can be found at ~/.digitalocean_password.
However, it is recommended to change that password and provide safer configurations. Fortunately for us, there is a handy command called mysql_secure_installation.
After that, you should be able to connect to MySQL using root as a user and providing the newly created password: mysql -uroot -p
To create a database, run the following SQL query by replacing jollygood with the database name of your choice:
CREATE DATABASE jollygood;
If you’re like me and chose the most secure option for every question of the mysql_secure_installation command, then you won’t be able to use your root user outside of your server. Not even going through an SSH tunnel first. Not even when adding root in the .env file of your application which is located on the server...
Whilst that’s all nice and secure, we need to find a way to access our database both from outside via SSH and from inside for our Laravel application. The solution is simple: we need to create a new database user.
Create a new MySQL user
For the sake of this tutorial, we’re going to create one additional user called loris — 👋. However, in a real setup, you might want to create multiple users such as one for yourself and one for your Laravel application.
To create a new database user, you first need to connect to MySQL with an existing user — in our case root — by running mysql -uroot -p.
Next, we’ll need to run three SQL queries.
- One that creates the user by providing a name and a password.
- One that gives the appropriate permissions to that user — in MySQL, we call them “privileges”.
- One that flushes the privileges to activate our changes — basically just flushing a cache.
You can find these three SQL queries below. Remember to replace loris with your actual username and provide a safe and long password.
# Create a new user.
CREATE USER 'loris'@'localhost' IDENTIFIED BY 'SOME_SAFE_PASSWORD';

# Give all privileges to that user on all tables of all databases.
GRANT ALL PRIVILEGES ON *.* TO 'loris'@'localhost';

# Reload privileges for changes to be active.
FLUSH PRIVILEGES;
Since this user will be for me, I’ve given myself all privileges to all tables of all databases. However, you might want to tweak that based on which user you’re creating.
For example, on the second query:
- If you replace
*.*withjollygood.*, then the user will only have access to thejollygooddatabase but it will have access to all its tables. - If you replace
*.*withjollygood.users, then the user will only have access to theuserstable of thejollygooddatabase.
Additionally, you may provide more granular privileges to different users — for example, you might want to create a user that can run SELECT queries for debugging purposes but cannot run INSERT, UPDATE or DELETE queries. If you’re interested in this, click here to see the full list of available privileges.
Needless to say, you may also combine privileges with database/table access to provide even more customised database permissions.
Connect to your Database remotely
Since we don’t have a deployed Laravel application yet we cannot use that newly created user in our environment variables.
However, we can use these credentials to access our production database from our local machine.
To access databases locally, I use and highly recommend the TablePlus application. This is not a referral link or anything, I just love that app.
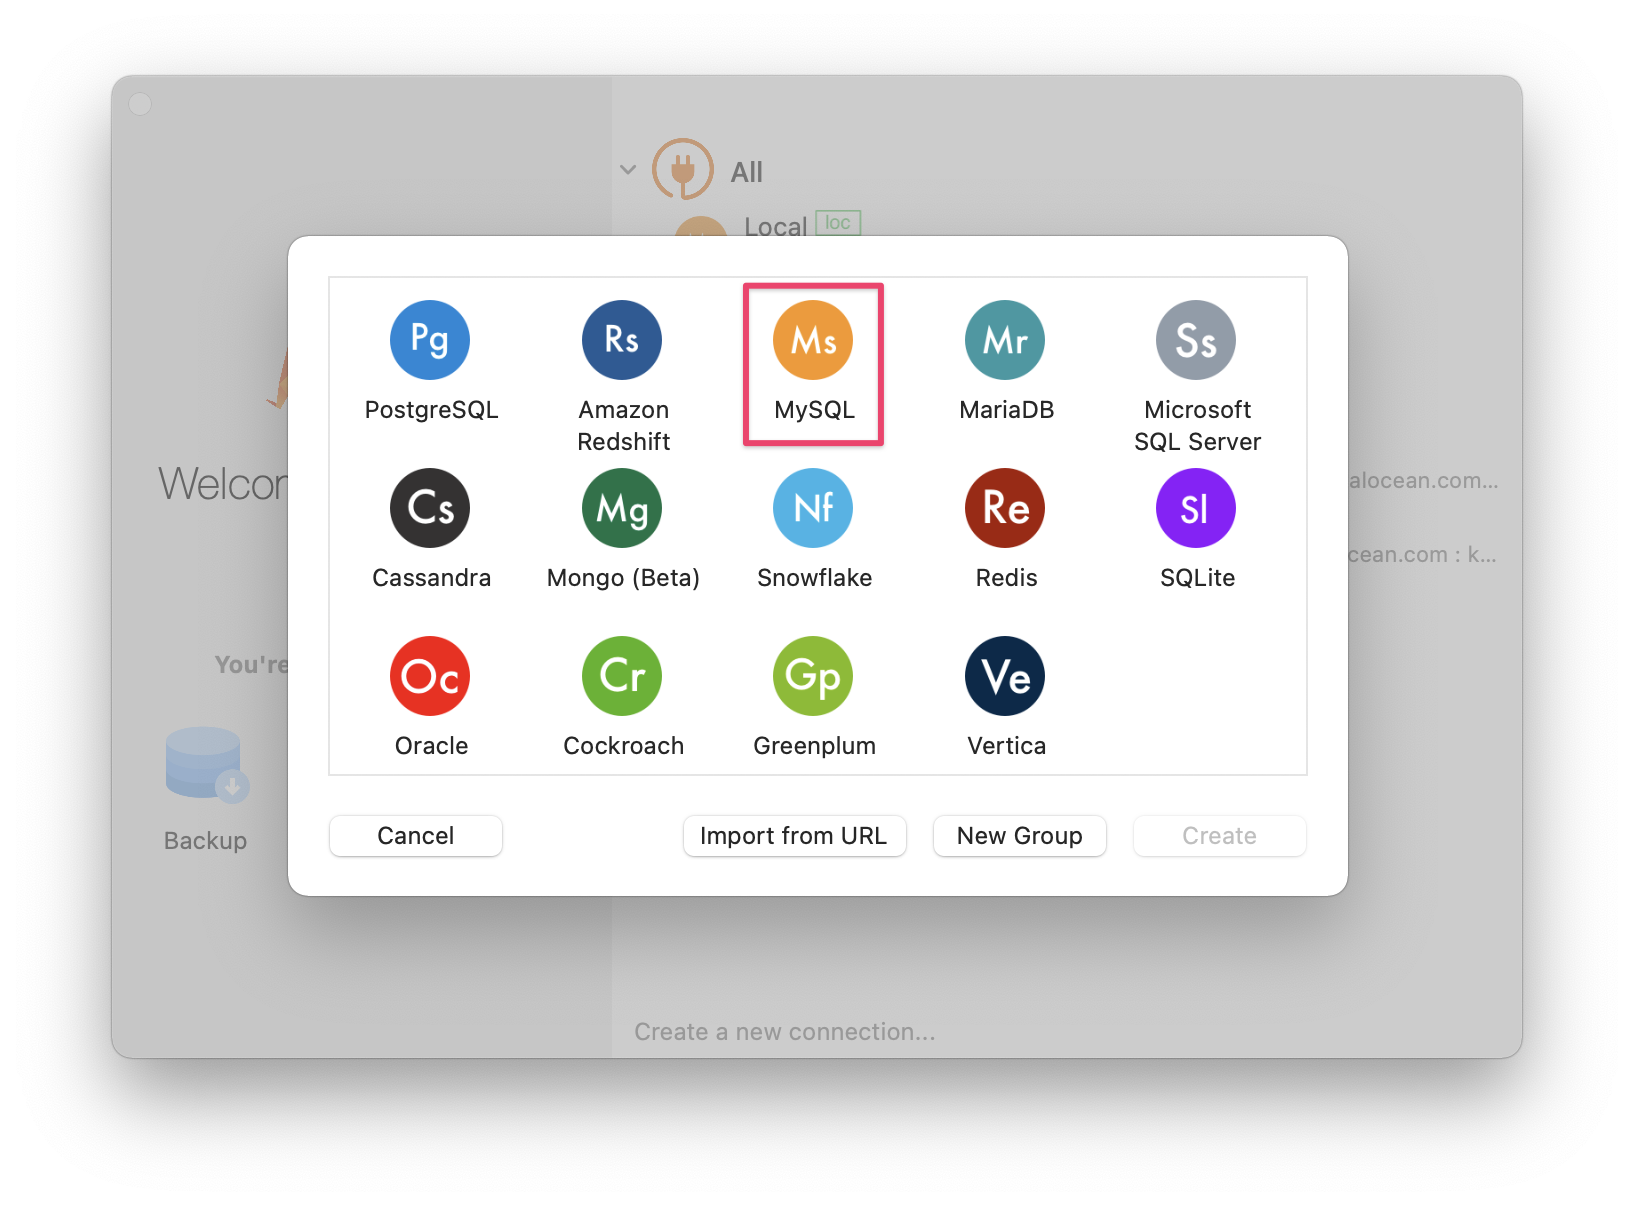
Okay, let’s create a new connection to access our production database from TablePlus. Click “Create a new connection...” and choose “MySQL”.
Then configure your connection like so:
- Leave
127.0.0.1as the host and3306as the port. - Enter your MySQL "User" and "Password" created in the previous section.
- Optionally enter a "Database" name to connect directly inside it.
- Select "Over SSH".
- Enter your IP address or domain name inside "Server" and keep port 22.
- Enter
rootinside "User". This is therootuser of your server not to be confused with therootuser of your database. - Select "Use SSH key". This will default to using your
~/.ssh/id_rsaprivate key but you may click on "Import a private key…" to provide a different one.
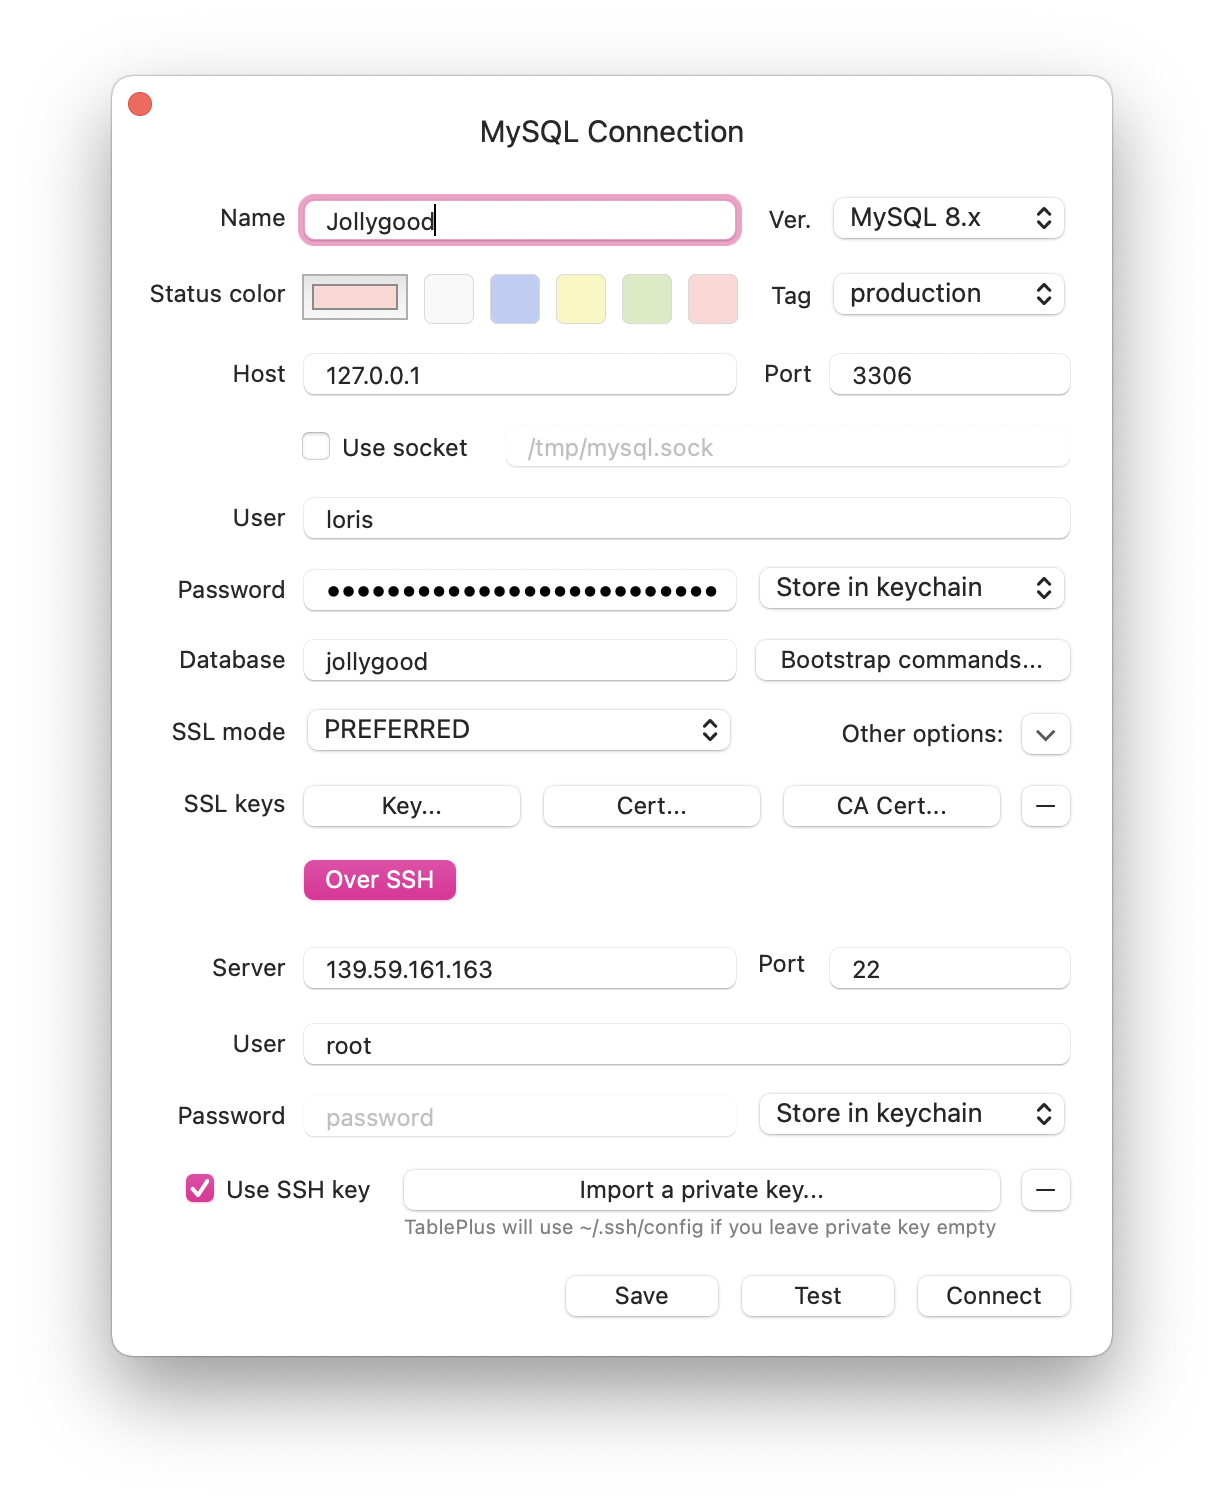
If everything went well, you should see all fields highlighted in green when you click the “Test” button.
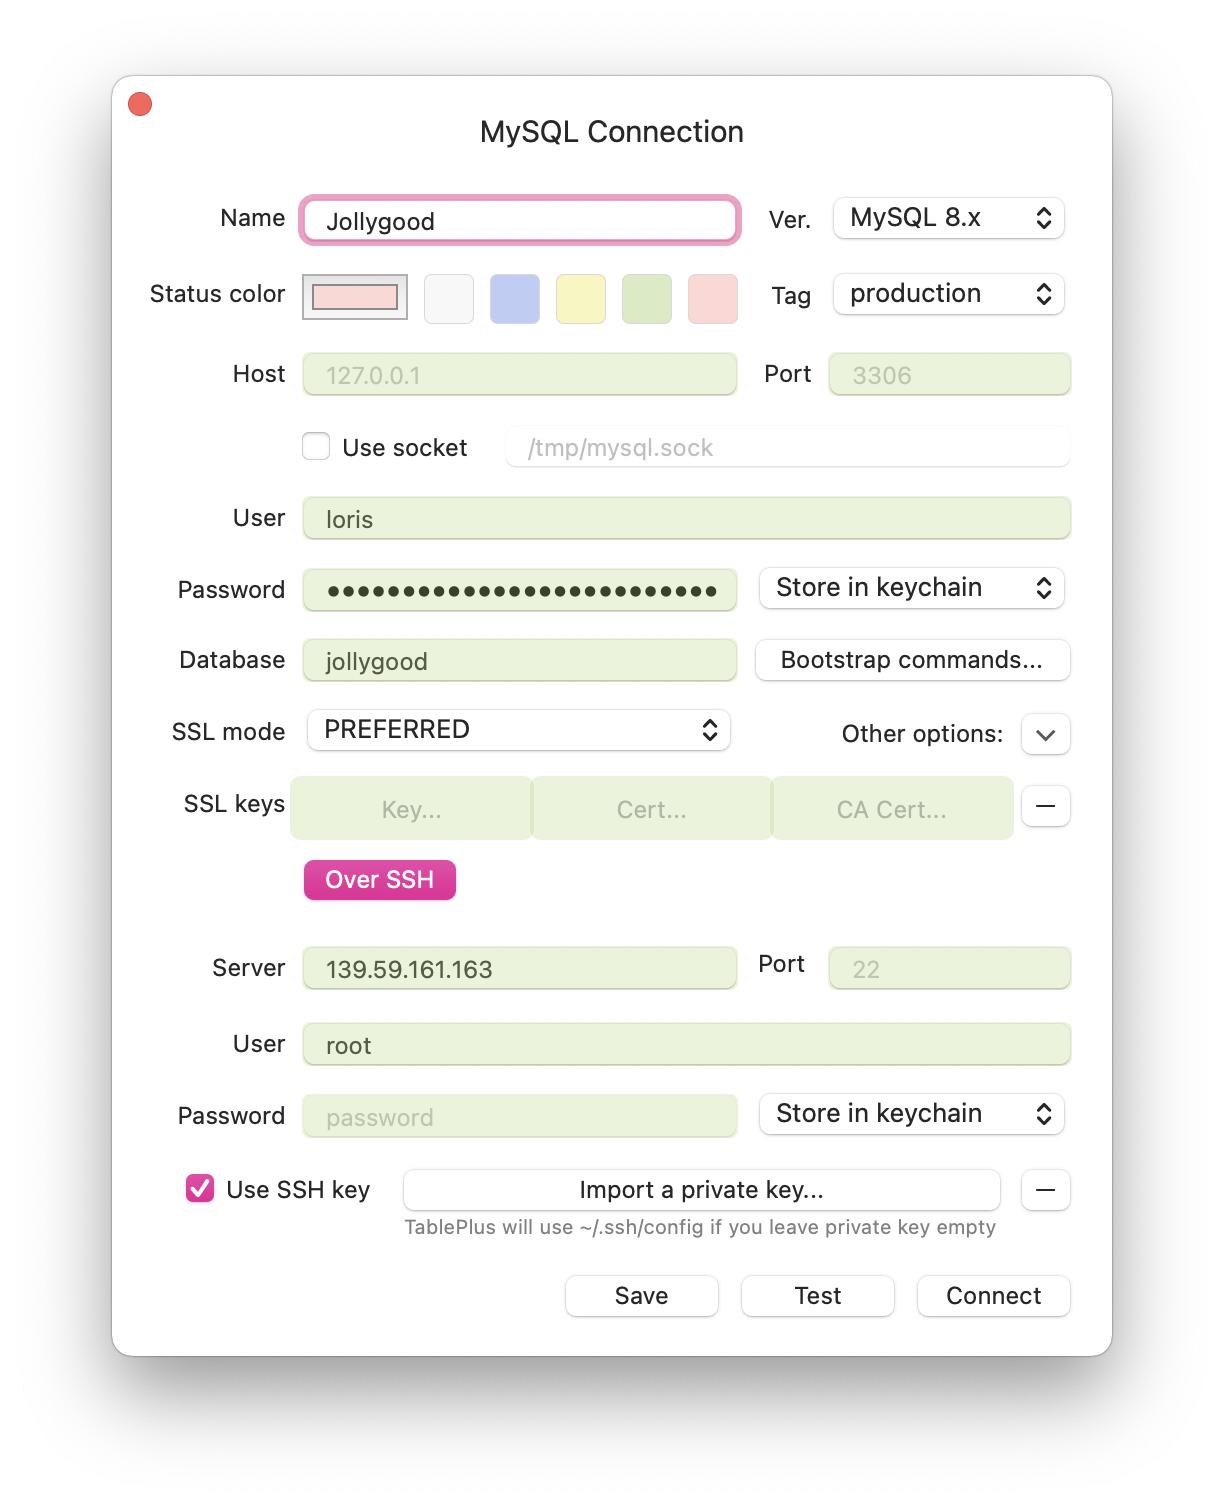
Then click “Save” and you can now access your production database from your local machine!
That being said, that database should be empty since we haven’t deployed our application and therefore we haven’t run its migrations. Thus, in the next episode, we’ll install and configure Deployer — a powerful library that will finally allow us to send our application to our server.
Conclusion
Woohoo, we’ve done it! 🥳
That was certainly not an easy to follow tutorial so congratulations on reading it through. I truly hope you’ve learned a lot from it and that you’ve successfully created your server.
As I mentioned earlier, if you followed the process and something went wrong along the way, please don’t hesitate to open a discussion so others can help you fix it and, as a result, you can help others that may be experiencing the same issue.
Now that we have a domain name, a server and a database ready, let’s finally deploy our application. In the next episode, we’ll focus on installing and configuring the Deployer library to our Laravel application. Don’t worry, after this article, it will feel like a walk in the park.
Introduction and preparations

Install and configure Deployer