Create your own Deployer recipes
So far we’ve managed to deploy our Laravel application from scratch using only tasks officially maintained by the Deployer library. And to be honest, there are so many useful tasks and recipes available out-of-the-box, that for 80% of Laravel applications they should be more than enough.
However, this 20% is not to be looked over and we should be ready to inject our own custom logic into our deployment flow whenever we need it.
That’s why, in this article, we’re going to see how to create our own recipes and how to use the powerful API provided by Deployer.
Creating a new recipe
Let’s get right to it. To keep things organised we are going to add a new folder at the root of our application that will contain all of our custom recipes. We can call this folder whatever we like but I’ll go for deploy so it’s super obvious it contains deployment logic.
Next, we’re going to create our first recipe inside this folder. Since, this time, we want to leverage the full power of PHP to customise our deployment flow, we’re going to create a PHP recipe. Let’s call it my-first-recipe.php.
For those who prefer reading code to reading text, that’s what we’ve done so far.
# Create a folder for your recipes.
mkdir deploy

# Create your first recipe.
touch deploy/my-first-recipe.php
Now, inside that new file, copy/paste the following code.
<?php

namespace Deployer;

// Your code here...
As you can see, tasks and recipes are created within one big shared namespace called Deployer.
It doesn’t follow PSR-4 because these files are not meant to define classes. Instead, we simply call various functions provided by the Deployer API directly inside these files. Think of them as procedural configuration files rather than the Object-Oriented Programming you’re likely used to.
We will see which functions are available and how to use them in this article but first let’s import our new recipe to our main deploy.yaml file.
To do that, we simply add a line inside the import section just like we’ve done so far. Since we called our folder deploy, we need to add deploy/my-first-recipe.php.
  import:
    - recipe/laravel.php
    - contrib/php-fpm.php
    - contrib/npm.php
+   - deploy/my-first-recipe.php
And that’s all there is to it. We’ve created and imported our first custom recipe. Now let’s write code inside it!
Setting options
All the concepts we’ve seen in episode 3 when creating our deploy.yaml file are still applicable here. Instead of defining them using YAML though we’re going to do that using PHP.
So let’s start with options — i.e. the key/value store under the config section of our deploy.yaml file.
Using PHP, we can set a key/value pair by using the set function. The first argument being the key and the second the value.
You may also override existing options by redefining them using the set function.
// Create your own options.
set('key', 'value');

// Override existing ones.
set('deploy_path', '/custom/deploy/path');
If the value of an option is an array, you may also append values to that array by using the add function. All values provided within the array will be merged with any existing values.
// You can set and append to arrays.
set('shared_files', ['.env']);
add('shared_files', ['foobar.md']);
In the example above, the shared_files array will contain both .env and foobar.md.
Finally, options can be lazily loaded — i.e. their value will not be resolved until it is required. Instead of providing a value to the set function, we simply need to provide a callback. The return value of this callback will be used whenever this option is required somewhere. The returning value will be cached by Deployer such that, when required more than once, the function will only execute once.
// This function will only run when someone
// requests the value of this option.
set('lazy_loaded_option', function () {
    return 42;
});
Lazy loaded options are particularly helpful to provide complex default values for recipes. That way if we decide to override that option, that function will never be executed.
Now let’s have a look at how to retrieve the value of an option.
Getting options
To retrieve the value of an option simply use the get function. Similarly to how we do things in Laravel, the first argument is the key we want to retrieve and the second optional argument is the default value to provide if that option does not exists. Speaking of, you may also use the has function to check the existence of an option.
// Get the value of an option.
$myOption = get('my_option');

// Get the value of an option or the given default value.
$myOption = get('my_option', 'My default value');

// Determine if "my_option" exists.
$myOptionExists = has('my_option');
Additionally, you may use the “mustache notation” — i.e. wrap your option key in double braces — to access the value of an option inside a string.
For example, you may define the value of an option using the value of another like so.
// Use the mustache notation to access options anywhere.
set('my_first_option', 'foo');
set('my_second_option', '{{my_first_option}} bar');
Most functions provided by Deployer will automatically parse strings for us such that options are resolved from their mustache notation. That being said, if you’d like to parse the result of a string containing options yourself, you may do this by using the parse function.
// Parse the options in the string.
$welcomeMessage = parse('Deploying to {{hostname}}!');
As I said though, almost all function provided by Deployer do that automatically for us so we shouldn’t need to reach out for the parse function too often.
Okay, let’s move on to tasks.
Creating tasks
Tasks are super important since they are the main unit of our deployment flow.
To create a task, we usually end up using more than one function provided by Deployer but 4 of them are particularly important.
Let’s start with a simple example using all 4 of these functions and I’ll explain what they do after the code. Imagine we have an artisan command that we would call using php artisan my-command and we want to create a task that immediately delegates to that command. Here’s how we can achieve this.
desc('Run "php artisan my-command" on the host.');
task('artisan:my-command', function () {
    cd('{{release_or_current_path}}');
    run('php artisan my-command');
});
-
desc. This function provides a description for the next task we’re going to define. That’s why you’ll often find adesccall immediately before calling thetaskfunction. -
task. This function registers our task by using the provided name and callback. The callback will be executed directly inside our host. -
cd. Inside thetaskcallback, you’ll find plenty of useful functions provided by the Deployer API. That one is particularly helpful because it allows us to jump to a given directory. -
run. Potentially the most important function to use inside thetaskcallback. It allows us to run any arbitrary command-line inside our server and returns its output.
Note that both the cd and the run function will parse any options provided in the string for us.
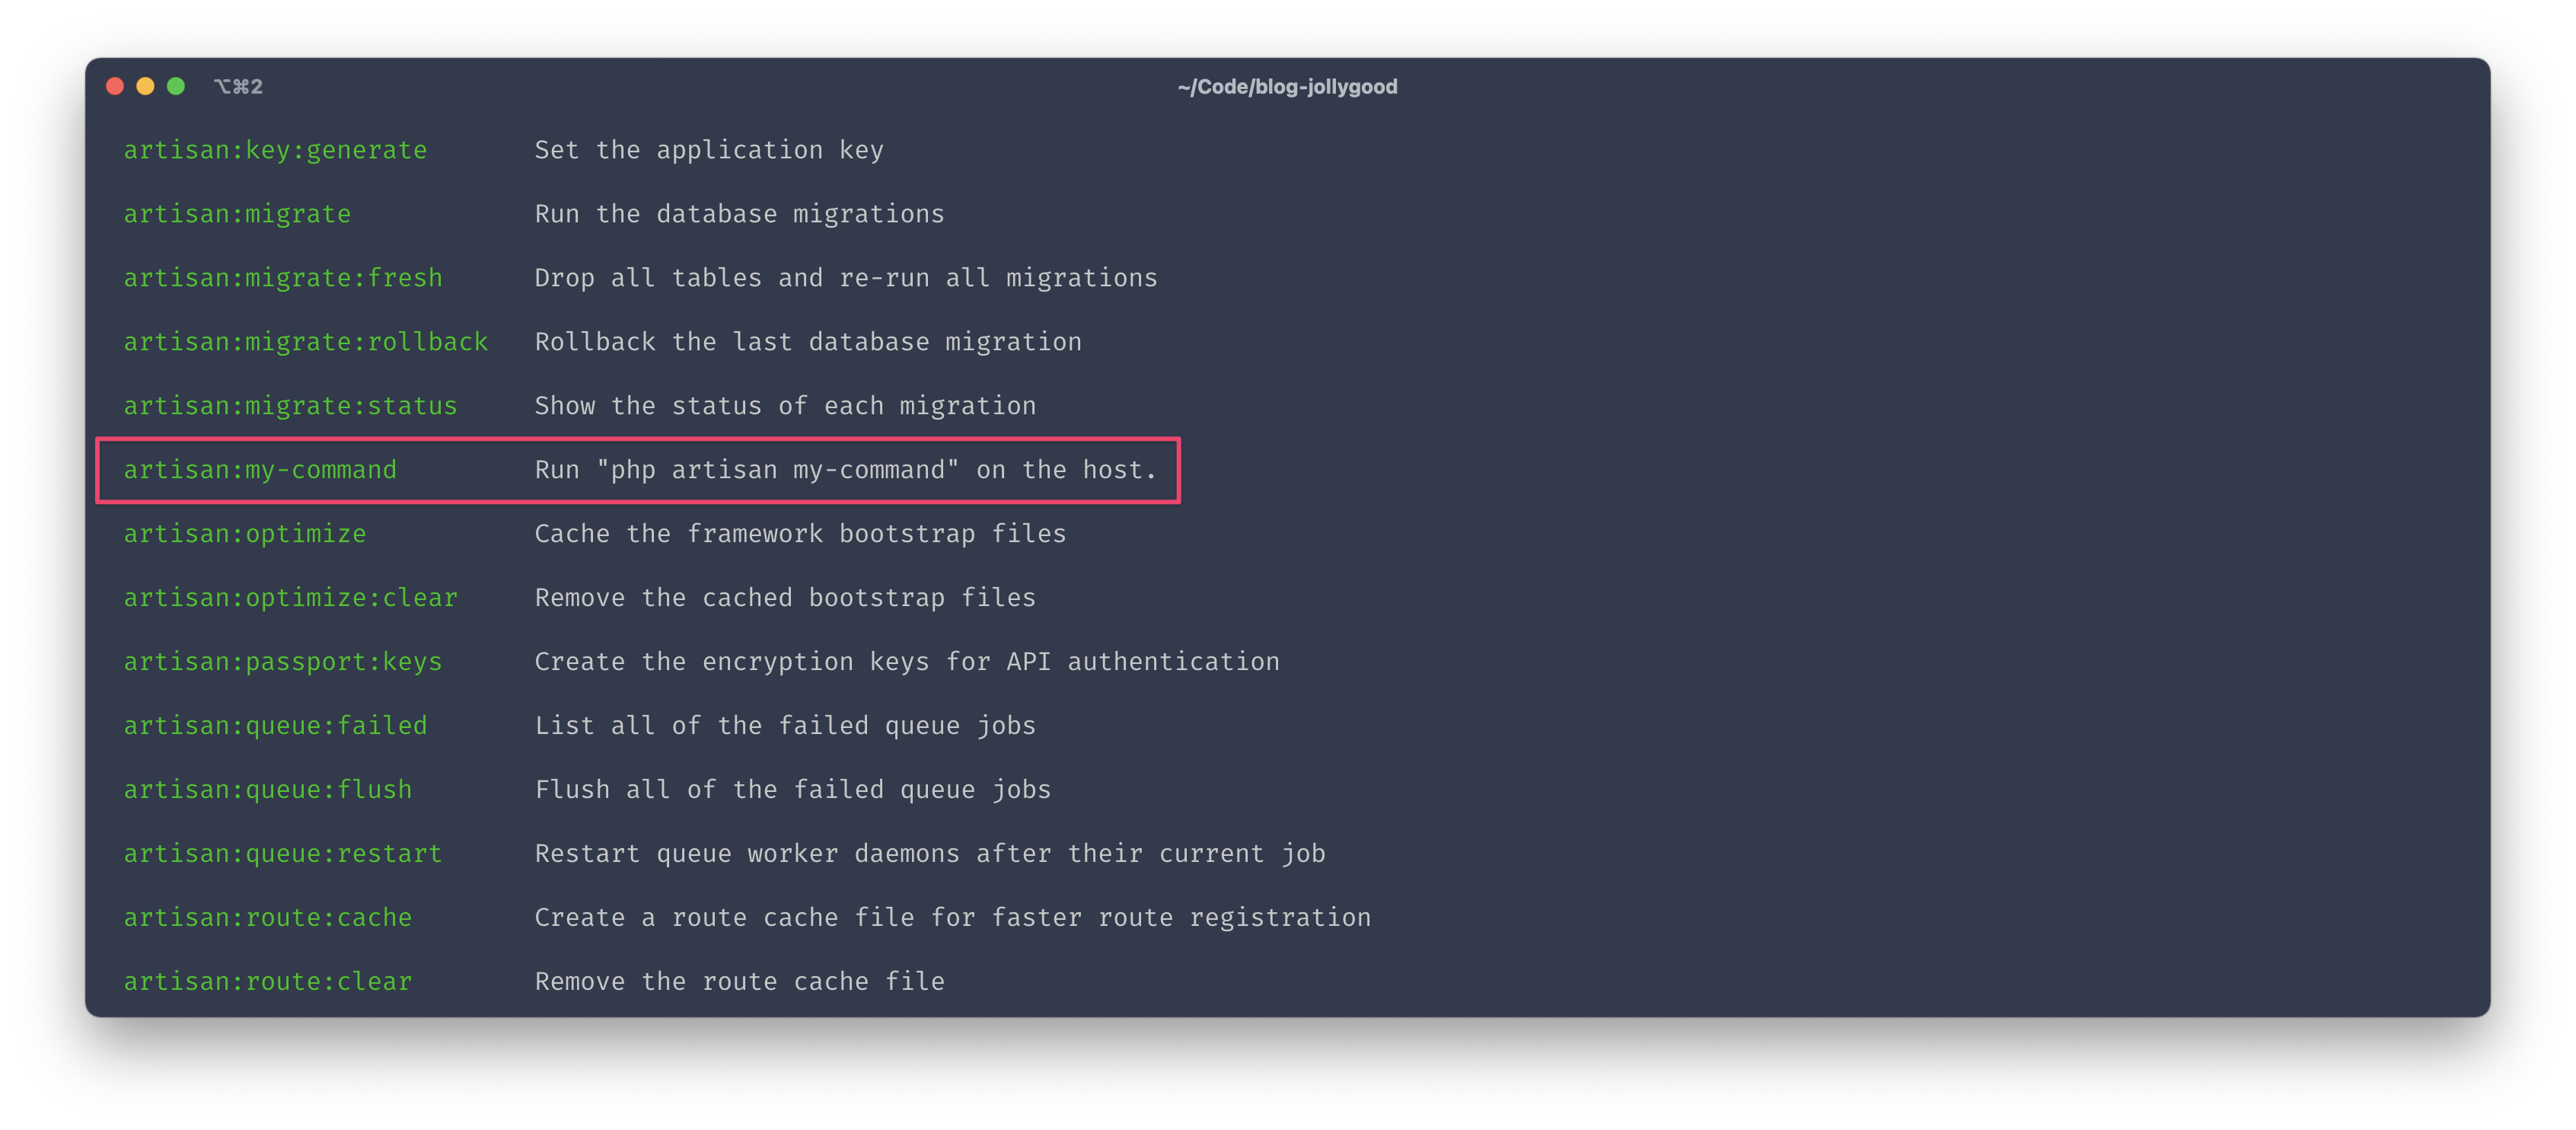
And voila! We’ve created our first custom task. If you save this and run dep on your terminal, you should see the list of all available tasks including the one we’ve just created. Notice how the text provided in the desc function is displayed here.
Instead of accepting a callback that will be executed inside our server, the task function can also accept an array of other tasks. This creates a “parent” task that will execute all of the given tasks in order whenever it is invoked.
task('restart:everything', [
    'nginx:restart',
    'php-fpm:reload',
    'mysql:restart',
    'redis:restart',
]);
Now, to be honest, what we’ve learned so far about tasks and options should be more than enough for most of the customisation you’ll ever need. But there’s much more we can do so let’s not stop the fun just yet.
Writing output
So far we’ve learned how to run custom command lines to our server but we haven’t talked about displaying their result back to us.
Whilst the run method is super useful, it doesn’t output anything back to us. Instead, it captures the output and gives it back as a return value.
But that’s a good thing. That means we get to control what should and shouldn’t be shown when we run tasks. If we didn’t have such control, the console output of dep deploy wouldn’t be as nice and clean.
Alright, so how do we write some output within our tasks? We do that by using the writeln function. It will output whatever is given as the first argument and add a line jump at the end.
For example, say we wanted to create a task that runs ls -la inside our server and returns the output of that command. Here’s how we can achieve this.
desc('Show the content of the app directory.');
task('app:directory', function () {
    cd('{{release_or_current_path}}');
    $output = run('ls -la');
    writeln($output);
});
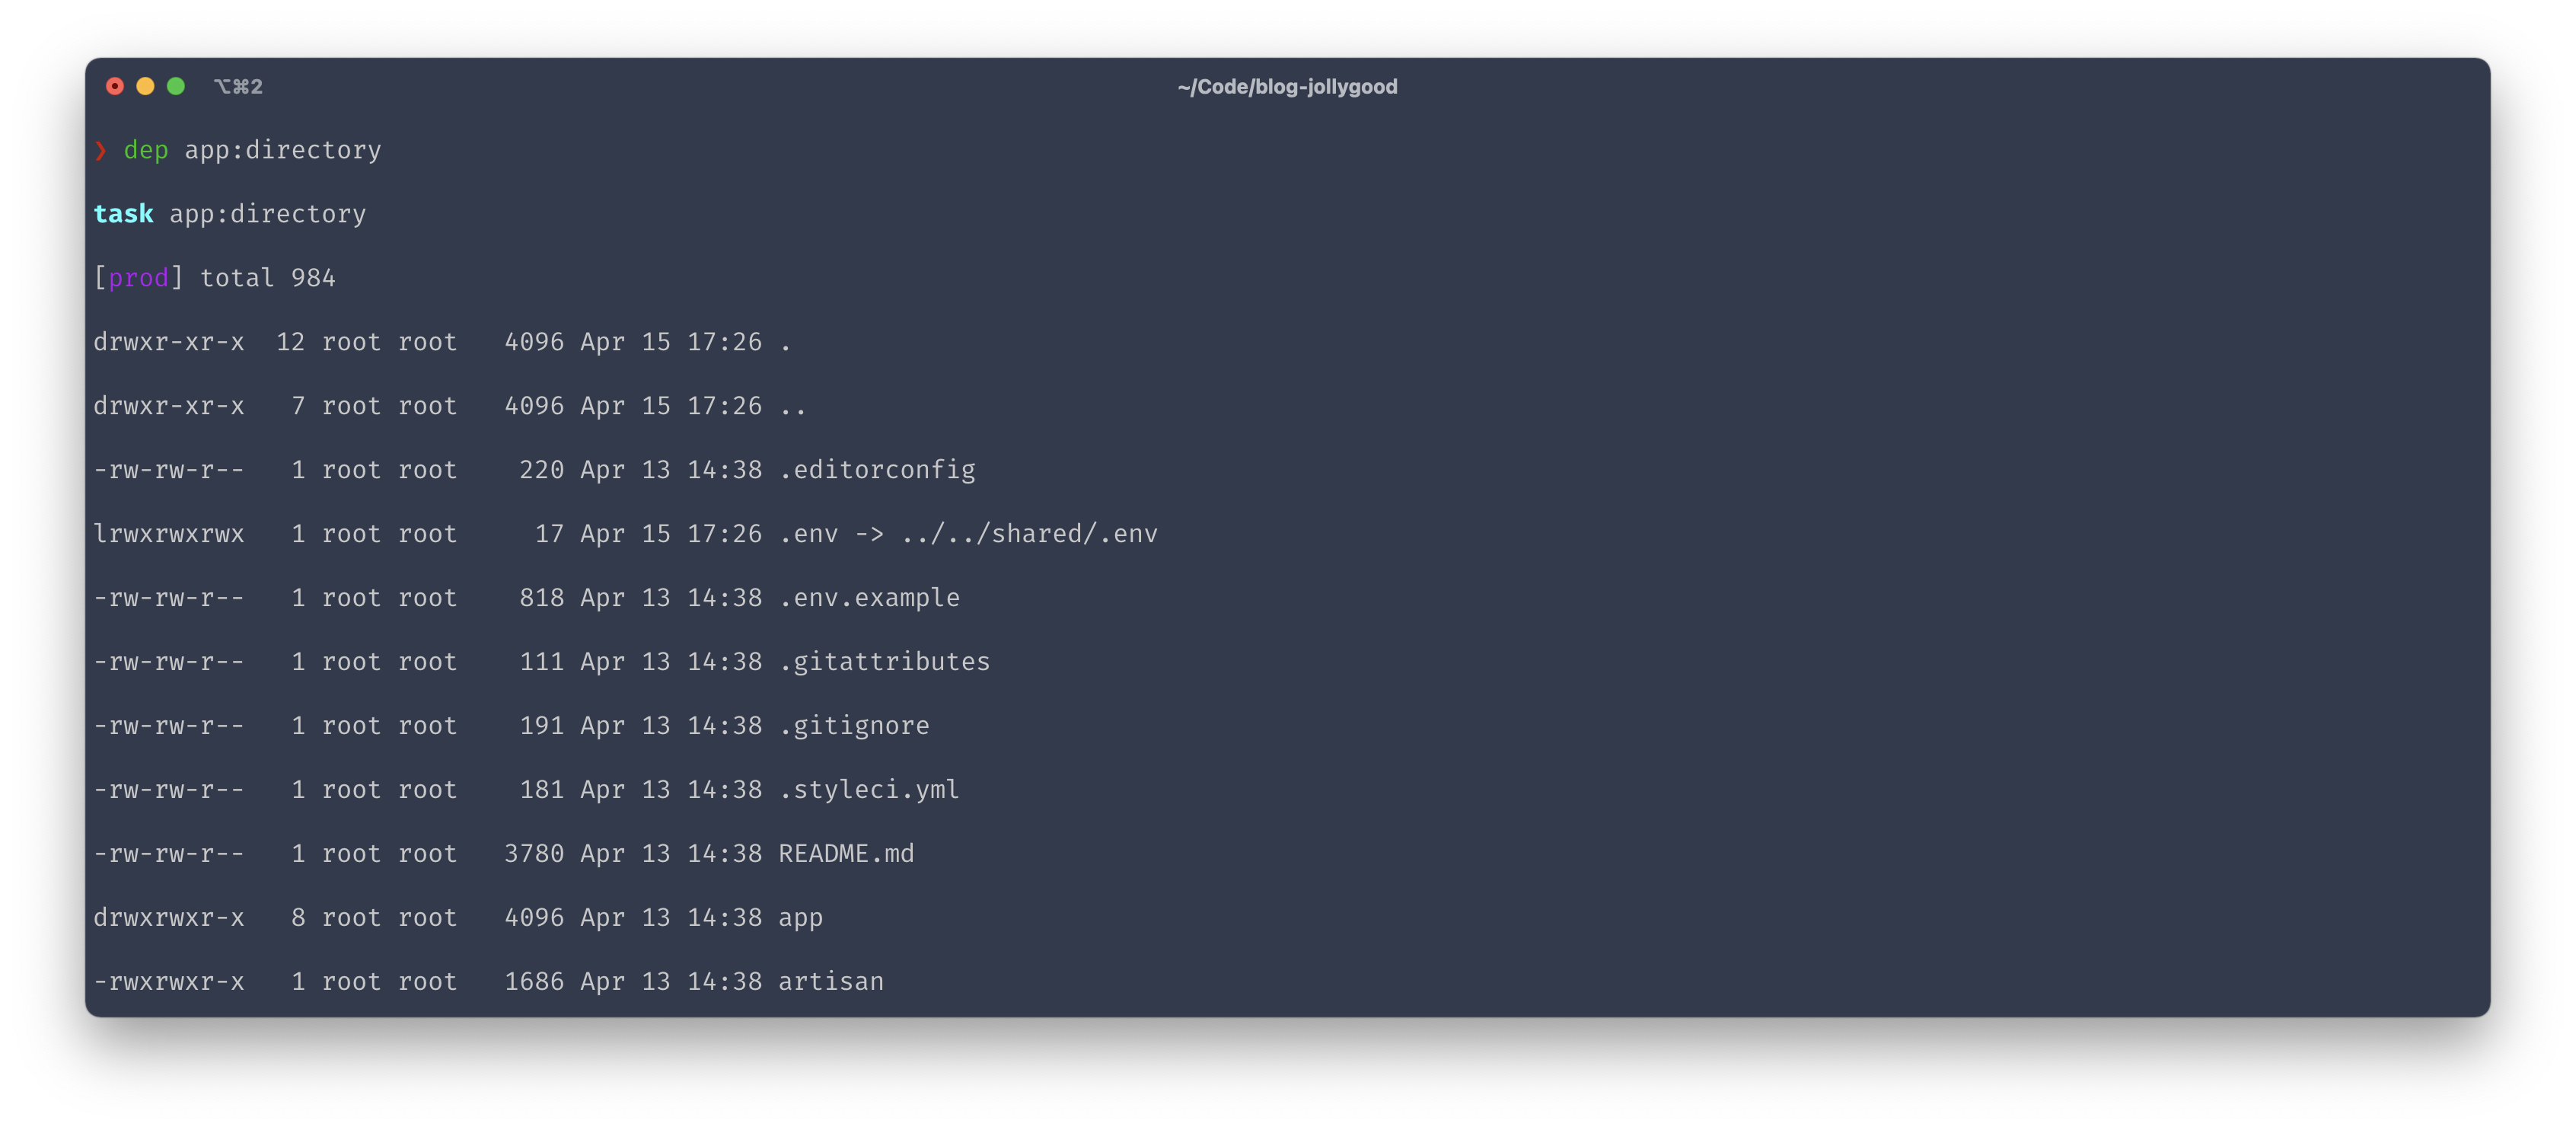
Now, we if run dep app:directory, we will see the folder structure of our application.
On top of writeln, Deployer provides the following output methods for you:
-
info. Same aswritelnbut adds a bold green "info" before the text. -
warning. Adds a bold yellow "warning" before the text and makes the entire text yellow. -
output. This function accepts no argument and returns an instance ofOutputInterfacefrom Symfony — i.e.Symfony\Component\Console\Output\OutputInterface. This allows you to create complex outputs by using the underlying Symfony API. For example, you may use it to create progress bars.
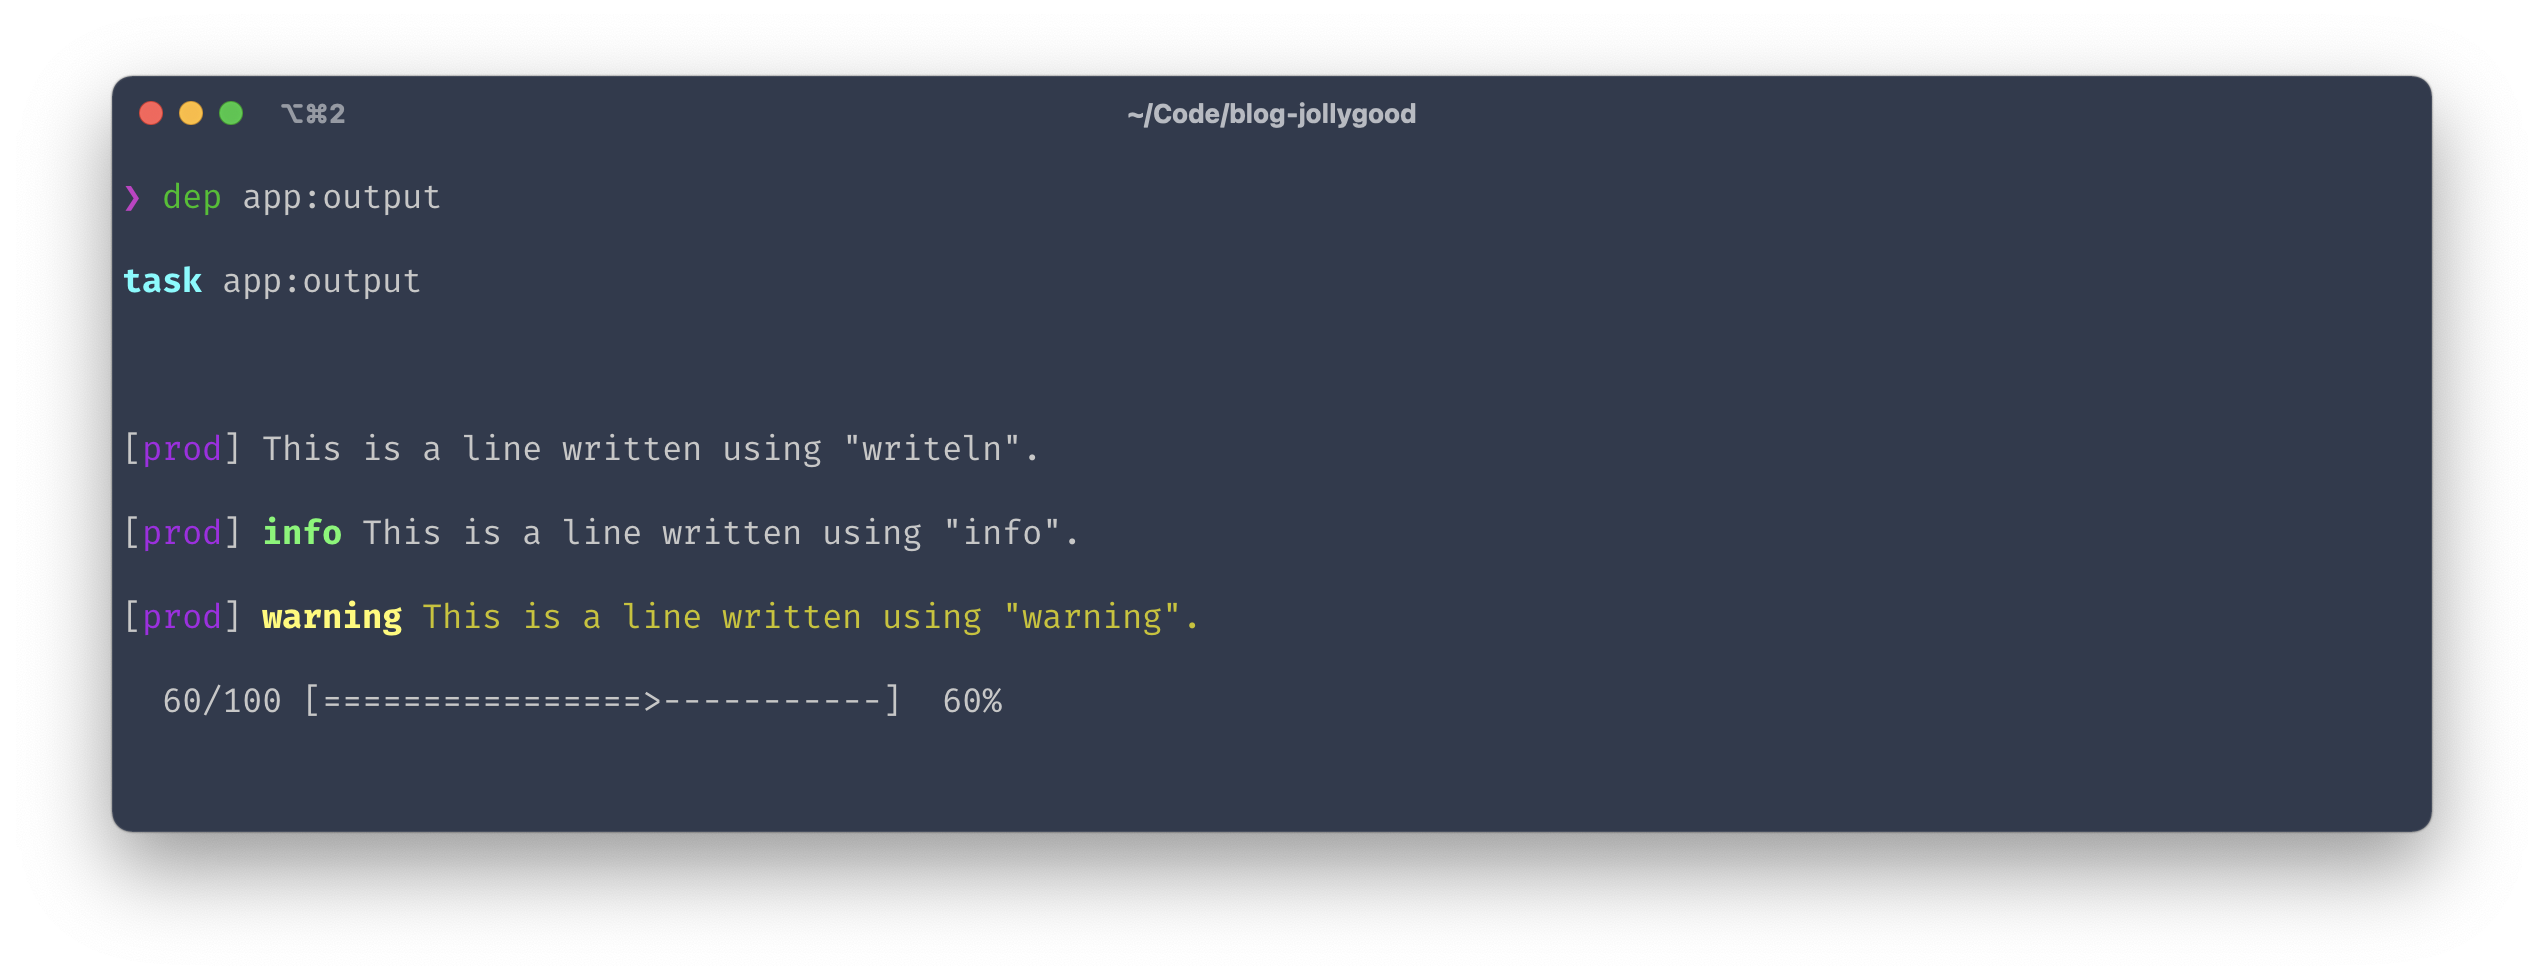
Here’s a task that demos all these functions.
use Symfony\Component\Console\Helper\ProgressBar;

desc('Demo all writing functions.');
task('app:output', function () {
    writeln('This is a line written using "writeln".');
    info('This is a line written using "info".');
    warning('This is a line written using "warning".');

    $output = output();
    $progressBar = new ProgressBar($output, 100);
    $progressBar->setProgress(60);
});
And here’s its execution.
Prompting input
Now that we know how to display things in our tasks, let’s talk about inputs. Deployer provides the following functions for us to ask questions to whoever is running the task.
-
ask. This function displays a question and returns the answer. -
askChoice. Same asaskbut we offer a list of options to choose from. -
askConfirmation. Asks a question whose answer can either be yes or no. -
askHiddenResponse. Asks a question whose answer will not be displayed in the terminal — e.g. for prompting password.
Each of these function except askHiddenResponse can provide a default value that will be used if the user presses "Enter". Here’s a task that demonstrates these function.
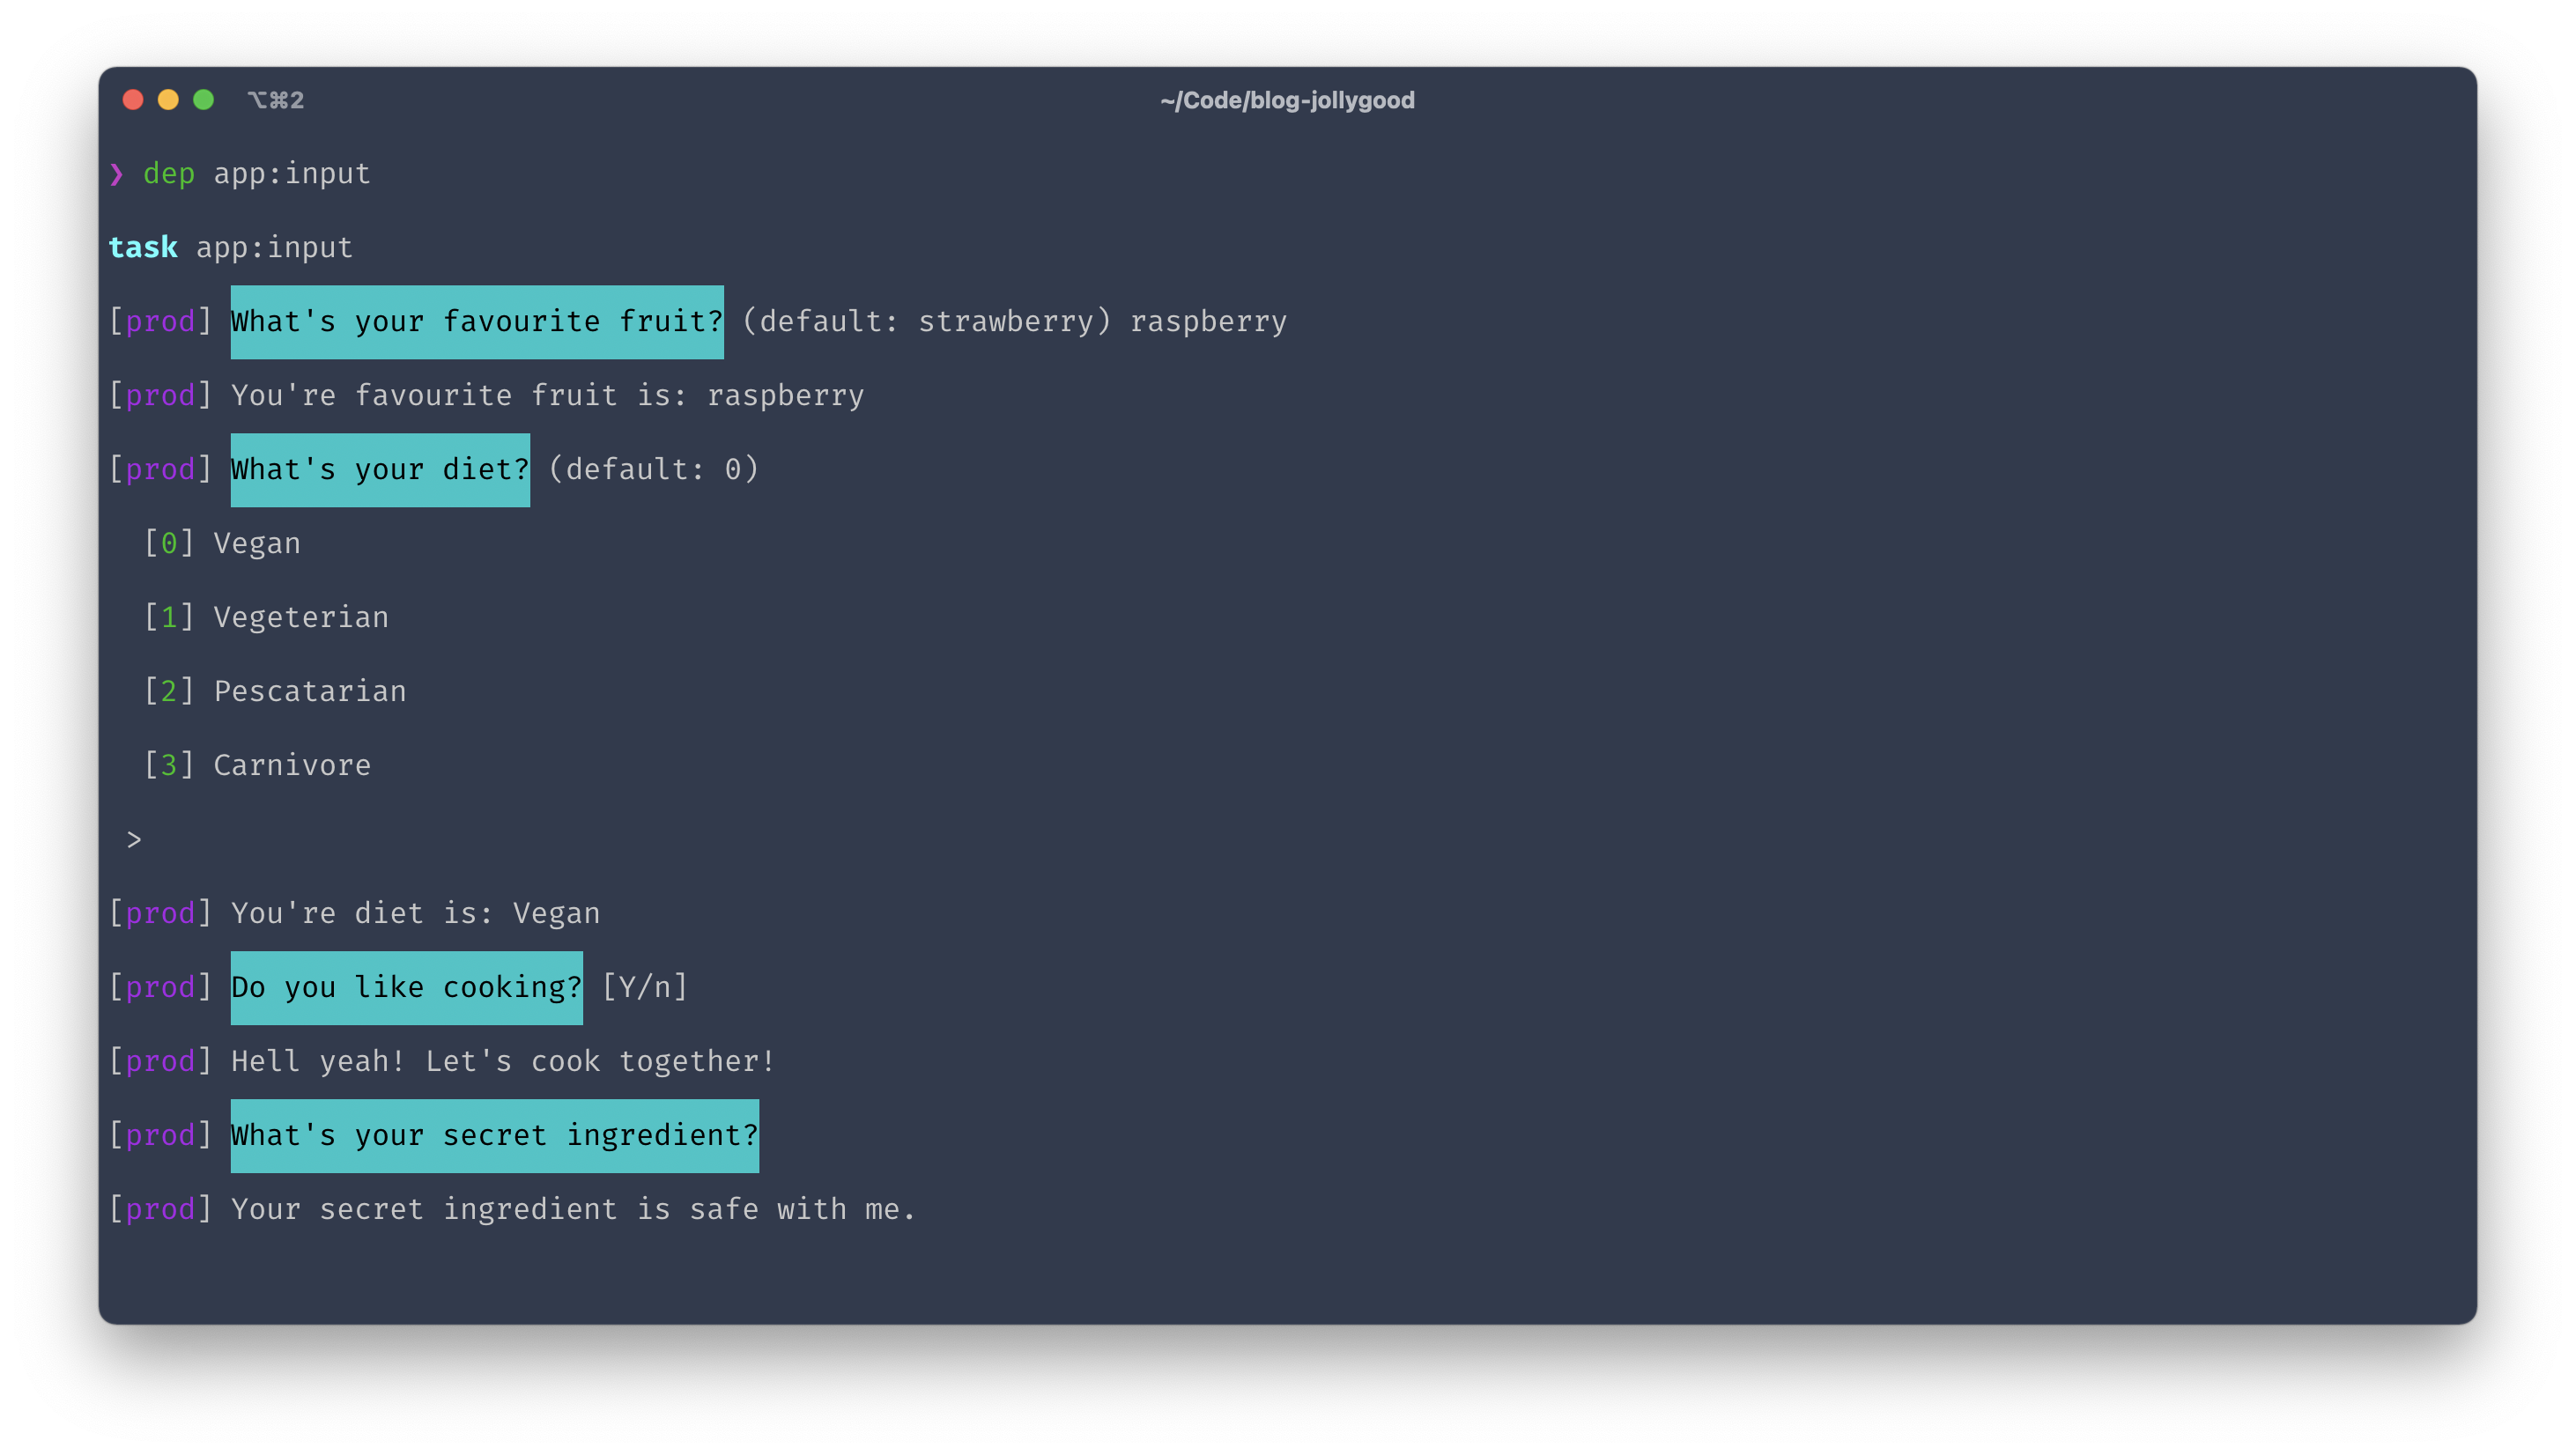
desc('Demo all prompting functions.');
task('app:input', function () {
    $fruit = ask("What's your favourite fruit?", 'strawberry');
    writeln("Your favourite fruit is: $fruit");

    $diet = askChoice("What's your diet?", ['Vegan', 'Vegeterian', 'Pescatarian', 'Carnivore'], 0);
    writeln("Your diet is: $diet");

    $likesCooking = askConfirmation("Do you like cooking?", true);
    writeln($likesCooking ? "Hell yeah! Let's cook together!" : "No worries, I'll cook for you!");

    $secretIngredient = askHiddenResponse("What's your secret ingredient?");
    writeln("Your secret ingredient is safe with me.");
});
And here’s the terminal output after running it.
Whilst prompting can be a useful and human-friendly way to configure tasks, remember that options can also be used within tasks to achieve the same result. Options have the advantage of being reusable, extendable and overridable by whoever ends up using our recipe.
Additionally, prompting the user won’t be very useful when there’s no user to prompt. For example, this could happen if the task was executed inside a Continuous Integration workflow — e.g. CI/CD pipelines on GitLab or GitHub actions on GitHub.
That being said, we can fix that last issue using options. For example, we can create an option called should_prompt that defaults to true like so.
set('should_prompt', true);
Then, we can use the value of that option to determine whether we should prompt the user or not.
desc('Demo bypassing prompts.');
task('app:bypass:prompt', function () {
    $shouldPrompt = get('should_prompt', true);
    $fruit = $shouldPrompt ? ask("What's your favourite fruit?", 'strawberry') : 'strawberry';
    writeln("Your favourite fruit is: $fruit");
});
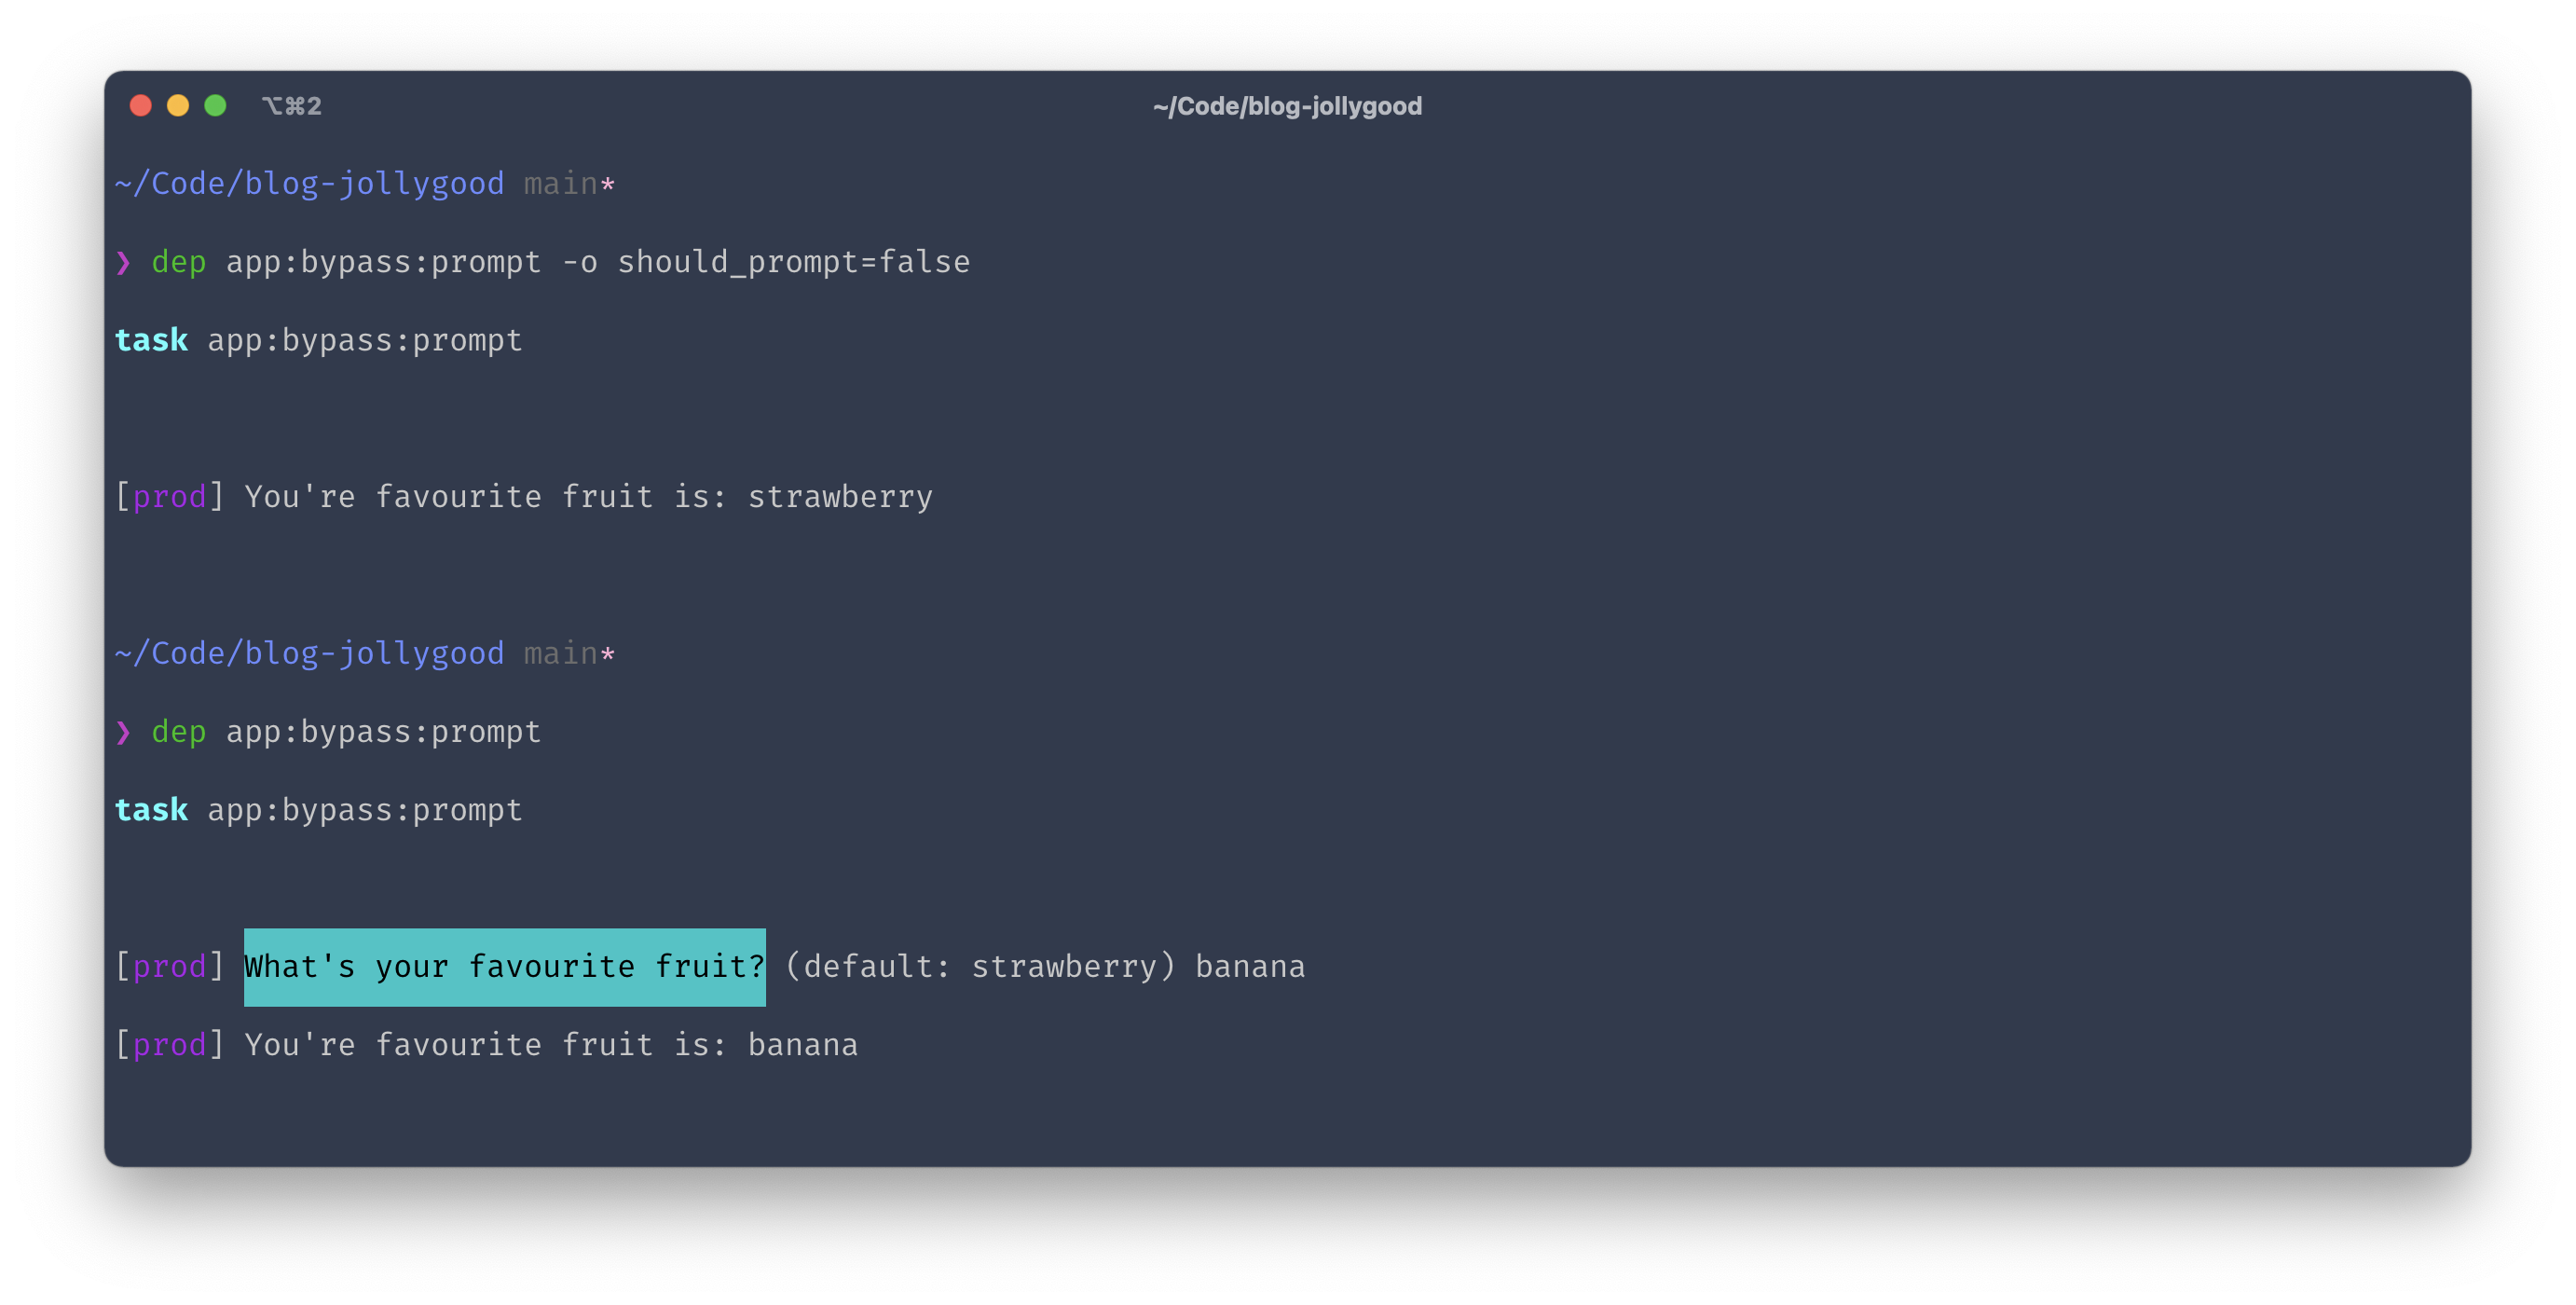
Finally, we can add an --option (or -o for short) to our dep task command to override the value of an option at runtime. For example, this is how we would run our task whilst setting the should_prompt option to false.
dep app:bypass:prompt -o should_prompt=false
And sure enough, if we run this we see no question from our task.
Alternatively, we may also use environment variables to determine if a user can be prompted. To do this, we simply need to replace our should_prompt option with a call to the getenv function. This function accepts an environment variable and returns its value. Assuming we always set CI=true in a Continuous Integration environment, we can replace our $shouldPrompt variable with this.
$shouldPrompt = ! getenv('CI');
EDIT 2021-04-25: I've just learned via Anton — the creator of Deployer — that there's a much simpler way to do this. There is a --no-interaction CLI option (or -n for short) that automatically skips all questions in the task and uses the default value provided instead. So if we had the following task.
task('app:fruit', function () {
    $fruit = ask("What's your favourite fruit?", 'strawberry');
    writeln("Your favourite fruit is: $fruit");
});
And ran it using the --no-interaction or -n CLI option.
dep app:fruit -n
Then we would see "Your favourite fruit is: strawberry". Much better right?
A little note for my fellow artisans. Since this series is about deploying a Laravel application using Deployer, you’re probably wondering why you’d need all of this input/output bric-à-brac when you could just create an artisan command and run it from deployer using run('php artisan my-command').
Well, you’re not wrong. In fact, in a lot of cases it might make more sense to create an artisan command anyway since it can be run locally, it can be tested, it can be added to the scheduler, it follows a structure your colleagues are used to, etc.
However, that can only work for tasks that only need access to your application layer. When creating deployment tasks, you’ll likely need to run CLI instructions affecting the infrastructure layer — e.g. rm -rf node_modules if you wanted to reset your npm dependencies. Whilst you could technically do that in an artisan command, it might be cleaner to write these low-level instructions inside a task instead of pushing everything to artisan commands. But of course, you do you, I’m not the Deployer recipe police. End of disclaimer. 😄
Other available methods
We’ve seen a lot of useful Deployer functions in this article yet there are many more available. For example:
- You may use
upload($source, $destination)ordownload($source, $destination)to respectively send files from your machine to your host or download files from your host to your machine. - You may use
invoke($task)to invoke another task from within a task callback. - You may use
fail($task, $callback), to execute some logic if and only if a given task fails. - You may use
commandExist($command)to check if a particular command likenpmexists on the server before running it. This is particularly helpful when creating open-sourced recipes.
I think we’ve seen enough for us to be comfortable building our own tasks and recipes but feel free to check everything else that’s available from the Deployer API. You can see all functions provided by Deployer here.
Labelling hosts and filtering tasks
Deployer also allows us to label our hosts in any way we want. We simply provide a labels option inside our host and give key/value pairs that identify it.
For instance, say we had two production servers. One used for serving HTTP requests from our API and another one used for processing jobs in the queue. We’ll say the former is in api mode and the latter in worker mode. Then we could label our two hosts accordingly like this.
hosts:
  production_1:
    # ...
    labels:
      mode: api
  production_2:
    # ...
    labels:
      mode: worker
Why would we want to do this? Because now we can target our hosts not only by aliases — i.e. production_1 and production_2 — but also by selectors!
If you look at the help page of any task by running dep task -h you should see the repeatable selector argument.
![Screenshot of the terminal output for "dep npm:install -h" showing the help page of the task. The usage section shows: npm:install [options] [--] [<selector>…].](/assets/articles/2021/0410-deployer-5-recipes/dep-task-help.png)
A selector is a key/value pair following the format key=value that will select all host with matching labels. For example, if we wanted to run a task only on hosts that process jobs, you would run dep task -- mode=worker.
Furthermore, you may add multiple selectors provided you have defined the corresponding labels on your hosts. For example, dep task -- mode=worker stage=prod would only affect production servers that process jobs.
The good thing about selectors is that they are consistently used everywhere in Deployer when we need to select hosts. For example, after defining your task using the task function, you may chain the select method to ensure the task will only run on selected hosts.
task('my-task', function () { ... })
    ->select('mode=api');
The select method supports multiple selectors by using commas , as OR separators and ampersands & as AND separators. Here are a few examples.
// mode=api OR mode=worker
'mode=api, mode=worker';

// mode=api AND stage=prod
'mode=api&stage=prod';

// (mode=api AND stage=prod) OR mode=worker
'mode=api&stage=prod, mode=worker';
Notice how we’ve got even more methods available to us now that we know the task function returns something. In fact, it returns the task object created by Deployer — concretely, Deployer\Task\Task.
From that Task object, we may chain many other methods such as:
-
->local()to tell Deployer that this task should run on our machine rather than on our hosts. -
->once()to tell Deployer that this task should run only once on one of the hosts. -
->hidden()to hide this task from CLI. - And more.
Feel free to have a look at the Task class to see all available methods.
A webhook recipe
Right, we’ve seen enough theory for now. Let’s have a look at a real recipe example.
They are plenty of available recipes such as contrib/discord.php that sends a Discord notification during a deployment. Similarly to these recipes, we’re going to create a recipe that pings us during a deployment but instead of sending a platform-specific notification, we’re going to send a generic webhook.
First of all, we’re going to create the following two options.
-
webhook_urlto know who we should ping. This will be required. -
webhook_datato pass an array of data to our webhook endpoint. This will default to an array containing the release number and the application name.
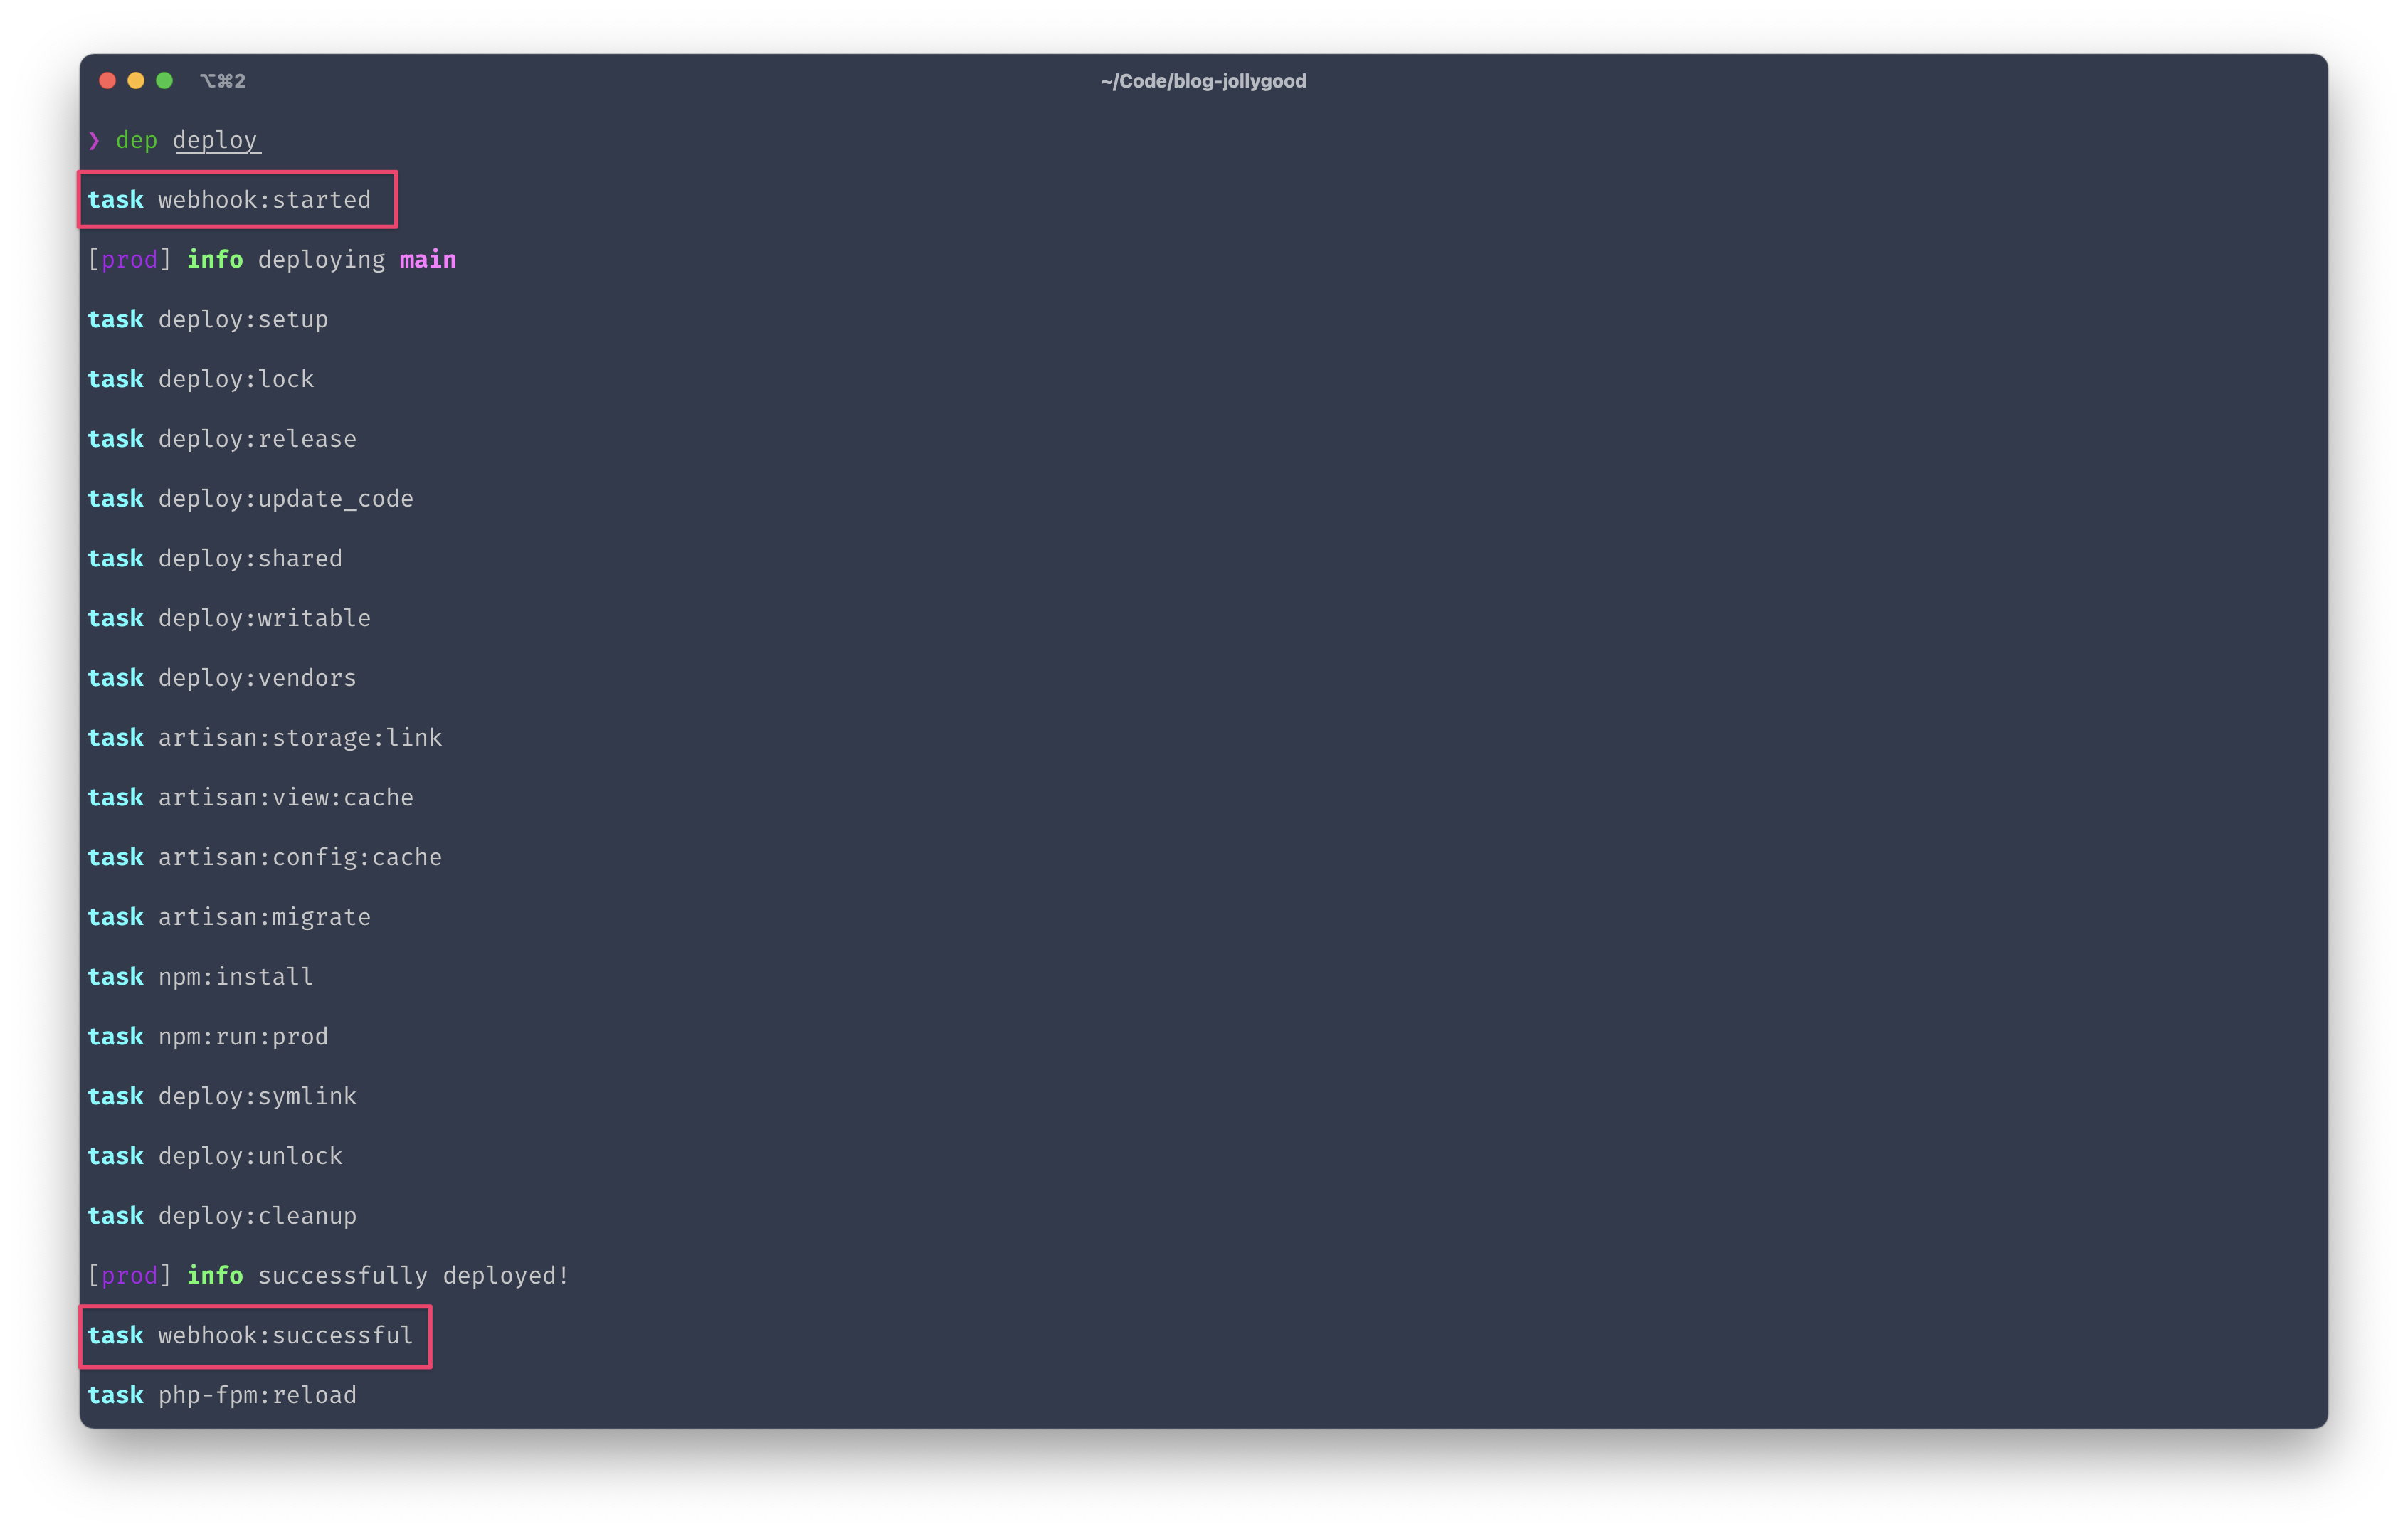
Then we’re going to create three tasks, one for each deployment state: webhook:started, webhook:successful and webhook:failed.
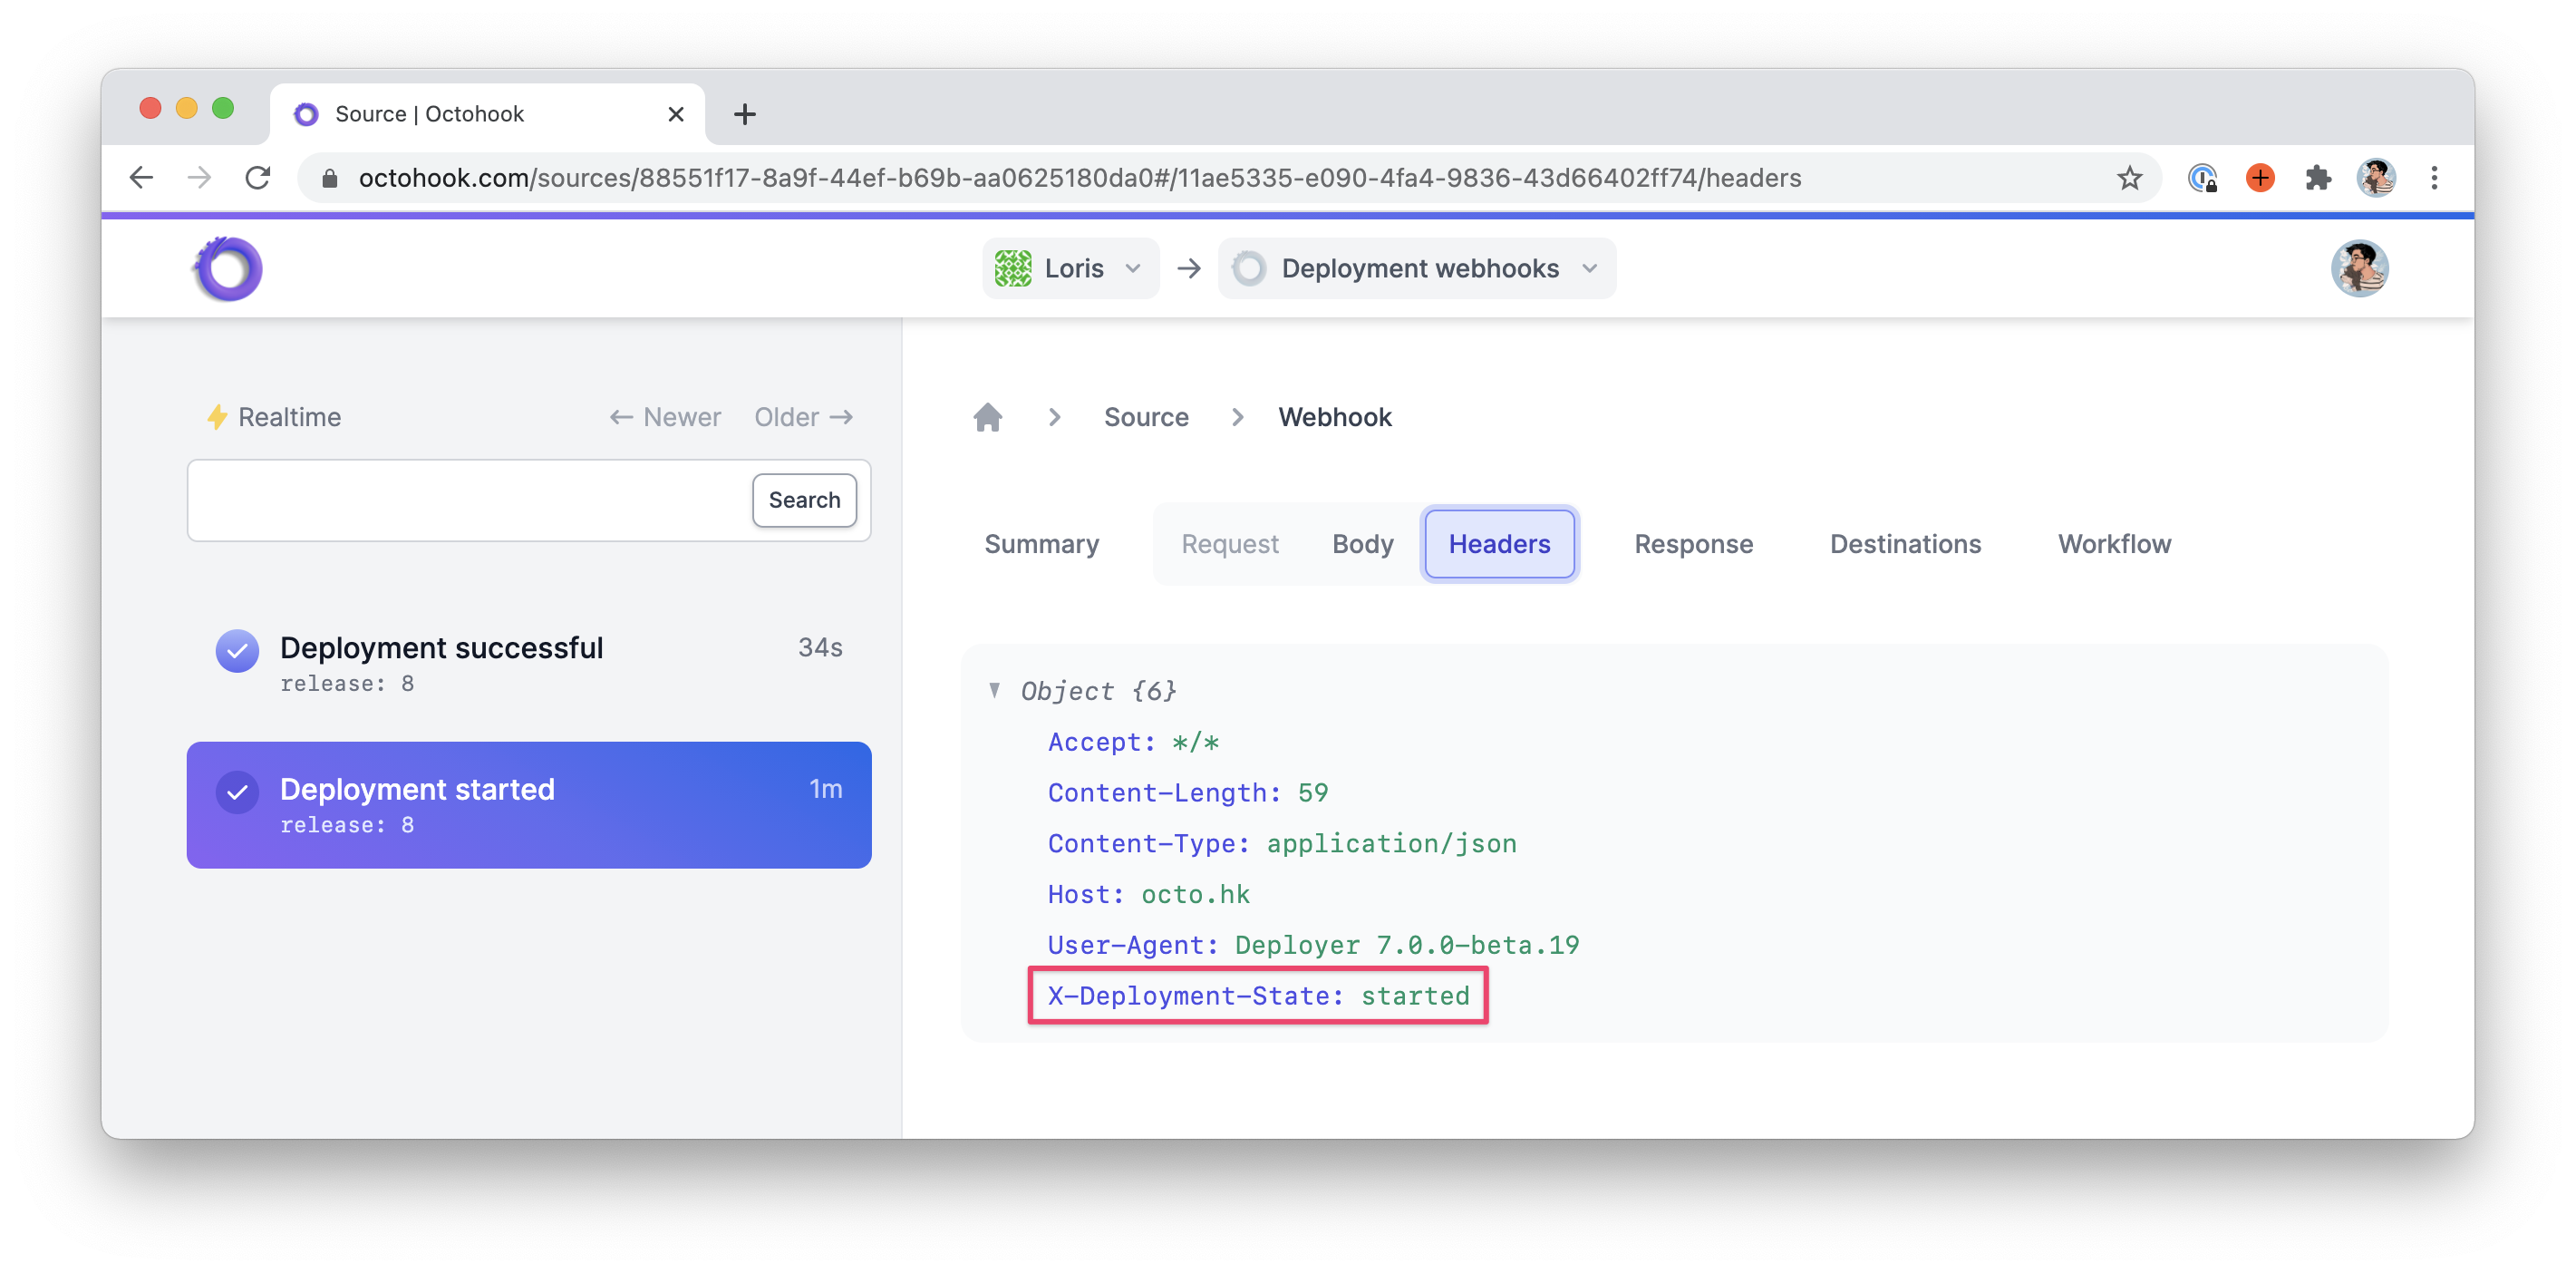
Each of these tasks will send a JSON POST request to the webhook_url using the webhook_data. Additionally, they will send their deployment state — i.e. started, successful or failed — inside an X-Deployment-State header to avoid altering the webhook_data array.
Deployer has a little cURL utility class that it uses to make HTTP requests so we’ll use it here as well but feel free to use whichever HTTP client you want — such as Guzzle.
Everything we need to create this recipe, we’ve studied in this article so I’m just going to go ahead and paste the code. There’s nothing new from a theoretical point of view but pay attention to how all the pieces we’ve studied fit together.
<?php

namespace Deployer;

use Deployer\Utility\Httpie;

set('webhook_url', function () {
    // We make this option required by throwing an exception if it's not overriden.
    throw new \RuntimeException('Please set up the "webhook_url" option.');
});

set('webhook_data', function () {
    return [
        // We can get the release number via the "release_name" option.
        'release' => get('release_name'),
        'application' => get('application'),
    ];
});

desc('Notify via webhook that the deployment started.');
task('webhook:started', sendWebhook('started'));

desc('Notify via webhook that the deployment was successful.');
task('webhook:successful', sendWebhook('successful'));

desc('Notify via webhook that the deployment failed.');
task('webhook:failed', sendWebhook('failed'));

function sendWebhook(string $state) {
    return function () use ($state) {
        Httpie::post(get('webhook_url'))
            ->body(get('webhook_data', []))
            ->header("X-Deployment-State: $state")
            ->send();
    };
};
Alright, so let’s save that as deploy/webhook.php and import it inside our deploy.yaml file.
  import:
    - recipe/laravel.php
    - contrib/php-fpm.php
    - contrib/npm.php
    - deploy/my-first-recipe.php
+   - deploy/webhook.php
Next, we need to configure our webhook_url option — meaning we need a webhook URL. For that, we can either create a new endpoint on our application or we can use a webhook hub such as Octohook.
I’m slightly biased since I co-created Octohook but it’s a nice app for capturing and redirecting webhooks in a very flexible way. In any case, it’s perfect for showcasing our little webhook recipe here. Thus, I created a new source for the occasion and copied the webhook URL provided by Octohook.
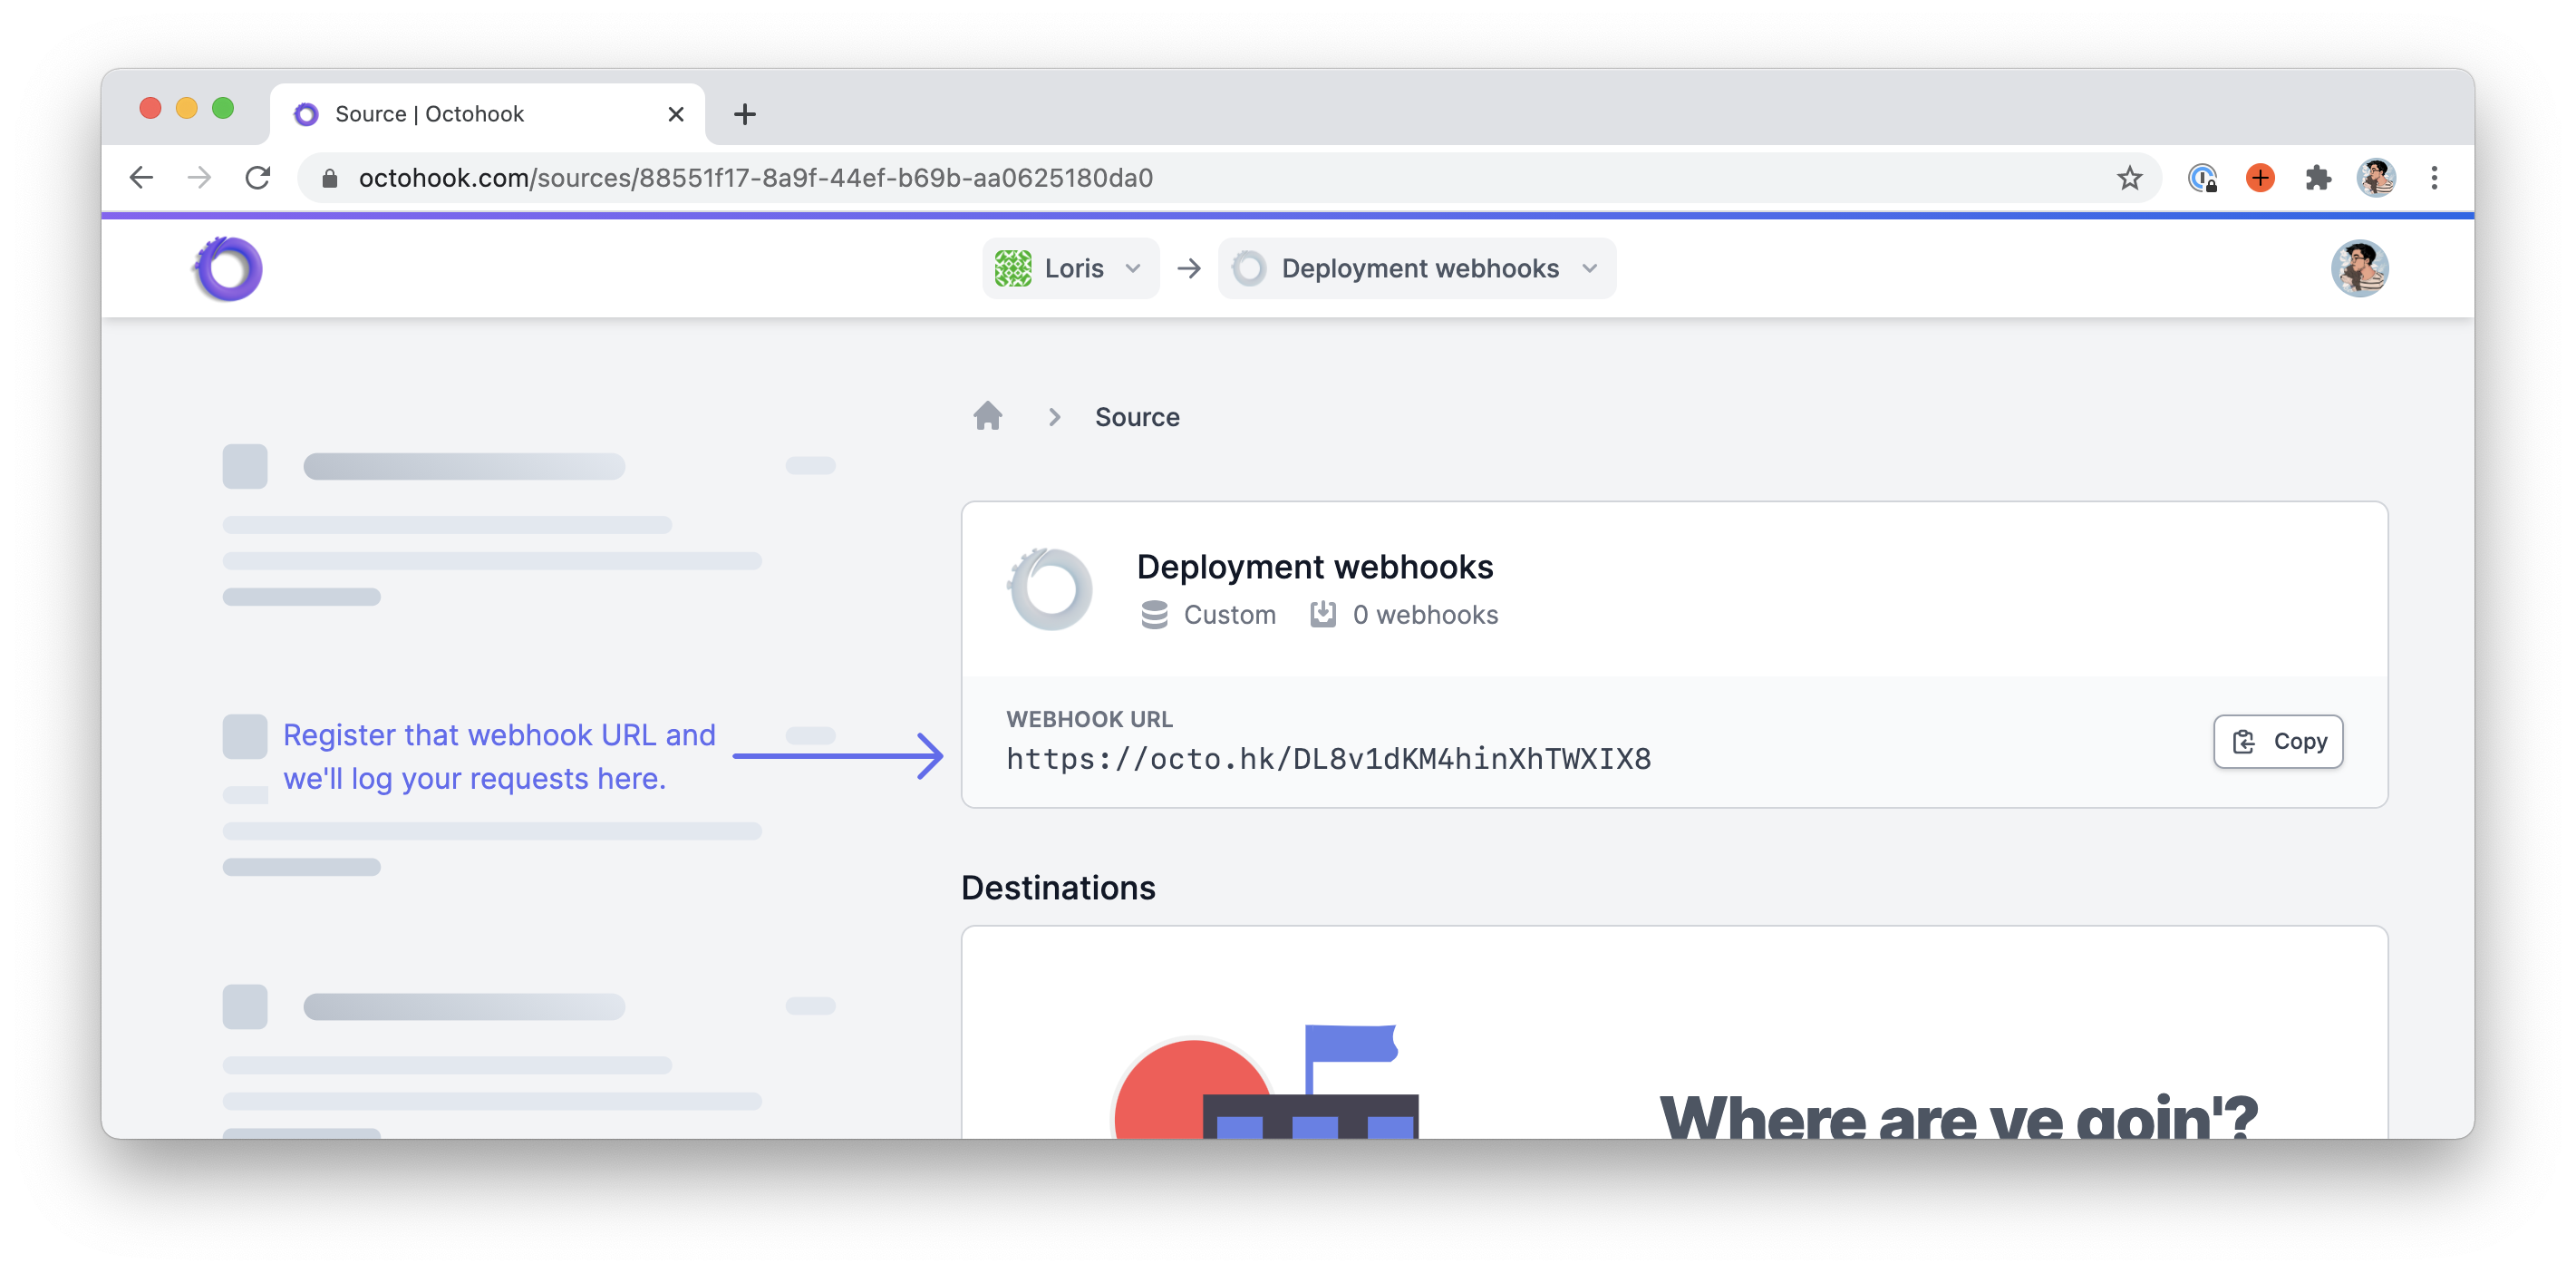
I can now store this webhook URL inside our deploy.yaml file like so.
  config:
    application: 'blog-jollygood'
    repository: '[email protected]:lorisleiva/blog-jollygood.git'
    php_fpm_version: '8.0'
+   webhook_url: 'https://octo.hk/DL8v1dKM4hinXhTWXIX8'
We won’t configure the webhook_data option since we’ve already provided a good default value.
Now, all we need to do is add our three new tasks to our deployment flow. We could add them to our deploy task directly but since there are supposed to hook before and after our deployment flow, they work perfectly with the before and add sections we’ve studied in episode 3.
+ before:
+   deploy: webhook:started

  after:
+   deploy:success: webhook:successful
-   deploy:failed: deploy:unlock
+   deploy:failed:
+     - deploy:unlock
+     - webhook:failed
Alright, let’s try this. We’ll run dep deploy one more time to create a new deployment.
And now if we go to Octohook, sure enough, we see our two webhooks with the right data…
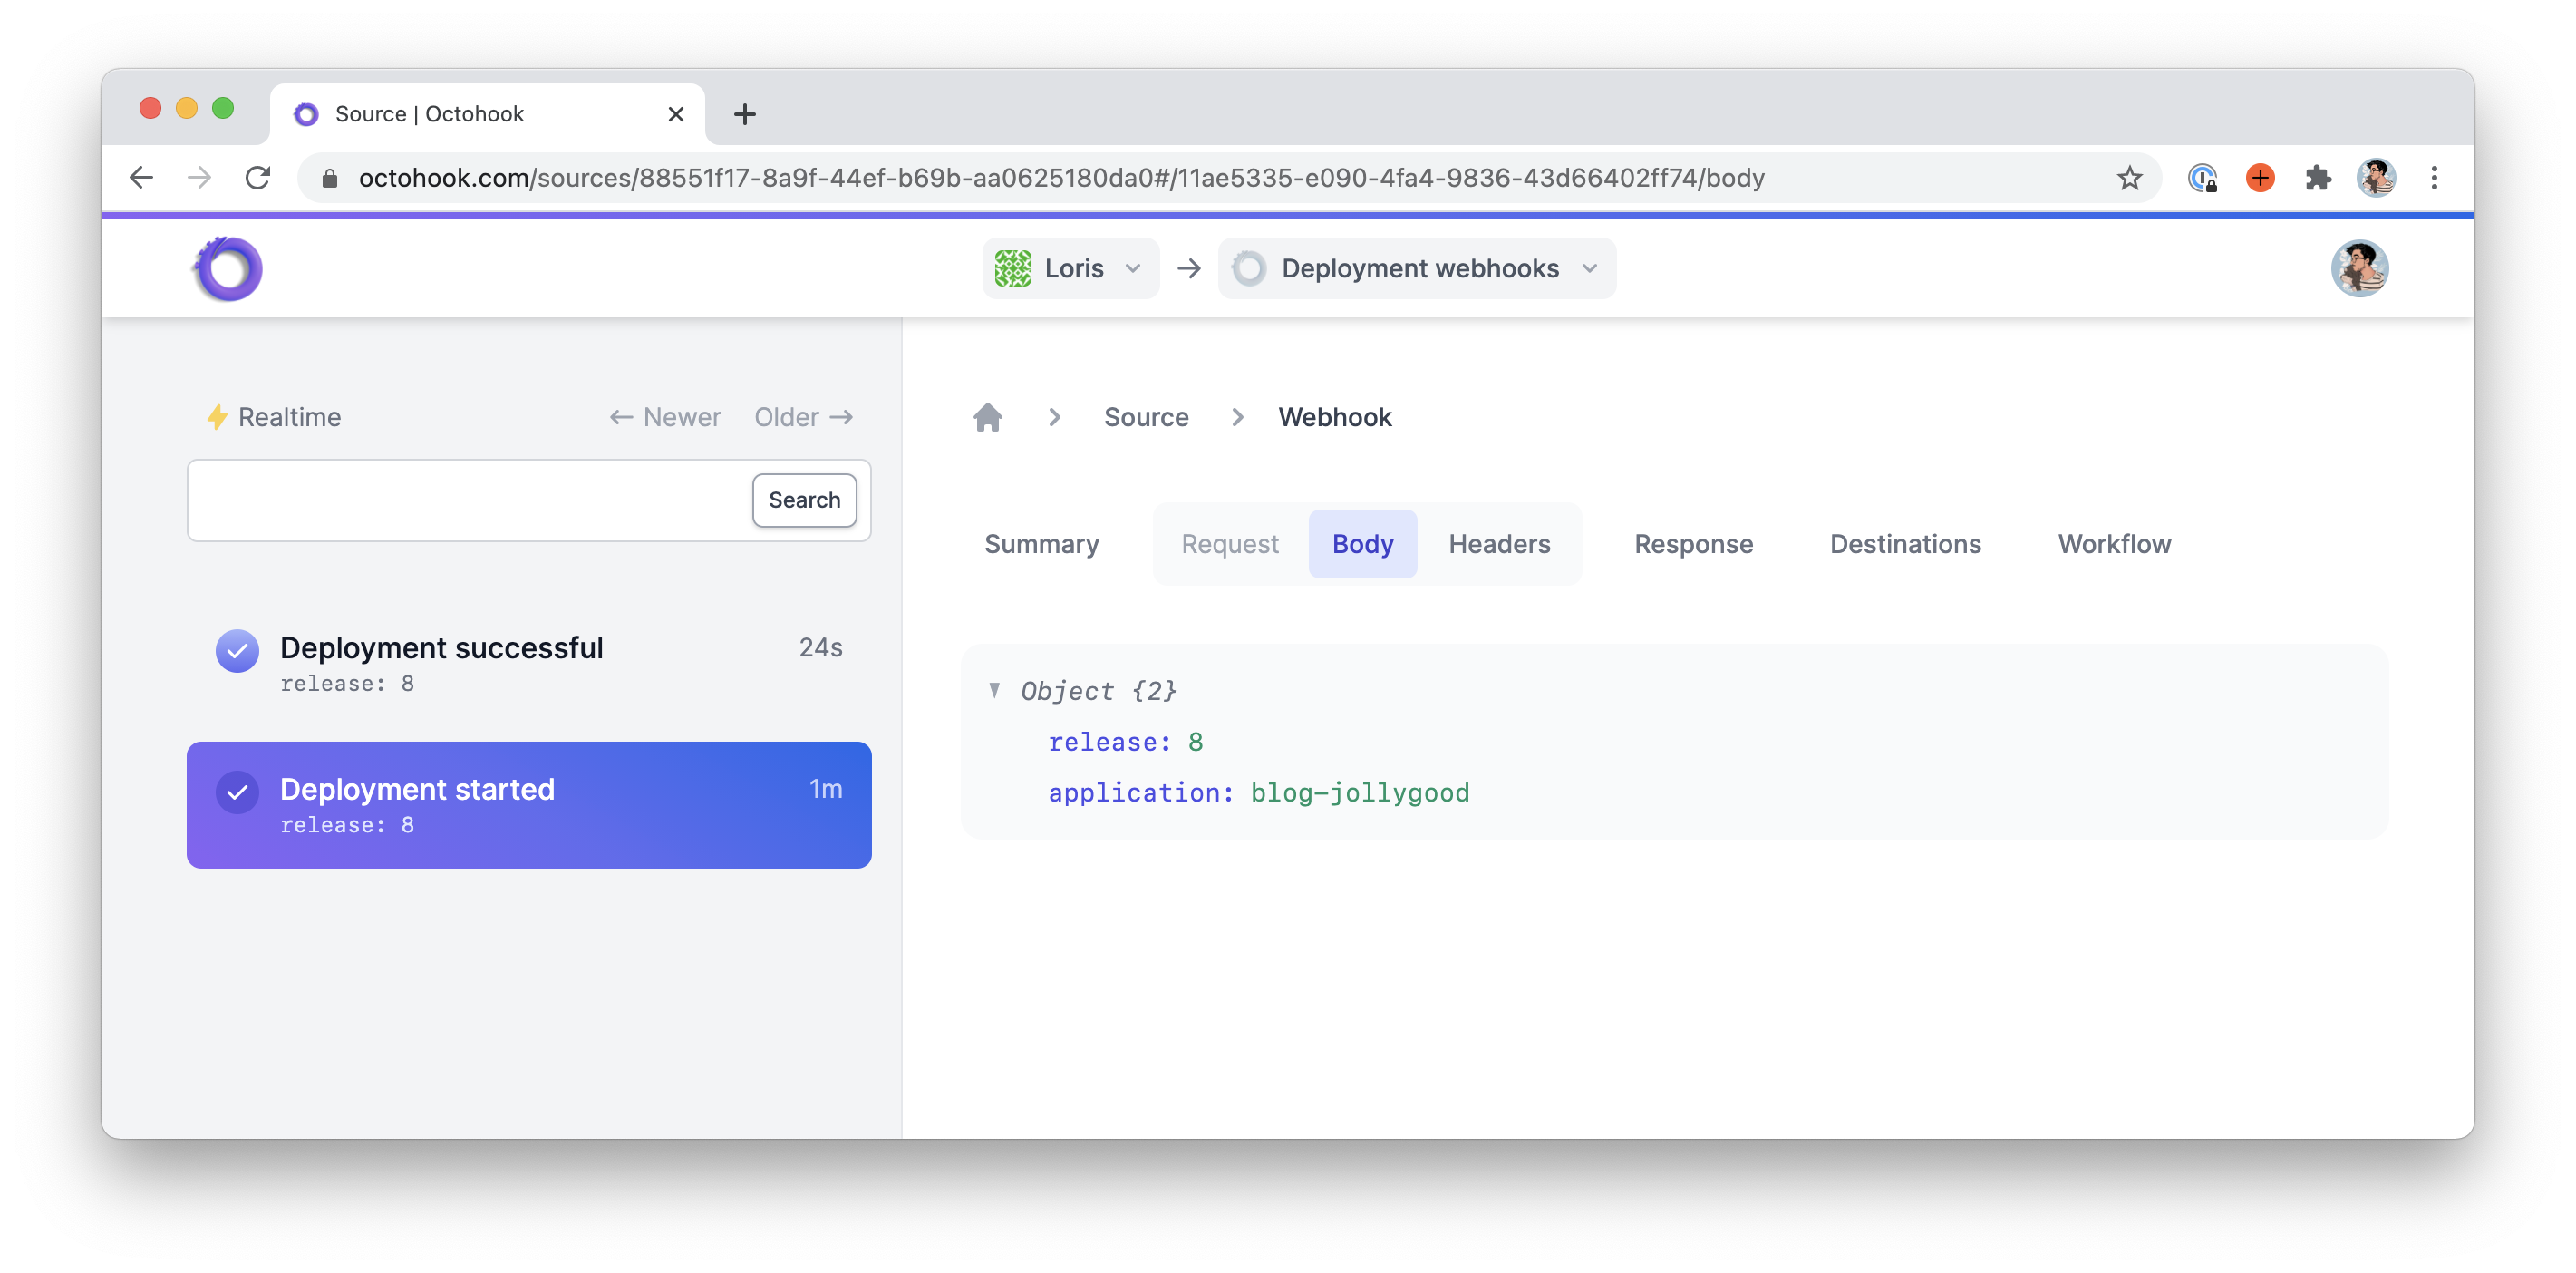
… And the right headers.
Conclusion
We’ve made it! We’ve covered a lot in the episode yet I could probably fill another couple of articles to cover the full API offered by Deployer.
As I mentioned though, once you’re comfortable setting up a few options and using them inside tasks that use cd, run and perhaps writeln, that’s 80% of your use-cases sorted.
If you’d like to take a look at the full code of this article, you can find the recipes we’ve created and the updated deploy.yaml file in the link below.
This episode concludes our deep dive into Deployer. In the next two episodes we will see how we can leverage server management applications such as Laravel Forge and Ploi to reduce the stress of maintaining our servers and we’ll make them work nicely with Deployer. See you soon! 🌸
EDIT 2021-05-03: Stefan Zweifel wrote a detailed article on how to deploy your Laravel applications using Deployer and GitHub Actions. This is the perfect follow up article to this series and I’ve learned a lot reading it. Be sure to check it out!
Deploy with zero-downtime

Deploy using Laravel Forge