Sending new tweets from the frontend
We are so close to having a finished decentralised application (dApp) we can share with the world! Everything is ready except that we can’t send tweets from our frontend. Not so handy for a Twitter-like application.
So let’s implement this right here right now and complete our dApp! 💪
Sending tweets
Since the last episode, you might have tried to connect your wallet and send a tweet to see what it does. Well, nothing is what it does. Not only does our sendTweet API endpoint returns mock data, but that mock data will now throw an error when trying to display the tweet since we've updated the TweetCard.vue component in the previous episode.
So let’s start by removing the last bit of mock data from our frontend and implement the real logic to send a tweet to our program.
Open the send-tweet.js file inside the api folder and replace all of its content with the following code.
import { web3 } from '@project-serum/anchor'
import { useWorkspace } from '@/composables'
import { Tweet } from '@/models'

// 1. Define the sendTweet endpoint.
export const sendTweet = async (topic, content) => {
    const { wallet, program } = useWorkspace()

  	// 2. Generate a new Keypair for our new tweet account.
    const tweet = web3.Keypair.generate()

    // 3. Send a "SendTweet" instruction with the right data and the right accounts.
    await program.value.rpc.sendTweet(topic, content, {
        accounts: {
            author: wallet.value.publicKey,
            tweet: tweet.publicKey,
            systemProgram: web3.SystemProgram.programId,
        },
        signers: [tweet]
    })

    // 4. Fetch the newly created account from the blockchain.
    const tweetAccount = await program.value.account.tweet.fetch(tweet.publicKey)

    // 5. Wrap the fetched account in a Tweet model so our frontend can display it.
    return new Tweet(tweet.publicKey, tweetAccount)
}
Okay, we’ve got some explaining to do.
- First of all, we defined the signature of our
sendTweetmethod. We need access to the topic and the content of the tweet which we require as the first two parameters. As with the other API endpoints, we import and call theuseWorkspacemethod to access our program and the connected Anchor wallet. - Next, we generate a new Keypair for our brand new
Tweetaccount. The tweet will be initialised at this Keypair’s public address and we will need the entire Keypair object to sign the transaction to prove we own this address. - We now have everything we need to send a
SendTweetinstruction to our Solana program. Much like we did in our tests, we pass the data, the account and the signers to thesendTweetmethod of our program’s API. This time, we use the connected wallet as theauthoraccount. - Now that the instruction has been sent we should have a
Tweetaccount at the providedtweet.publicKeyaddress. Thus, we use it to access the data of our newly created tweet. We do this so we can return the created tweet account to whoever is calling this API endpoint. This enables our components to automatically add it to the list of tweets to display without having to re-fetch all the tweets on the page. - Finally, we wrap the fetched account data and the generated public key in a
Tweetobject so that our frontend has everything it needs to display it.
Using the sendTweet API
If you look inside the TweetForm.vue component responsible for creating new tweets, you'll notice we don't need to change anything as it already provides the topic and content of the tweet as first and second parameters already.
const send = async () => {
    if (! canTweet.value) return
    const tweet = await sendTweet(effectiveTopic.value, content.value)
    emit('added', tweet)
    topic.value = ''
    content.value = ''
}
However, it will new send a real instruction to our program as opposed to returning a mock tweet like it was before.
The right commitment
Awesome! So with our sendTweet API endpoint properly wired, we should be able to send our first tweet through the frontend, right? Sadly no.
There’s a little bug in our useWorkspace composable which causes our code to throw the following error.
TypeError: Cannot read properties of undefined (reading 'preflightCommitment')
The bug is that we only provided two parameters when instantiating our Provider object when we should have given three.
const provider = computed(() => new Provider(connection, wallet.value)) // <- Missing 3rd parameter.
The missing third parameter is a configuration object that’s used to define the commitment of our transactions.
To fix this, we could simply give an empty array — i.e. {} — as a third argument which would fallback to the default configurations.
However, I’d like us to take that opportunity to understand what configurations are needed and how we can provide them explicitly.
This configuration object accepts two properties: commitment and preflightCommitment. Both of them define the level of commitment we expect from the blockchain when sending a transaction. The only difference between the two is that preflightCommitment will be used when simulating a transaction whereas commitment will be used when sending the transaction for real.
If you’re wondering why we would need to simulate a transaction, a good example would be for your wallet to show you the amount of money that is expected to be gained or lost from a transaction before approving it.
Now, what exactly is a “commitment”? According to the Solana documentation, a commitment describes how finalized a block is at the point of sending the transaction. When we send a transaction to the blockchain it is added to a block which will need to be “finalized” before officially becoming a part of the blockchain’s data. Before a block is “finalized”, it has to be “confirmed” by a voting system made on the cluster. Before a block is “confirmed”, there is a possibility that the block will be skipped by the cluster.
Therefore, there are 3 commitment levels that match exactly the scenarios describe above. They are, in descending order of commitment:
-
finalized. This means, we can be sure that the block will not be skipped and, therefore, the transaction will not be rolled back. -
confirmed. This means the cluster has confirmed through a vote that the transaction’s block is valid. Whilst this is a strong indication the transaction will not roll back, it is still not a guarantee. -
processed. This means, the transaction has been processed and added to a block and we don't need any guarantees on what will happen to that block.
So which commitment level should we choose for our little Twitter-like application? Looking at the Solana documentation, they recommend the following.
When querying the ledger state, it's recommended to use lower levels of commitment to report progress and higher levels to ensure the state will not be rolled back.
In our case, I wouldn’t consider a tweet being rolled back to be a critical issue. On top of that, it is very unlikely that a block containing our transaction will end up being skipped by the cluster. Therefore, the processed commitment level is good enough for our application. We’ll use it for both simulated and real transactions.
Note that using the finalized commitment level might be more appropriate for (non-simulated) financial transactions with critical consequences.
Now that we know which commitment levels to use, let’s explicitly configure them in our useWorkspace.js composable. First, we defined two variables preflightCommitment and commitment for simulated and real transactions respectively.
// ...

const preflightCommitment = 'processed'
const commitment = 'processed'
const programID = new PublicKey(idl.metadata.address)
let workspace = null
Then, we pass these commitment levels to the Provider constructor as a configuration object. We also give the commitment variable as the second parameter of our Connection object so it can use it as a fallback commitment level when it is not directly provided on the transaction.
export const initWorkspace = () => {
    const wallet = useAnchorWallet()
    const connection = new Connection('http://127.0.0.1:8899', commitment)
    const provider = computed(() => new Provider(connection, wallet.value, { preflightCommitment, commitment }))
    const program = computed(() => new Program(idl, programID, provider.value))

    // ...
}
Airdropping some SOL
Alright, now surely we can send a tweet via our frontend?! Almost… 😅
If we try to send a tweet right now, we’ll get the following error in the console.
Attempt to debit an account but found no record of a prior credit.
Okay, we’ve seen this error in the past. That means, we’ve got no money. Remember how I told you that starting a local ledger always gives 500 million SOL to your local machine’s wallet for running tests? Well, the issue here is that we’re not using that wallet in our browser. Instead, we’re using our real wallet in the local cluster.
That means we need to explicitly airdrop ourselves some money before we can send transactions.
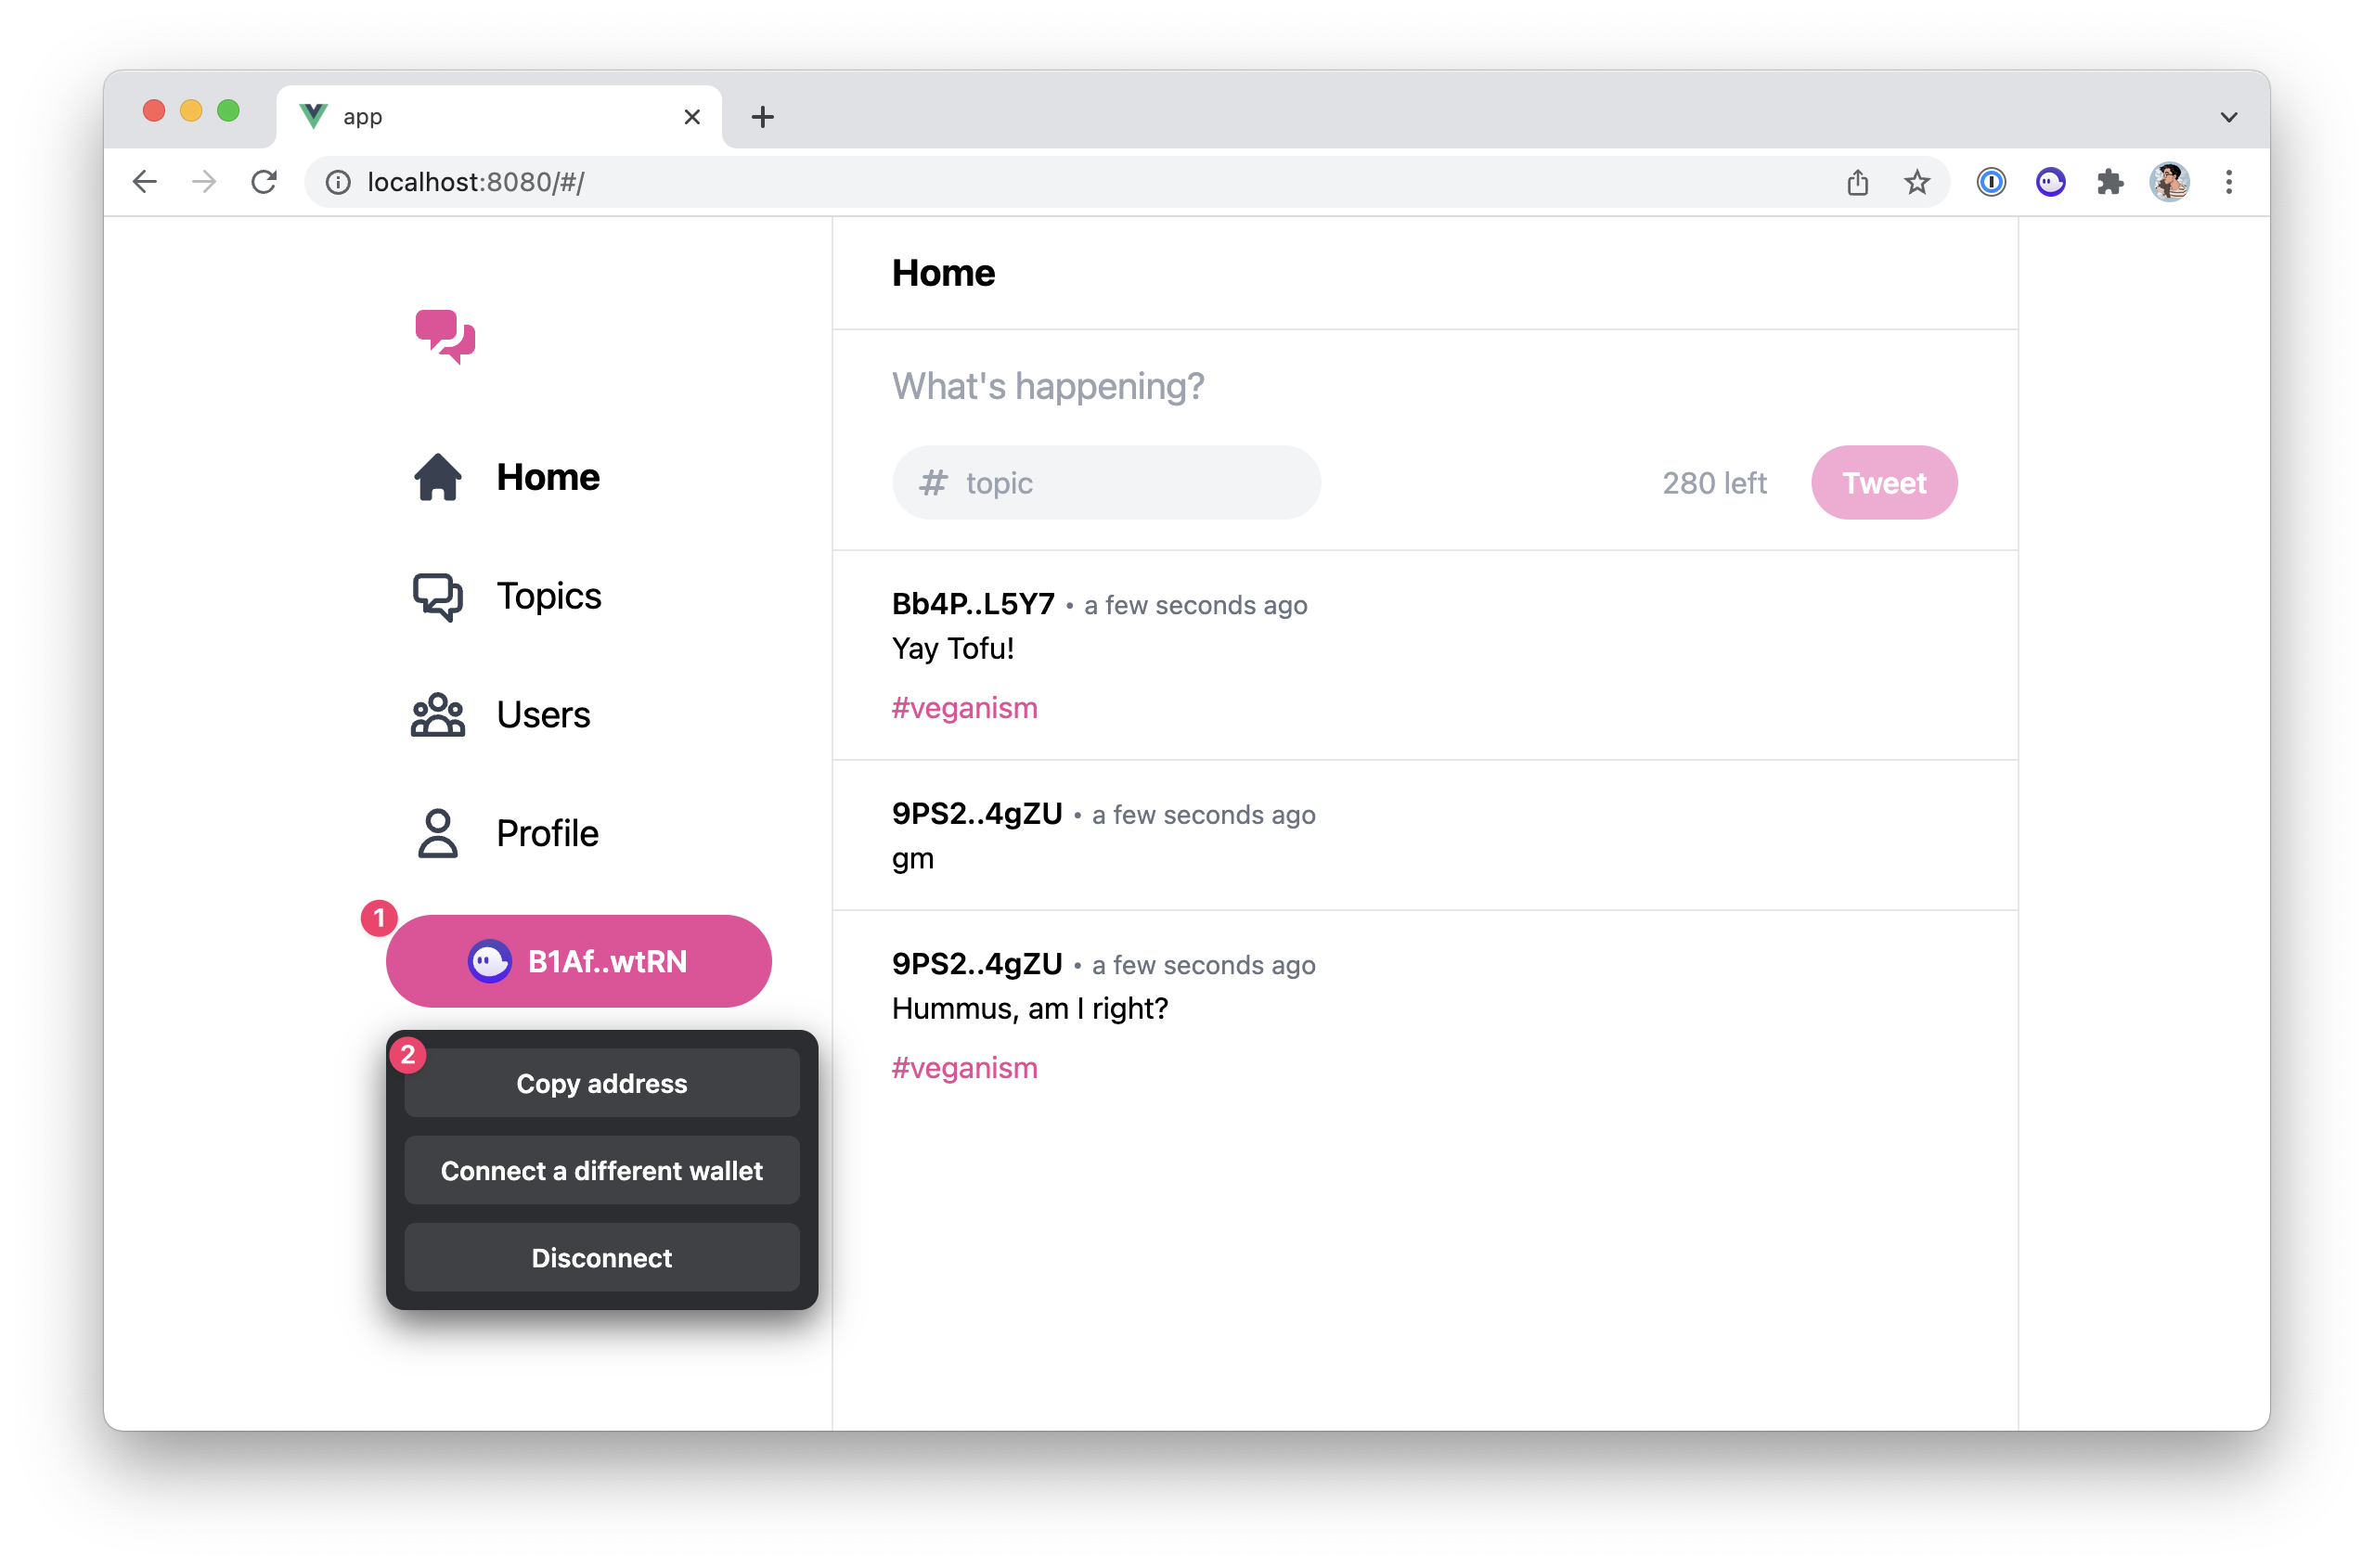
To do that, we first need to know the public key of our real wallet. We can use the dropdown menu of the wallet button for that purpose. Once your wallet is connected, click on the wallet button on the sidebar and select "Copy address".
Next, we can use the solana airdrop command followed by how many SOL we want to airdrop and the address of the account to credit.
We don’t need much money but let’s give ourselves 1000 SOL — why not, we deserve it. Then, paste your public key and run that command. That’s what it looks like for me.
solana airdrop 1000 B1AfN7AgpMyctfFbjmvRAvE1yziZFDb9XCwydBjJwtRN

# Outputs:
# Requesting airdrop of 1000 SOL
#
# Signature: 4rBNKMyRTcddaT9QHtYSD62Juk5F4AdgryiuE4N83Yj8JJVTomAnHWL8xvPitJdtDdLorSf81rBsYz89r7dXis6y4
#
# 1000 SOL
Alright, now we can finally send our first tweet from the frontend!
Enter some content and, optionally, a topic before hitting the “Tweet” button. You should get a pop-up window from your wallet provider asking you to approve the transaction.
Depending on your wallet provider, you should also see an estimation of how much SOL this transaction will credit or debit from your account. However, using Phantom, this often doesn’t work for me when using the local cluster as the simulated transaction just loops forever.
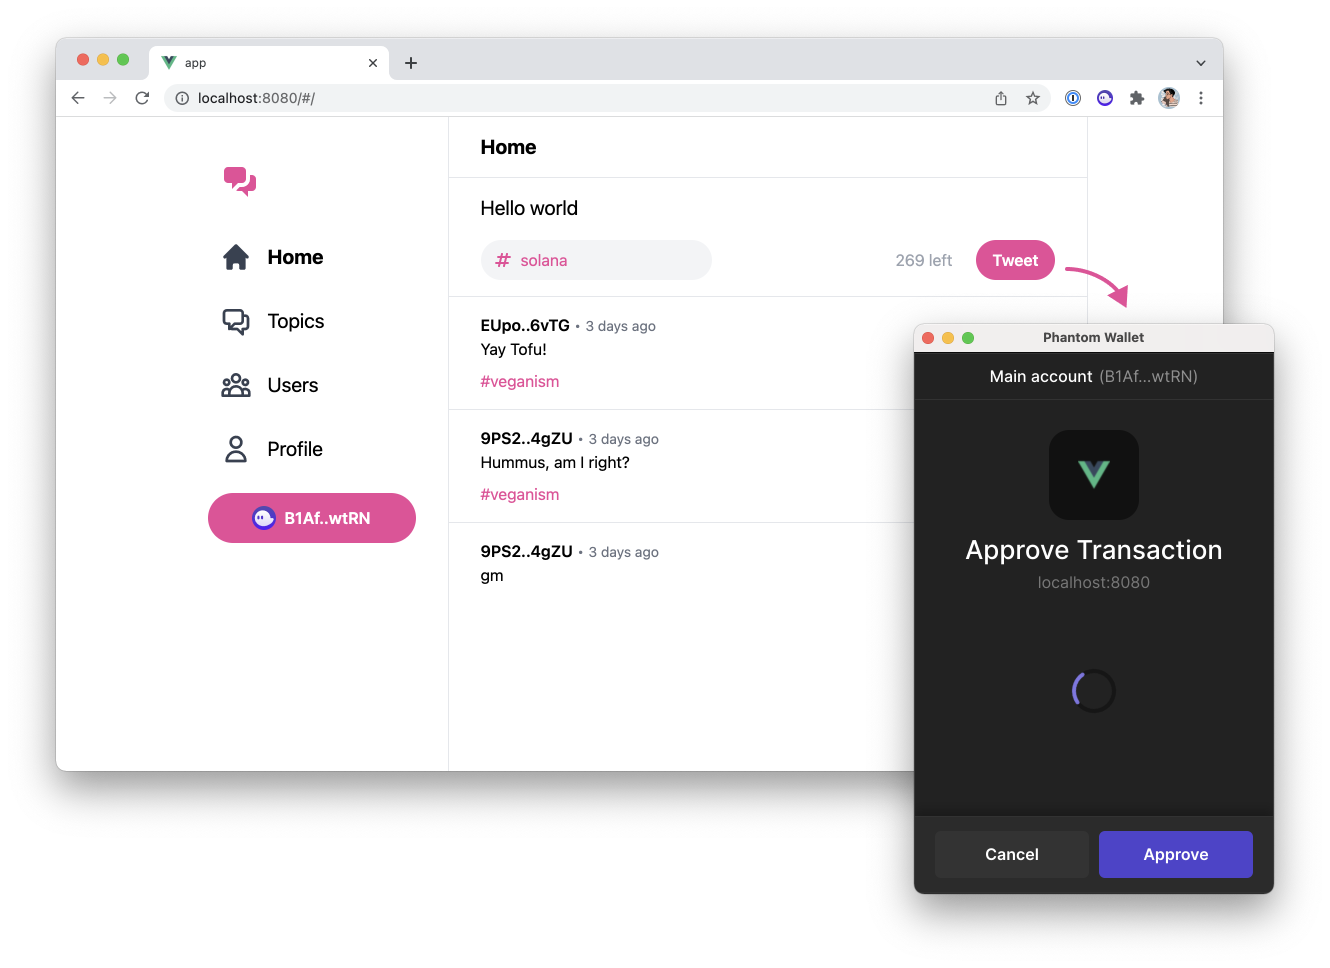
Nevertheless, clicking on “Approve” should run the transaction for real and display the new tweet at the top of the list! 🥳
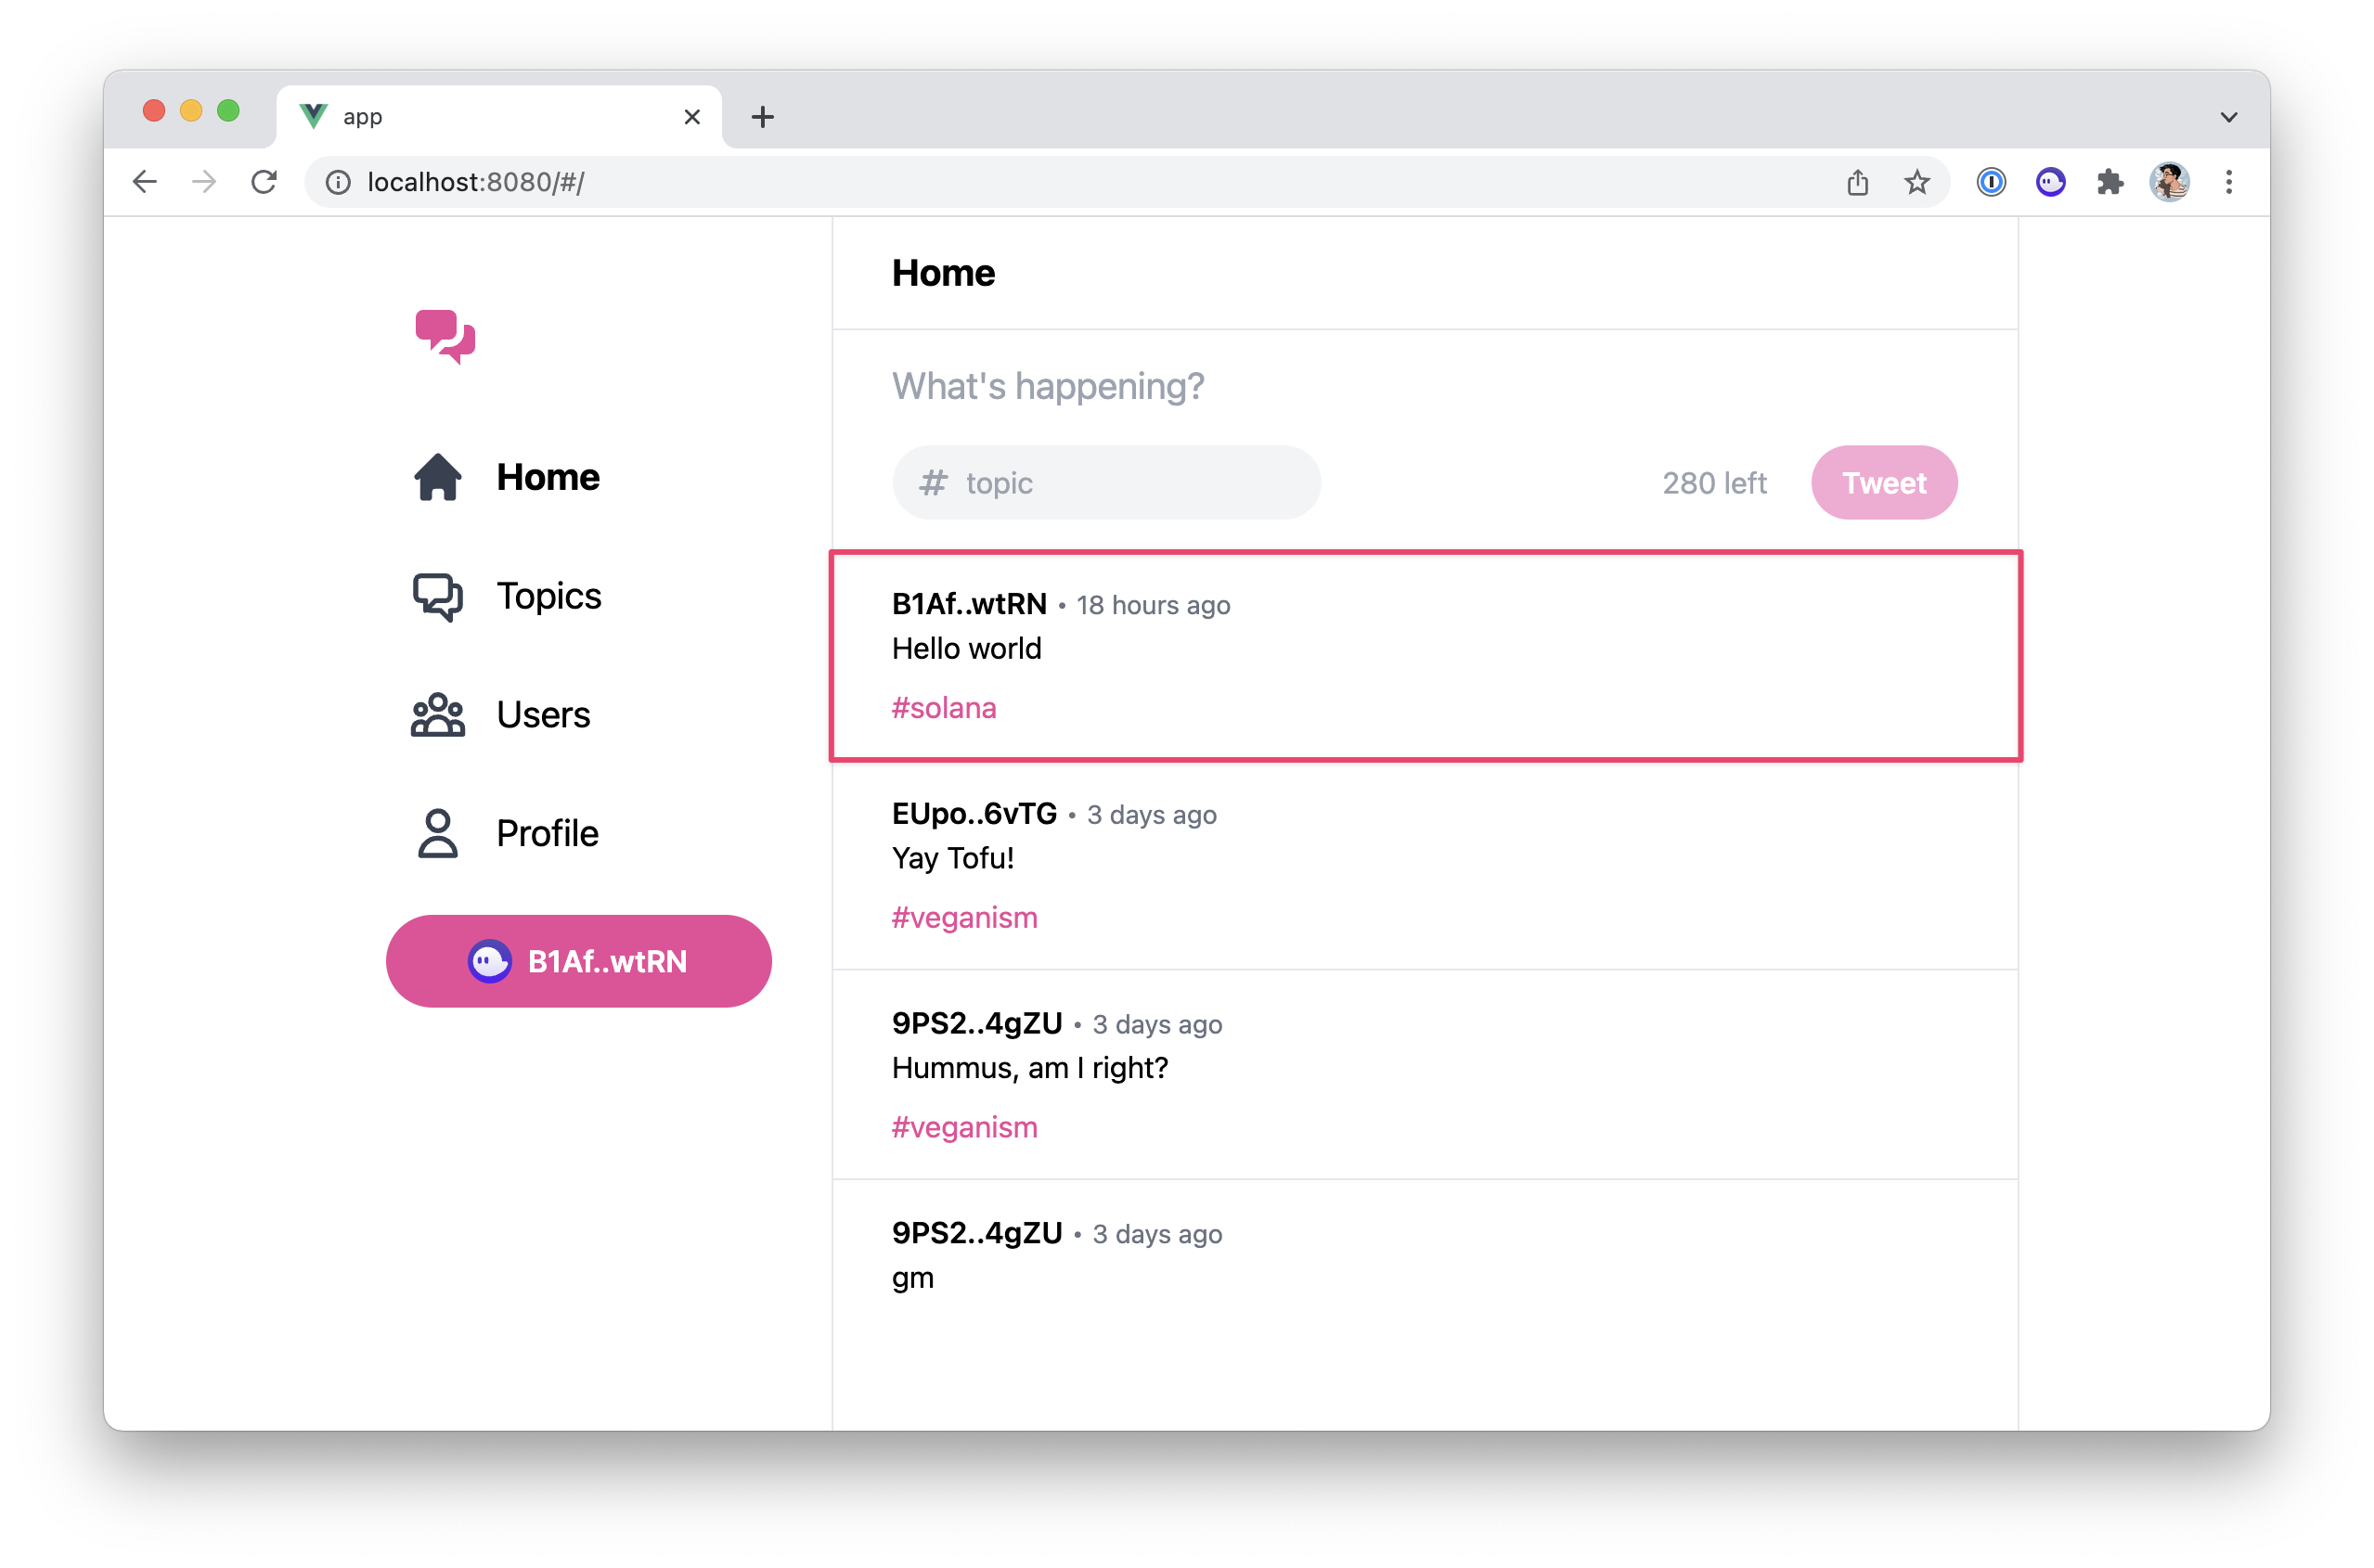
If you refresh the page, you can see that our new tweet has been properly persisted to our local ledger.
Conclusion
Hell yeah, our decentralised application is finally functional! 🔥🔥🔥
Now, all that’s left to do is deploy it to a real cluster to share it with the rest of the world. And that’s exactly what we’ll do in the next episode!
Fetching tweets in the frontend

Deploying to devnet


