Deploying to devnet
So far in this series, we’ve only developed our decentralised application (dApp) locally on our machine. Now that our dApp is ready, let’s learn how to deploy it so everyone can benefit from it.
In Solana, there are multiple clusters we could deploy to. The main one that everybody uses with real money is called “mainnet”. Another one, called “devnet”, can be used to test our program on a live cluster that uses fake money.
When deploying dApps, it is common to first deploy to the “devnet” cluster as you would on a staging server and then, when you’re happy with everything, deploy to the “mainnet” cluster analogous to a production server.
In this episode, we’re going to learn how to deploy to the devnet cluster. However, deploying to mainnet is a very similar process so you should also be able to do that by the end of this episode. Additionally, I’ll make sure to add a note any time there’s a little difference between the two.
Alright, let’s do it!
Changing the cluster
The first thing to do is to change our cluster from localhost to devnet. We need to do this in two places: in the terminal and our program’s configurations.
The former is easy to do. We simply need to run this command in our terminal to let Solana know we want to use the devnet cluster.
solana config set --url devnet

# Outputs:
# Config File: /Users/loris/.config/solana/cli/config.yml
# RPC URL: https://api.devnet.solana.com
# WebSocket URL: wss://api.devnet.solana.com/ (computed)
# Keypair Path: /Users/loris/.config/solana/id.json
# Commitment: confirmed
🚀 For mainnet, run solana config set --url mainnet-beta instead.
From this point, any solana command that we run in our terminal will be executed on the devnet cluster. That includes, solana airdrop, solana deploy, etc.
This means that we no longer need to start a local ledger on our machine — using solana-test-validator or anchor localnet — to interact with the blockchain.
The next place we need to change our cluster is in the Anchor.toml file of our program.
If you look inside that file, you should currently see the following.
[programs.localnet]
solana_twitter = "2BDbYV1ocs2S1PsYnd5c5mqtdLWGf5VbCYvf28rs9LGj"

# ...

[provider]
cluster = "localnet"
wallet = "/Users/loris/.config/solana/id.json"
- Under
[provider], we’re telling Anchor to use the localnet cluster and where to find the wallet that should be used to pay for transactions and storage. - Under
[programs.localnet], we’re giving Anchor the program ID — i.e. the public key — of oursolana_twitterprogram.
It’s important to notice that the program ID is provided under the context of a cluster — here, the localnet cluster. This is because the same program could be deployed to different addresses based on the cluster. For instance, you could use a different program ID for the mainnet cluster so that only a few restricted members have the right to deploy to mainnet.
But hang on a minute, that program ID is public, right?
That’s true! The program ID is public but its keypair is located on the target/deploy folder and Anchor uses a naming convention to find it. If your program is called solana_twitter, then it will try to find the keypair located at target/deploy/solana_twitter-keypair.json. If that file cannot be found when deploying your program, a new keypair will be generated giving us a new program ID. This is exactly why we had to update the program ID after the very first deployment.
Whilst we didn’t pay much attention to that target/deploy/solana_twitter-keypair.json file before, it is important to acknowledge that this file is the proof that you own the program at this address. If you deploy to mainnet using this keypair and someone else gets hold of it, that person will be able to deploy any changes they want to your program.
In our case, we’ll keep things simple and use the same keypair for all clusters but I would recommend using a different keypair for the mainnet cluster at least.
[programs.localnet]
solana_twitter = "2BDbYV1ocs2S1PsYnd5c5mqtdLWGf5VbCYvf28rs9LGj"

[programs.devnet]
solana_twitter = "2BDbYV1ocs2S1PsYnd5c5mqtdLWGf5VbCYvf28rs9LGj"

[programs.mainnet]
solana_twitter = "2BDbYV1ocs2S1PsYnd5c5mqtdLWGf5VbCYvf28rs9LGj"

# ...

[provider]
cluster = "devnet"
wallet = "/Users/loris/.config/solana/id.json"
As you can see in the code above, we duplicated the [programs.localnet] section twice. Once for [programs.devnet] and once for [programs.mainnet]. Then we updated the cluster to “devnet” under [provider].
🚀 For mainnet, simply set cluster to “mainnet”.
And that’s it! We’re now on the devnet cluster.
Airdropping on devnet
Before we can deploy our program to devnet, we need to get some money on this cluster.
If you remember, we used the command solana airdrop in the past to give ourselves some money in our local cluster. Well, we can do the same in the devnet cluster except that the command has a limit at around 5 SOL.
So let’s give ourselves some SOLs on devnet. We’ll do that for both of our wallets: the one we use on our local machine to deploy the program, and our “real” wallet that we use in the browser to make transactions.
For the former, we don’t need to specify the address because it is located at ~/.config/solana/id.json which is the default place to look for your machine’s keypair. Therefore, we can run the following.
solana airdrop 5
Note that if we needed more than 5 SOLs we could run that command again. It’s just we can’t get too many SOLs at a time.
If you get the following error Error: unable to confirm transaction. This can happen in situations such as transaction expiration and insufficient fee-payer funds, it often means that the devnet faucet is drained and you should try again a bit later. You can also try requesting fewer SOLs and see if it works. Feel free to check the Solana discord as well to get some updates on when it’s replenished.
For the other wallet — i.e. our “real” wallet — we can run the same command but we need to specify its address as a second argument. For me, it looks like that.
solana airdrop 5 B1AfN7AgpMyctfFbjmvRAvE1yziZFDb9XCwydBjJwtRN
We’re now ready to deploy!
🚀 For mainnet, we cannot use the airdrop command since we’re handling real money. Therefore, you would need to transfer some money to your local machine’s wallet from your real wallet. Alternatively, you could import your real wallet locally on your machine and use it when deploying to mainnet by providing the path to its keypair on the wallet option of the Anchor.toml configuration file.
Deploying the program
Let’s finally deploy our program to devnet! As usual, we’ll use the anchor deploy command now that Anchor knows which cluster to deploy to. Whilst this is not necessary, I always like to run anchor build before deploying to make sure I’m deploying the latest version of my code.
anchor build
anchor deploy
Congratulations! Your code is now available on the devnet cluster for everyone to use! 🥳
Now let’s update our frontend so we can interact with our program in the devnet cluster instead of the local one.
To achieve that, we need to change the cluster URL inside the useWorkspace composable.
Replace the localhost URL with the following and, boom, our frontend is now using the devnet cluster as well!
const connection = new Connection('https://api.devnet.solana.com', commitment)
At this point, you should be able to send and read tweets from the devnet cluster using the VueJS applications.
Now all that’s left to do is deploy our frontend to a server somewhere so that other users can interact with it too. But first, let’s talk about costs.
The cost of deploying
Earlier, we ran a command to airdrop 5 SOL to the wallet of our local machine so it can have enough money to deploy our program. Let’s see how much that cost us. We can run the following command to access the balance of our local wallet.
solana balance

# Outputs:
# 2.361026
We now have 2.361026 SOL which means deploying cost us 2.638974 SOL in total. At the time of writing, that’s about $450.
Fortunately for us, we deployed on devnet where we can airdrop ourselves some money but if we wanted to deploy that to the mainnet cluster, we would need to pay that from our own pocket.
So why does it cost that much and do we have to pay that sort of money every time we deploy?
The reason it cost so much is, just like when creating accounts, we need to allocate some storage on the blockchain to hold the code of our program. Once compiled, our code requires quite a few bytes which mean the rent-exempt money to pay is usually pretty high. On top of that, Solana defaults to allocating twice the amount of space needed to store the code. Why does it do that? Because our program is likely to have updates in the future and it is trying to account for the fact that, when we next deploy, we might need more space.
If necessary, we may change this by explicitly telling Solana how much space we want to allocate for our program.
Therefore, deploying for the first time on a cluster is an expensive transaction because of the initial rent-exempt money but, afterwards, deploying again should cost virtually nothing — i.e. the price of a transaction — because we’ve already paid for our storage.
Good, now that we know more about the economics of deploying, let’s go back to deploying the frontend of our application.
Copying the IDL file
If you look inside the useWorkspace composable, you will see that we import the IDL file generated by Anchor using a relative path that is outside of the app directory containing our VueJS application.
import idl from '../../../target/idl/solana_twitter.json'
This works on our machine because we built the application locally and therefore the target folder was properly created. However, when deploying our frontend to a server, it won’t have access to this target repository. Therefore, we need to copy and paste the generated IDL somewhere inside our app folder.
To make our life a little easier, let’s add a custom copy-idl script inside our Anchor.toml file.
[scripts]
test = "yarn run ts-mocha -p ./tsconfig.json -t 1000000 tests/**/*.ts"
copy-idl = "mkdir -p app/src/idl && cp target/idl/solana_twitter.json app/src/idl/solana_twitter.json"
The first part of the script ensures the app/src/idl folder exists and the second part copies the IDL file inside it.
Now, every time we want to copy that IDL over to our frontend, all we have to do is run the following command. Let’s do it now so we can access the IDL file in our frontend.
anchor run copy-idl
Finally, we need to update the import path of our IDL file inside the useWorkspace composable so it points to the new IDL path.
import idl from '@/idl/solana_twitter.json'
Note that there’s a new feature starting from Anchor v0.19.0 that allows us to specify a custom directory that the IDL file should be copied to every time we run anchor build.
[workspace]
types = "app/src/idl/"
That sounds perfect but, at the time of writing, it won’t copy the program ID inside the IDL which we need for our workspace. Therefore, I decided to go with a traditional copy script but keep an eye out for this feature as I’m sure it will continue to improve.
Multiple environments in the frontend
Currently, we’re having to manually update the cluster URL inside the useWorkspace composable every time we want to switch clusters.
It would be much better if this could be set dynamically. One way to achieve this would be to have a little dropdown on the application where users can select their cluster. However, I prefer having one explicit cluster defined for each environment I deploy to. For instance, solana-twitter.com would be using the mainnet cluster whereas devnet.solana-twitter.com would be using the devnet cluster.
Luckily, VueJS applications support multiple environments via the “mode” feature.
Here is how this works.
- We’ll create multiple environment files inside our
appdirectory:.envfor local variables,.env.devnetfor devnet variables and.env.mainnetfor mainnet variables. - When compiling our frontend, we can tell VueJS which mode we are compiling and it will use the environment file that matches that mode. It fallbacks to using
.envwhich is why we’re using that one locally. - Any variables starting with
VUE_APP_inside these environment files will be automatically injected in theprocess.envof our frontend. - We can access these variables inside the
useWorkspacecomposable to provide a cluster URL dynamically. - Finally, we’ll add a few more scripts in our
package.jsonfile to help us compile the frontend for all the different modes.
Okay, let’s implement this.
(1) Start by adding the following files inside the app directory and copy/paste their content. We’ll only define one variable that provides the URL of each cluster.
-
.envVUE_APP_CLUSTER_URL="http://127.0.0.1:8899" -
.env.devnetVUE_APP_CLUSTER_URL="https://api.devnet.solana.com" -
.env.mainnetVUE_APP_CLUSTER_URL="https://api.mainnet-beta.solana.com"
(4) Next, update the useWorkspace composable to use that variable.
// ...

const clusterUrl = process.env.VUE_APP_CLUSTER_URL
const preflightCommitment = 'processed'
const commitment = 'processed'
const programID = new PublicKey(idl.metadata.address)
let workspace = null

export const useWorkspace = () => workspace

export const initWorkspace = () => {
    const wallet = useAnchorWallet()
    const connection = new Connection(clusterUrl, commitment)
    // ...
}
(5) Finally, add the following scripts to your app/package.json file.
"scripts": {
  "serve": "vue-cli-service serve",
  "serve:devnet": "vue-cli-service serve --mode devnet",
  "serve:mainnet": "vue-cli-service serve --mode mainnet",
  "build": "vue-cli-service build",
  "build:devnet": "vue-cli-service build --mode devnet",
  "build:mainnet": "vue-cli-service build --mode mainnet",
  "lint": "vue-cli-service lint"
},
Done! Now we can build our frontend for devnet using npm run build:devnet and it will automatically know to use the URL of the devnet cluster.
Note that if you currently have npm run serve running on a terminal, you will need to exit it (Ctrl+C) and run npn run serve:devnet instead so it uses the right cluster URL.
Deploying the frontend
Alright, now it’s time to push our frontend application to the world. There are gazillion options to deploy a frontend app so by all means feel free to use the method you prefer.
In my case, I’m used to deploying frontend-only applications using Netlify because it’s free and it’s honestly pretty amazing.
All you need to do is have your code on a repository somewhere and it will ask you for the command to run and the directory to serve. Nice and simple like it should be.
Note that before deploying, I’ve added a little favicon and updated the metadata of the index.html file inside the app/public folder. Feel free to download and extract the following ZIP file into your public directory if you want to do the same.
Next, in my Netlify account, I’ve added a new site and provided the following options.
- Branch to deploy:
main - Base directory:
app - Build command:
npm run build:devnet - Publish directory:
app/dist
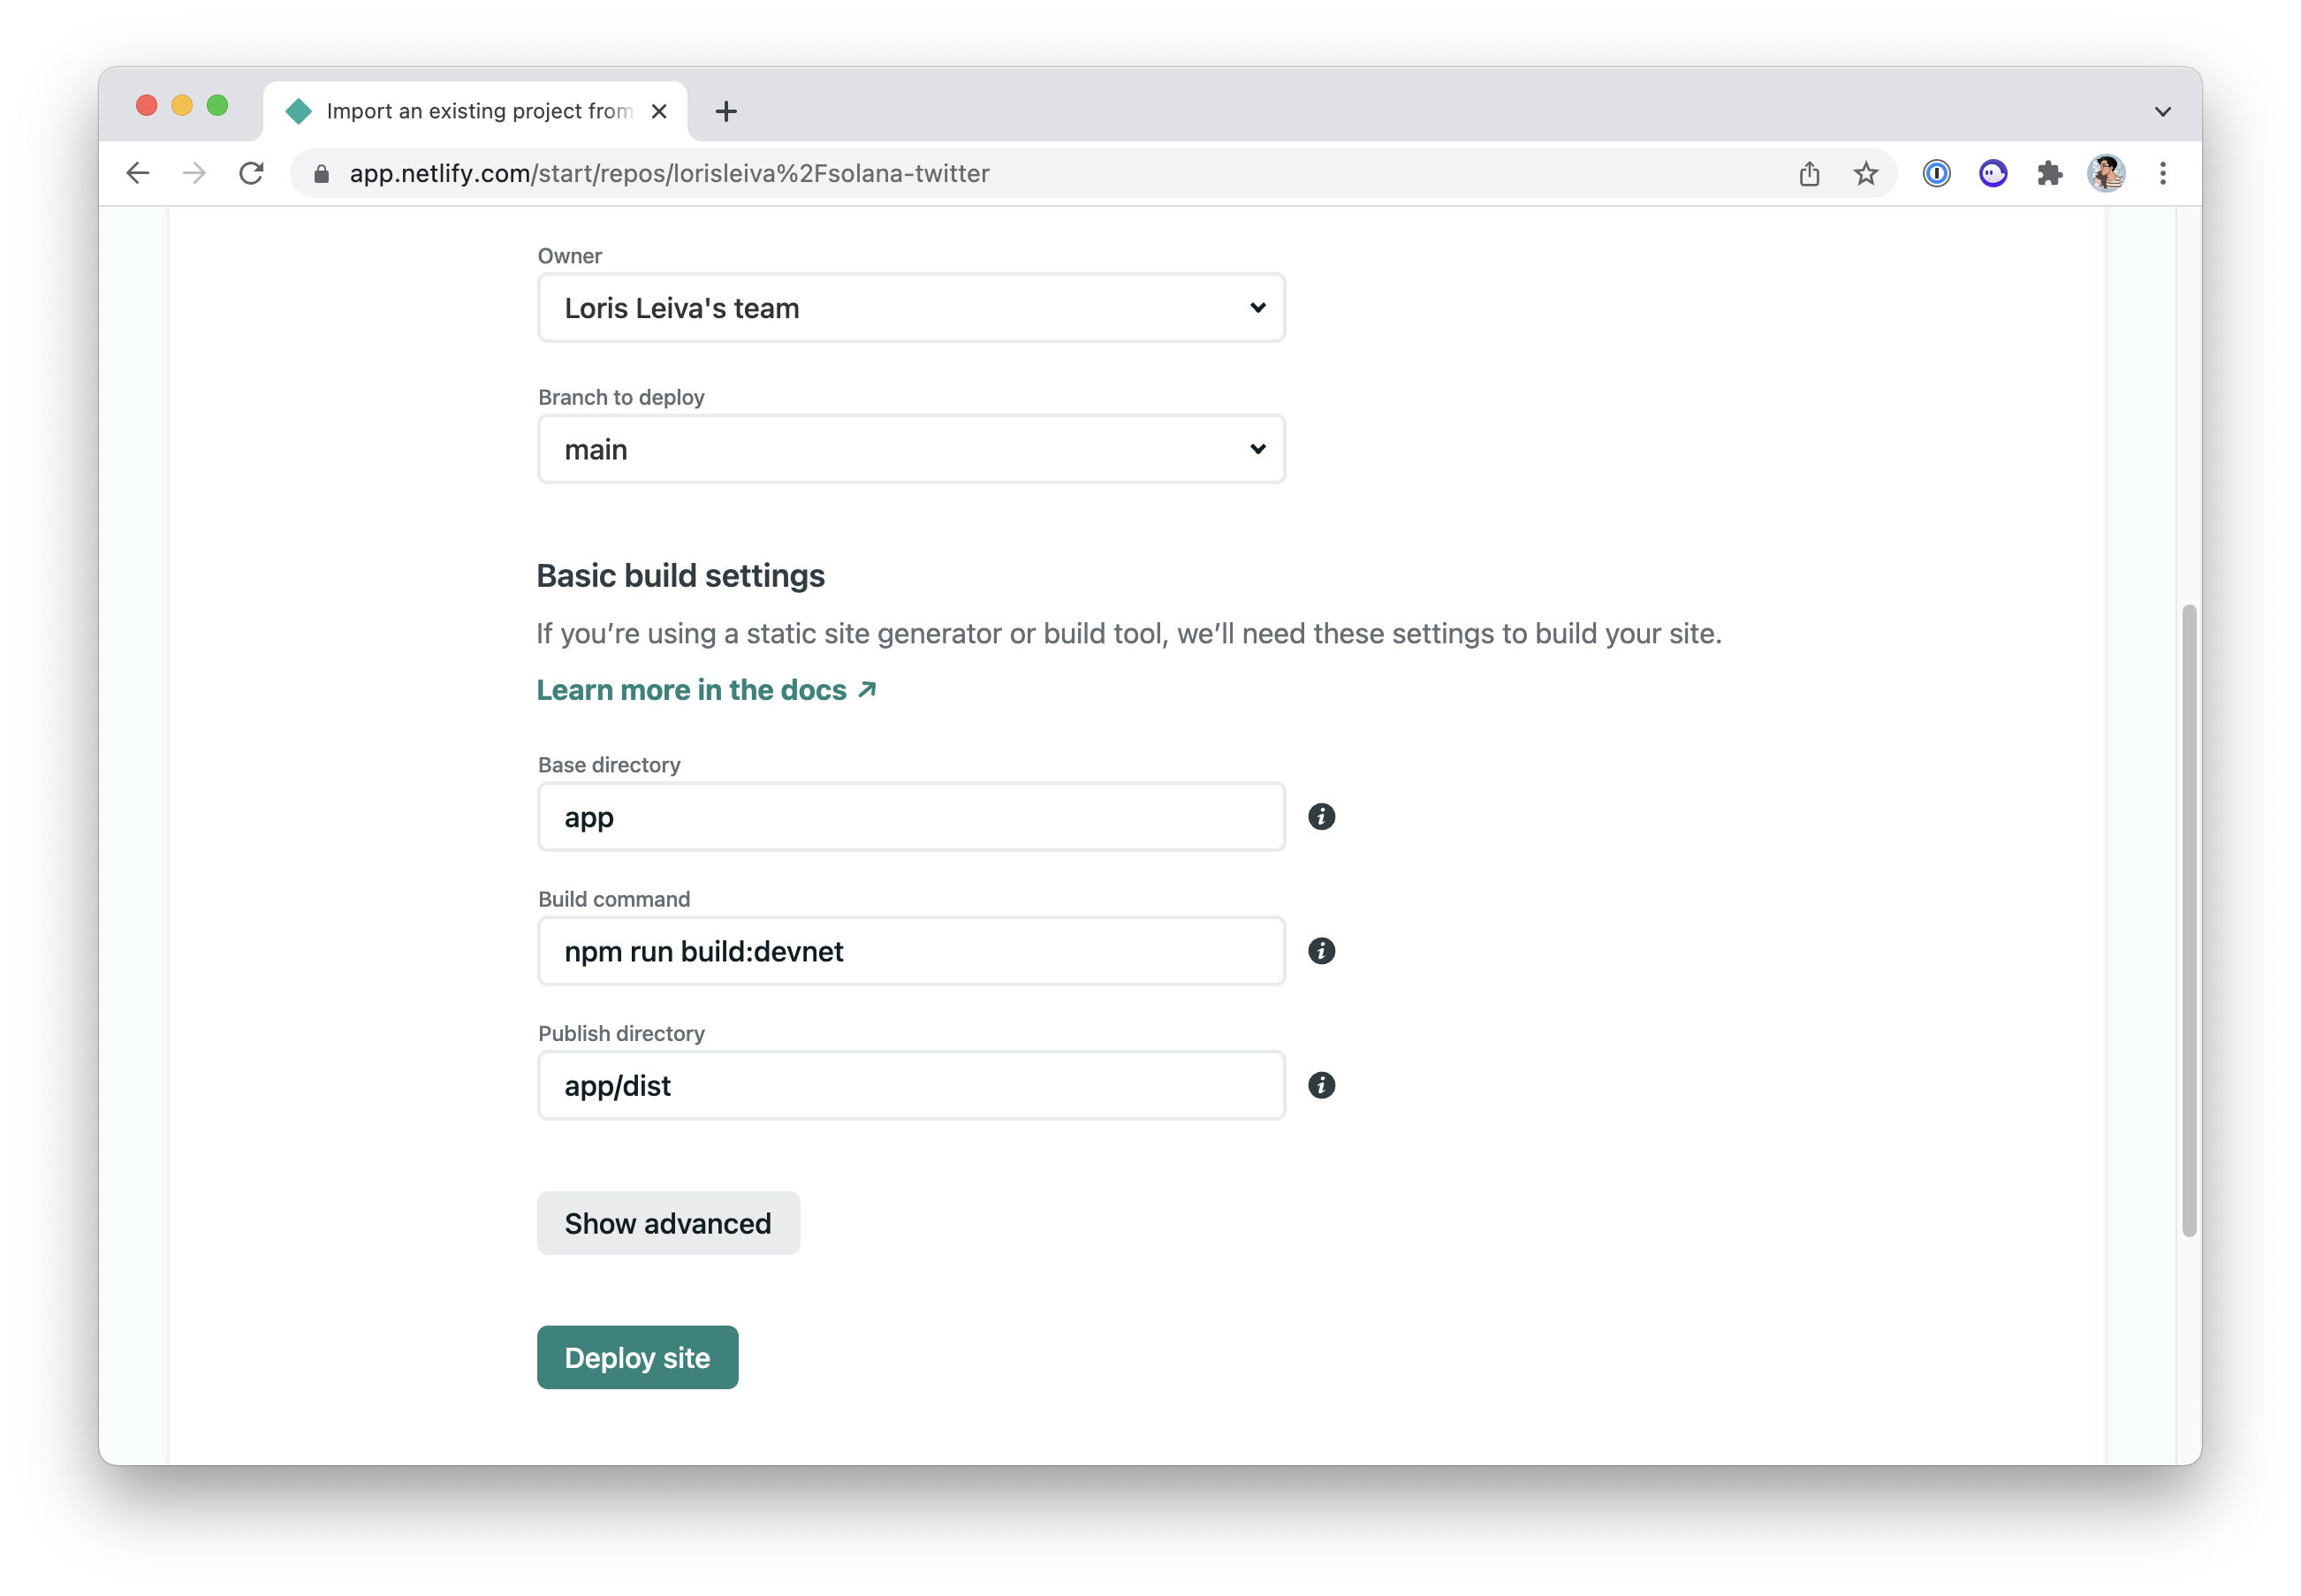
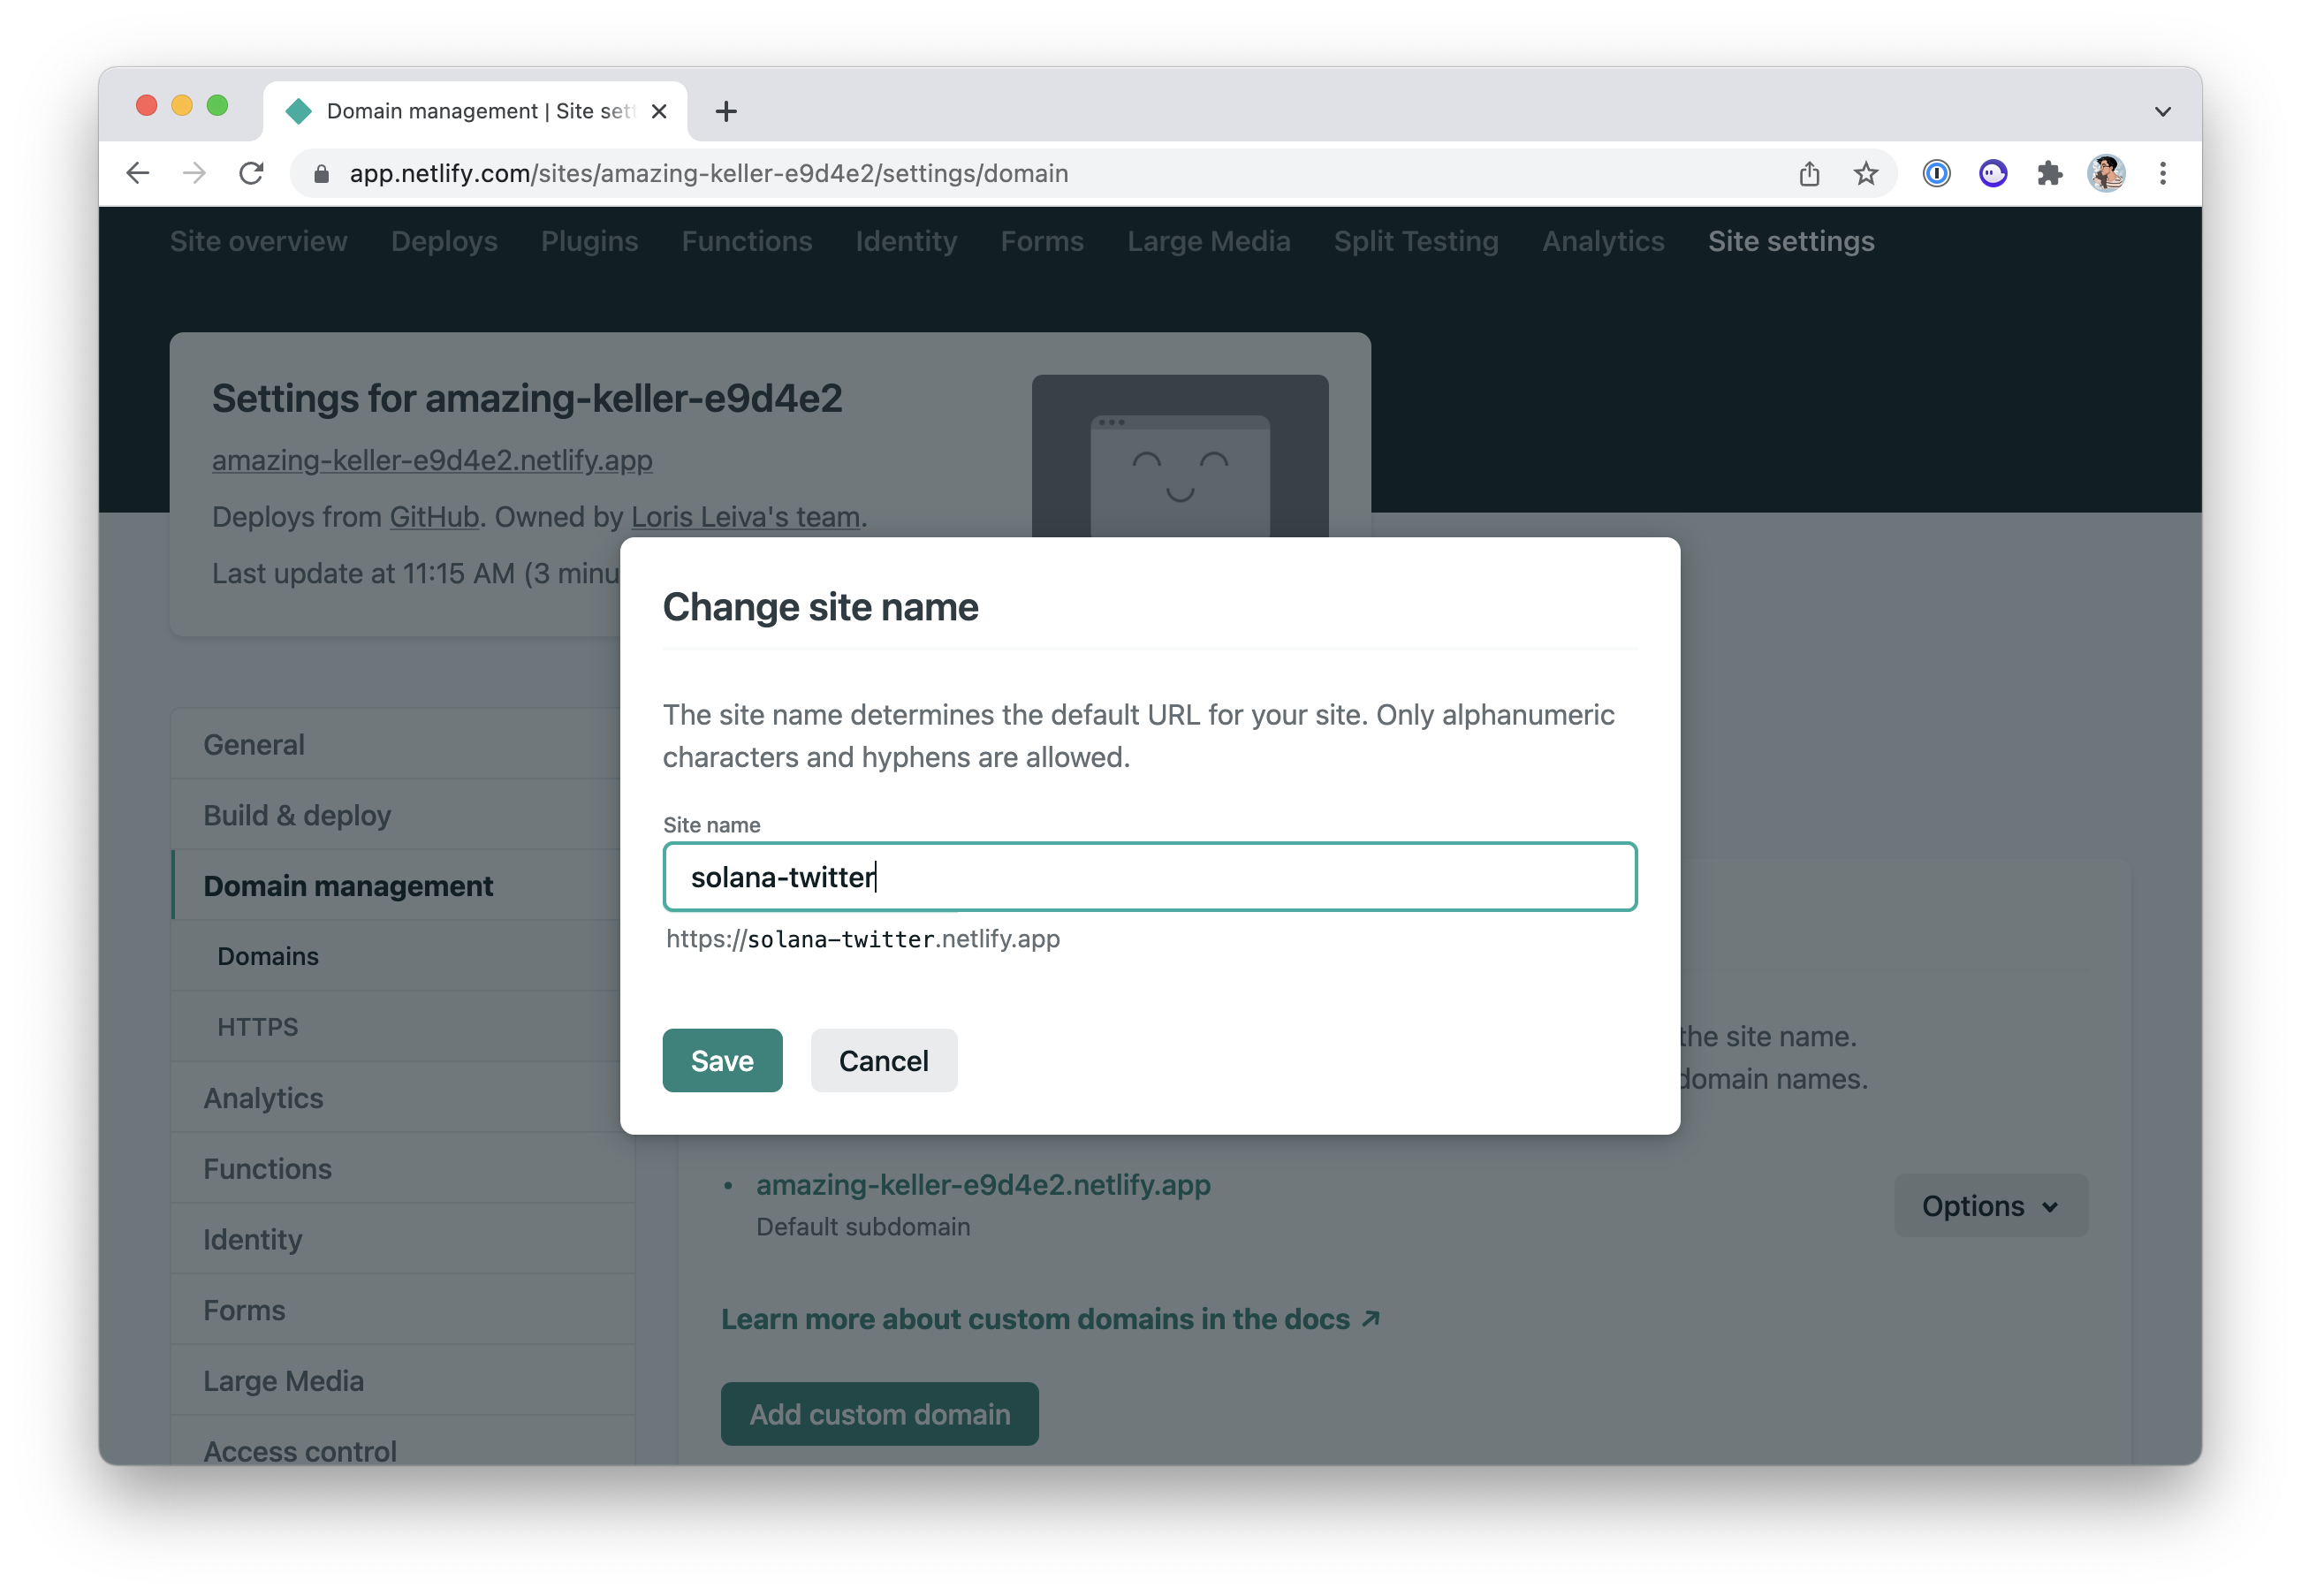
And that’s it. Our frontend has been deployed to a random subdomain of netlify.app. You can connect your own domain name for free or if like me, you’re just using this as a learning project, you can update the Netlify subdomain to something a bit nicer. In my case, I’ve used solana-twitter.netlify.app.
Another nice thing about Netlify is that it will automatically trigger a new deployment every time you push a commit to your selected branch which defaults to main.
And we’re done! You can now share your URL to all your frens and start tweeting in Solana! 🔥🥳
Bonus: Publish your IDL
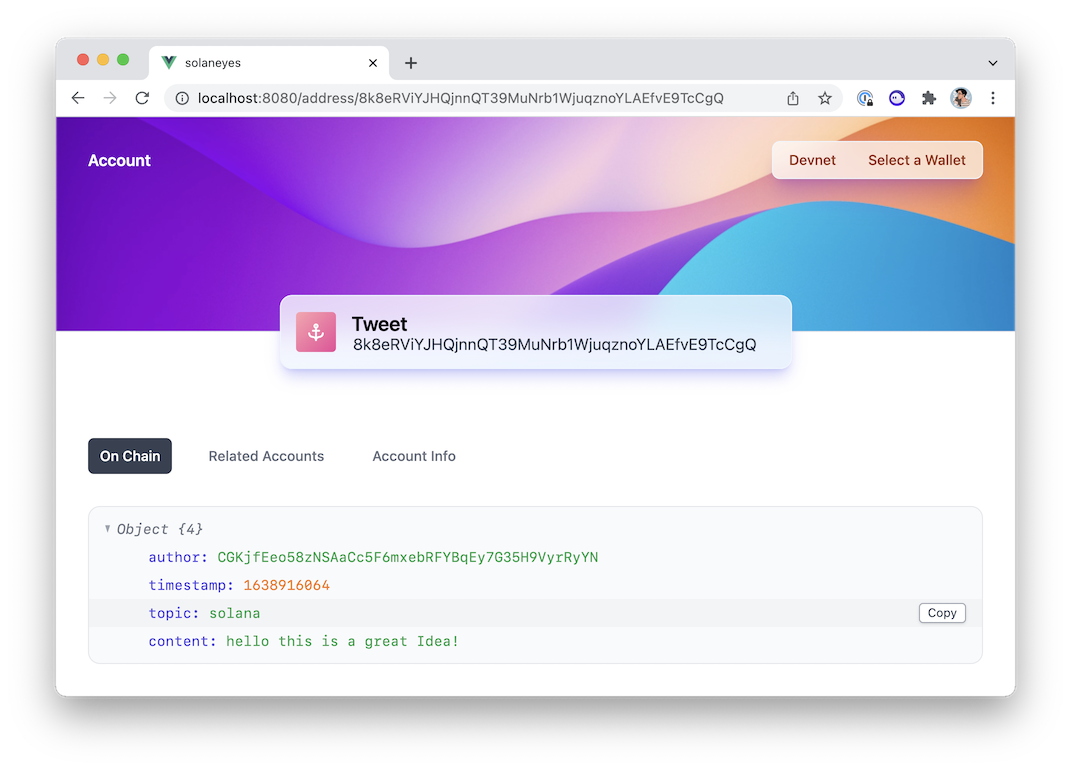
This is an optional step but it's good to know that you can publish your IDL file on the blockchain. This allows for other tools in the Solana ecosystem to recognise your program and understand what it has to offer.
Here's an example with a Solana explorer I'm building. Even though the explorer knows nothing about our program, it can fetch the IDL file and decode the Tweet account accordingly to show some valuable information.
To publish your IDL file, all you need to do is run the following in the terminal.
anchor idl init <programId> -f <target/idl/program.json>
And if your program changes in the future, you can upgrade the published IDL by running:
anchor idl upgrade <programId> -f <target/idl/program.json>
Developing cycle
Before I leave you, let’s just do a tiny recap of the developing cycle we have been using when creating and deploying a dApp in Solana. I’ll give it to you as code because let’s be honest, that’s the best thing to read.
# Make sure you’re on the localnet.
solana config set --url localhost
# And check your Anchor.toml file.

# Code…

# Run the tests.
anchor test

# Build, deploy and start a local ledger.
anchor localnet
# Or
solana-test-validator
anchor build
anchor deploy

# Copy the new IDL to the frontend.
anchor run copy-idl

# Serve your frontend application locally.
npm run serve

# Switch to the devnet cluster to deploy there.
solana config set --url devnet
# And update your Anchor.toml file.

# Airdrop yourself some money if necessary.
solana airdrop 5

# Build and deploy to devnet.
anchor build
anchor deploy

# Push your code to the main branch to auto-deploy on Netlify.
git push
Conclusion
We’ve done it! You can congratulate yourself for finishing this series because it certainly was a tough journey to follow. 💪
I hope you’ve learned a lot along the way and hopefully enough so you can start developing more dApps. If you do, I’d love to hear about what you’re building! Nothing would make me happier than seeing this article series lifting others to build amazing things.
If there’s anything else you’d like to learn regarding Solana development feel free to reach out. I’m planning on adding more bonus episodes to this series in the future and making them “GitHub sponsor only” so they can help me a little bit financially.
On top of that, I’m planning on adding more generic Solana articles for free on my blog so feel free to follow me on Twitter to get some updates.
As usual, you can find the repository for this episode on GitHub and compare its code to the previous episode.
I’ll see you soon for more Solana adventures. LFG! 😘
Sending new tweets from the frontend

Updating tweets