Testing our instruction
Our program may be ready but our job is not finished. In this article, we will write a few tests that interact with our program and, more specifically, our SendTweet instruction.
Whilst writing tests might not feel like the most exciting task, it is the perfect opportunity for us to understand how we can interact with our program and on behalf of which wallet.
Welcome to the other side
So far in this series, we’ve focused on program development, that is, the part of the code that lives in the blockchain.
Now, it’s time to move on to the other side — a.k.a. the client.
Much like a traditional web server, we need a client to interact with our Solana program. Later on in this series, we will implement a JavaScript client using the VueJS framework, but for now, we will use a JavaScript client to test our program.
The benefit of that is, after writing our tests, we will know the exact syntax to use in our frontend to interact with our program.
Okay, so how does one interact with the Solana blockchain?
Solana offers a JSON RPC API for this purpose. Don’t get scared by the RPC specifications, at the end of the day, it’s just an API.
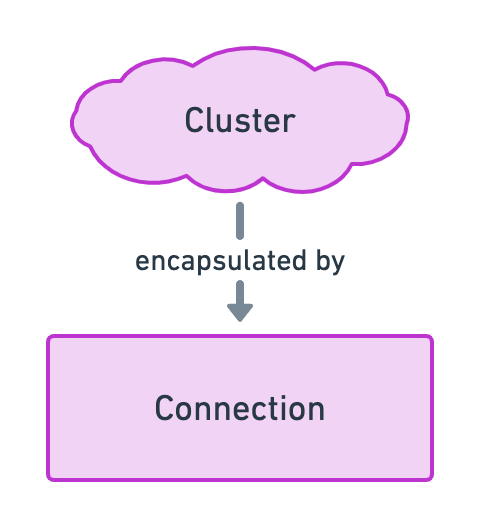
That being said, Solana provides a JavaScript library called @solana/web3.js that encapsulates this API for us by providing a bunch of useful asynchronous methods.
All of these methods live inside a Connection object that requires a Cluster for it to know where to send its requests. As usual, that cluster can be localhost, devnet, etc. Since we’re working locally for now, we’re using the “localhost” cluster.
Here’s a little visual representation that will keep growing in this article.
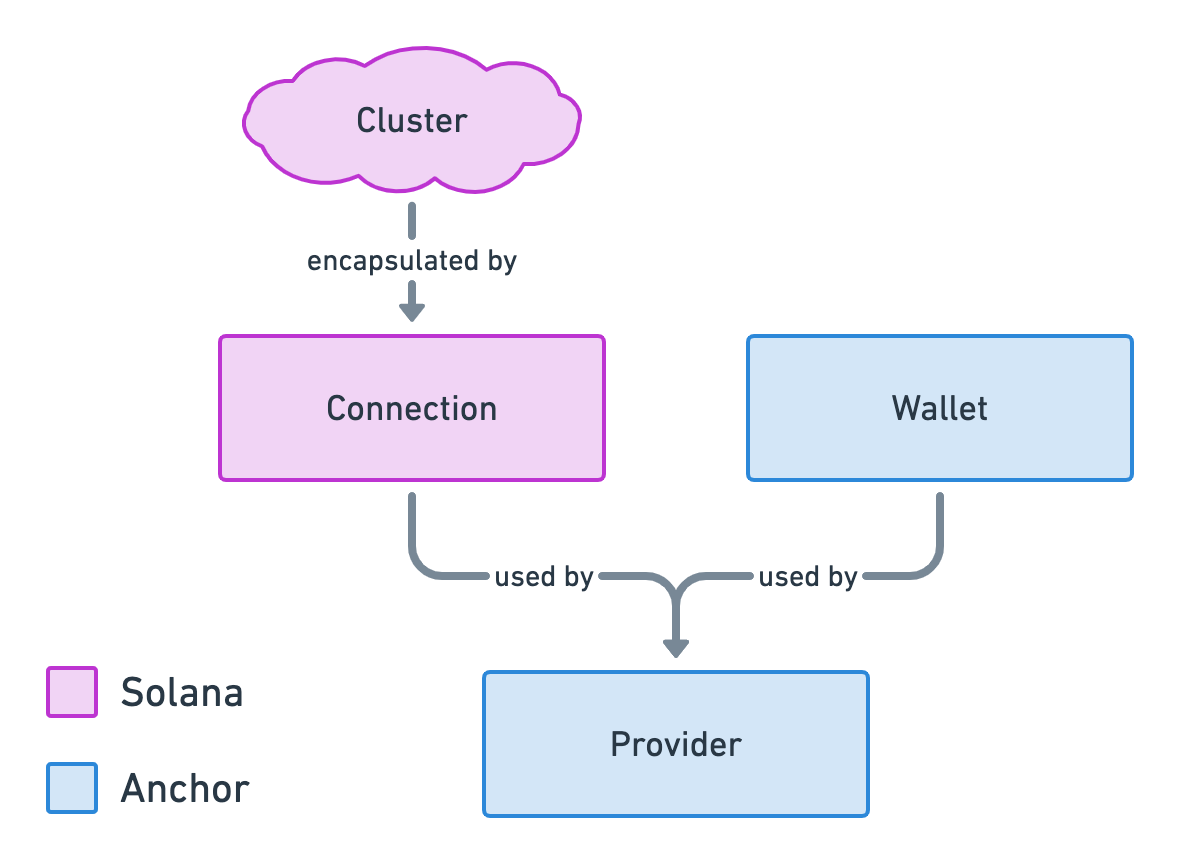
Now we know how to interact with the Solana blockchain but how can we sign transactions to prove our identity? For that, we need a Wallet object that has access to the key pair of the user making the transaction.
Fortunately for us, Anchor also provides a JavaScript library called @project-serum/anchor that makes all of this super easy.
Anchor’s library provides us with a Wallet object that requires a key pair and allows us to sign transactions. But that’s not it, it also provides us with a Provider object that wraps both the Connection and the Wallet and automatically adds the wallet’s signature to outgoing transactions. The Provider object makes interacting with the Solana blockchain on behalf of a wallet seamless.
Here’s an updated version of our previous diagram.
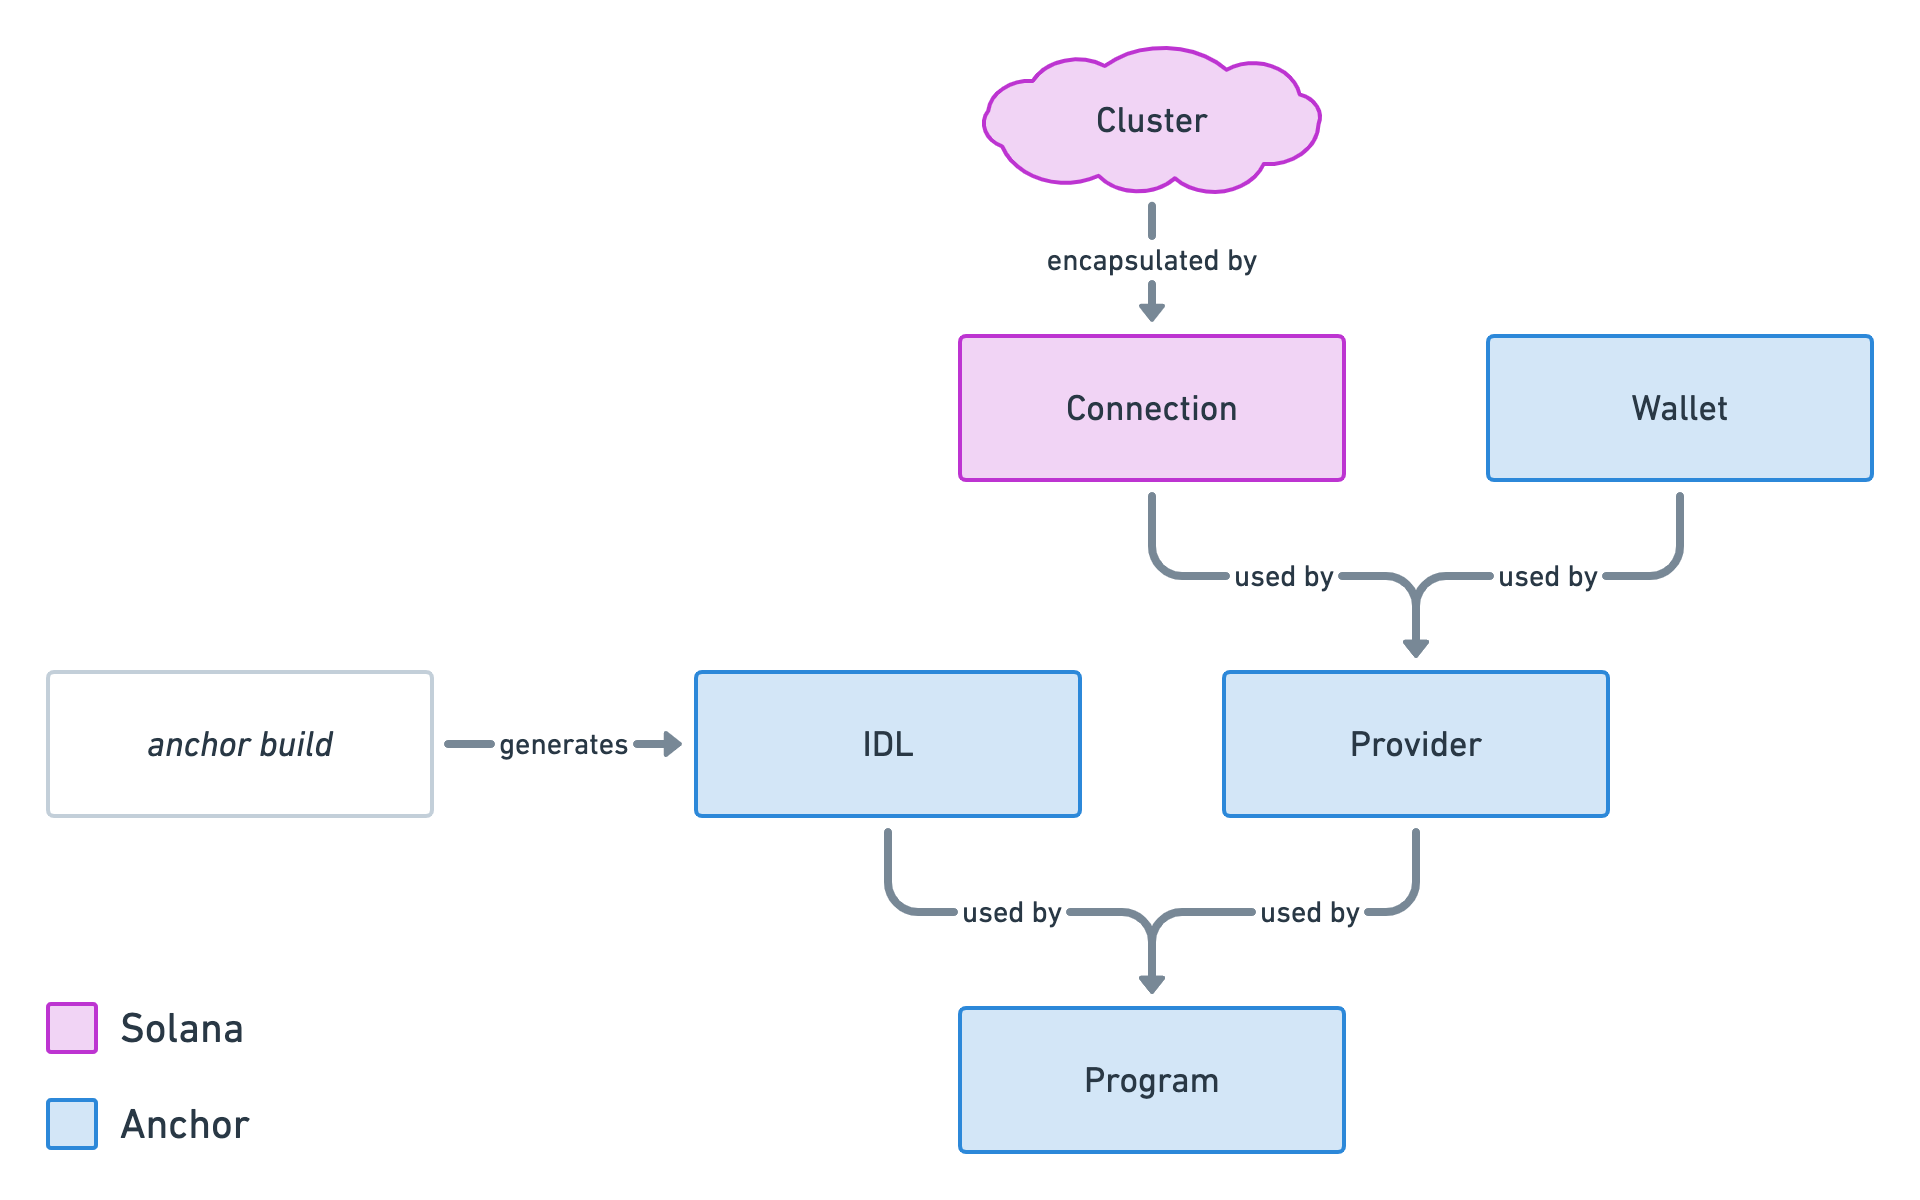
But wait there’s more! If you remember, in episode 2 we mentioned that every time we run anchor build Anchor generates a JSON file called an IDL — stands for "Interface Description Language". That IDL file contains a structured description of our program including its public key, instructions and accounts.
Imagine what we could get if we would combine that IDL file that knows everything about our program and that Provider object that can interact with the Solana blockchain on behalf of a wallet. That would be the final piece of the puzzle.
Well, imagine no more because Anchor provides yet another object called Program that uses both the IDL and the Provider to create a custom JavaScript API that completely matches our Solana program. Thanks to that Program object, we can interact with our Solana program on behalf of a wallet without even needing to know anything about the underlying API.
And there you have it, the final picture illustrating how Anchor encapsulates Solana’s JavaScript library to improve our developer experience.
A client just for tests
Let’s put what we’ve learned into practice by setting up a Program object that we can use in our tests.
First of all, no need to import any new JavaScript libraries, both of the libraries mentioned above are included by default on every Anchor project.
Then, if you look at the diagram above, there are essentially two questions we need to answer to end up with a Program object: which cluster and which wallet?
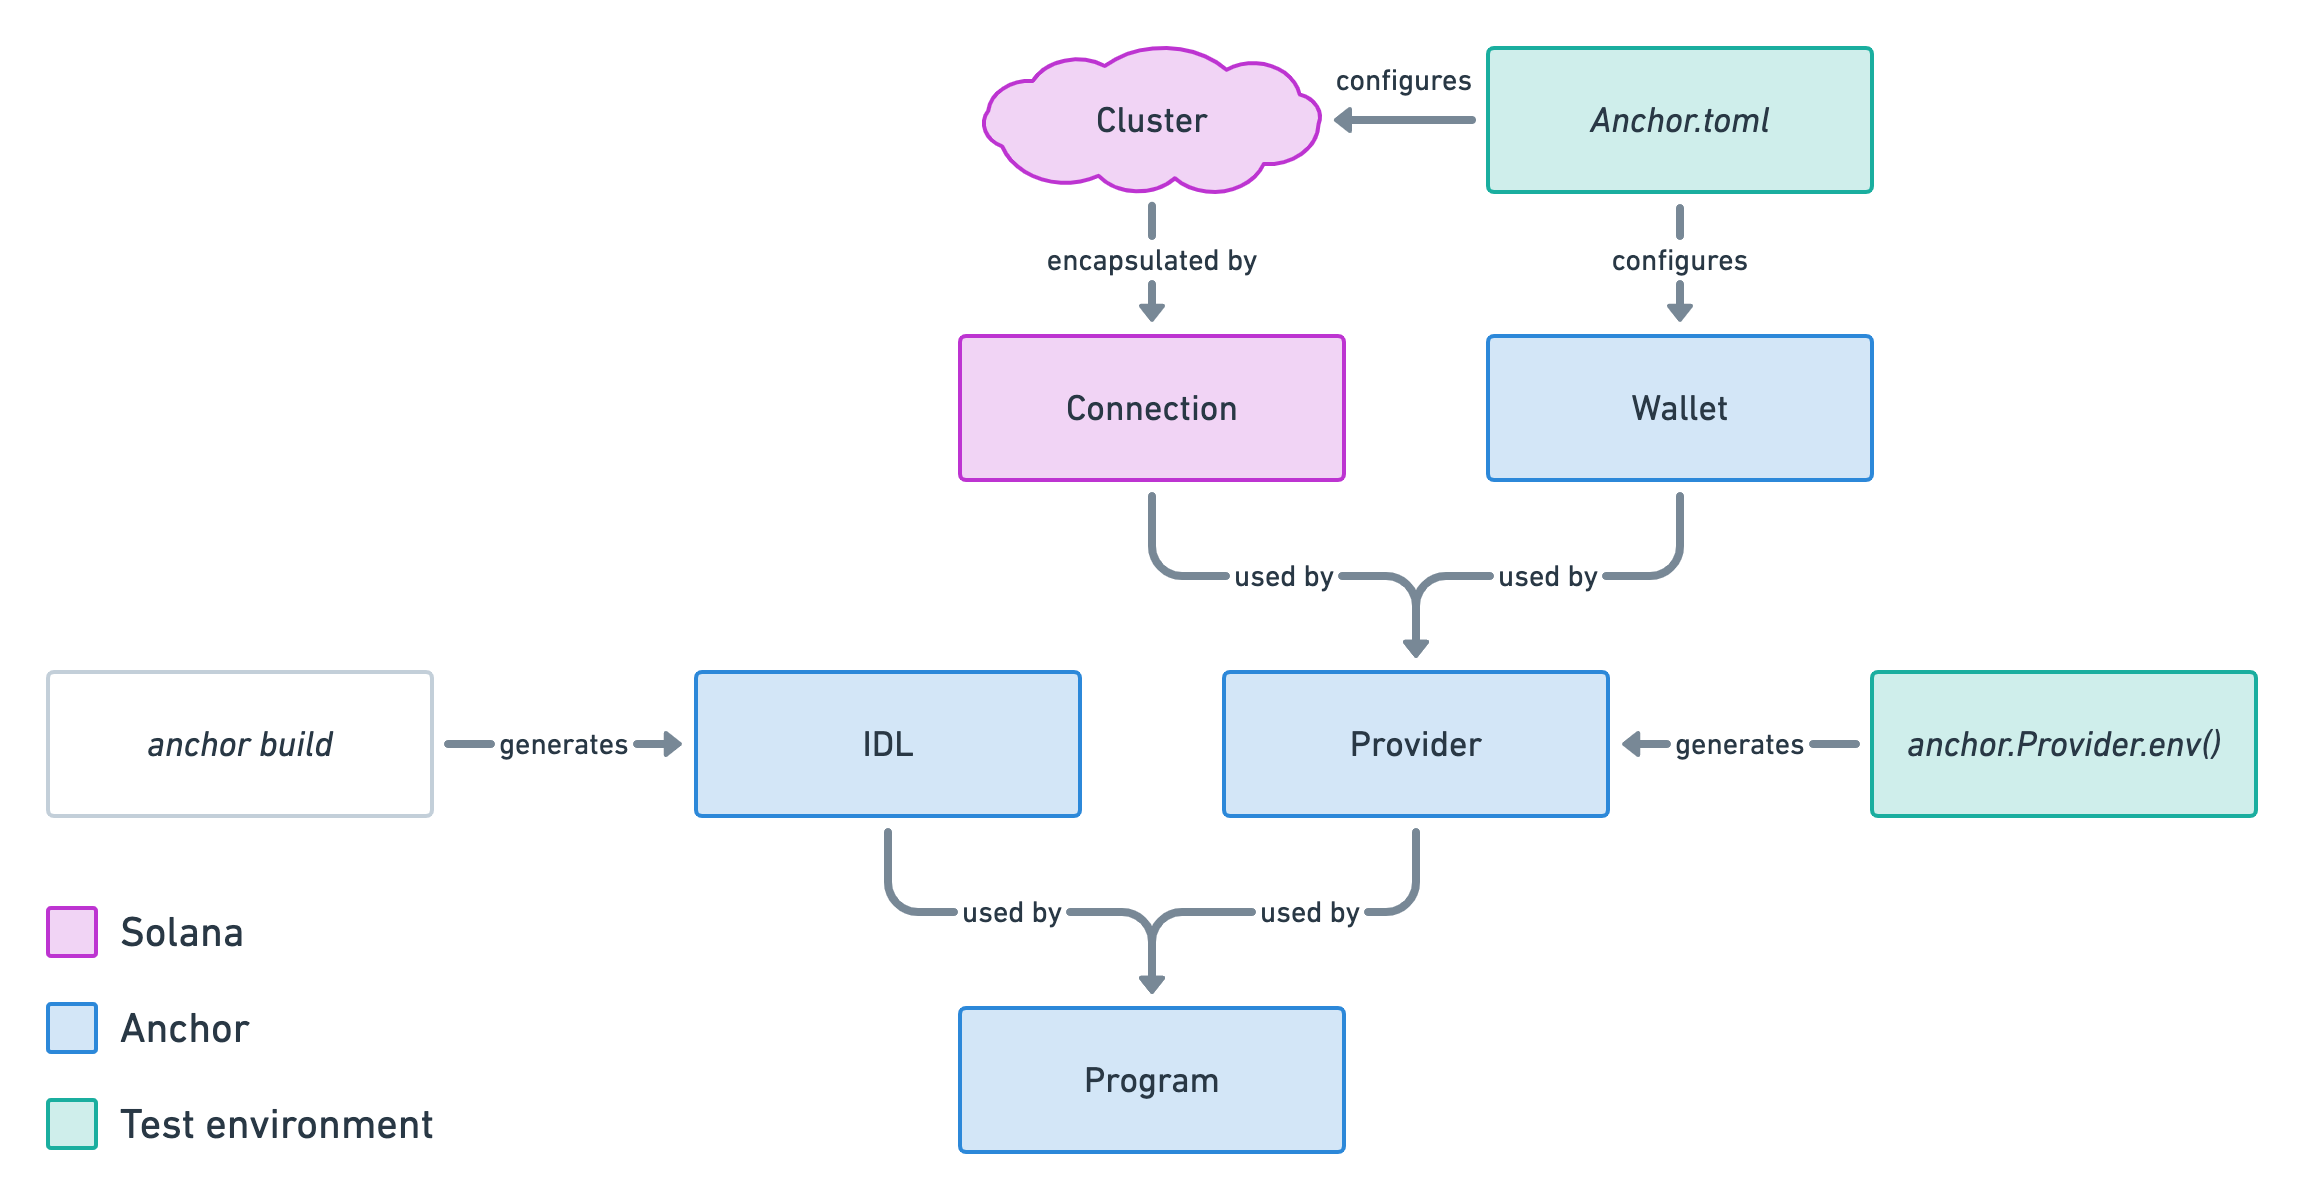
Anchor takes care of answering both of these questions for us by generating a Provider object that uses the configurations inside our Anchor.toml file.
More precisely, it will look into your provider configurations which should look something like this.
[provider]
cluster = "localnet"
wallet = "/Users/loris/.config/solana/id.json"
With these provider configurations, it knows to use the localhost cluster — using a local ledger — and it knows where to find your key pair on your local machine.
Now, open your test file that should be located at tests/solana-twitter.ts. If you look at the first 2 lines located inside the describe method, you should see the following.
// Configure the client to use the local cluster.
anchor.setProvider(anchor.Provider.env());
const program = anchor.workspace.SolanaTwitter as Program<SolanaTwitter>;
- The first line calls the
anchor.Provider.env()method to generate a newProviderfor us using ourAnchor.tomlconfig file. Remember: Cluster + Wallet = Provider. It then registers that new provider using theanchor.setProvidermethod. - The second line uses that registered provider to create a new
Programobject that we can use in our tests. Note that, since the tests are written in TypeScript, we are also leveraging the customSolanaTwittertype that Anchor generated for us when runninganchor build. That way, we can get some nice auto-completion from our code editor.
And just like that, our test client is all set up and ready to be used! Here's a little update on our diagram to reflect what we've learned here.
Sending a tweet
Right, enough theory, let's write our first test! Let's start by deleting the dummy test that was auto-generated in our tests/solana-twitter.ts file.
  // Configure the client to use the local cluster.
  anchor.setProvider(anchor.Provider.env());
  const program = anchor.workspace.SolanaTwitter as Program<SolanaTwitter>;

- it('Is initialized!', async () => {
-     // Add your test here.
-     const tx = await program.rpc.initialize({});
-     console.log("Your transaction signature", tx);
- });
Now, add the following code instead.
it('can send a new tweet', async () => {
    // Before sending the transaction to the blockchain.

    await program.rpc.sendTweet('TOPIC HERE', 'CONTENT HERE', {
        accounts: {
            // Accounts here...
        },
        signers: [
          	// Key pairs of signers here...
        ],
    });

    // After sending the transaction to the blockchain.
});
Don't worry if your IDE shows some red everywhere. It's just TypeScript complaining our instruction doesn't have enough data. We'll get there gradually.
Okay, let's digest that piece of code:
- We've created a new test called "it can send a new tweet" using the
itmethod from themochatest framework. - We used an
asyncfunction because we are going to call asynchronous functions inside it. More precisely, we're going to need toawaitfor the transaction to finish before we can make sure the right account was created. - We used our
programobject to interact with our program. Theprogramobject contains anrpcobject which exposes an API matching our program's instructions. Therefore, to make a call to ourSendTweetinstruction, we need to call theprogram.rpc.sendTweetmethod. - When using any method from the
program.rpcobject, we need to first provide any argument required by the instruction. In our case, that's thetopicand thecontentarguments in this order. -
The last argument of any
program.rpcmethod is always the context. If you remember from the previous episode, the context of an instruction contains all the accounts necessary for the instruction to run successfully. On top of providing theaccountsas an object, we also need to provide the key pairs of allsignersas an array. Note that we don't need to provide the key pair of our wallet since Anchor does that automatically for us.
Okay, let's fill this sendTweet method with real data. Let's provide a topic and a content for our tweet and let's make it vegan because why not? 🌱
it('can send a new tweet', async () => {
    await program.rpc.sendTweet('veganism', 'Hummus, am I right?', {
        accounts: {
            // Accounts here...
        },
        signers: [
          	// Key pairs of signers here...
        ],
    });
});
Next, let's fill the accounts. From the context of our SendTweet instruction, we need to provide the following accounts: tweet, author and system_program. We'll start with the tweet account.
Since this is the account our instruction will create, we just need to generate a new key pair for it. That way, we can also prove we are allowed to initialise an account at this address because we can add the tweet account as a signer.
We can generate a new key pair in JavaScript using the anchor.web3.Keypair.generate() method. Then we can add that generated key pair in the signers array and add its public key to the accounts object.
it('can send a new tweet', async () => {
    const tweet = anchor.web3.Keypair.generate();
    await program.rpc.sendTweet('veganism', 'Hummus, am I right?', {
        accounts: {
            tweet: tweet.publicKey,
        },
        signers: [tweet],
    });
});
Next up, the author account. For that, we need to access the public key of the wallet used inside our program. Remember how our program contains a provider which contains a wallet? That means we can access our wallet's public key via program.provider.wallet.publicKey.
Since Anchor automatically adds the wallet as a signer to each transaction, we don't need to change the signers array.
it('can send a new tweet', async () => {
    const tweet = anchor.web3.Keypair.generate();
    await program.rpc.sendTweet('veganism', 'Hummus, am I right?', {
        accounts: {
            tweet: tweet.publicKey,
            author: program.provider.wallet.publicKey,
        },
        signers: [tweet],
    });
});
Finally, we need to provide the system_program account. Note that, in JavaScript, Anchor automatically transforms snake case variables into camel case variables inside our context. This means we need to provide the System Program using systemProgram instead of system_program.
Now, how do we access the public key of Solana's official System Program in JavaScript? Simple, we can access the System Program using anchor.web3.SystemProgram and so we can access its public key via anchor.web3.SystemProgram.programId.
it('can send a new tweet', async () => {
    const tweet = anchor.web3.Keypair.generate();
    await program.rpc.sendTweet('veganism', 'Hummus, am I right?', {
        accounts: {
            tweet: tweet.publicKey,
            author: program.provider.wallet.publicKey,
            systemProgram: anchor.web3.SystemProgram.programId,
        },
        signers: [tweet],
    });
});
Boom! Just like that, we're ready to send tweets to our own Solana program. 🤯
Whilst running this test will successfully create a Tweet account on the blockchain, we're not actually testing anything yet. So the next step is to make another call to the blockchain to fetch the newly created account and make sure the data matches with what we've sent.
To fetch an account on the blockchain we need to access another API provided by the program object. By calling program.account.tweet, we have access to a few methods that help us fetch Tweet accounts from the blockchain. Note that these methods are available for every account defined in our Solana program. So if we had a UserProfile account, we could fetch them using the program.account.userProfile API.
Within these API methods, we can use fetch to retrieve exactly one account by providing its public key. Because Anchor knows what type of account we're trying to fetch, it will automatically parse all the data for us.
So let's fetch our newly created Tweet account. We'll use the public key of our tweet key pair to fetch our tweetAccount. Let's also log the content of that account so we can see what's in there.
it('can send a new tweet', async () => {
    // Call the "SendTweet" instruction.
    const tweet = anchor.web3.Keypair.generate();
    await program.rpc.sendTweet('veganism', 'Hummus, am I right?', {
        accounts: {
            tweet: tweet.publicKey,
            author: program.provider.wallet.publicKey,
            systemProgram: anchor.web3.SystemProgram.programId,
        },
        signers: [tweet],
    });

    // Fetch the account details of the created tweet.
    const tweetAccount = await program.account.tweet.fetch(tweet.publicKey);
  	console.log(tweetAccount);
});
Now let's run our tests using anchor test — remember this will build, deploy and test our program by running its own local ledger.
Reminder: Apple M1 users will need to run solana-test-validator --no-bpf-jit --reset and anchor test --skip-local-validator on a separate terminal session.
You should see the test passing — normal as we haven't defined any assertions yet — but you should also see an object that looks like this in the logs.
{
  author: PublicKey {
    _bn: <BN: 7d9c91c77d1f5b693cf0b3960a0c037211298a1e495ac14ef0d8fb904b38388f>
  },
  timestamp: <BN: 619e2495>,
  topic: 'veganism',
  content: 'Hummus, am I right?'
}
Congrats! That's the account we've retrieved from the blockchain and it looks like it's got the right data. At least for the topic and the content.
So the last thing to do for us to complete our test is to write assertions. For that, we'll need to import the assert library at the top of our test file. No need to install it, it's already one of our dependencies.
import * as anchor from '@project-serum/anchor';
import { Program } from '@project-serum/anchor';
import { SolanaTwitter } from '../target/types/solana_twitter';
import * as assert from "assert";
Now, we can use assert to:
- Ensure two things are equal using
assert.equal(actualThing, expectedThing). - Ensure something is truthy using
assert.ok(something).
So let's remove our previous console.log and add some assertions inside our test.
it('can send a new tweet', async () => {
    // Execute the "SendTweet" instruction.
    const tweet = anchor.web3.Keypair.generate();
    await program.rpc.sendTweet('veganism', 'Hummus, am I right?', {
        accounts: {
            tweet: tweet.publicKey,
            author: program.provider.wallet.publicKey,
            systemProgram: anchor.web3.SystemProgram.programId,
        },
        signers: [tweet],
    });

    // Fetch the account details of the created tweet.
    const tweetAccount = await program.account.tweet.fetch(tweet.publicKey);

    // Ensure it has the right data.
    assert.equal(tweetAccount.author.toBase58(), program.provider.wallet.publicKey.toBase58());
    assert.equal(tweetAccount.topic, 'veganism');
    assert.equal(tweetAccount.content, 'Hummus, am I right?');
    assert.ok(tweetAccount.timestamp);
});
A few things to note here:
- The first assertion ensures the author of the newly created account matches the public key of our wallet. Since both
tweetAccount.authorandprogram.provider.wallet.publicKeyare public key objects, they will have different references and therefore we can't simply compare them as objects. Instead, we convert them into a Base 58 format using thetoBase58method so they will be equal if and only if these two strings match. Note that the wallet address you give to people in Solana is the Base 58 encoding of your public key. Mine is:B1AfN7AgpMyctfFbjmvRAvE1yziZFDb9XCwydBjJwtRN. - The next two assertions ensure both the
topicand thecontentof our tweet were stored correctly. - Finally, the last assertion ensures our tweet has a non-empty
timestamp. We could also check that the timestamp corresponds to the current time but it's a bit tricky to do without having the test failing every so often due to the time not matching to the second. Thus, let's keep the test simple and just make sure we have a timestamp.
All done! We can now run anchor test and see our test and all of its assertions passing!
Should we write a few more?
Sending a tweet without a topic
Now that we understand how to write tests for our program, we can simply copy/paste our first test and tweak a few things to test different scenarios.
In this case, I'd like us to add a scenario for tweets that have no topics since our frontend will allow users to send tweets without them.
To test this scenario, copy/paste our first test, rename it "can send a new tweet without a topic" and replace the 'veganism' topic with an empty string ''. Note that I've also replaced the content with "gm".
it('can send a new tweet without a topic', async () => {
    // Call the "SendTweet" instruction.
    const tweet = anchor.web3.Keypair.generate();
    await program.rpc.sendTweet('', 'gm', {
        accounts: {
            tweet: tweet.publicKey,
            author: program.provider.wallet.publicKey,
            systemProgram: anchor.web3.SystemProgram.programId,
        },
        signers: [tweet],
    });

    // Fetch the account details of the created tweet.
    const tweetAccount = await program.account.tweet.fetch(tweet.publicKey);

    // Ensure it has the right data.
    assert.equal(tweetAccount.author.toBase58(), program.provider.wallet.publicKey.toBase58());
    assert.equal(tweetAccount.topic, '');
    assert.equal(tweetAccount.content, 'gm');
    assert.ok(tweetAccount.timestamp);
});
Et voilà! We now have two tests testing different scenarios. Onto the next one.
Sending a tweet from a different author
Let's test a slightly more complicated scenario now. So far, we've used our wallet as the author of the tweet we're sending but, technically, we should be able to tweet on behalf of any author as long we can prove we own its public address by signing the transaction.
So let's do that. Again, starting by copy/pasting our first test, we'll do the following:
- Generate a new key pair and assign it in an
otherUservariable. - Provide that
otherUser's public key as theauthoraccount. - Add the
otherUserkey pair in thesignersarray. Note that Anchor will only automatically sign transactions using our wallet which is why we need to explicitly sign here. - Ensure the
authorof the fetchedtweetAccountmatches the public key of ourotherUser.
it('can send a new tweet from a different author', async () => {
    // Generate another user and airdrop them some SOL.
    const otherUser = anchor.web3.Keypair.generate();

    // Call the "SendTweet" instruction on behalf of this other user.
    const tweet = anchor.web3.Keypair.generate();
    await program.rpc.sendTweet('veganism', 'Yay Tofu!', {
        accounts: {
            tweet: tweet.publicKey,
            author: otherUser.publicKey,
            systemProgram: anchor.web3.SystemProgram.programId,
        },
        signers: [otherUser, tweet],
    });

    // Fetch the account details of the created tweet.
    const tweetAccount = await program.account.tweet.fetch(tweet.publicKey);

    // Ensure it has the right data.
    assert.equal(tweetAccount.author.toBase58(), otherUser.publicKey.toBase58());
    assert.equal(tweetAccount.topic, 'veganism');
    assert.equal(tweetAccount.content, 'Yay Tofu!');
    assert.ok(tweetAccount.timestamp);
});
Unfortunately, this test will not pass.
If we try to run it, we will get the following error — you need to read the error logs carefully to find it.
Transfer: insufficient lamports 0, need 10467840
Okay, what is happening and what is lamport?
A lamport is the smallest decimal of Solana's native token SOL. The Solana token has exactly 9 decimals, which mean 1 SOL is equal to 1'000'000'000 lamports.
Lamports are used a lot in Solana development as they allow us to make micropayments of fractional SOLs whilst handling amounts using integers. They are named after Solana's biggest technical influence, Leslie Lamport.
Okay, so the error is telling us we have insufficient funds. More precisely, we need 10467840 lamports or 0.01046784 SOL.
It turns out this is exactly the amount of money we need for our Tweet account to be rent-exempt. When we sized our Tweet account in episode 3, we came up with a required storage of 1376 bytes. Let's find out how much money we need for an account of 1376 bytes to be rent-exempt.
solana rent 1376
# Outputs:
# Rent per byte-year: 0.00000348 SOL
# Rent per epoch: 0.000028659 SOL
# Rent-exempt minimum: 0.01046784 SOL       <- Aha!
Good, now we understand what's happening. The transaction is failing because we're using the otherUser as the author of the tweet which is set to pay the rent-exempt money on the Tweet account but that otherUser has no money at all!
To fix this, we need to airdrop some money to the otherUser before we can call our SendTweet instruction.
We can do this using the connection object which is available under program.provider.connection. This object contains a requestAirdrop asynchronous method that accepts a public key and an amount of lamport. Let's give that user 1 SOL — or 1 billion lamports.
await program.provider.connection.requestAirdrop(otherUser.publicKey, 1000000000);
Now, this API method is a bit special because the user still won't have any money after the await call. That's because it's only "requesting" for the airdrop. To ensure we wait long enough for the money to be in the otherUser account, we need to wait for the transaction to confirm.
Fortunately for us, there is a confirmTransaction method on the connection object that does just this. It accepts a transaction signature which is returned by the previous requestAirdrop call.
  const signature = await program.provider.connection.requestAirdrop(otherUser.publicKey, 1000000000);
  await program.provider.connection.confirmTransaction(signature);
Let's add this code to our test and run anchor test to see if it passes.
it('can send a new tweet from a different author', async () => {
    // Generate another user and airdrop them some SOL.
    const otherUser = anchor.web3.Keypair.generate();
    const signature = await program.provider.connection.requestAirdrop(otherUser.publicKey, 1000000000);
    await program.provider.connection.confirmTransaction(signature);

    // Call the "SendTweet" instruction on behalf of this other user.
    const tweet = anchor.web3.Keypair.generate();
    await program.rpc.sendTweet('veganism', 'Yay Tofu!', {
        accounts: {
            tweet: tweet.publicKey,
            author: otherUser.publicKey,
            systemProgram: anchor.web3.SystemProgram.programId,
        },
        signers: [otherUser, tweet],
    });

    // Fetch the account details of the created tweet.
    const tweetAccount = await program.account.tweet.fetch(tweet.publicKey);

    // Ensure it has the right data.
    assert.equal(tweetAccount.author.toBase58(), otherUser.publicKey.toBase58());
    assert.equal(tweetAccount.topic, 'veganism');
    assert.equal(tweetAccount.content, 'Yay Tofu!');
    assert.ok(tweetAccount.timestamp);
});
Yes! All tests are passing! ✅
solana-twitter
  ✔ can send a new tweet (277ms)
  ✔ can send a new tweet without a topic (517ms)
  ✔ can send a new tweet from a different author (1055ms)


3 passing (2s)
Before we move on to our next test, you might be wondering: Why didn't we need to do airdrop some money to our wallet on the previous tests?
That's because every time a new local ledger is created, it automatically airdrops 500 million SOL to your local wallet which, by default, is located at ~/.config/solana/id.json.
If you remember, running anchor test starts a new local ledger for us and therefore airdrops some money to our wallet automatically every single time. That's why we never need to airdrop money into our local wallet before each test.
Okay, let's move on to our two final tests for this episode.
Testing our custom guards
So far, we've only tested "happy paths" — i.e. scenarios that are allowed.
In the previous episode, we created two custom guards in our SendTweet instruction to ensure topics and contents could not have more than 50 and 280 characters respectively. So it could be a good idea to add a test for each of these guards to make sure they work properly.
These tests will be slightly different from the previous ones because we will be asserting that an error is being thrown.
Let's start with the topic and create a new test called "cannot provide a topic with more than 50 characters". This time, we'll only copy the first part of the first test we created.
it('cannot provide a topic with more than 50 characters', async () => {
    const tweet = anchor.web3.Keypair.generate();
    await program.rpc.sendTweet('veganism', 'Hummus, am I right?', {
        accounts: {
            tweet: tweet.publicKey,
            author: program.provider.wallet.publicKey,
            systemProgram: anchor.web3.SystemProgram.programId,
        },
        signers: [tweet],
    });
});
Now we need to replace the topic veganism with anything which has more than 50 characters. To make this obvious, we'll create a topic made of only one character repeated 51 times using the repeat JavaScript function.
it('cannot provide a topic with more than 50 characters', async () => {
    const tweet = anchor.web3.Keypair.generate();
    const topicWith51Chars = 'x'.repeat(51);
    await program.rpc.sendTweet(topicWith51Chars, 'Hummus, am I right?', {
        // ...
    });
});
Good, now — if our guard works properly — this call should throw an error. But how do we assert for this? They are many ways to do this, including an assert.throws method that accepts a callback and an error that should match the error thrown. However, I prefer to use a try/catch block so we can make further assertions on the error object.
The idea is:
- We wrap our code in a
tryblock. - We
catchany error and make further assertions on the error thrown before returning so the test stops here. - After the
try/catchblock, we callassert.failsince we should have returned inside thecatchblock.
We end up with the following test.
it('cannot provide a topic with more than 50 characters', async () => {
    try {
        const tweet = anchor.web3.Keypair.generate();
        const topicWith51Chars = 'x'.repeat(51);
        await program.rpc.sendTweet(topicWith51Chars, 'Hummus, am I right?', {
            accounts: {
                tweet: tweet.publicKey,
                author: program.provider.wallet.publicKey,
                systemProgram: anchor.web3.SystemProgram.programId,
            },
            signers: [tweet],
        });
    } catch (error) {
        assert.equal(error.msg, 'The provided topic should be 50 characters long maximum.');
        return;
    }

    assert.fail('The instruction should have failed with a 51-character topic.');
});
And just like that, we have a passing test that ensures our custom "topic" guard is working properly!
We can do the same for our custom "content" guard, by copy/pasting that test, using a content of 281 characters and tweaking some of the other variables and texts. We end up with the following test.
it('cannot provide a content with more than 280 characters', async () => {
    try {
        const tweet = anchor.web3.Keypair.generate();
        const contentWith281Chars = 'x'.repeat(281);
        await program.rpc.sendTweet('veganism', contentWith281Chars, {
            accounts: {
                tweet: tweet.publicKey,
                author: program.provider.wallet.publicKey,
                systemProgram: anchor.web3.SystemProgram.programId,
            },
            signers: [tweet],
        });
    } catch (error) {
        assert.equal(error.msg, 'The provided content should be 280 characters long maximum.');
        return;
    }

    assert.fail('The instruction should have failed with a 281-character content.');
});
Awesome, now both of our custom guards are tested!
The only annoyance with testing instruction calls that throw errors is that these errors will inevitably become visible in our test logs and add a lot of noise to the terminal. I couldn't see any way around that without overriding some console methods so if anyone has a neat solution to this issue feel free to share it and I'll update this article accordingly.
Conclusion
Congrats on finishing episode 5! Not only we've implemented five tests for our Solana program, but we've also learned how to build JavaScript clients that interact with our program.
Knowing these concepts — Program, Provider, Wallet, etc. — will be a big help when we implement our JavaScript frontend.
In the next episode, we'll add three final tests that will fetch multiple Tweet accounts at once. This will allow us to understand how we can retrieve and display all tweets and filter them by topic or by author. See you there! 👋
Our first instruction

Fetching tweets from the program


