Fetching tweets from the program
Let's see what we've learned so far. Implementing a Solana program that creates Tweet accounts... Check! ✅ Interacting with our program from a client to send tweets to the blockchain... Check! ✅ Retrieving all of our tweets to display them to our users... Hmm... Nope! ❌
Let's learn how to do this now! We'll add a few tests that retrieve multiple tweets and ensure we get the right tweets in the right amount.
Fetching all tweets
Let's start simple by retrieving all Tweet accounts ever created on the blockchain.
In the previous episode, we learned that Anchor exposes a little API for each type of account inside the program object. For instance, the retrieve the Tweet account API, we need to access program.account.tweet.
Previously, we used the fetch method inside that API to retrieve a specific account based on its public key. Now, we'll use another method called all that simply returns all of them!
const tweetAccounts = await program.account.tweet.all();
And just like that we have an array of all tweet accounts ever created.
Let's add a new test at the end of the tests/solana-twitter.ts file. We're adding it at the end because we need to make sure we have accounts to retrieve. The first 5 tests end up creating a total of 3 tweet accounts — since 2 of the test make sure accounts are not created under certain conditions.
Therefore, our new test will retrieve all accounts and make sure we've got exactly 3.
it('can fetch all tweets', async () => {
    const tweetAccounts = await program.account.tweet.all();
    assert.equal(tweetAccounts.length, 3);
});
Now if we run anchor test, we should see all 6 of the tests passing! ✅
Note that for this new test to always work, we need to make sure our local ledger is empty before running the tests. When running anchor test, Anchor does that automatically for us by starting a new empty local ledger.
However, if you run tests with your own local ledger — by running solana-test-validator and anchor run test on a different terminal session — then make sure to reset your local ledger before running the tests by exiting the current local ledger and starting a new empty one using solana-test-validator --reset. If you don't, you'll end up with 6 tweet accounts the next time you run your tests and therefore our brand new test will fail.
This applies for Apple M1 users that have to run solana-test-validator --no-bpf-jit --reset and anchor test --skip-local-validator instead of anchor test. Just make sure you restart your local ledger before running the tests every time.
Filtering tweets by author
Okay, let's move on to our next test. we know how to fetch all Tweet account ever created but how can we retrieve all accounts matching certain criteria? For example, how can we retrieve all Tweet accounts from a particular author?
It turns out, you can provide an array of filters to the all() method above to narrow the scope of your result.
Solana supports only 2 types of filters and both of them are quite rudimentary.
The dataSize filter
The first filter — called dataSize — is quite simple. You give it a size in bytes and it will only return accounts that match exactly that size.
For instance, we can create a 2000 bytes dataSize filter this way.
{
    dataSize: 2000,
}
Anything above or below 2000 bytes will not be included in the result.
Since all of our Tweet accounts have a size of 1376 bytes, that's not very useful to us.
The memcmp filter
The second filter — called memcmp — is a bit more useful. It allows us to compare an array of bytes with the account's data at a particular offset.
That means, we need to provide an array of bytes that should be present in the account's data at a certain position and it will only return these accounts.
So we need to provide 2 things:
- The
offset: The position (in bytes) in which we should start comparing the data. This expects an integer. - The
bytesarray: The data to compare to the account's data. This array of bytes should be encoded in base 58.
For instance, say I wanted to retrieve all accounts that have my public key at the 42nd byte. Then, I could use the following memcmp filter.
{
    memcmp: {
        offset: 42, // Starting from the 42nd byte.
        bytes: 'B1AfN7AgpMyctfFbjmvRAvE1yziZFDb9XCwydBjJwtRN', // My base-58 encoded public key.
    }
}
Note that memcmp filters only compare exact data. We cannot, for example, check that an integer at a certain position is lower than a provided number. Still, that memcmp filter is powerful enough for us to use it in our Twitter-like dApp.
Use the memcmp filter on the author's public key
Okay, back to the matter at hand. Let's use that memcmp filter to filter tweets from a given author.
So we need two things: the offset and the bytes. For the offset, we need to find out where in the data the author's public key is stored. Fortunately, we've already done all that work in episode 3.
We know that the first 8 bytes are reserved for the discriminator and that the author's public key comes afterwards. Therefore, our offset is simply: 8.
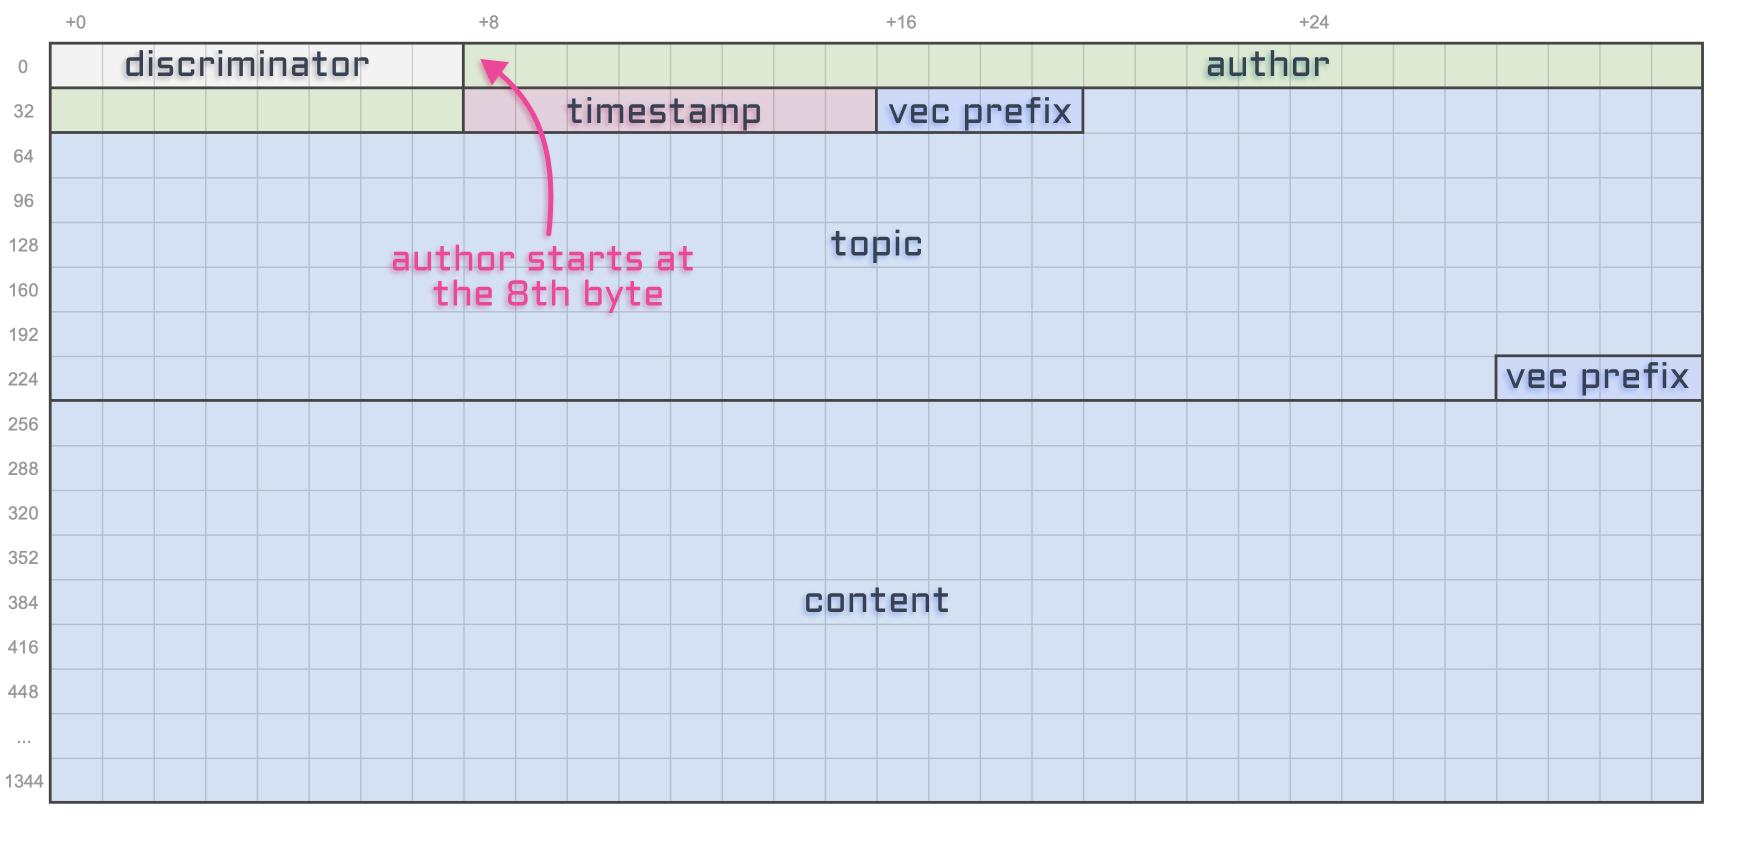
Now, for the bytes, we need to provide a base-58 encoded public key. For the purpose of our test, we'll use our wallet's public key to retrieve all tweets posted by the wallet.
We end up with the following piece of code.
const authorPublicKey = program.provider.wallet.publicKey
const tweetAccounts = await program.account.tweet.all([
    {
        memcmp: {
            offset: 8, // Discriminator.
            bytes: authorPublicKey.toBase58(),
        }
    }
]);
Considering only two of the three Tweet accounts created in the tests are from our wallet, the tweetAccounts variable should only contain two accounts.
Let's fit that code into a new test and make sure we get exactly two accounts back.
it('can filter tweets by author', async () => {
    const authorPublicKey = program.provider.wallet.publicKey
    const tweetAccounts = await program.account.tweet.all([
        {
            memcmp: {
                offset: 8, // Discriminator.
                bytes: authorPublicKey.toBase58(),
            }
        }
    ]);

    assert.equal(tweetAccounts.length, 2);
});
Let's be a bit more strict in that test and make sure that both of the accounts inside tweetAccounts are in fact from our wallet.
For that, we'll loop through the tweetAccounts array using the every function that returns true if and only if the provided callback returns true for every account.
it('can filter tweets by author', async () => {
    const authorPublicKey = program.provider.wallet.publicKey
    const tweetAccounts = await program.account.tweet.all([
        {
            memcmp: {
                offset: 8, // Discriminator.
                bytes: authorPublicKey.toBase58(),
            }
        }
    ]);

    assert.equal(tweetAccounts.length, 2);
    assert.ok(tweetAccounts.every(tweetAccount => {
        return tweetAccount.account.author.toBase58() === authorPublicKey.toBase58()
    }))
});
Done! We have our second test and we know how to filter by authors! 🎉
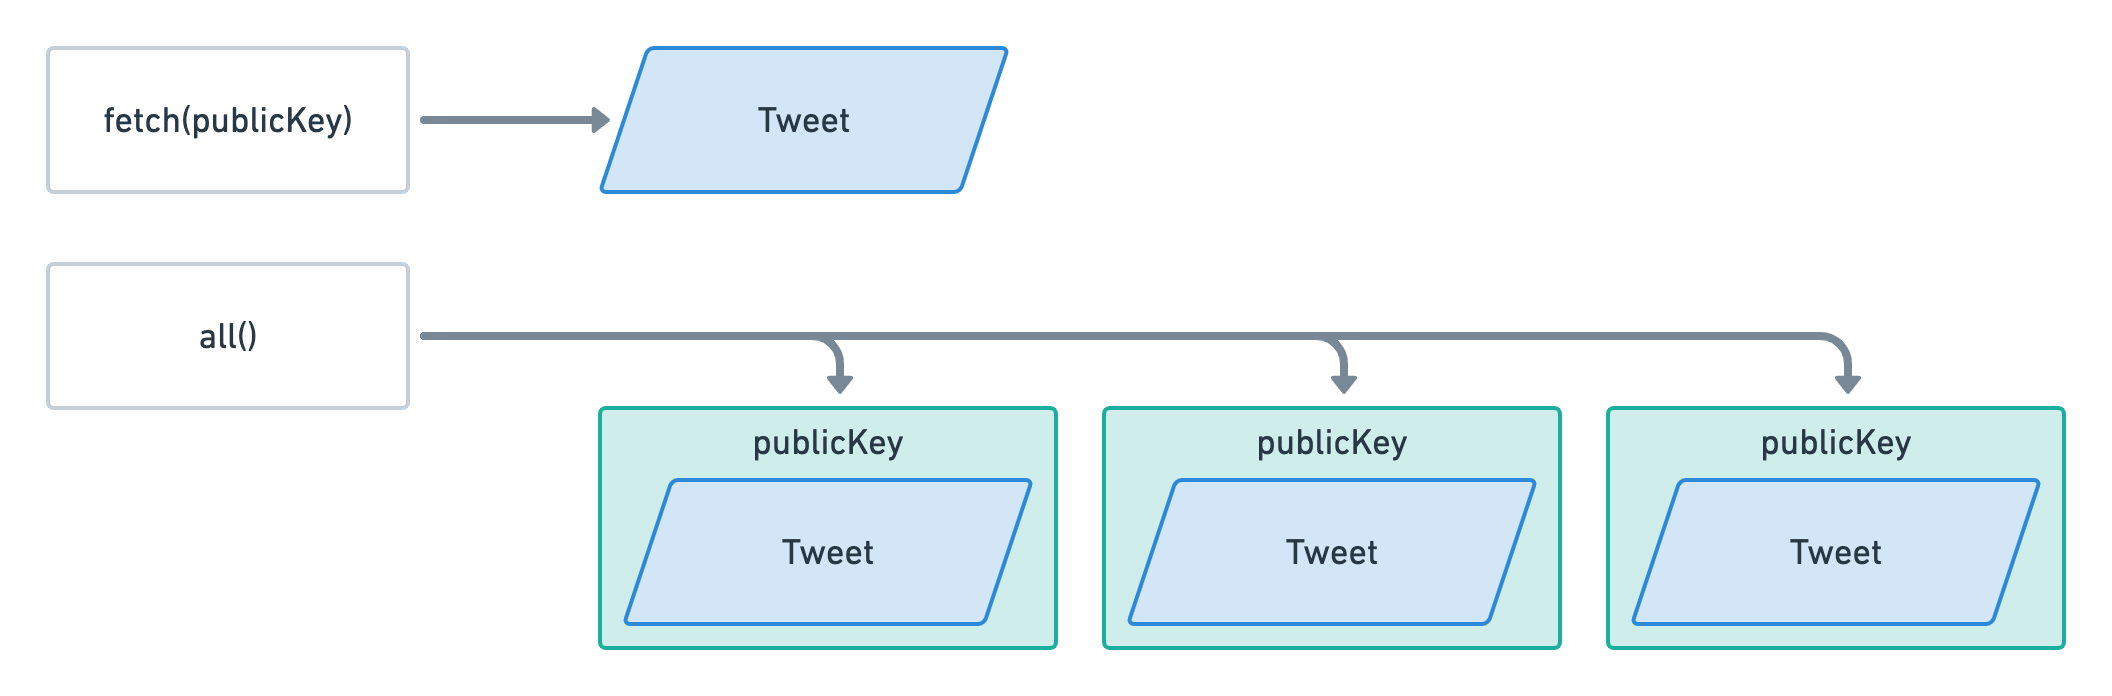
You might be wondering why we are accessing the author's public key via tweetAccount.account.author whereas, when using the fetch method, we were accessing it via tweetAccount.author directly. That's because the fetch and the all methods don't return exactly the same objects.
When using fetch, we get the Tweet account with all of its data parsed.
When using all, we get the same object but inside a wrapper object that also provides its publicKey. When using fetch, we're already providing the public key of the account so it's not necessary for that method to return it. However, when using all, we don't know the public key of these accounts and, therefore, Anchor wraps the account object in another object to gives us more context. That's why we're accessing the account data through tweetAccount.account.
Here's a little diagram to summarise this.
Filtering tweets by topic
Filtering tweets by topic is very similar to filtering tweets by author. We still need a memcpm filter but with different parameters.
Let's start with the offset. Again, if we look at the way our Tweet account is structured, we can see that the topic starts at the 52nd byte.
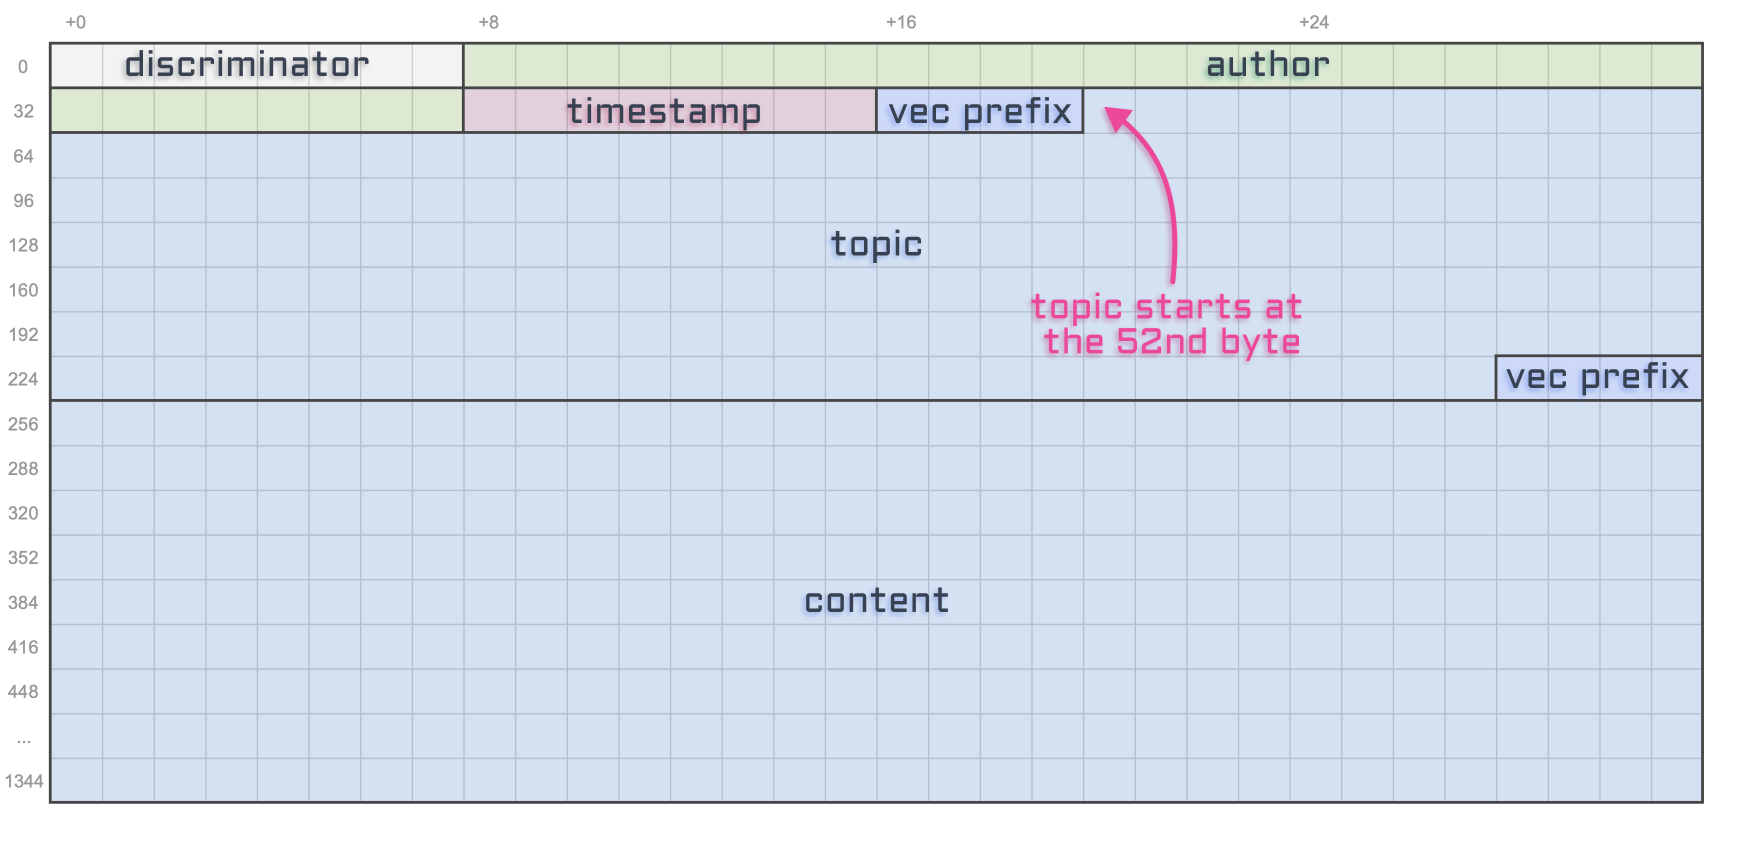
That's because we have 8 bytes for the discriminator, 32 bytes for the author, 8 bytes for the timestamp and an extra 4 bytes for the "string prefix" that tells us the real length of our topic in bytes.
So let's add these numbers explicitly in a memcmp filter to make it easier to maintain in the future.
const tweetAccounts = await program.account.tweet.all([
    {
        memcmp: {
            offset: 8 + // Discriminator.
                32 + // Author public key.
                8 + // Timestamp.
                4, // Topic string prefix.
            bytes: '', // TODO
        }
    }
]);
Next, we need to provide a topic to search for in our tests. Since two of the three accounts created in the tests use the veganism topic, let's use that.
However, we can't just give 'veganism' as a string to the bytes property. It needs to be a base-58 encoded array of bytes. To do this, we first need to convert our string to a buffer which we can then encode in base 58.
- We can convert a string to a buffer using
Buffer.from('some string'). - We can base-58 encode a buffer using
bs58.encode(buffer).
The Buffer variable is already available globally but that's not the case for the bs58 variable that we need to import explicitly at the top of our test file.
import * as anchor from '@project-serum/anchor';
import { Program } from '@project-serum/anchor';
import { SolanaTwitter } from '../target/types/solana_twitter';
import * as assert from "assert";
import * as bs58 from "bs58";
So now we can finally fill the bytes property with our base-58 encoded veganism topic.
const tweetAccounts = await program.account.tweet.all([
    {
        memcmp: {
            offset: 8 + // Discriminator.
                32 + // Author public key.
                8 + // Timestamp.
                4, // Topic string prefix.
            bytes: bs58.encode(Buffer.from('veganism')),
        }
    }
]);
Similarly to our previous test, let's create a new test that asserts tweetAccounts contains only two accounts and that both of them have the veganism topic.
it('can filter tweets by topics', async () => {
    const tweetAccounts = await program.account.tweet.all([
        {
            memcmp: {
                offset: 8 + // Discriminator.
                    32 + // Author public key.
                    8 + // Timestamp.
                    4, // Topic string prefix.
                bytes: bs58.encode(Buffer.from('veganism')),
            }
        }
    ]);

    assert.equal(tweetAccounts.length, 2);
    assert.ok(tweetAccounts.every(tweetAccount => {
        return tweetAccount.account.topic === 'veganism'
    }))
});
Conclusion
Retrieving and filtering multiple tweet accounts... Check! ✅
Congratulations, you now have a fully tested Solana program! We can now spend the rest of our time implementing a JavaScript client for our program that our users can interact with. Fortunately, because we've learned so much by writing tests, this will feel very familiar.
I'll see you in the next episode where we'll start scaffolding our VueJS application. Let's go! 🔥
Testing our instruction

Scaffolding the frontend