Integrating with Solana wallets
At this point, we've got a nice user interface to send and read tweets but nothing is wired to our Solana program. In addition, we have no way of knowing which wallet is connected in the user's browser. So let's fix that.
In this episode, we'll focus on integrating our frontend with Solana wallet providers such as Phantom or Solfare so we can send transactions on behalf of a user. Once we'll have access to the connected wallet, we'll be able to create a "Program" object just like we did in our tests.
Okay, let's get started!
Install Solana wallet libraries
Fortunately for us, there are some JavaScript libraries we can use to help us integrate with many wallet providers out there.
These libraries are available on GitHub and there is even a package for Vue 3! So let's install these libraries right now. We'll need one for the main logic and components and one for importing all supported wallet adapters.
Run the following inside your app directory to install them.
npm install solana-wallets-vue @solana/wallet-adapter-wallets
Initialise the wallet store
With these libraries installed, the first thing we need to do is to initialise the wallet store. This will provide a global store giving us access to useful properties and methods anywhere in our application.
Inside the script part of your App.vue component, add the following lines.
import { useRoute } from 'vue-router'
import TheSidebar from './components/TheSidebar'
import { PhantomWalletAdapter, SolflareWalletAdapter } from '@solana/wallet-adapter-wallets'
import { initWallet } from 'solana-wallets-vue'

const route = useRoute()

const wallets = [
    new PhantomWalletAdapter(),
    new SolflareWalletAdapter(),
]

initWallet({ wallets, autoConnect: true })
This does two things.
- It imports two wallet providers: Phantom and Solflare. It then registers these two wallet providers inside a
walletsarray. Whilst we'll only use these two in this series, note that you can use any of the supported wallet providers listed here. To add some more, import the relevant class from@solana/wallet-adapter-walletsand instantiate it in thewalletsarray. - It imports and calls the
initWalletmethod to initialise the global store using the wallets defined in step 1 so it knows which wallet providers we want to support. Additionally, we set theautoConnectoption totrueso that it will automatically try to reconnect the user's wallet on page refresh.
And just like that, our wallet store is initialised and we can use its properties and methods to create components allowing users to connect their wallets. Fortunately, one of the libraries we've installed also provide UI components that handle all of that for us.
Use wallet UI components
The solana-wallets-vue library provides VueJS components that allow the user to select a wallet provider and connect to it. It contains a button to initiate the process, a modal to select the wallet provider and a dropdown that can be used once connected to copy your address, change provider or disconnect.
All of that can be added to your application through the following component.
<wallet-multi-button></wallet-multi-button>
This component will delegate to other components — such as <wallet-connect-button> — to give the user a complete workflow to connect, manage and disconnect their wallet.
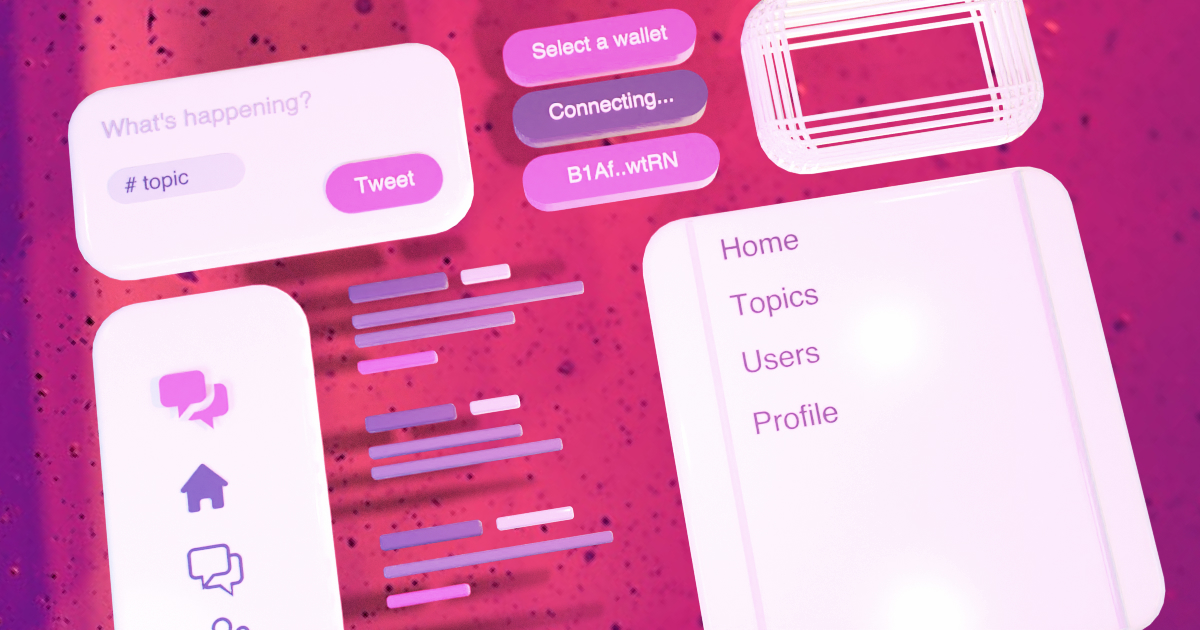
Currently, we have a fake "Select a wallet" button on the sidebar. Thus, let's replace it with the two components above to connect our wallets for real.
Inside the script part of the TheSidebar.vue component, add the following line to import the component.
import { WalletMultiButton } from 'solana-wallets-vue'
Then, use it inside the template part and remove the fake button.
- <!-- TODO: Connect wallet -->
- <div class="bg-pink-500 text-center w-full text-white rounded-full px-4 py-2">
-     Select a wallet
- </div>
+ <wallet-multi-button></wallet-multi-button>
Last but not least, we need to import some CSS to style that component properly. Add the following line to your main.js file. It's important to add it before our main.css file so we can make some design tweaks in the next section.
// CSS.
import 'solana-wallets-vue/styles.css'
import './main.css'

// ...
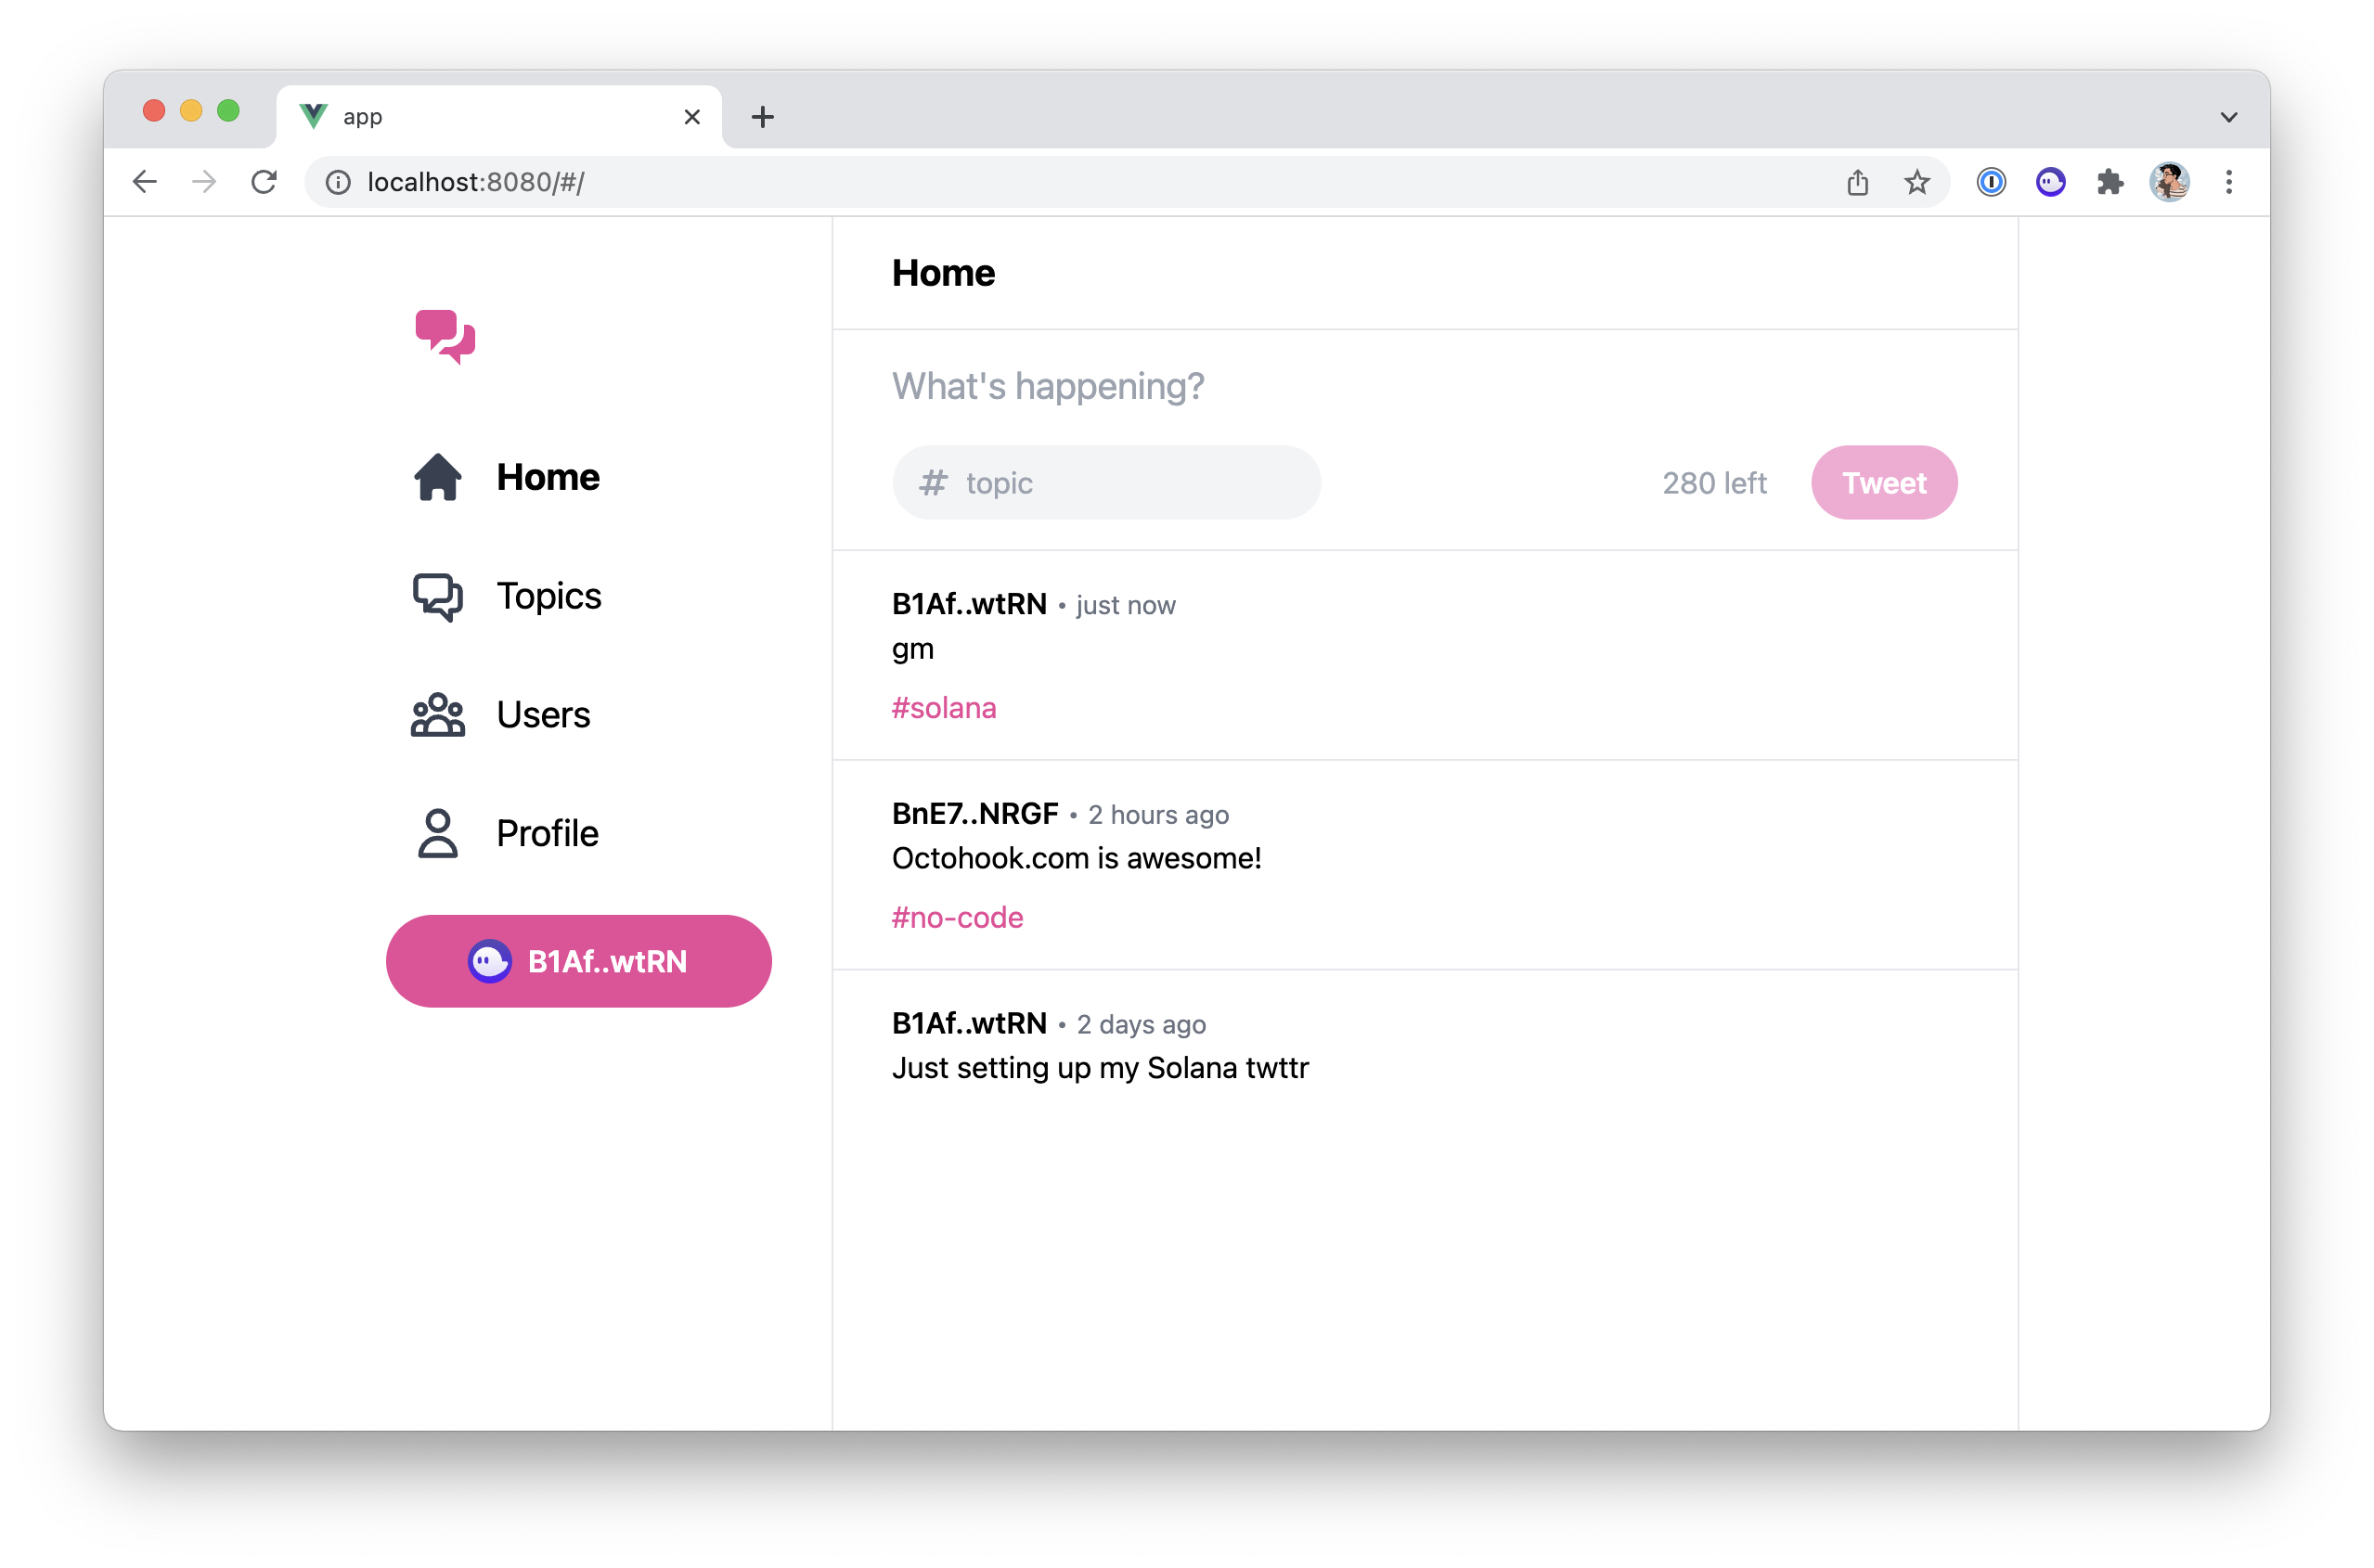
Awesome! At this point you should be able to compile your application — using npm run serve — and connect your wallet! 🎉
Note that, if you don't have a wallet or a browser extension such as Phantom installed yet, don't worry about it, we'll tackle that in a minute. But first, let's have a look at what our wallet button looks like.
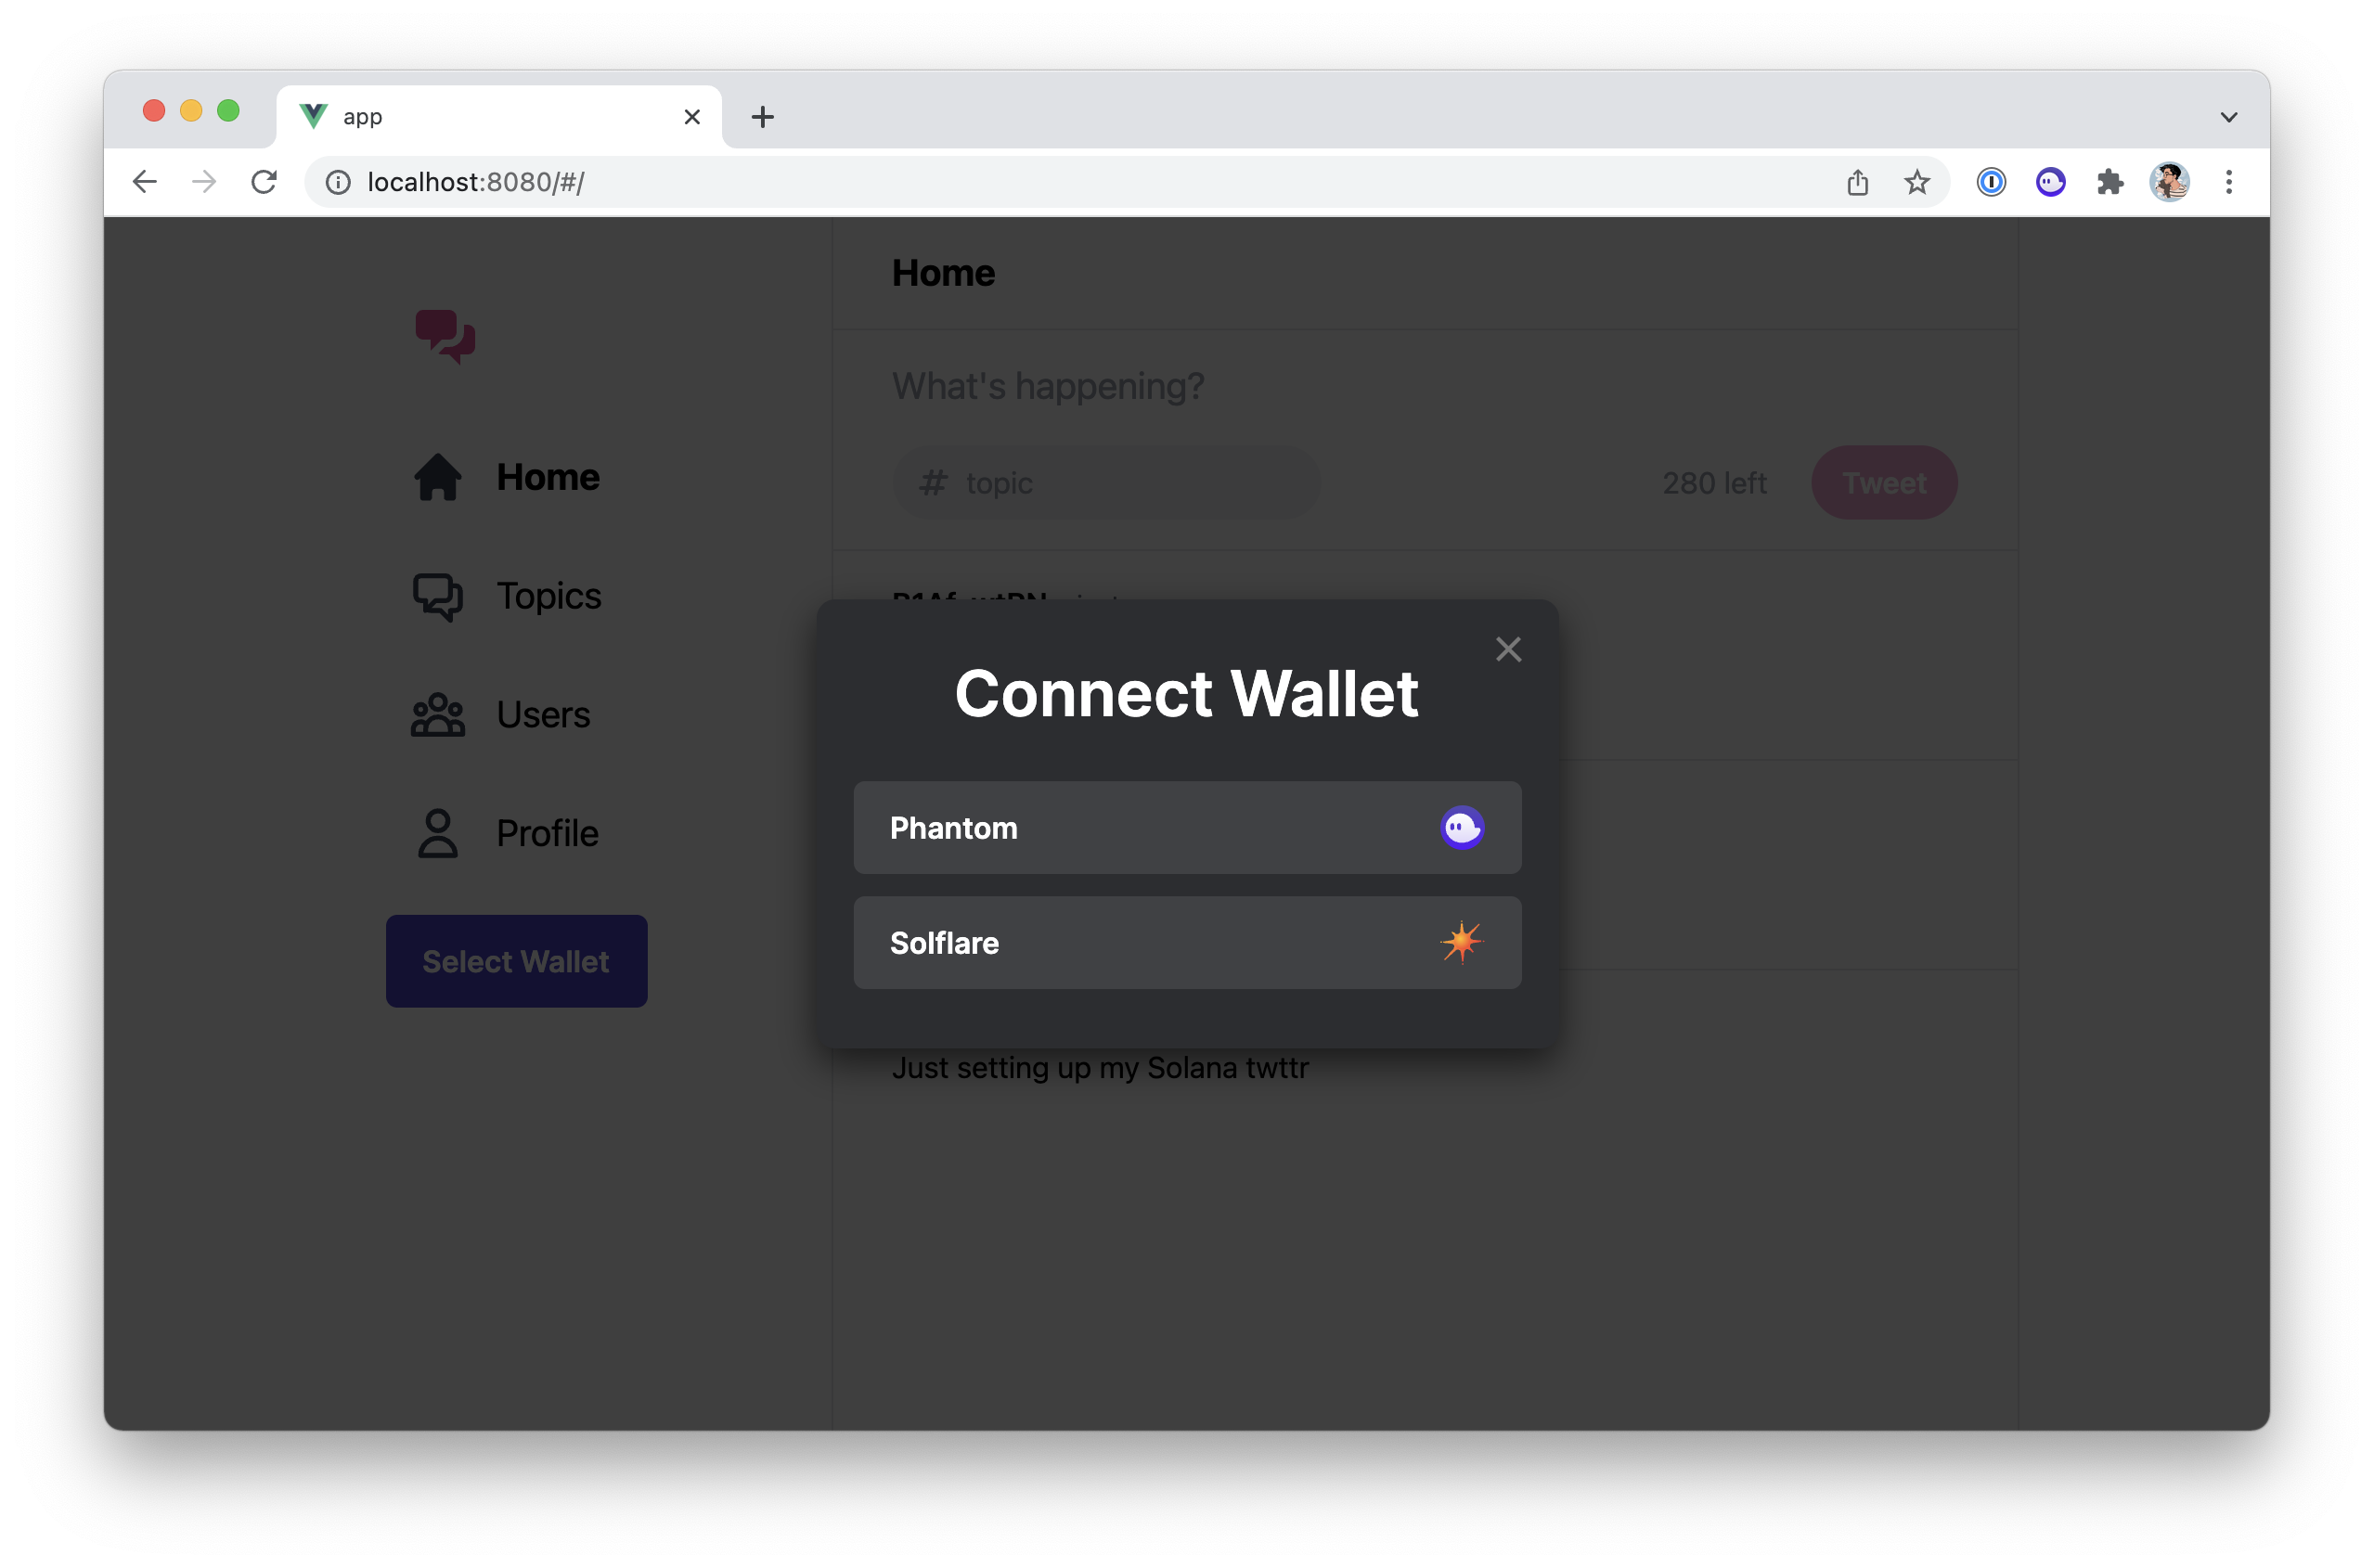
Overall, not so bad but the style doesn't really match the rest of our application and the dropdown is not properly aligned so let's fix that.
Update the design of the wallet button
Fortunately for us, all the UI components provided by the solana-wallets-vue library use CSS classes that we can override to tweak their style.
So let's do that. Open your main.css file and add the following lines at the end of the file.
.swv-dropdown {
    @apply w-full;
}

.swv-button {
    @apply rounded-full w-full;
}

.swv-button-trigger {
    @apply bg-pink-500 justify-center !important;
}

.swv-dropdown-list {
    @apply top-auto bottom-full md:top-full md:bottom-auto md:left-0 md:right-auto;
}

.swv-dropdown-list-active {
    @apply transform -translate-y-3 md:translate-y-3;
}
The @apply directive allows us to write CSS using TailwindCSS classes for convenience. Aside from that, we're just updating some CSS classes.
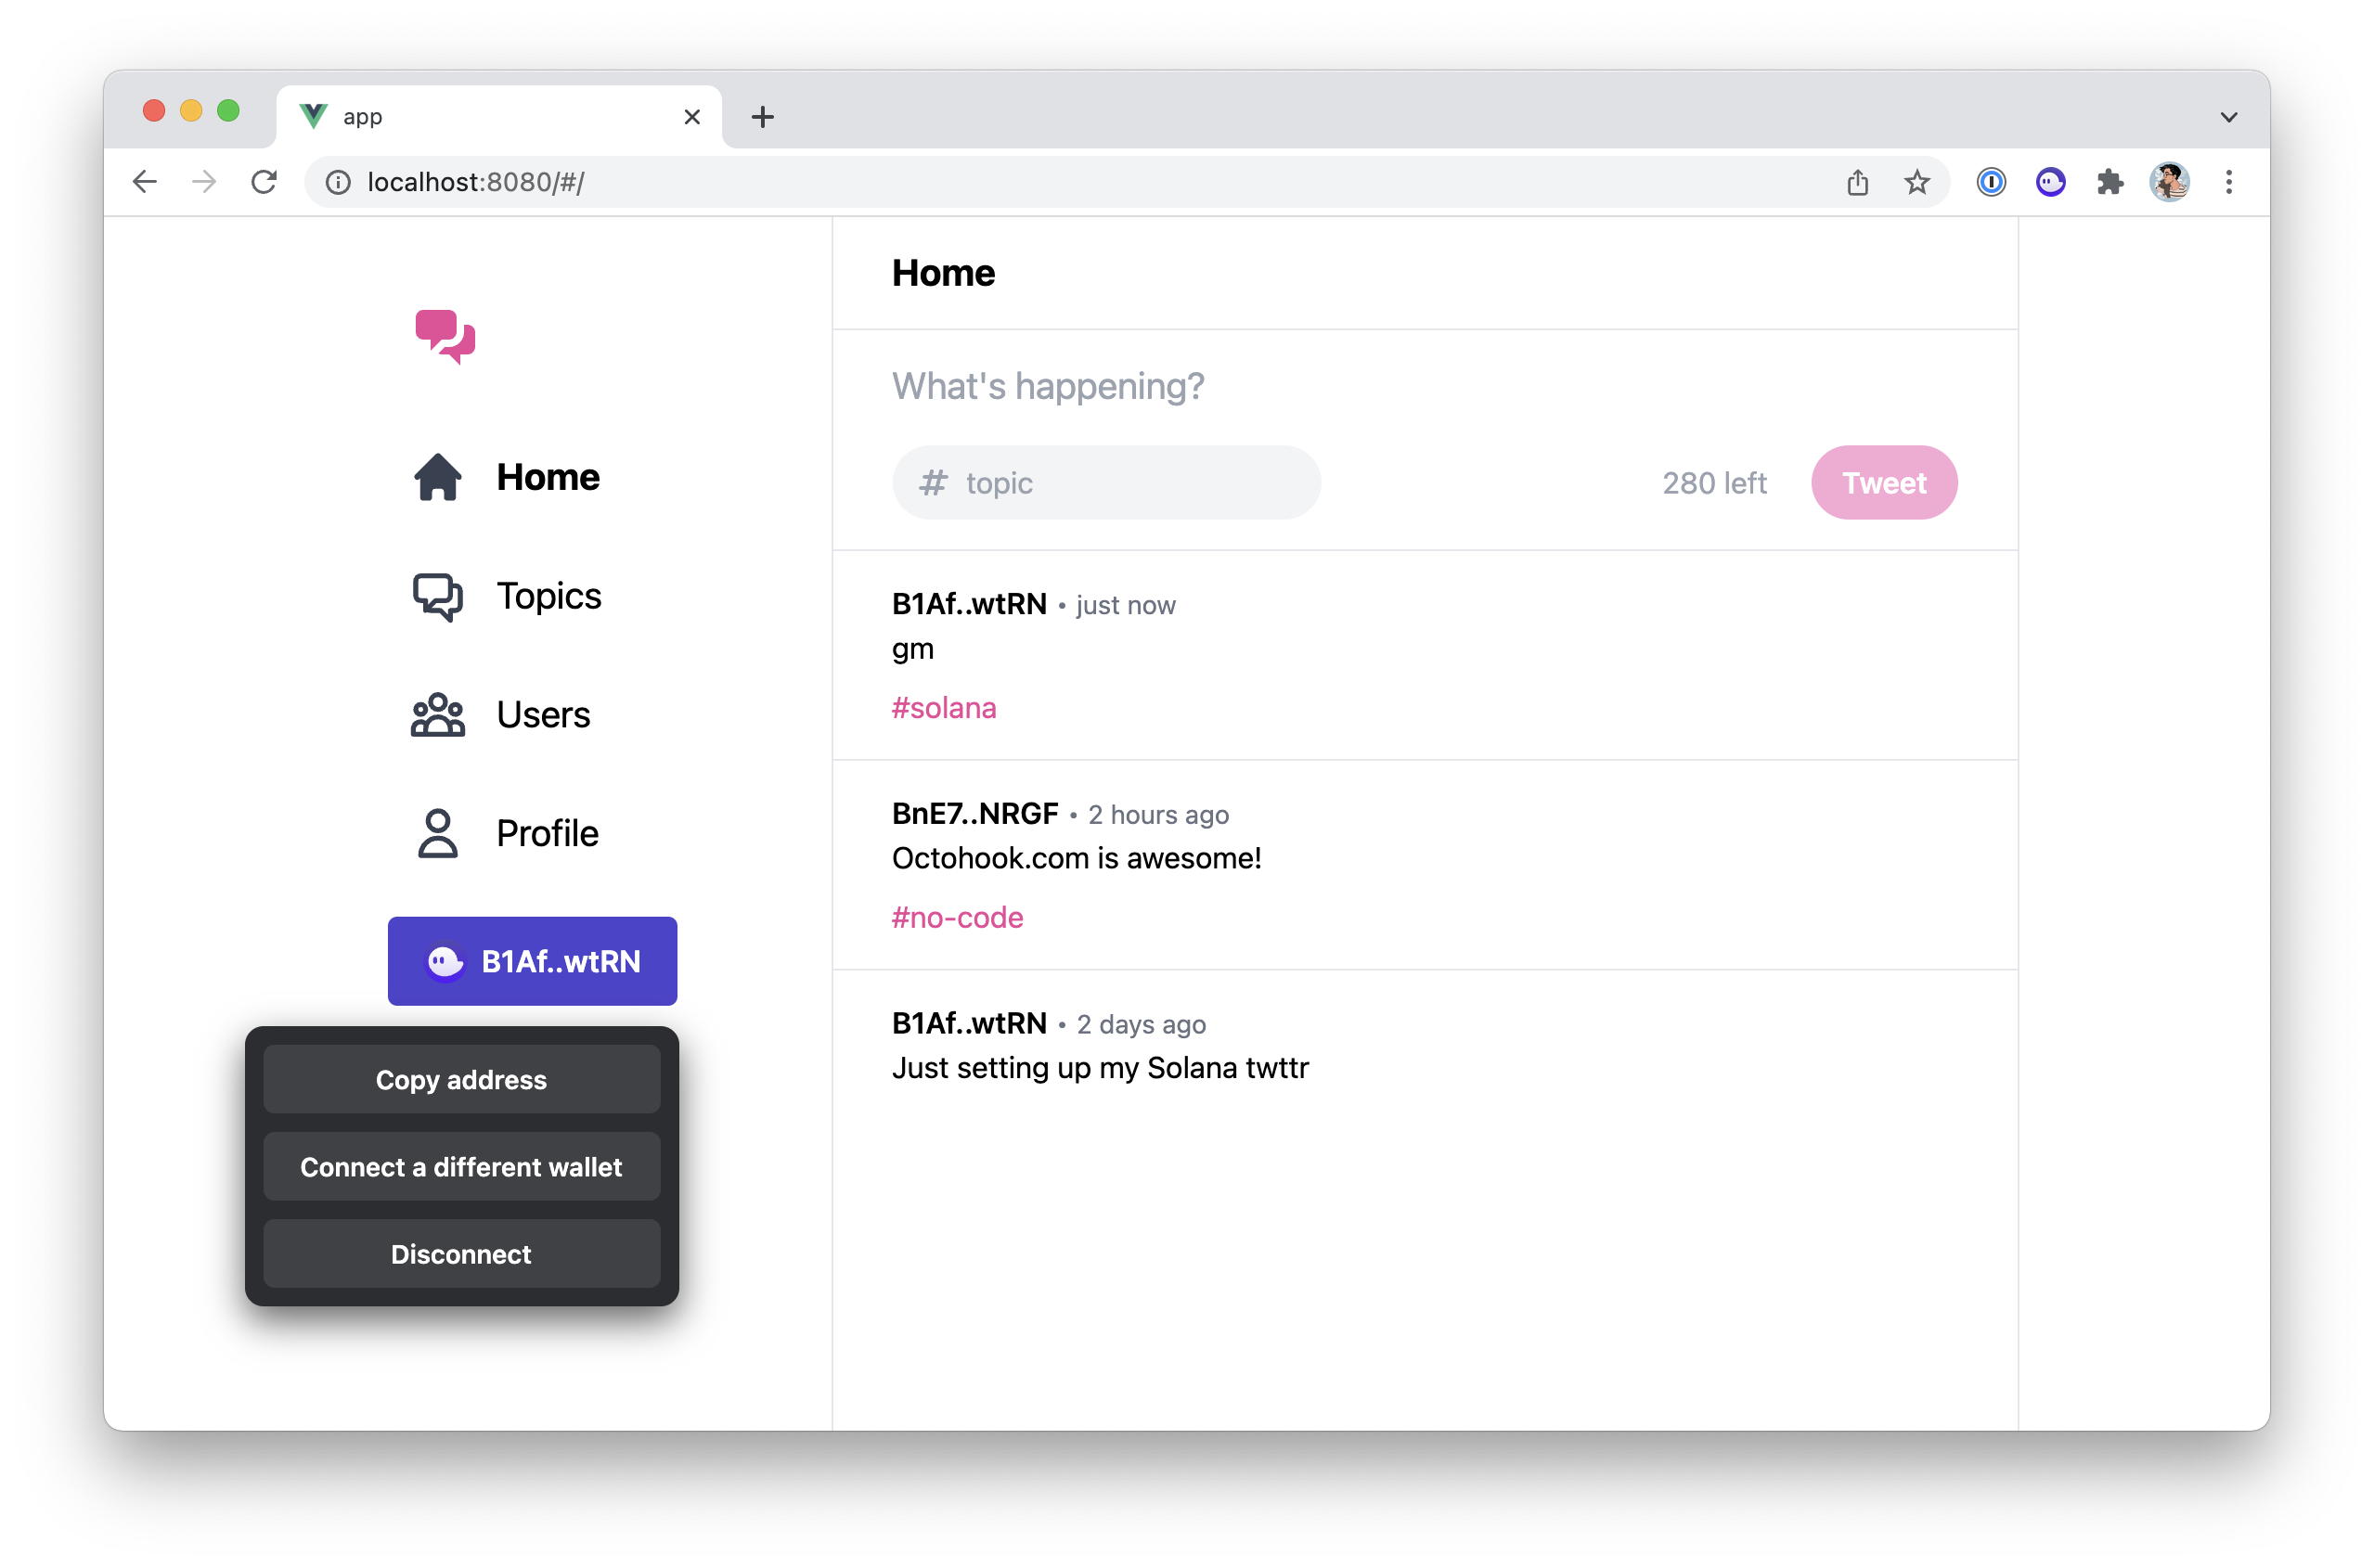
Okay, let's have a look at our wallet button now.
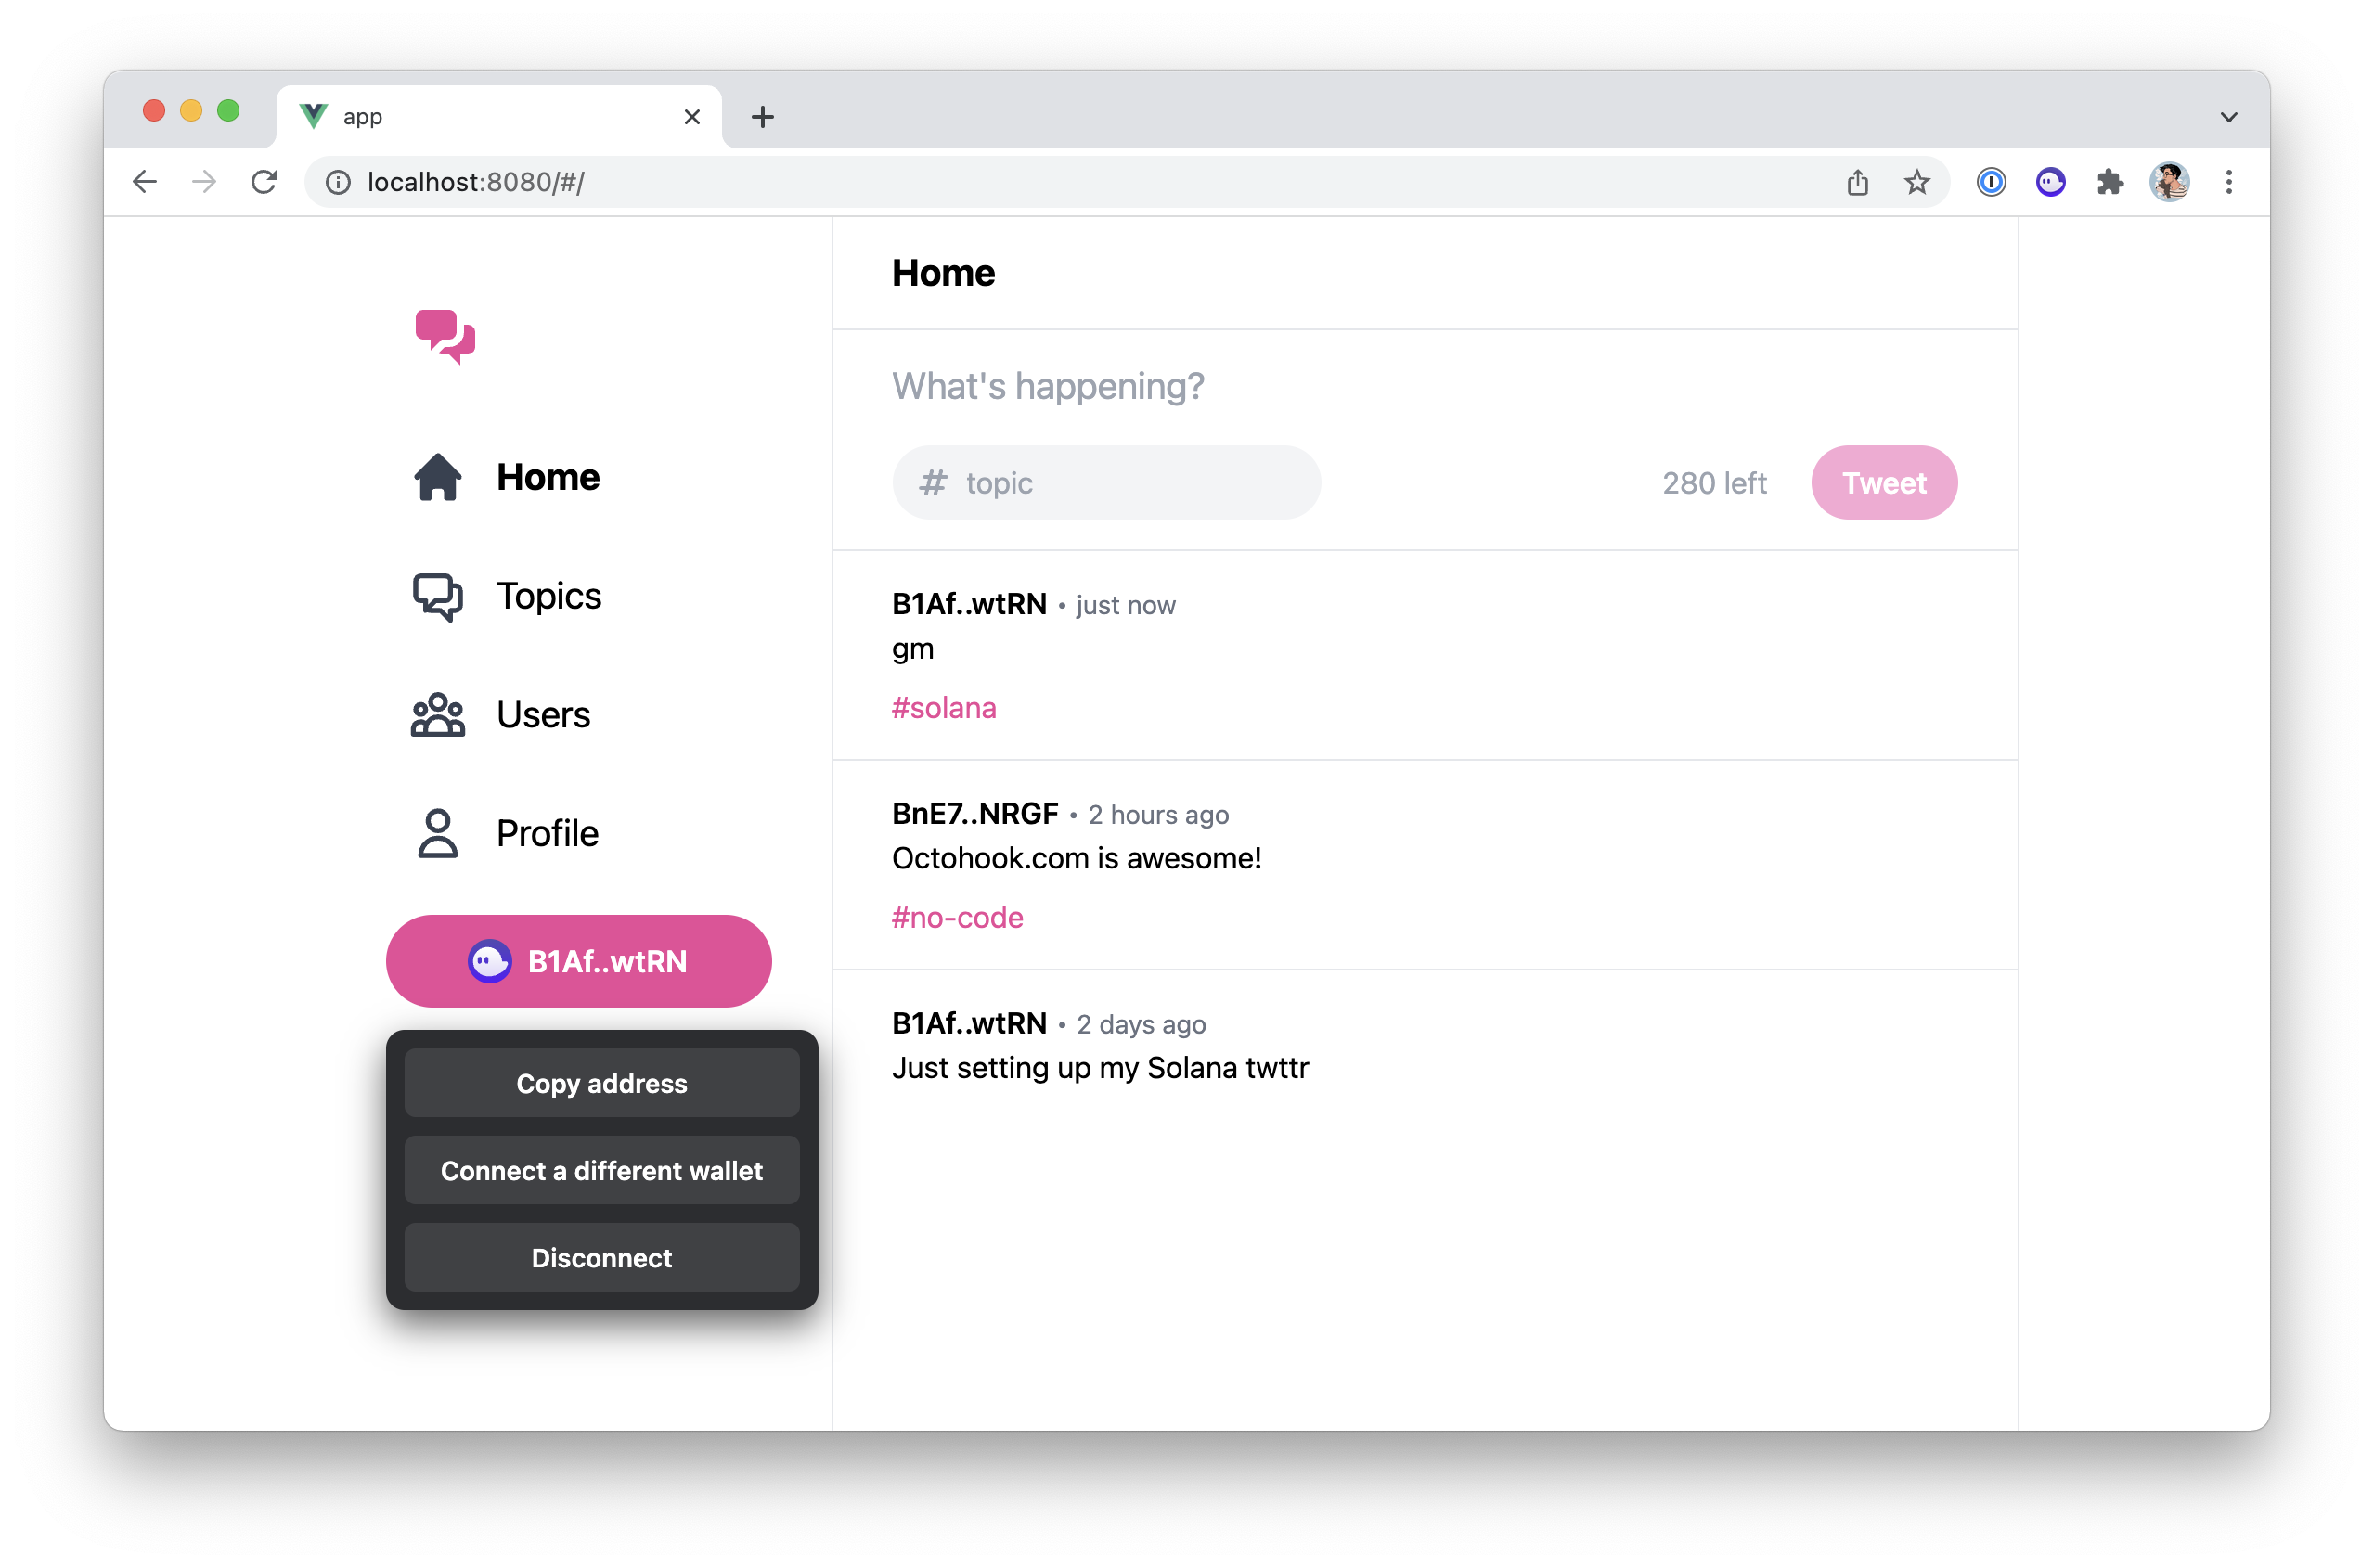
Much better! 🎨
Connect your wallet
It is worth mentioning that the wallet you're going to use in your browser is usually different from the wallet we created earlier in this series to run our tests in the console. The former is typically your "real" wallet whereas the latter is just the wallet your local machine uses to run tests or use CLI tools. They can be the same if you want them to be but I prefer to keep them separate.
Now, if you already have a wallet registered in a wallet provider such as Phantom or Solflare, you should already be good to go. If you're using another wallet provider, feel free to add it to the wallets array we defined earlier.
However, if you don't have a wallet or a wallet provider installed as a browser extension, then you'll need to do this to interact with your application. For that purpose, I recommend installing Phantom in your browser. It's a very popular wallet provider and has a friendly user interface. Once installed, you can follow the steps to create a new wallet directly on the Phantom extension. Be sure to store your recovery phrase someplace safe since it can recover your full wallet including its private key.
By default, your wallet will show you the money or assets you have in the "mainnet" cluster. The "mainnet" cluster is basically the real cluster where real money is kept. However, the same wallet can be used in other clusters such as "devnet" — a live cluster with fake money to test things — or "localnet" — your local cluster.
As such, if you want to see your money or assets in other clusters, you may do this by changing a setting in your wallet provider. In Phantom, you can do this by clicking on the cog icon, then going to the "Change Network" setting and selecting your cluster here.
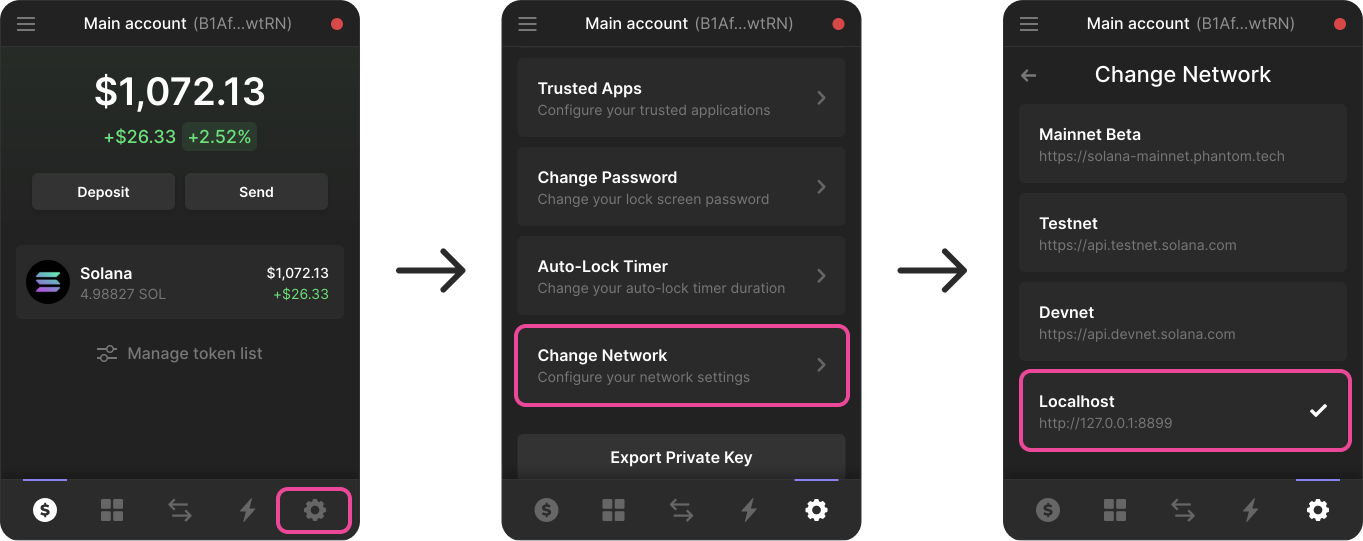
Note that changing this setting is optional as it only affects the assets displayed by the wallet provider. It does not affect which cluster our application sends transactions to. We will configure this within our code a bit later in this article.
Access wallet data
At this point, users can connect their wallet to our application and we can access that data within our VueJS components. But how do we access that data and what do we actually get from it?
How and what?
Let's start with the "how".
You can access the data provided by the wallet store by using the useWallet composable from the solana-wallets-vue library.
import { useWallet } from 'solana-wallets-vue'
const data = useWallet()
As long as the initWallet() method was called, this will give you access to properties and methods regarding the connected wallet.
So what do we actually get from useWallet()?
-
wallet. Potentially the most interesting piece of information for us is the user's connected wallet. If the user has connected a wallet, this will be an object containing its public key. Otherwise, this property will benull. -
ready,connected,connectinganddisconnecting. These are useful booleans for us to understand which state we are in. For instance, we can use theconnectedboolean to know if the user has connected its wallet or not. - The
select,connectanddisconnectmethods enable us to select, connect to and disconnect from a wallet provider. We don't need to use these methods directly since they are already being used by the wallet UI components we imported earlier. - The
sendTransaction,signTransaction,signAllTransactionsandsignMessagemethods enable us to sign messages and/or transactions on behalf of the connected wallet. Whilst we will not use them directly, Anchor requires some of these methods inside itswalletobject.
Anchor wallet
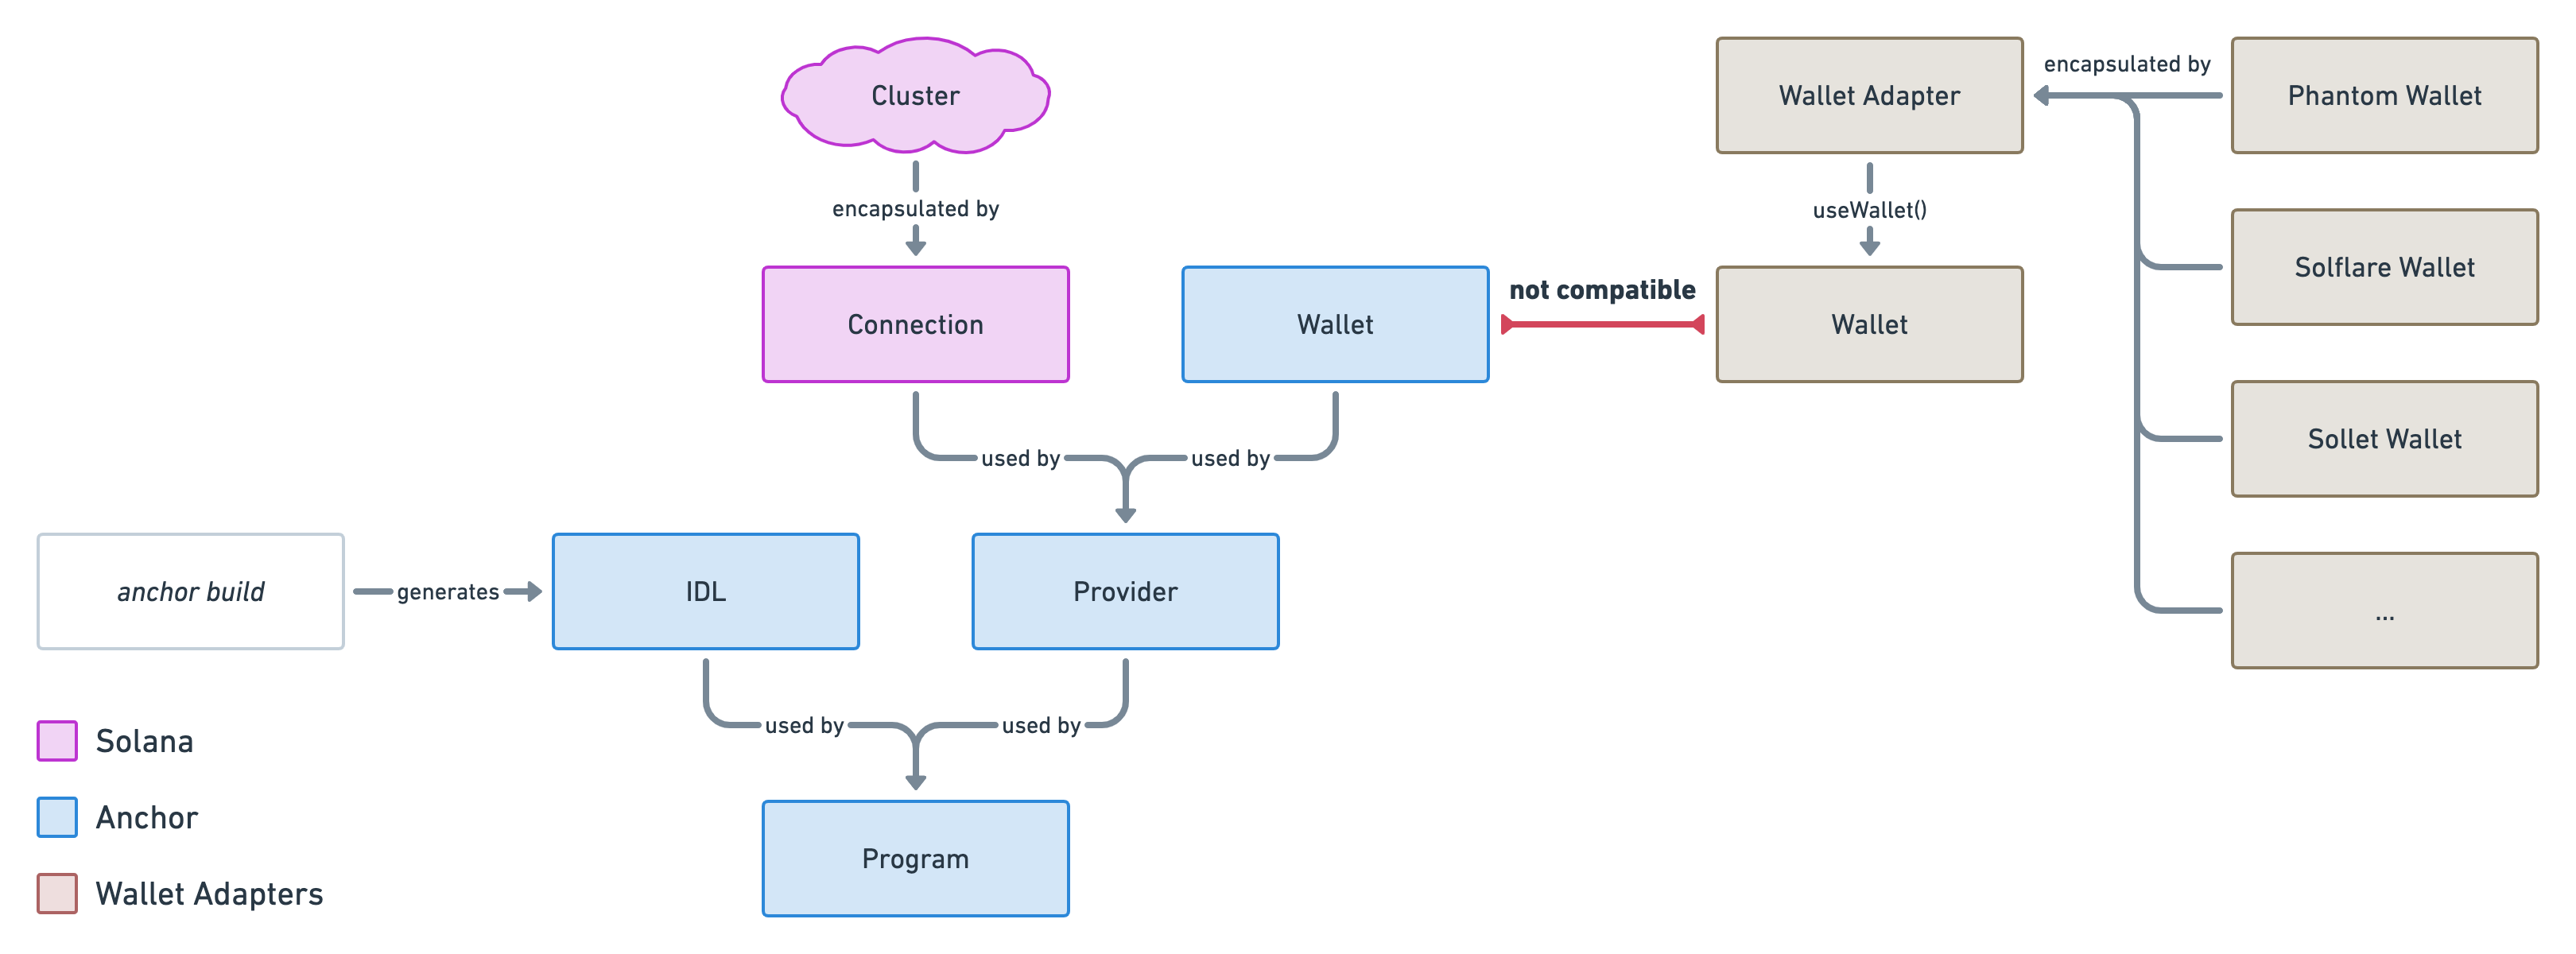
As you can see, useWallet() gives us lots of granular information that can be used to interact with the connected wallet. Because of that, the wallet object it provides is not compatible with Anchor's definition of a wallet. If you remember the following diagram from episode 5, you can see that Anchor uses its own "Wallet" object to interact with the connected wallet and sign transactions on its behalf.
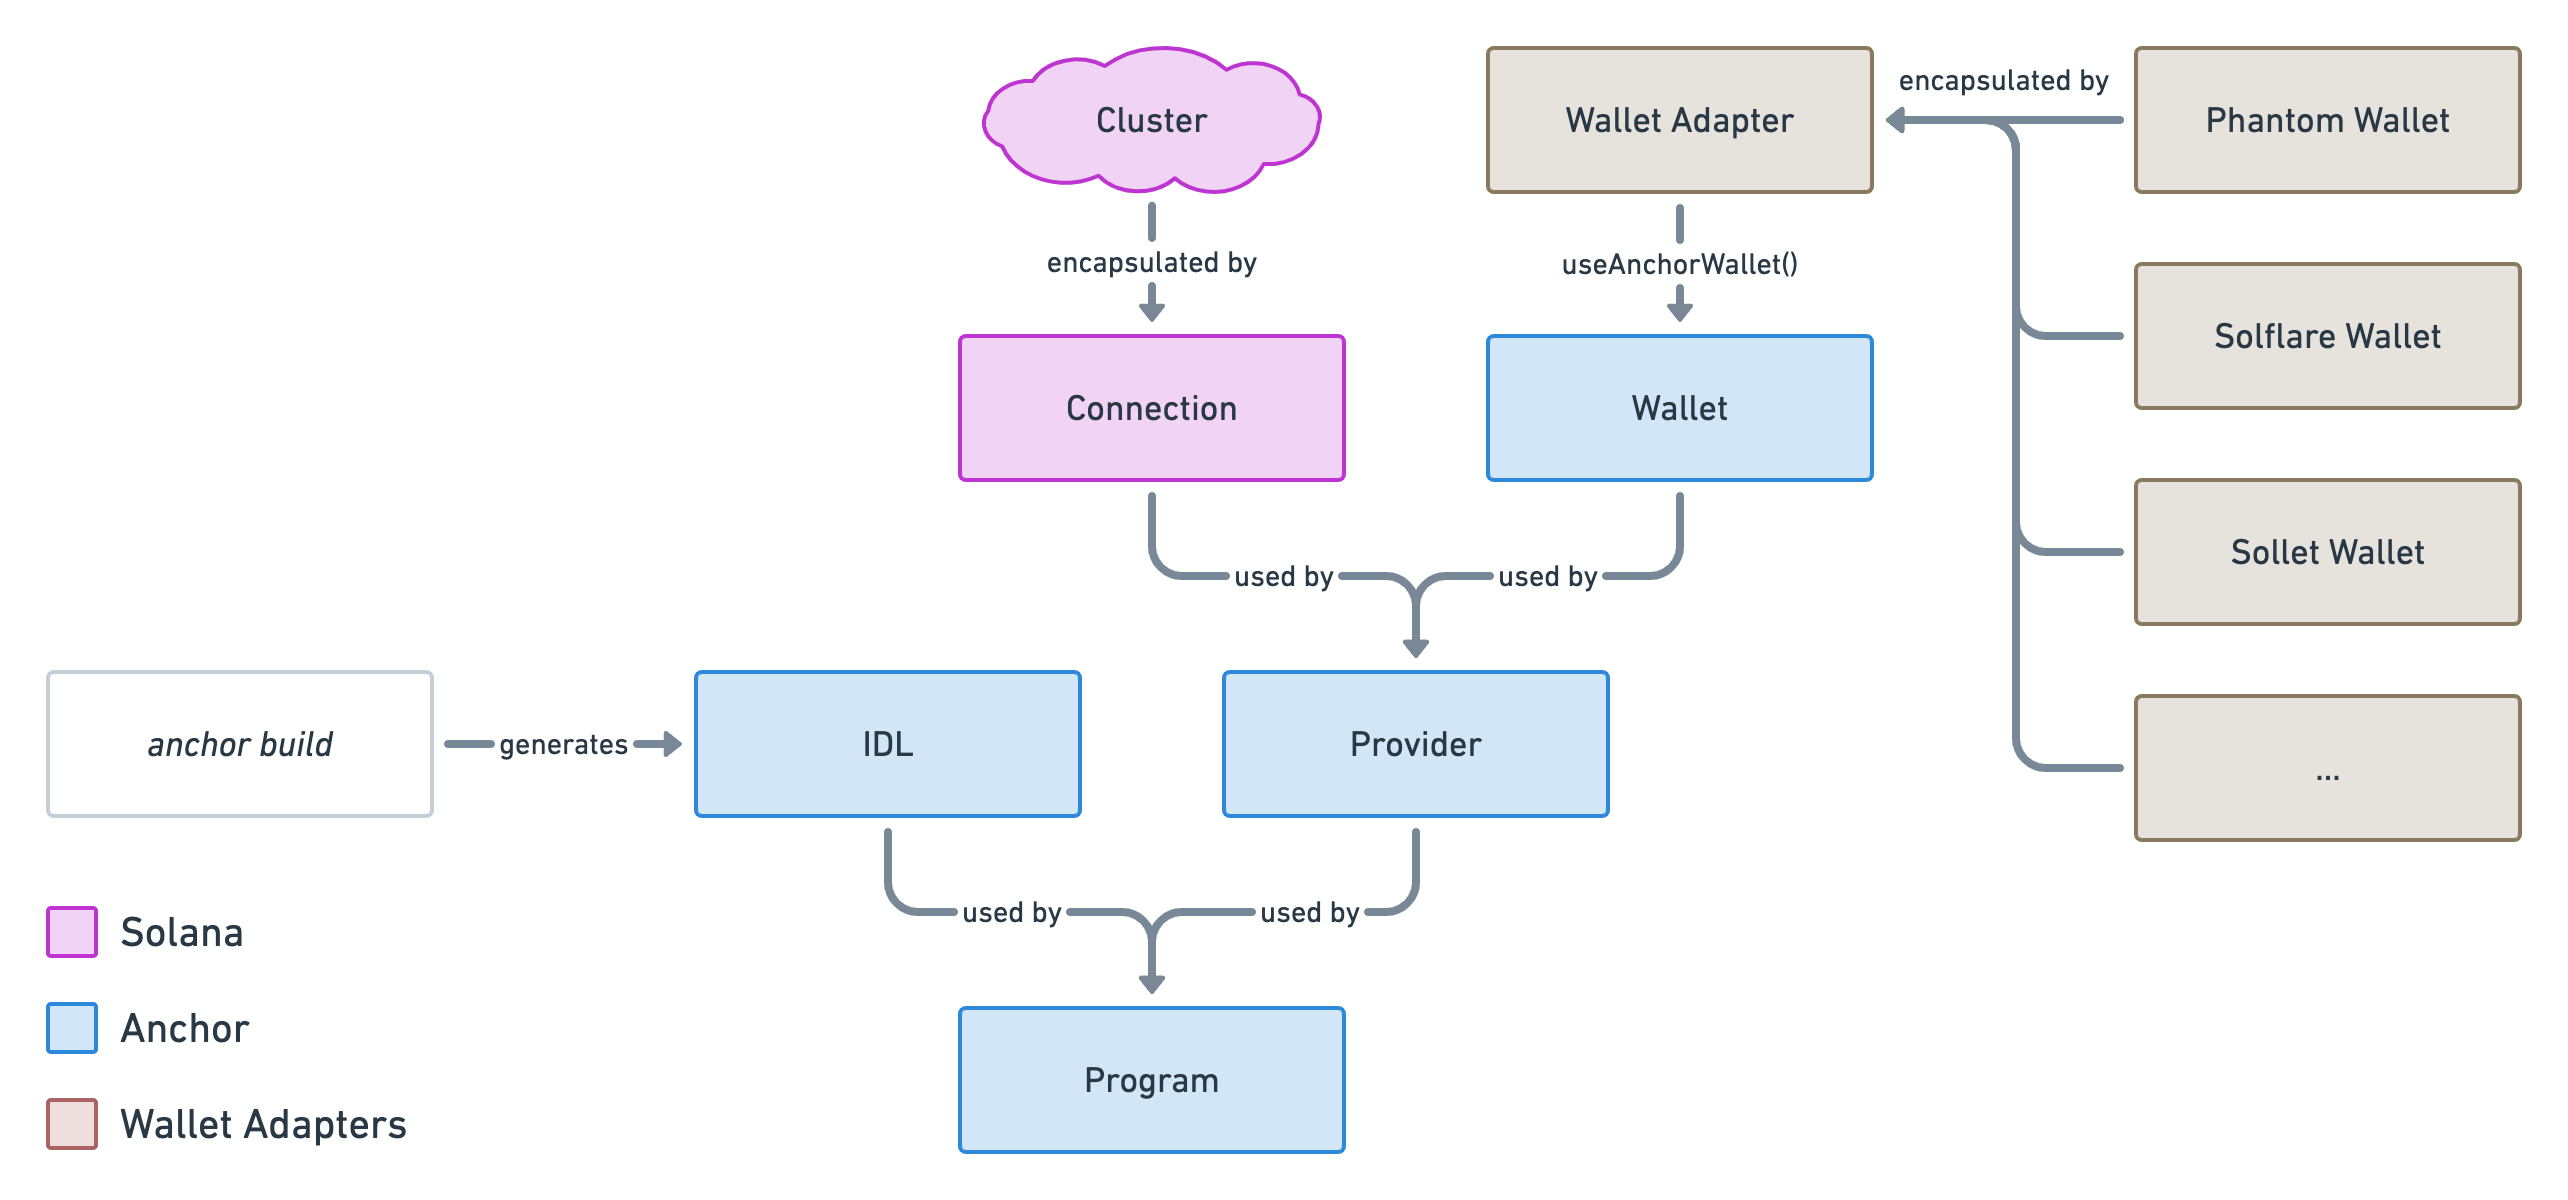
In order to get an object compatible with Anchor's definition of a wallet, we can use yet another composable called useAnchorWallet. This will return a wallet object that can sign transactions.
import { useAnchorWallet } from 'solana-wallets-vue'
const wallet = useAnchorWallet()
And just like that, we can connect our previous Anchor diagram with our brand new wallet integration.
Reactive variables in VueJS
I'd like to take a little break here to talk about reactive variables in Vue 3. If you're not familiar with them, some of the code you'll read later could be a little confusing.
Most of the properties we've listed above are reactive and wrapped inside Ref objects. If you're not familiar with Vue's Ref variables, they ensure the content of a variable is passed by reference and not by value.
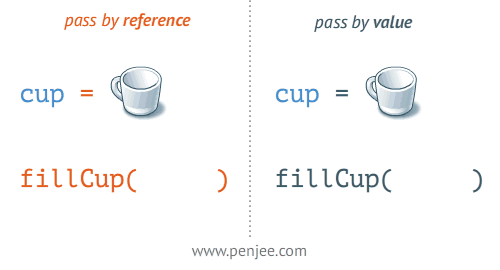
This means, by having a reference of a Ref variable, we can mutate its content and any code using that variable can be notified of such change. To access the content of a Ref variable, you must access its value property — e.g. wallet.value — unless you're using that variable inside a VueJS template, in which case, VueJS automatically does that for you. You can read more about them in Vue's documentation or — if you're used to React — this might help.
Here's a little example to summarise how we can access Ref variables. Inside the script part, we use value. Inside the template part, we don't.
<script setup>
import { ref } from 'vue'
const name = ref('Loris')
console.log(name.value) // Outputs: Loris
</script>

<template>
  <div>{{ name }}</div> <!-- Displays: Loris -->
</template>
Use wallet data in components
Okay, let's put what we've learned into practice.
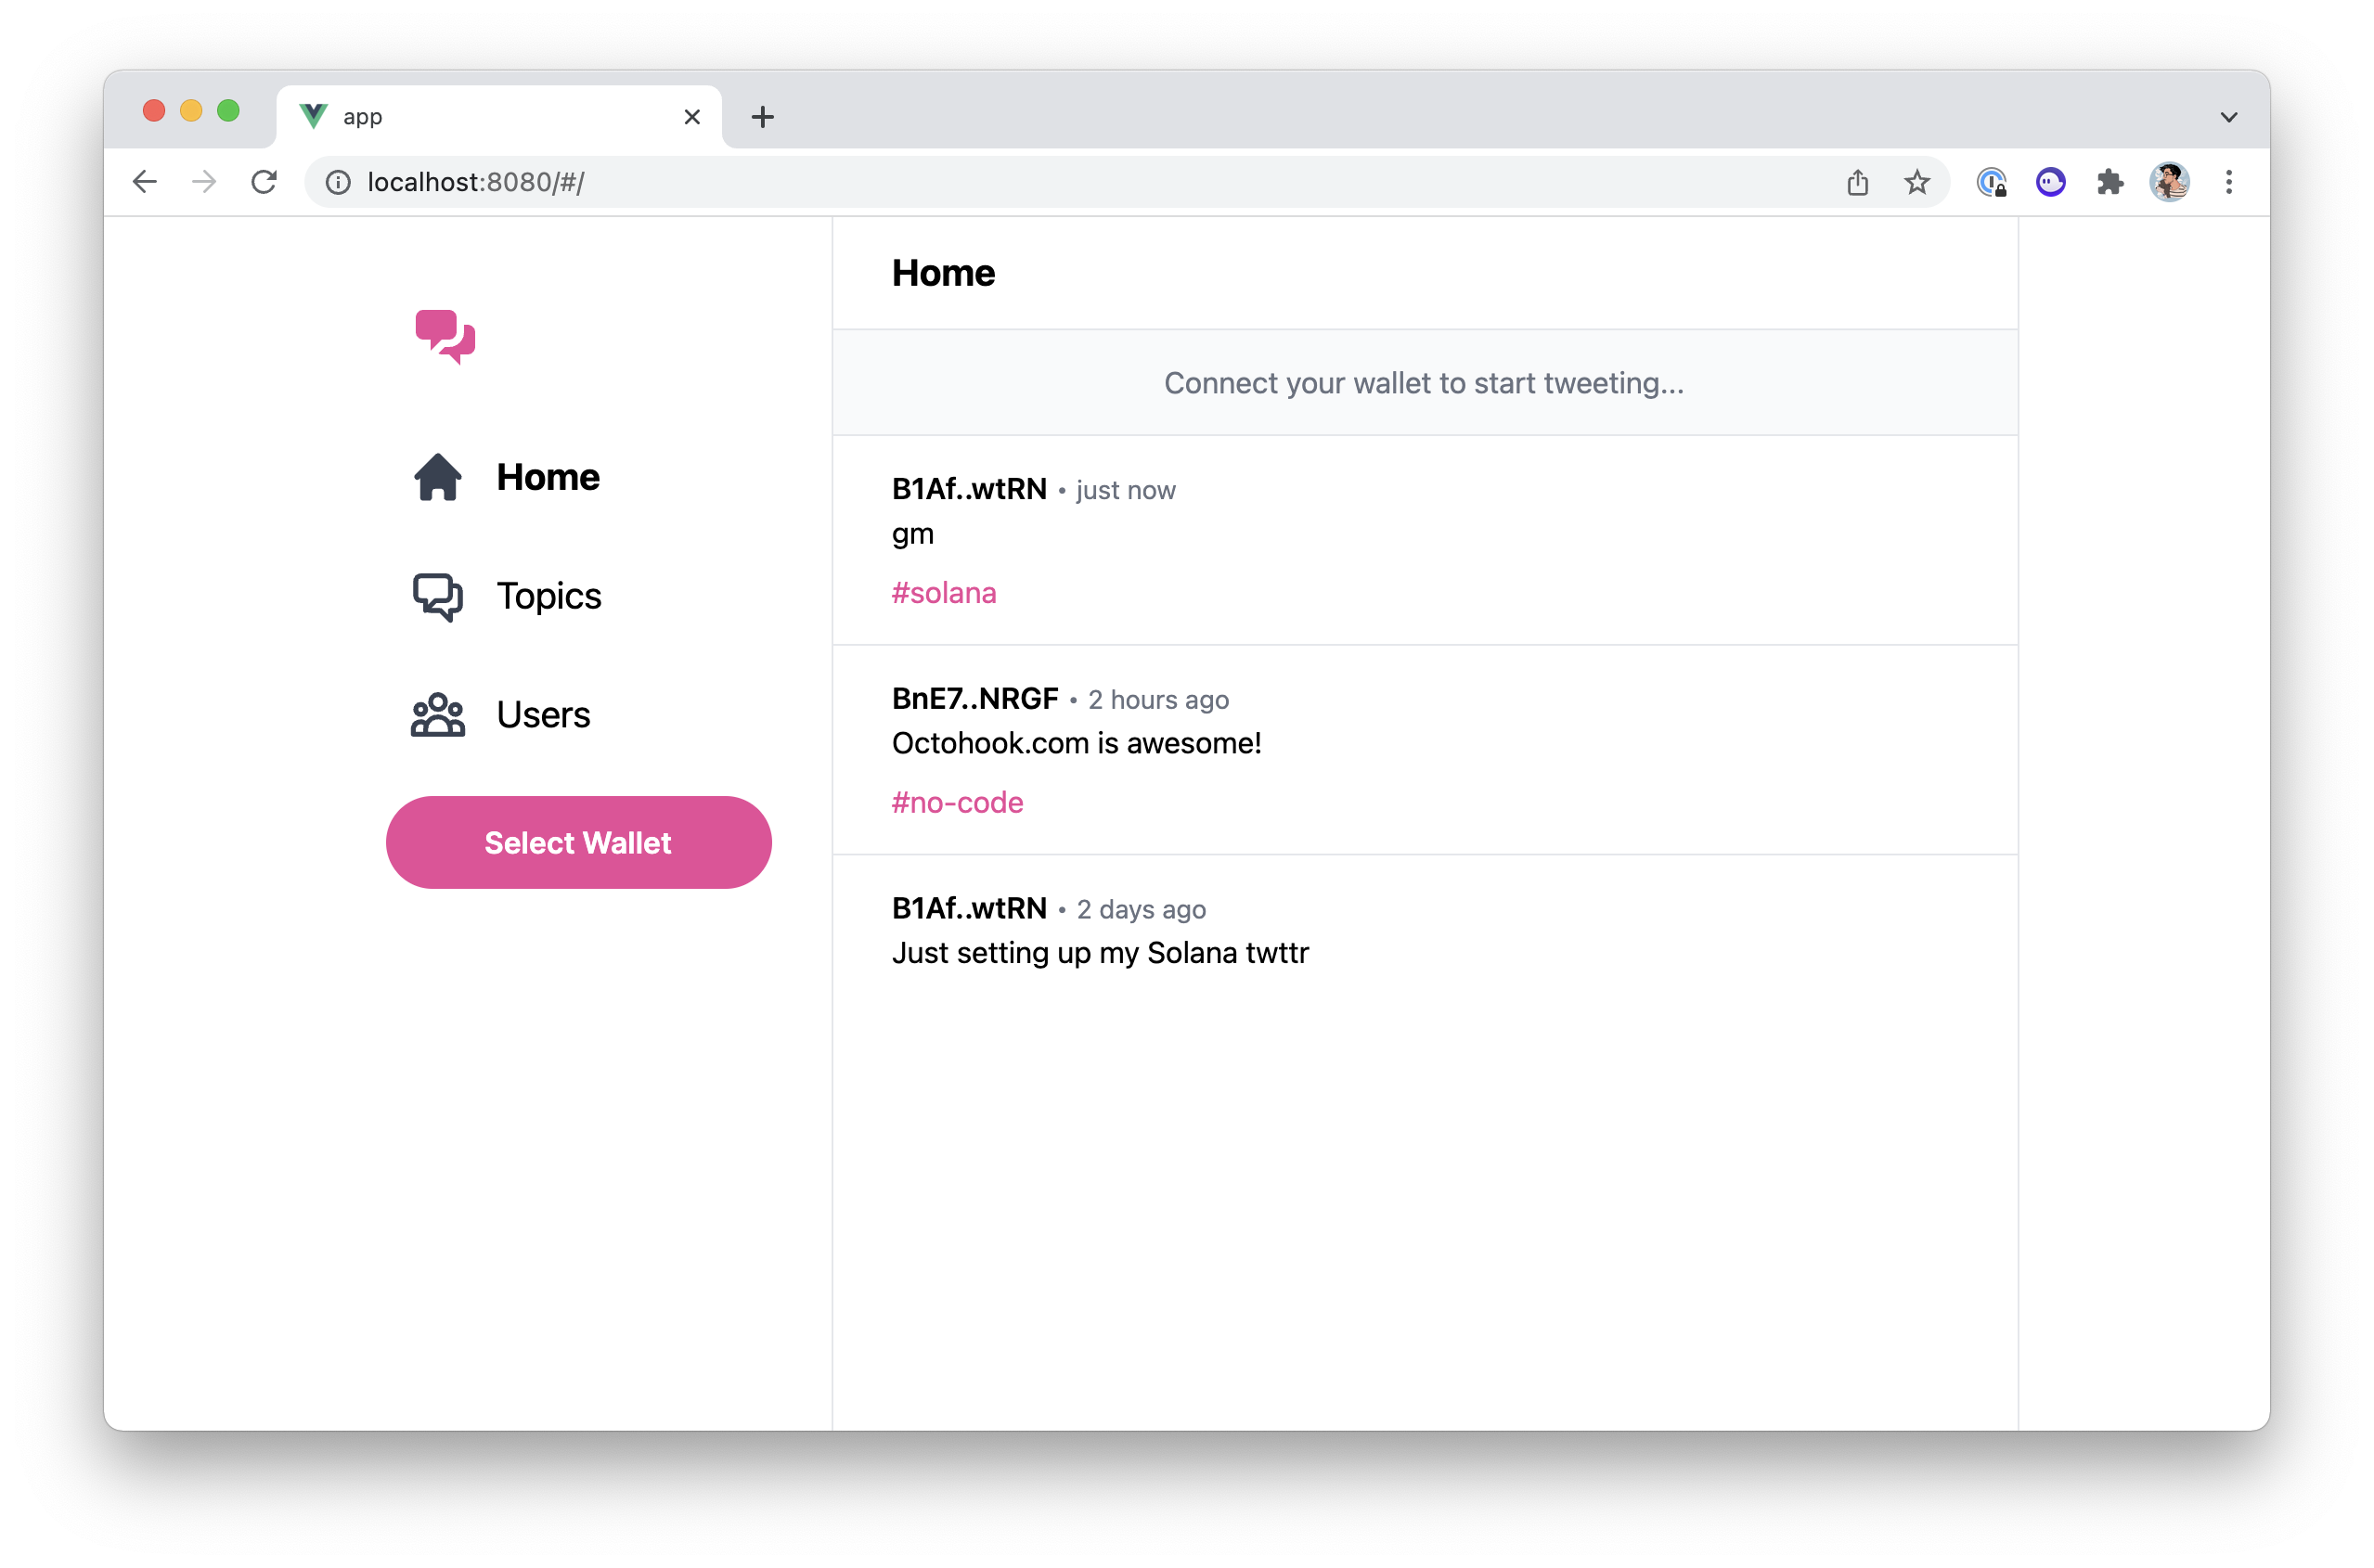
At the moment, anyone can see the form that allows users to send tweets. However, that form should only be visible to users that have connected their wallets so let's fix that.
In the script part of the TweetForm.vue component, import the useWallet composable.
import { computed, ref, toRefs } from 'vue'
import { useAutoresizeTextarea, useCountCharacterLimit, useSlug } from '@/composables'
import { sendTweet } from '@/api'
import { useWallet } from 'solana-wallets-vue'
Then, in the template part of the component — Under "Permissions" — update the following line.
  // Permissions.
- const connected = ref(true) // TODO: Check connected wallet.
+ const { connected } = useWallet()
This will use the connected variable from the wallet data instead of being always true like it was before.
If you look inside the template of that component, you can see that this connected variable is used to toggle which HTML we are showing to the user: either the form or an empty state.
<template>
    <div v-if="connected" class="px-8 py-4 border-b">
        <!-- Form here... -->
    </div>

    <div v-else class="px-8 py-4 bg-gray-50 text-gray-500 text-center border-b">
        Connect your wallet to start tweeting...
    </div>
</template>
And that's it! Now, only users with connected wallets can see the tweet form.
Let's do another one. This time, we'll make sure the profile page is not visible on the sidebar if you're not connected.
In the script part of TheSidebar.vue component, import and call useWallet to access the connected variable.
import { WalletMultiButton, useWallet } from 'solana-wallets-vue'
const { connected } = useWallet()
Then, inside the template, look for the comment that says "TODO: Check connected wallet". Under that comment, replace v-if="true" with v-if="connected" and voilà! You can also remove that "TODO" comment now.
<template>
    <aside class="flex flex-col items-center md:items-stretch space-y-2 md:space-y-4">
        <!-- ... -->
        <div class="flex flex-col items-center md:items-stretch space-y-2">
          	<!-- ... -->
            <router-link v-if="connected" :to="{ name: 'Profile' }" ...>
                <!-- ... -->
            </router-link>
        </div>
        <div class="fixed bottom-8 right-8 md:static w-48 md:w-full">
            <wallet-modal-provider>
                <wallet-multi-button></wallet-multi-button>
            </wallet-modal-provider>
        </div>
    </aside>
</template>
To recap, here's what you should see if you have a connected wallet.
And here's what you should see if you don't. I.e. no profile page and no tweet form.
We need more data
Okay, let's take a deep breath and see what we've accomplished so far in this episode.
- We imported and called
initWalletto initialise a wallet store that provides everything we need to connect a wallet and access its data. - We imported a UI component that make use of that to allow users to connect their wallets.
- We accessed the data provided by the wallet store using
useWallet()in various components. - We found out that we can use
useAnchorWallet()to obtain awalletobject compatible with Anchor.
So if we refer to our diagram that represents all entities needed for Anchor to create a Program, we can see that we currently only have one piece of the puzzle: the "Wallet".
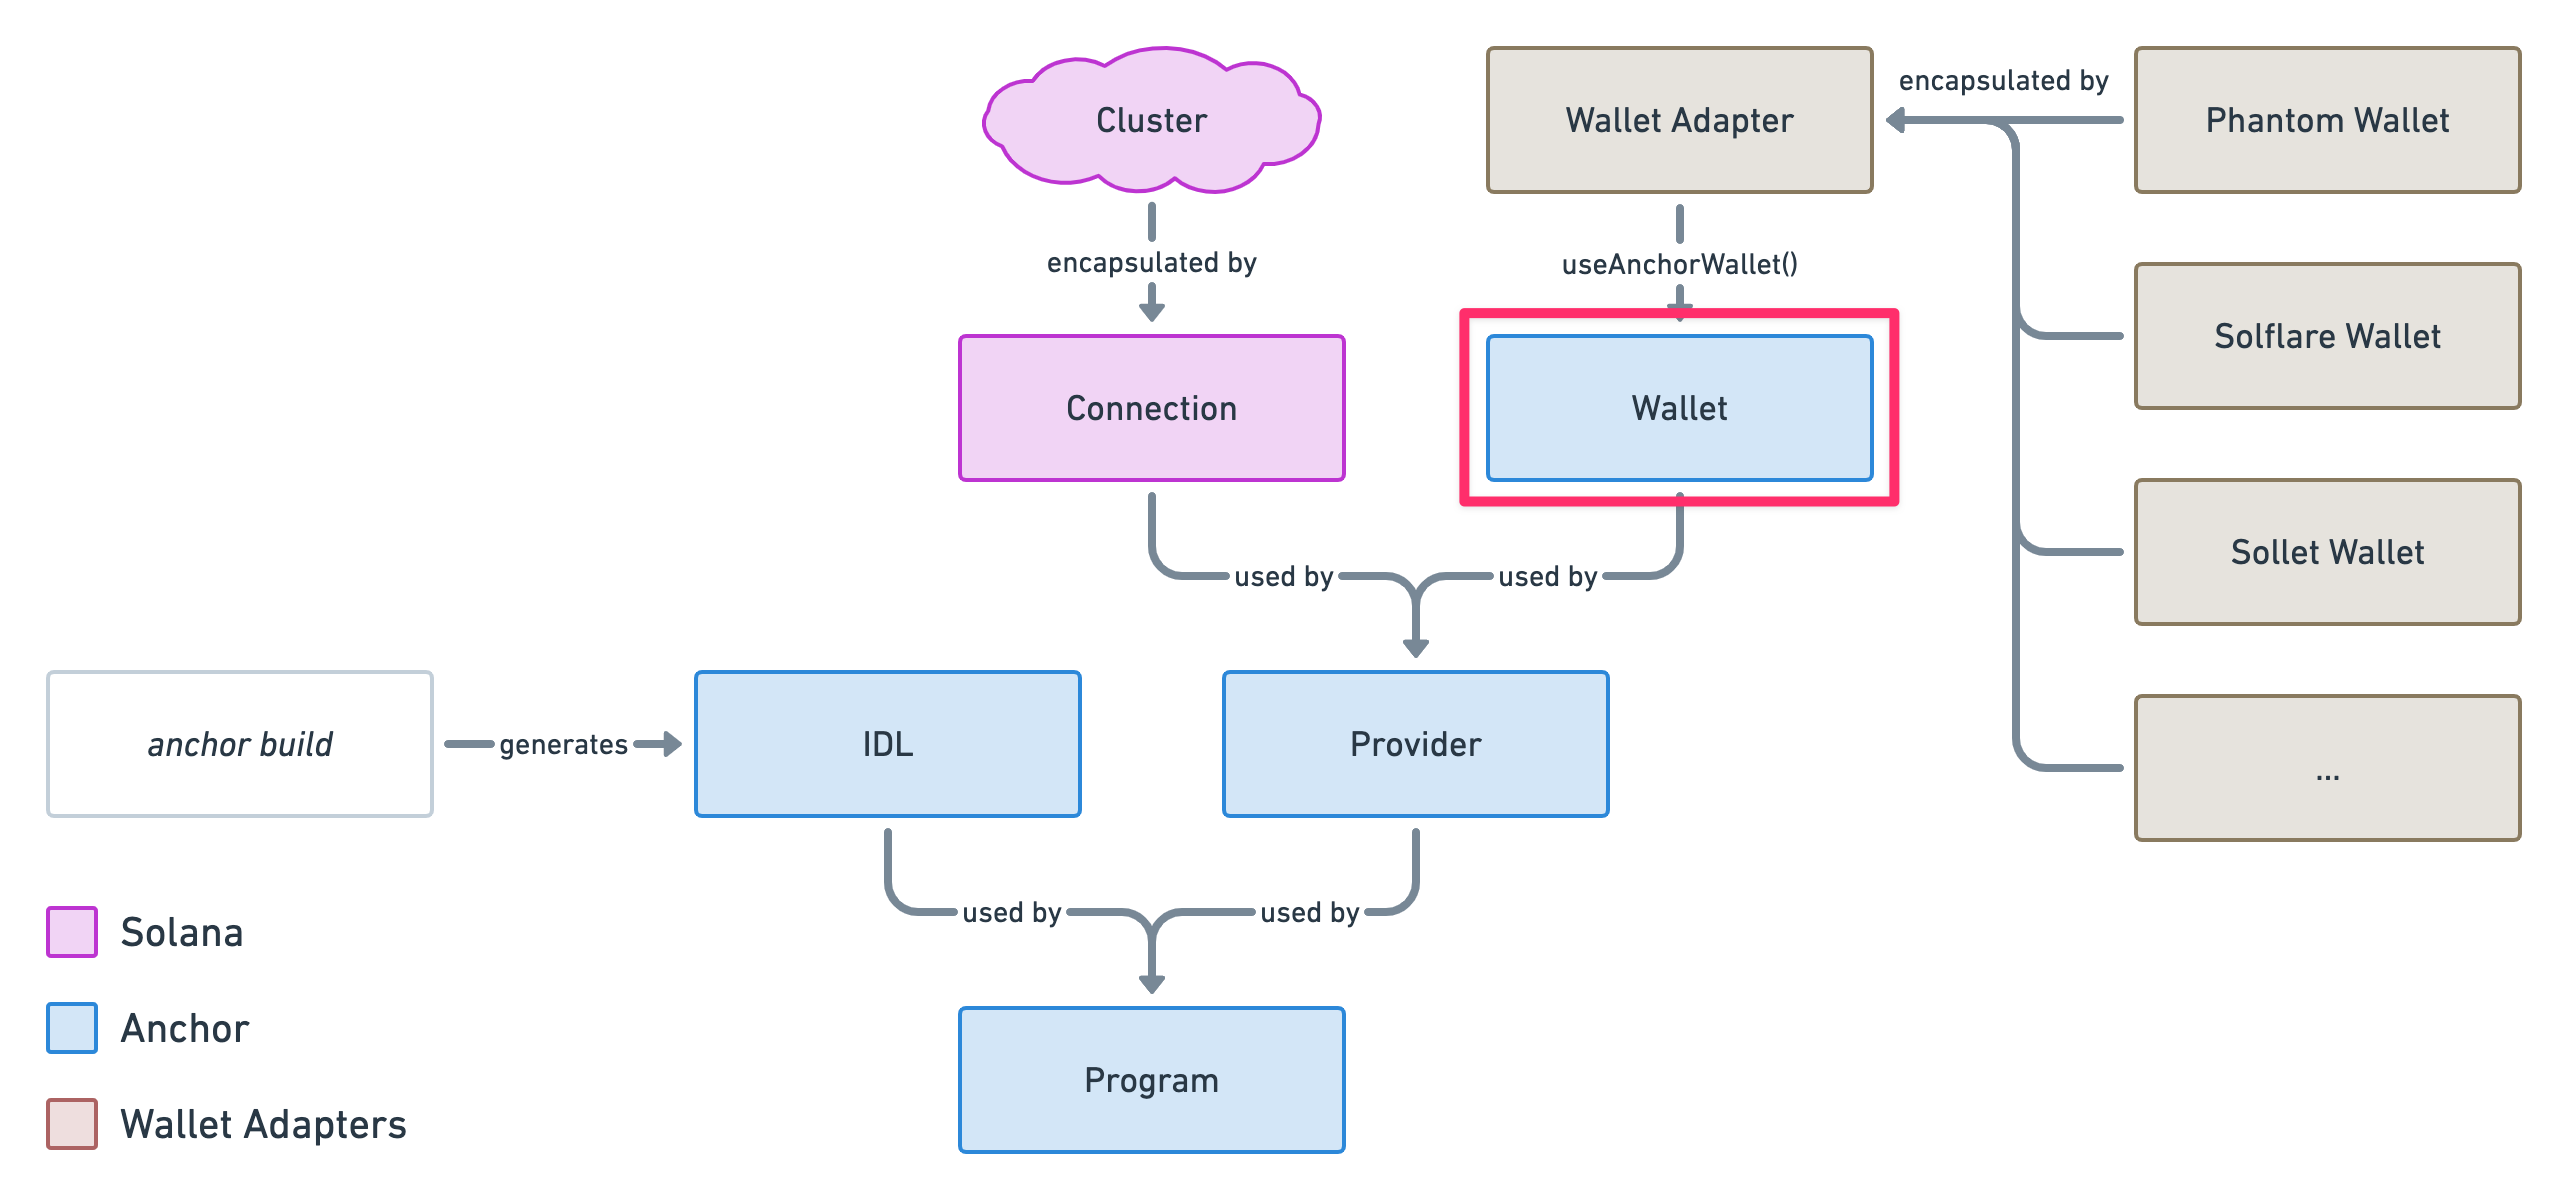
In order for us to have everything we need to interact with our Solana program, we need to fill the rest of the puzzle. Fortunately for us, the "Wallet" piece was the most difficult piece to find since we needed to integrate with wallet providers which we've now done.
Anchor refers to this whole picture as a "Workspace" because it gives us everything we need to work with our program.
Provide a workspace
Okay, let's fill the missing pieces of the puzzle and create our workspace. We'll create a new useWorkspace.js file inside the composables folder and register it inside composables/index.js.
export * from './useAutoresizeTextarea'
export * from './useCountCharacterLimit'
export * from './useFromRoute'
export * from './useSlug'
export * from './useWorkspace'
Inside the useWorkspace.js composable, we'll use a global variable to provide a new global store to our application. For that, we need an initWorkspace method that initialises that variable and a useWorkspace method that access it. Here's how we can do this using VueJS.
let workspace = null

export const useWorkspace = () => workspace

export const initWorkspace = () => {
    workspace = {
        // Provided data here...
    }
}
Let's start simple, by importing the connected Anchor wallet and providing it as data. That way, we don't need to use the other composables to access the connected wallet. We'll have everything in one place.
import { useAnchorWallet } from 'solana-wallets-vue'

let workspace = null

export const useWorkspace = () => workspace

export const initWorkspace = () => {
    const wallet = useAnchorWallet()

    workspace = {
        wallet,
    }
}
The next thing we need is a Connection object. For that, we simply need to know which cluster — or network — we want to interact with. For now, we'll continue to develop our application locally. Therefore, we'll hardcode our localhost URL which is: http://127.0.0.1:8899. We'll have a more dynamic way to handle this in the future when we'll deploy to devnet.
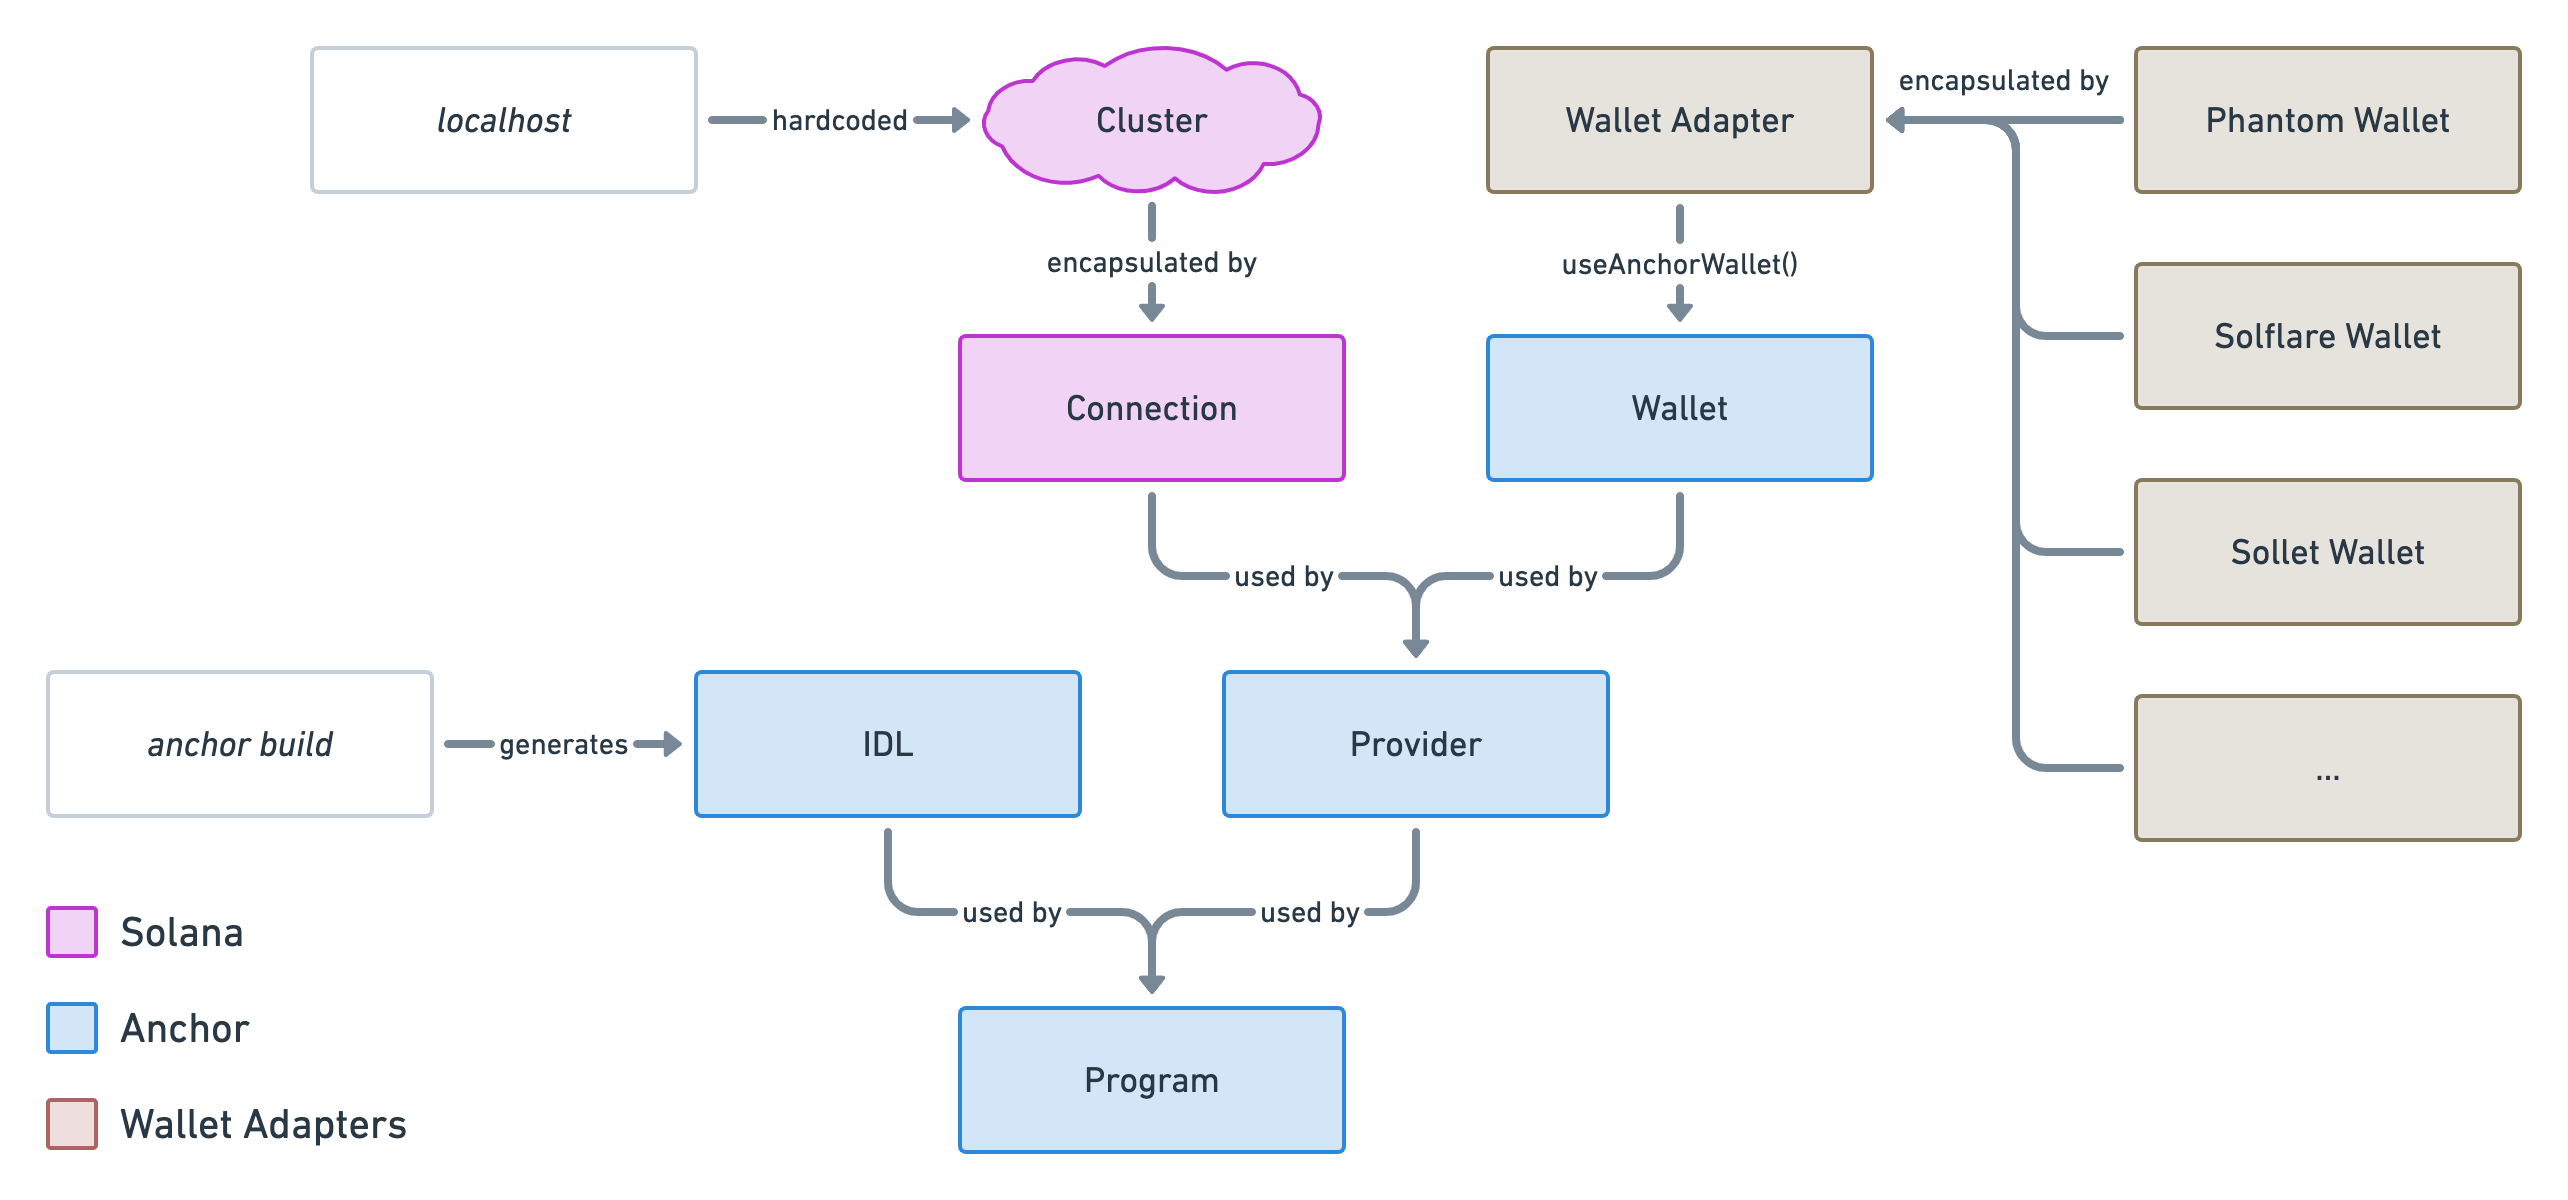
So let's create a new Connection object using this cluster URL and provide it as data as well.
import { useAnchorWallet } from 'solana-wallets-vue'
import { Connection } from '@solana/web3.js'

let workspace = null

export const useWorkspace = () => workspace

export const initWorkspace = () => {
    const wallet = useAnchorWallet()
    const connection = new Connection('http://127.0.0.1:8899')

    workspace = {
        wallet,
        connection,
    }
}
We know that Connection + Wallet = Provider so we can now create a new Provider object. However, this provider object needs to be a computed property so that it is recreated when the wallet property changes — e.g. it is disconnected or connected as another wallet.
Here's how we can achieve this using VueJS. Notice how we access the wallet using wallet.value inside the computed method.
import { computed } from 'vue'
import { useAnchorWallet } from 'solana-wallets-vue'
import { Connection } from '@solana/web3.js'
import { Provider } from '@project-serum/anchor'

let workspace = null

export const useWorkspace = () => workspace

export const initWorkspace = () => {
    const wallet = useAnchorWallet()
    const connection = new Connection('http://127.0.0.1:8899')
    const provider = computed(() => new Provider(connection, wallet.value))

    workspace = {
        wallet,
        connection,
        provider,
    }
}
Next, we need to access the IDL file which is the JSON file representing the structure of our program. This file is auto-generated in the target folder of the root of our project so let's access it directly from there.
Note that this will not work when the app is deployed to a server on its own since the target folder will be empty but we will take care of that later on when we deploy to devnet.
import { computed } from 'vue'
import { useAnchorWallet } from 'solana-wallets-vue'
import { Connection } from '@solana/web3.js'
import { Provider } from '@project-serum/anchor'
import idl from '../../../target/idl/solana_twitter.json'

let workspace = null

export const useWorkspace = () => workspace

export const initWorkspace = () => {
    const wallet = useAnchorWallet()
    const connection = new Connection('http://127.0.0.1:8899')
    const provider = computed(() => new Provider(connection, wallet.value))

    workspace = {
        wallet,
        connection,
        provider,
    }
}
Finally, because IDL + Provider = Program, we can now create our program object. We'll use a computed property here as well because provider is also reactive.
On top of asking for the idl and the provider objects, creating a Program also requires its address as an instance of PublicKey. Fortunately for us, the IDL file already contains that information under idl.metadata.address. We just need to wrap this in a PublicKey object and feed it to the program.
⛔️ Warning: The metadata.address variable containing our program ID will only be available after running anchor deploy because that's when Anchor knows which address the program was deployed to. So if you run anchor build without running anchor deploy, you will end up with the following error: Cannot read properties of undefined (reading 'address').
And there we have it! The final code of our useWorkspace.js composable that gives us access to everything we need to interact with our Solana program.
import { computed } from 'vue'
import { useAnchorWallet } from 'solana-wallets-vue'
import { Connection, PublicKey } from '@solana/web3.js'
import { Provider, Program } from '@project-serum/anchor'
import idl from '../../../target/idl/solana_twitter.json'

const programID = new PublicKey(idl.metadata.address)
let workspace = null

export const useWorkspace = () => workspace

export const initWorkspace = () => {
    const wallet = useAnchorWallet()
    const connection = new Connection('http://127.0.0.1:8899')
    const provider = computed(() => new Provider(connection, wallet.value))
    const program = computed(() => new Program(idl, programID, provider.value))

    workspace = {
        wallet,
        connection,
        provider,
        program,
    }
}
Now, all we need to do is call that initWorkspace method somewhere so that our application can access its data. Since the workspace store depends on the wallet store, let's call initWorkspace immediately after calling initWallet.
Inside our App.vue component, we'll add the following lines of code.
import { useRoute } from 'vue-router'
import TheSidebar from './components/TheSidebar'
import { PhantomWalletAdapter, SolflareWalletAdapter } from '@solana/wallet-adapter-wallets'
import { initWallet } from 'solana-wallets-vue'
import { initWorkspace } from '@/composables'

// ...

initWallet({ wallets, autoConnect: true })
initWorkspace()
Phew, all done! We can now access the workspace data from any component of our application.
Use the workspace
Before we wrap up this article, let's have a quick look at how we can access that workspace data in our components.
We'll take that opportunity to update the wallet address on the profile page.
If you open the PageProfile.vue component, you should see a public key hardcoded in the template.
<div v-if="true" class="border-b px-8 py-4 bg-gray-50">
    B1AfN7AgpMyctfFbjmvRAvE1yziZFDb9XCwydBjJwtRN
</div>
Now that we have access to the real connected wallet, let's replace this with its public key.
<script setup>
import { ref, watchEffect } from 'vue'
import { fetchTweets } from '@/api'
import TweetForm from '@/components/TweetForm'
import TweetList from '@/components/TweetList'
import { useWorkspace } from '@/composables'

const tweets = ref([])
const loading = ref(true)
const { wallet } = useWorkspace()

// ...
</script>

<template>
    <div v-if="wallet" class="border-b px-8 py-4 bg-gray-50">
        {{ wallet.publicKey.toBase58() }}
    </div>
    <tweet-form @added="addTweet"></tweet-form>
    <tweet-list :tweets="tweets" :loading="loading"></tweet-list>
</template>
As you can see, we:
- Imported the
useWorkspacecomposable. - Extracted any variable needed from
useWorkspace()— here, thewalletobject. - Used the
walletobject inside our template to display its public key in base 58 format.
This was a simple example, but we're now able to do much more than that. Just like we were in our tests, we can now access the program object and use its various APIs to interact with our Solana program which is exactly what we will be doing in the next couple of episodes.
Conclusion
First of all, well done for following this far! Honestly, this series has been quite a journey and I'm super happy to see many of you looking forward to the next episodes.
Whilst integrating with wallets has been made super easy for us by the solana-wallets-vue repository, we still had to set it up properly and understand various concepts along the way. But look at what we've got now:
- Users can connect their wallets.
- Our app can access data regarding the connected wallet and act accordingly.
- Our app has access to a full workspace allowing it to interact with our Solana program the same way we were in our tests.
That's a massive progress from our mock application that wasn't doing anything before!
As usual, you can access the code for this episode in the branch below and compare it with the previous episode.
In the next episode, we will replace the mock data from our api files and use our brand new workspace to fetch real tweets from our Solana program.
EDIT 2022-02-10: This article was updated to use the new solana-wallets-vue package.
Scaffolding the frontend
Fetching tweets in the frontend