Add billing to your apps in 10 minutes
When you are a side-project hoarder like myself — or manage many freelance projects — you end up working on the same problems over and over again. One of the biggest things I find myself working on every project is billing and subscriptions.
No matter how many times I’ve worked on billing in the past, it still feels like the first time. What tables and attributes do I need in my database already? What are the essential webhooks for this to work safely? What data do I need to show my users when they are subscribed and when they’re not? What about invoices? What about emails? What if they started a trial? What if they cancelled? What if they are on a grace period until their billing cycle ends?
Well, fear not dear developers. Let’s tackle this problem once and for all. Right here, right now! 💪
Paddle
First, let’s agree on which subscription provider to use. There is no right or wrong providers to choose from but at the end of the day, a choice has to be made.
In this article, I will use Paddle for the following reasons:
- They are a bit more expensive than their competitors but they remove a lot more responsibilities off of our shoulders. For instance, they handle all taxes and VAT for us. Good bye tax nightmares.
- They have a simple API designed around webhooks making it easier to get started.
- We only need 3 webhook handlers to get started:
subscription_created,subscription_updatedandsubscription_cancelled. - They provide frontend modals so we never need to implement a checkout form.
- Last but not least, it enables us to use Kanuu.
Kanuu
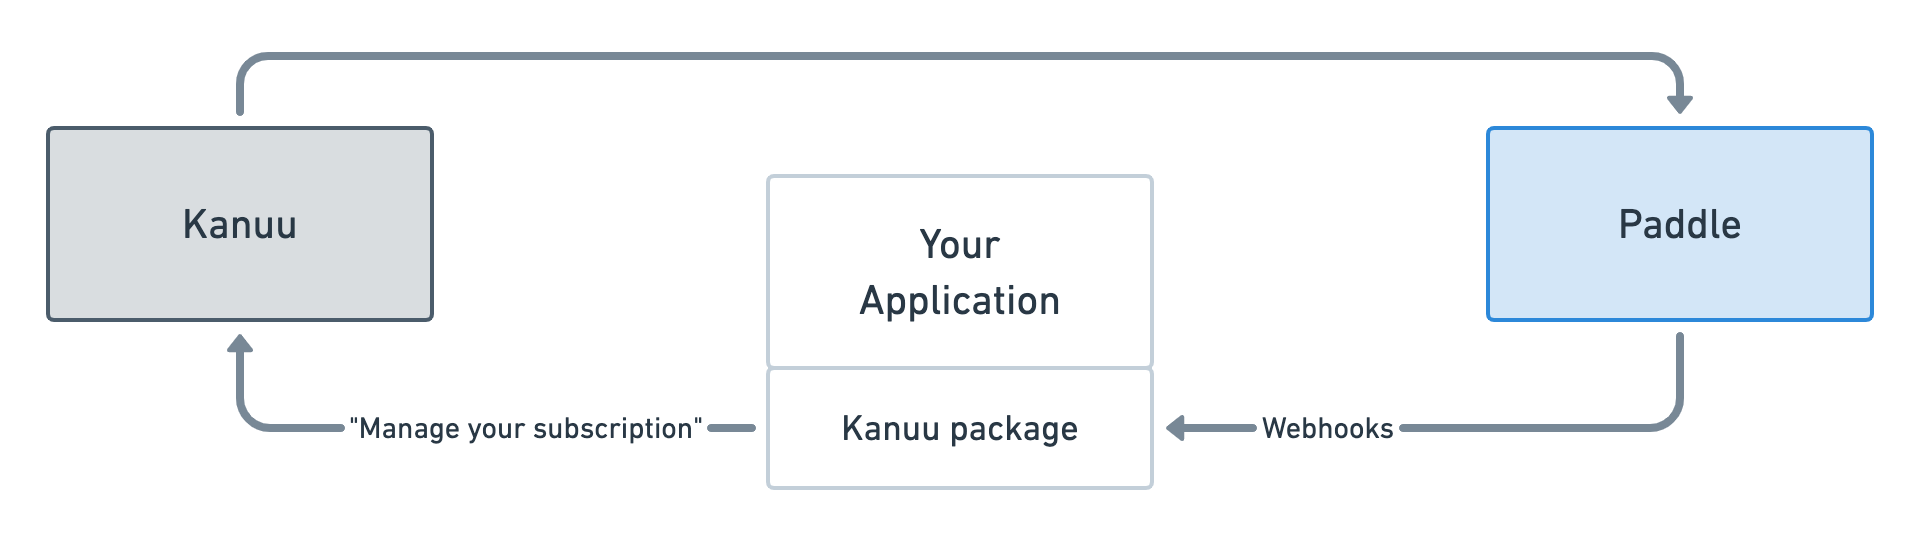
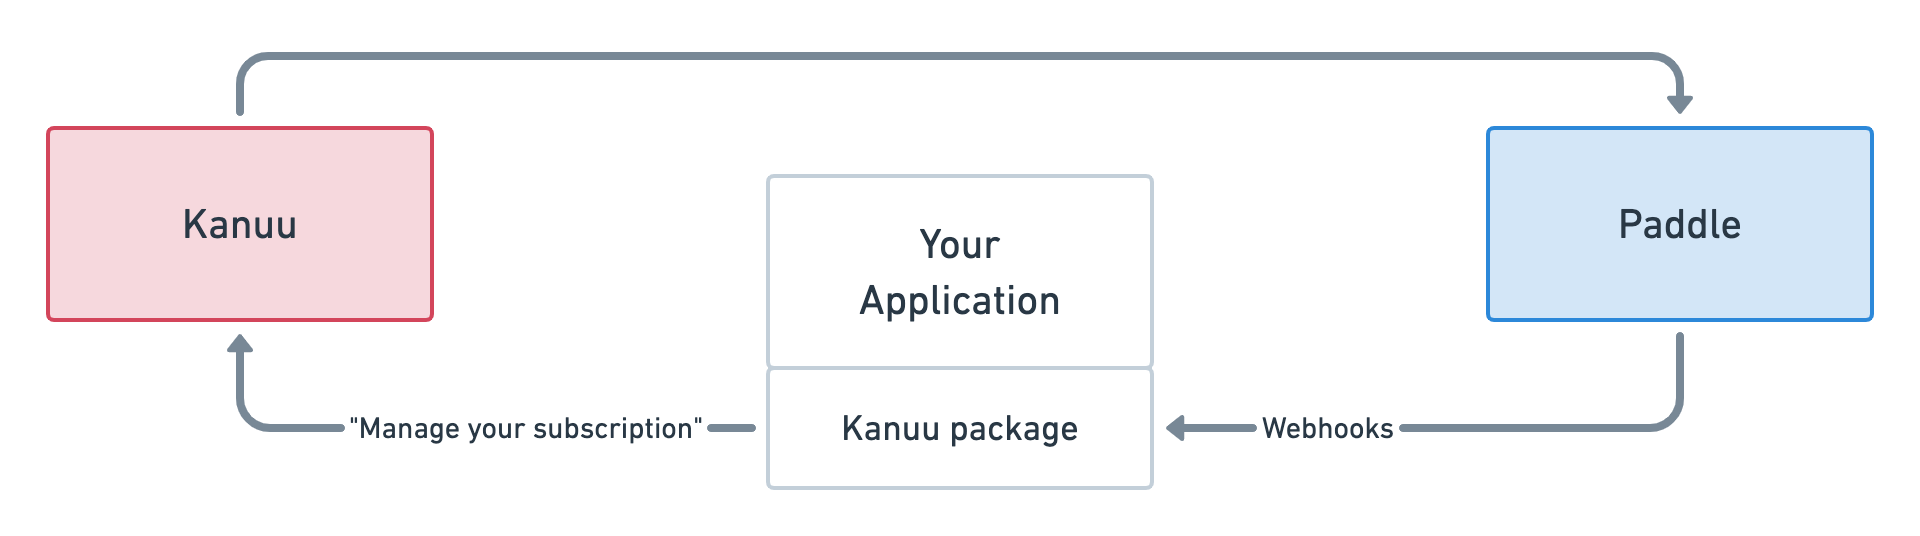
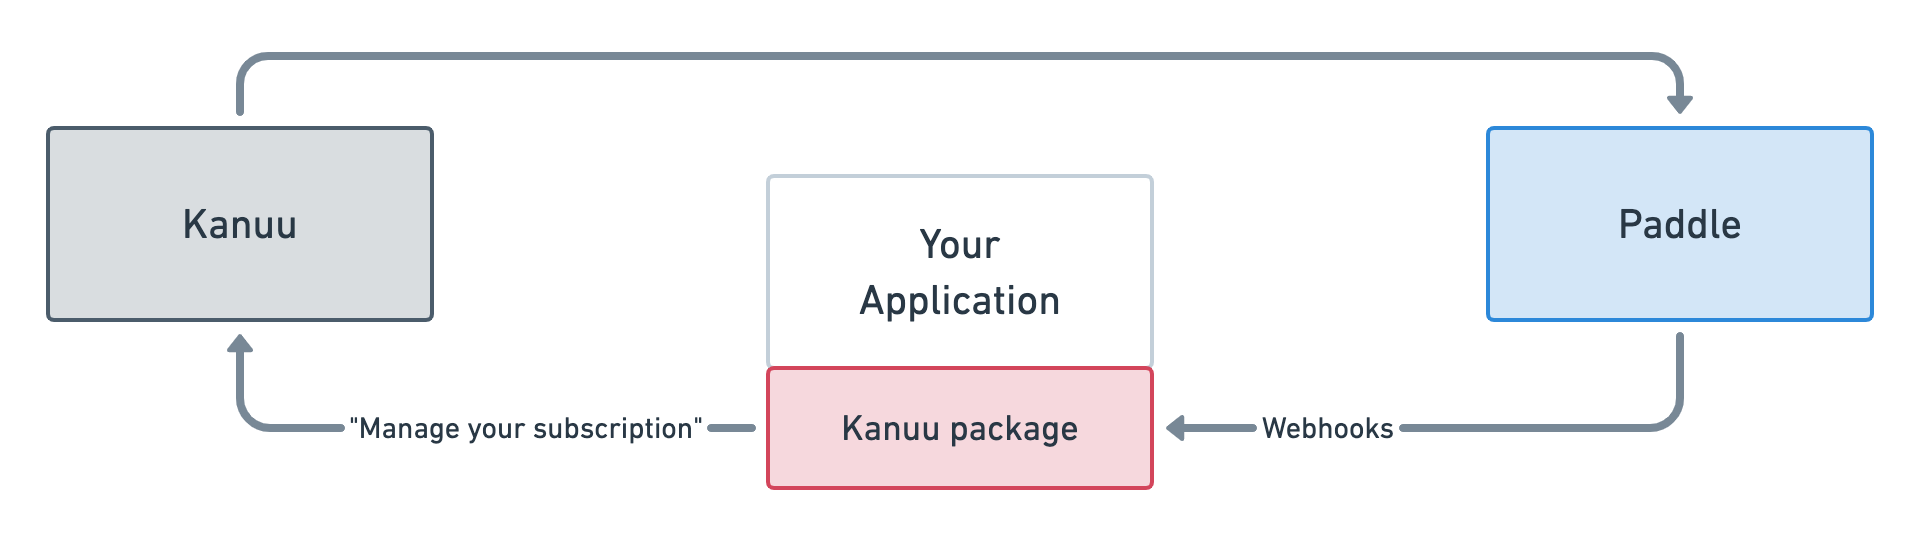
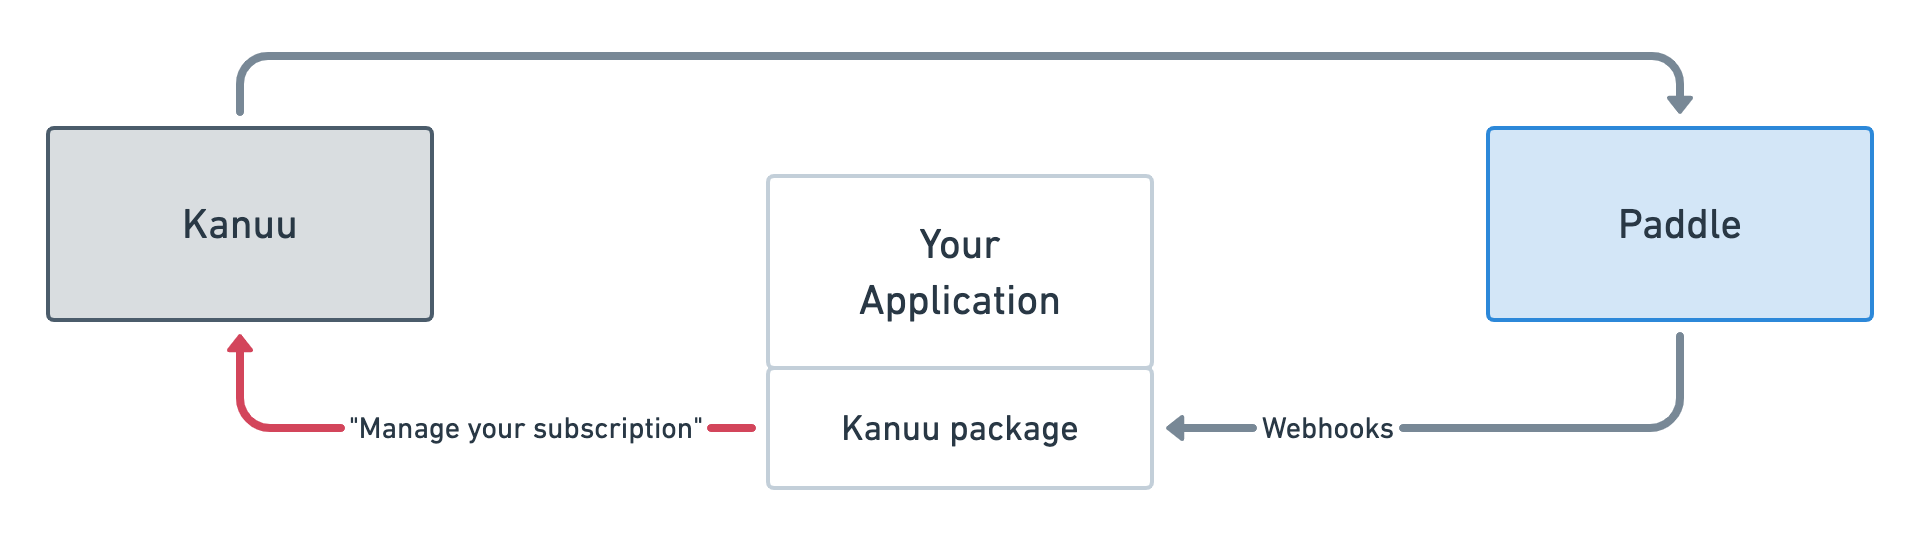
Using Paddle is great but we still have plenty of work ahead of us. We need a full interface allowing users to both subscribe and manage their subscription. That UI must handle every possible subscription state. It must use Paddle’s JavaScript library and add callbacks to notify our application of subscription changes even though we will also receive webhooks — in case they take a while to arrive.
That’s where Kanuu comes in. Kanuu is a project that Nikita, Sam and I created because we couldn’t face creating yet another billing UI. Kanuu replaces all your UI requirements with a simple button. That button uses a nonce to securely redirect your user to Kanuu where they can manage all aspects of their subscription including selecting a plan and creating a subscription.
All of the changes that happen on Kanuu, will happen on your Paddle account and therefore you will be notified in realtime via webhooks. So ultimately, the only thing we are left to handle are 3 webhooks and create a subscription model that captures all that data.
If your application is using Laravel, Kanuu provides a helpful package that can even handle webhooks for you and verify their signature.
Concretely, this is how we are going to tackle billing once and for all. We send our customers to Kanuu to create or manage their subscription. Since Kanuu uses Paddle’s JavaScript library, Paddle is automatically notified of any change. Paddle will notify us of these changes via webhooks so we have to listen for them.
A quick note on pricing, Kanuu is free for your first 20 active customers. That means you don’t pay anything until you have 20 users giving you money. And after that, you pay a mere $5/month. I know I’m massively biased, but that’s a no-brainer for me. Especially when you’ll see all it can do for you.
Okay enough theory, let’s see how we can actually add billing to a brand new Laravel application in 10 minutes using Paddle and Kanuu.
Ready?
Go!
New Laravel app
Let’s use Laravel Breeze to get all that authentication scaffolding out of the box. Nothing else to see here, you know the drill.
# Create a new Laravel application.
laravel new kanuu-getting-started
cd kanuu-getting-started

# Download and install Laravel Breeze.
composer require laravel/breeze --dev
php artisan breeze:install

# Compile frontend assets.
npm install && npm run dev

# Create a new database and run migrations.
mysql -uroot -e "create database kanuu_getting_started;"
php artisan migrate
Next!
Set up Paddle
First, you’ll need to set up a Paddle account, this is not something that can be done in 10 minutes since the process requires a manual review but we’ll assume you’ve done that already. If you haven’t, no problem. Just follow along and I’ll make sure to share plenty of screenshots so you’re not lost.
Once you have access to your Paddle account, we’ll need some credentials for the rest of the process. Let’s get it over and done with and copy all the variables we need.
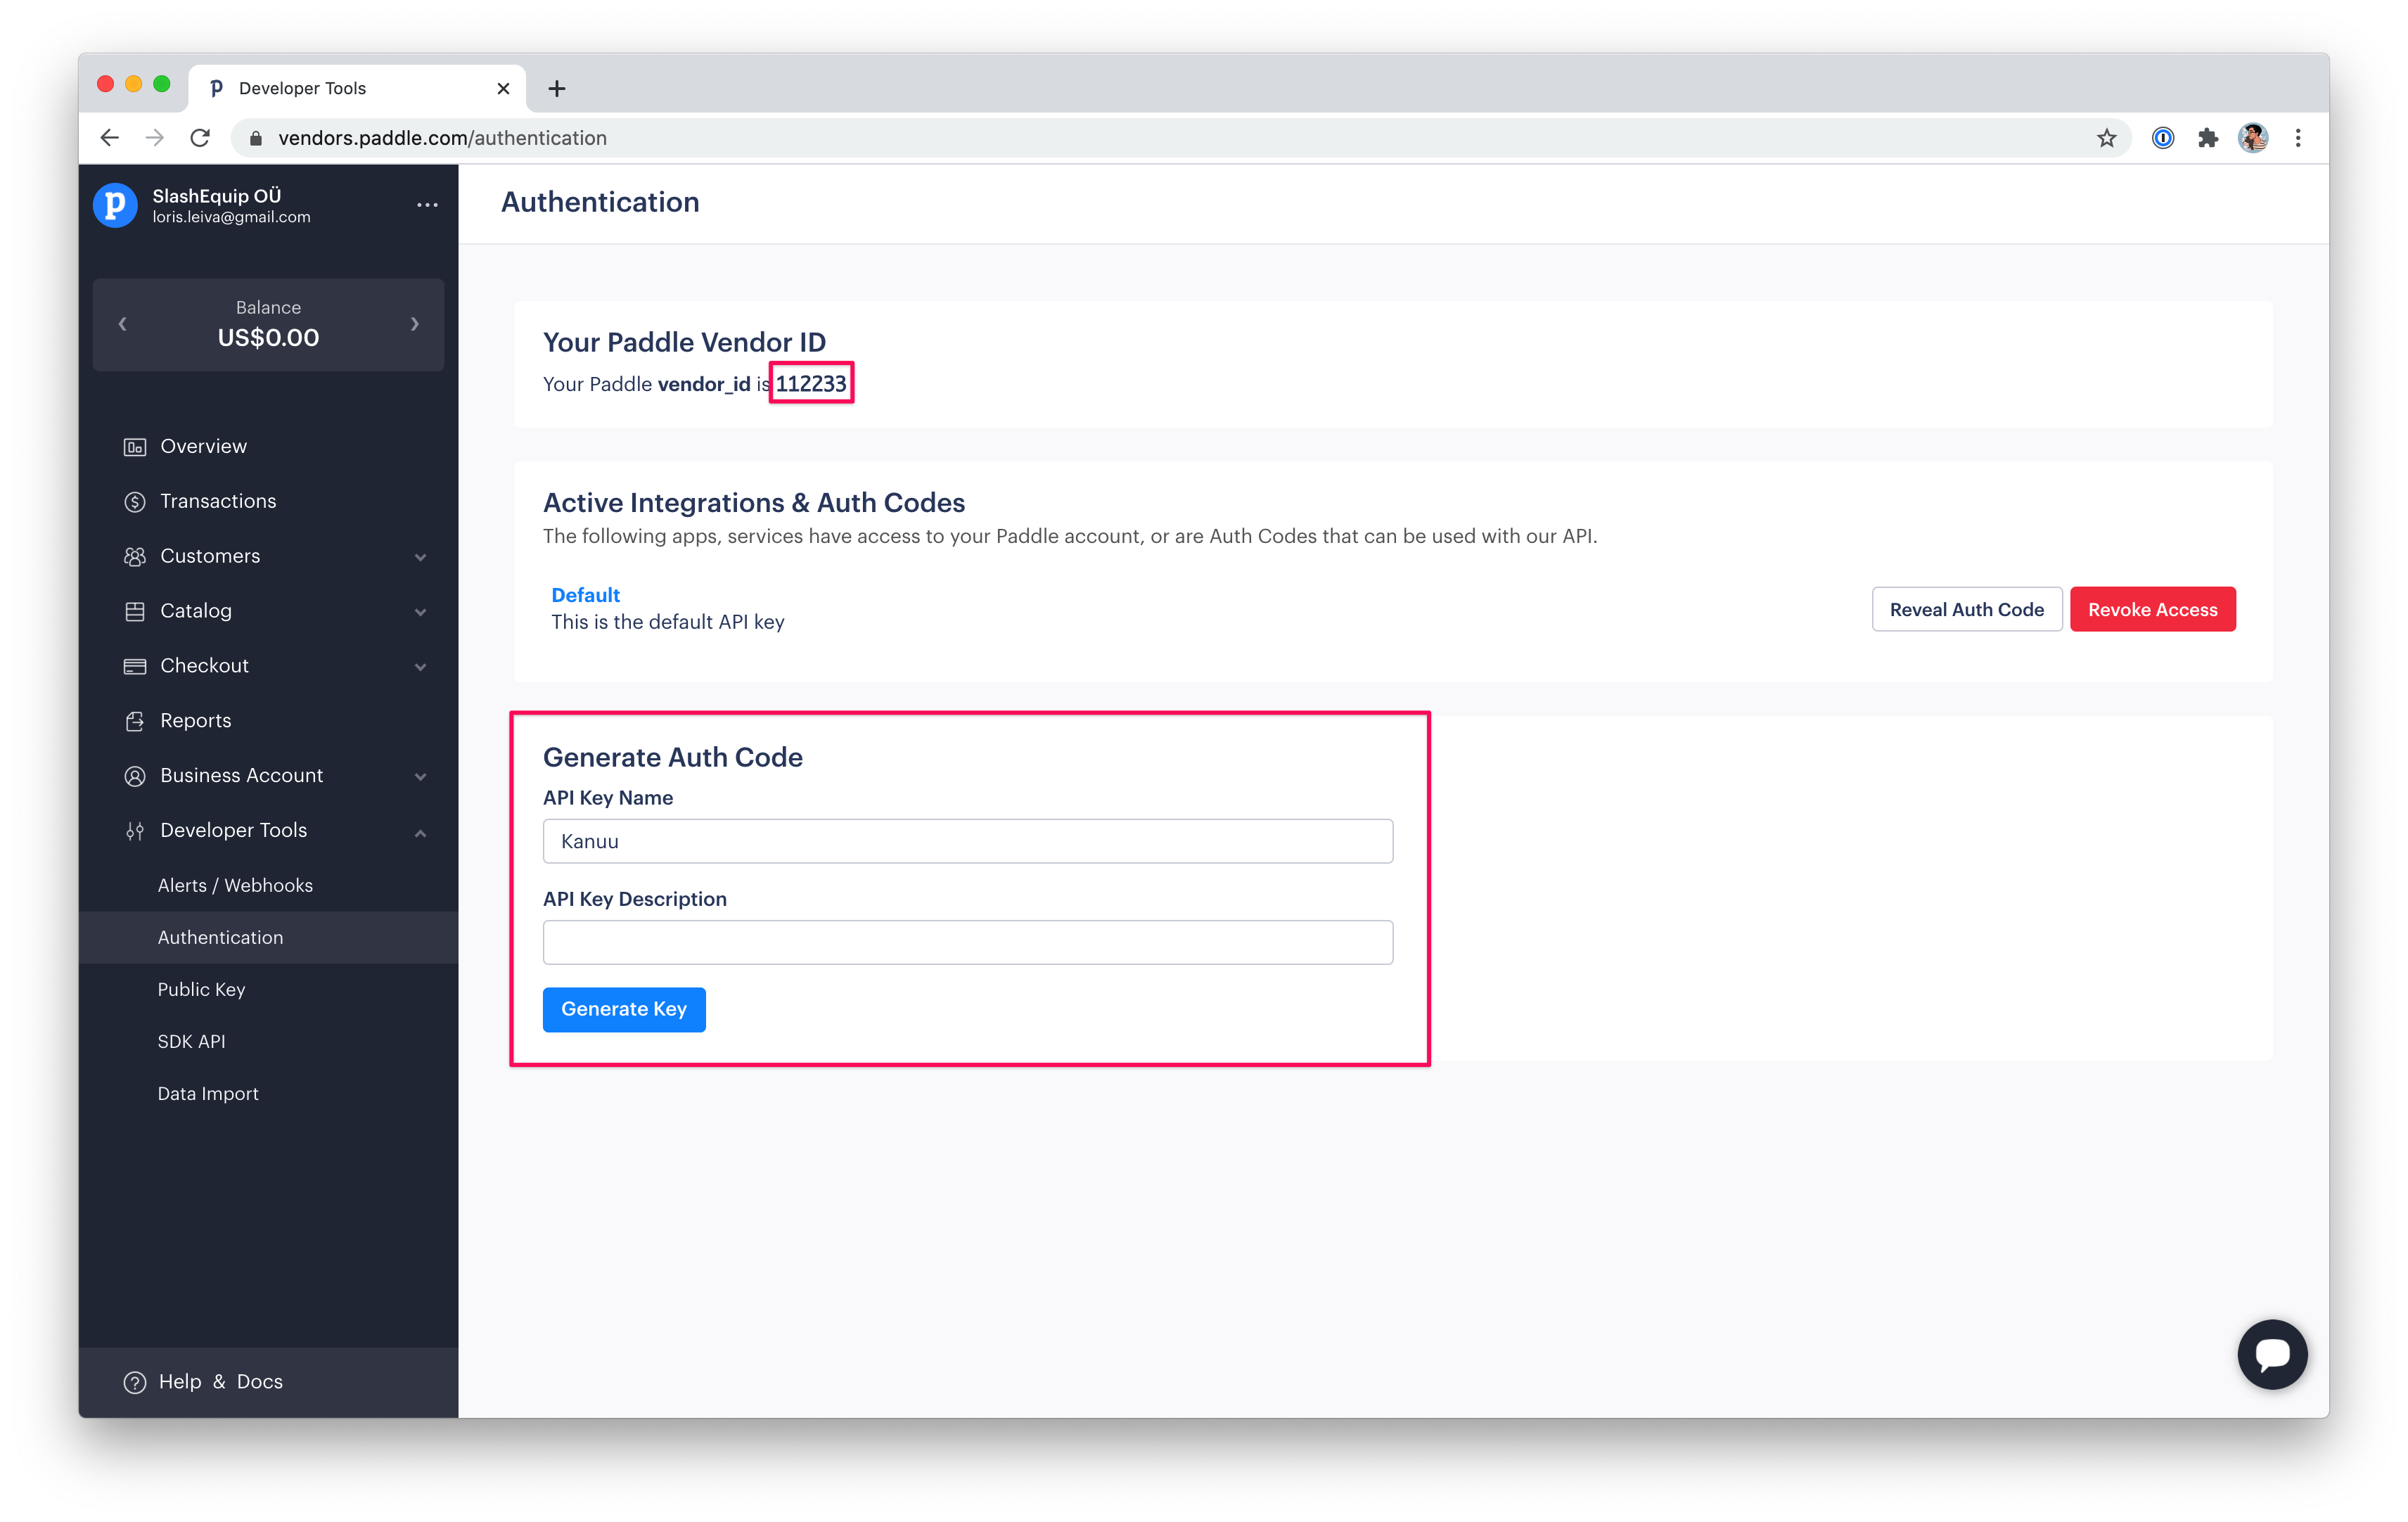
Vendor ID and API key
Go to “Developer Tools > Authentication” and copy your vendor ID. In the same page, create an API key for Kanuu. You’ll need to paste these in your Kanuu settings in a minute.
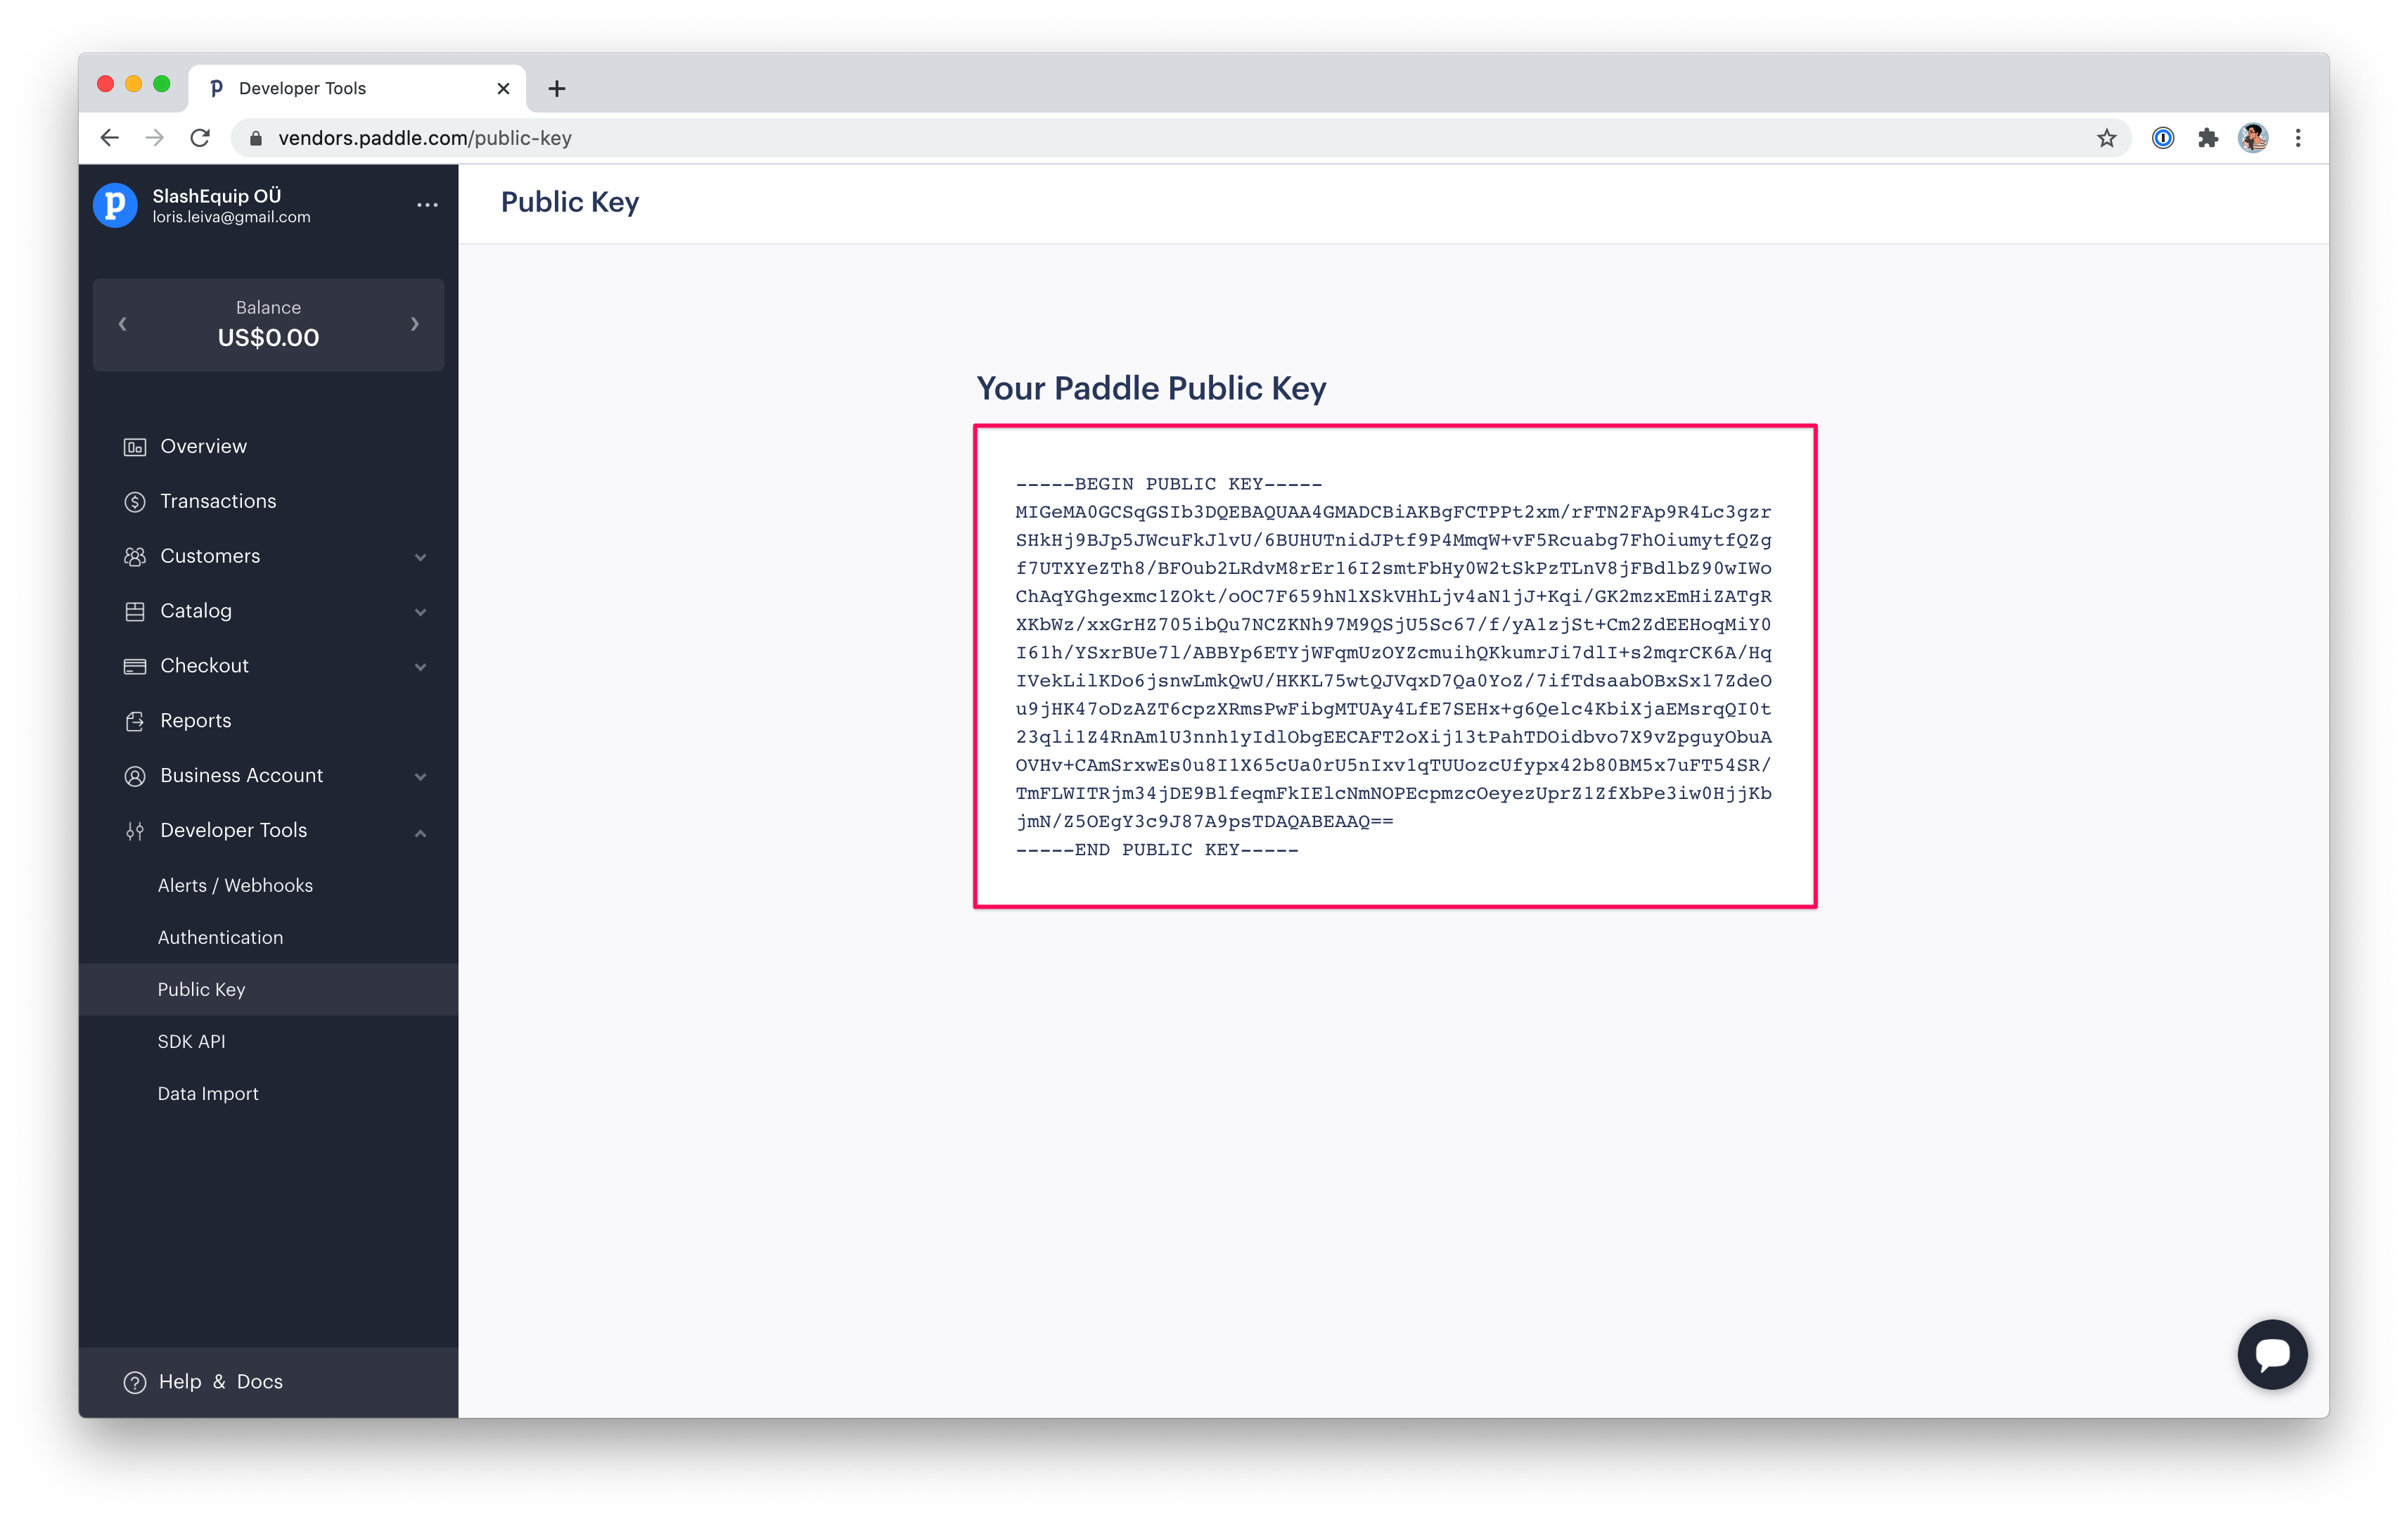
Public key
Go to “Developer Tools > Public Key” and copy your public key. You’ll need this as an environment variable to verify webhook signatures.
Set up Kanuu
Next, you’ll need a Kanuu account, click here to create one.
Then, go to your “Team Settings” and update your team profile.
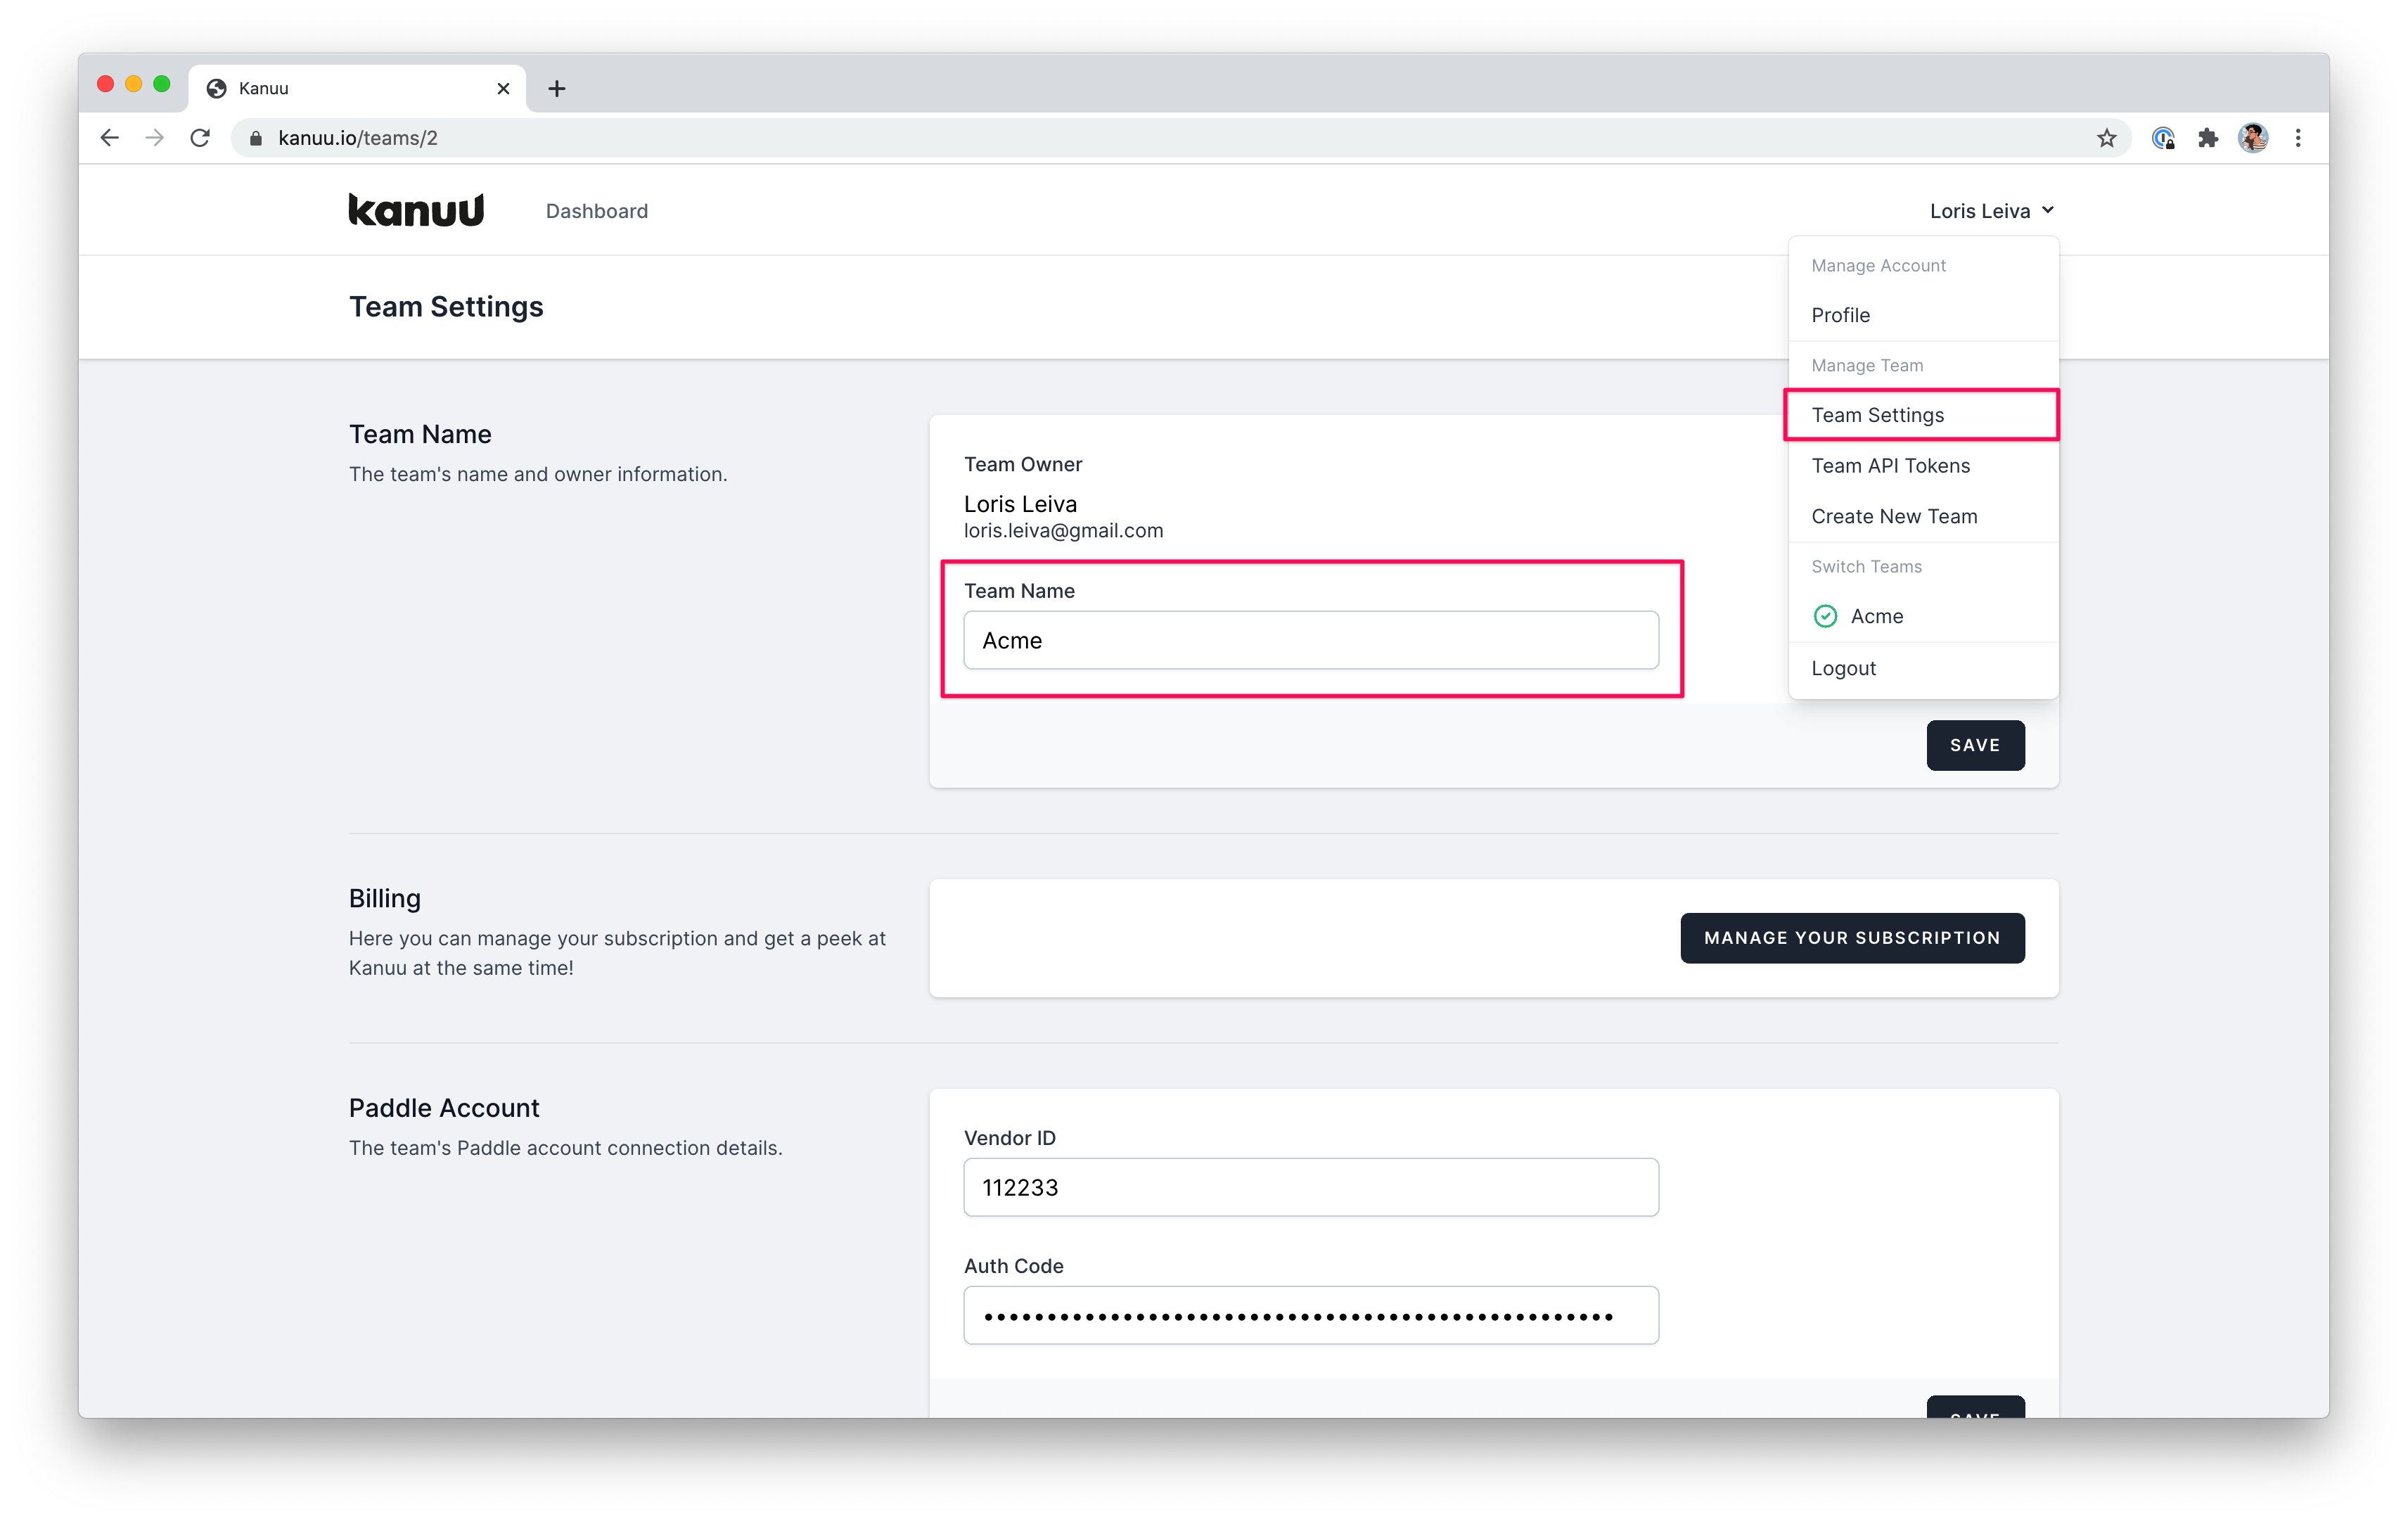
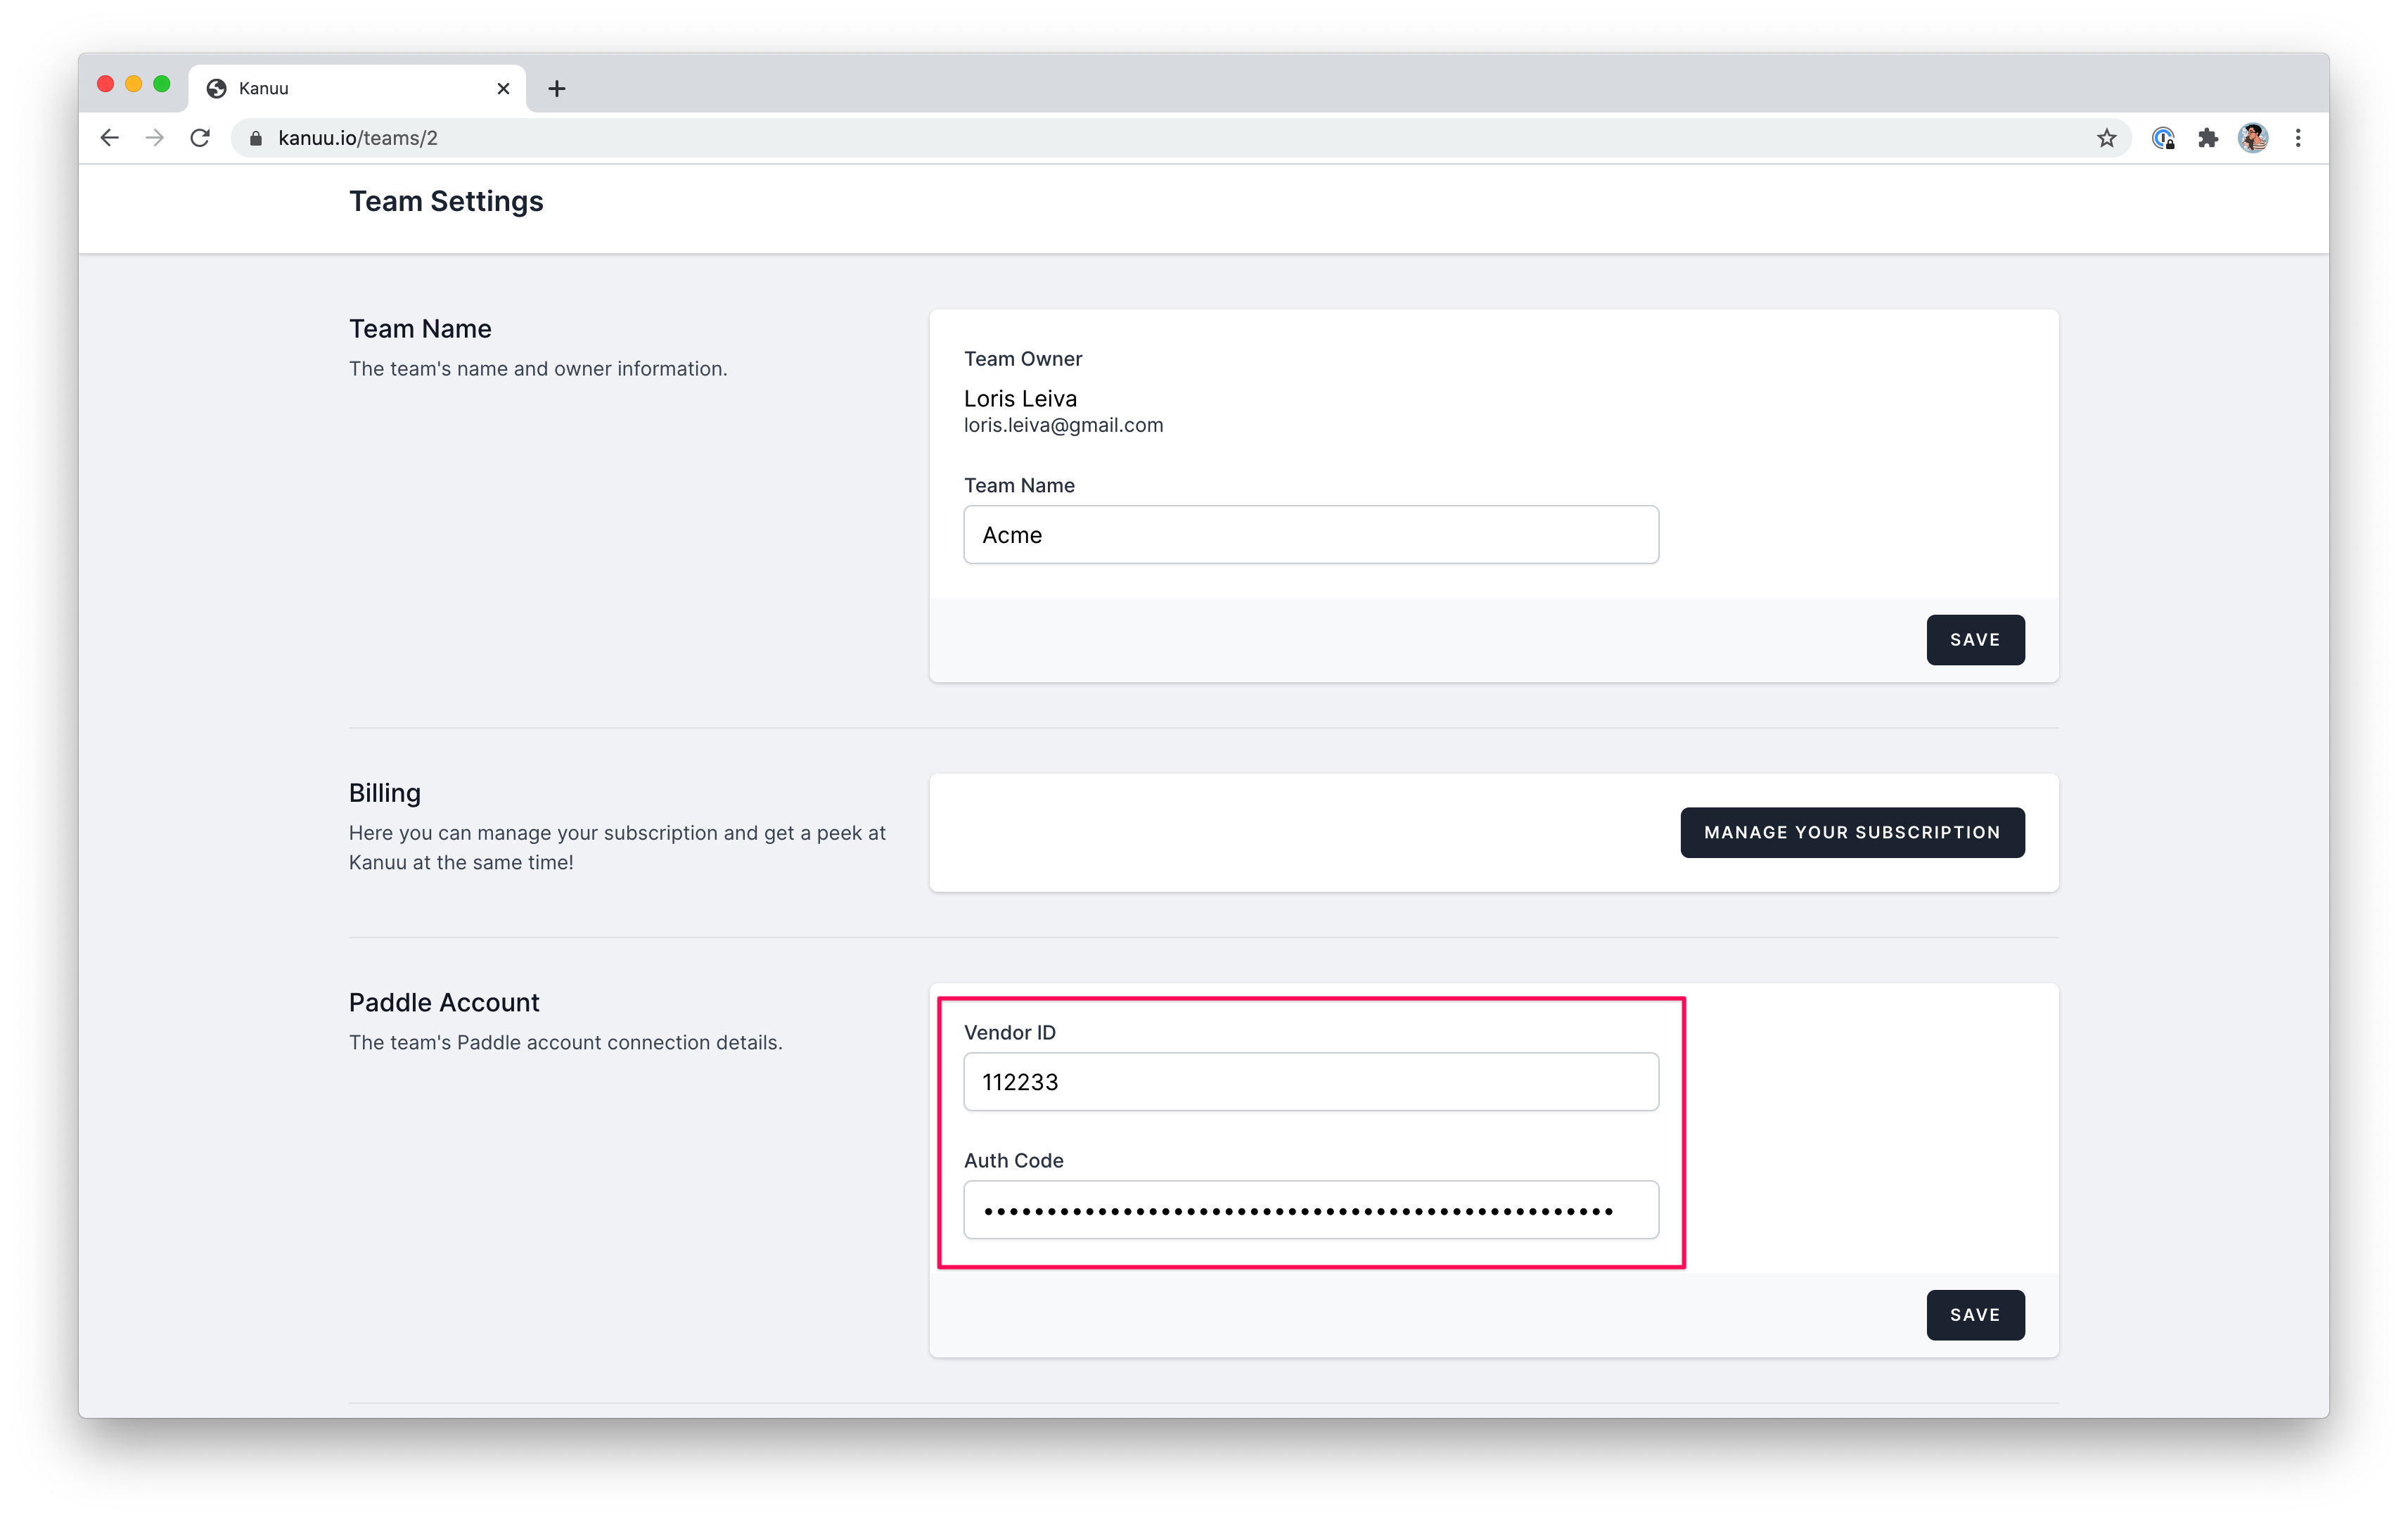
Next, on the same page, enter your Paddle credentials in the “Paddle Account” section. This will allow Kanuu to interact with Paddle on your behalf in the subscription UI it provides.
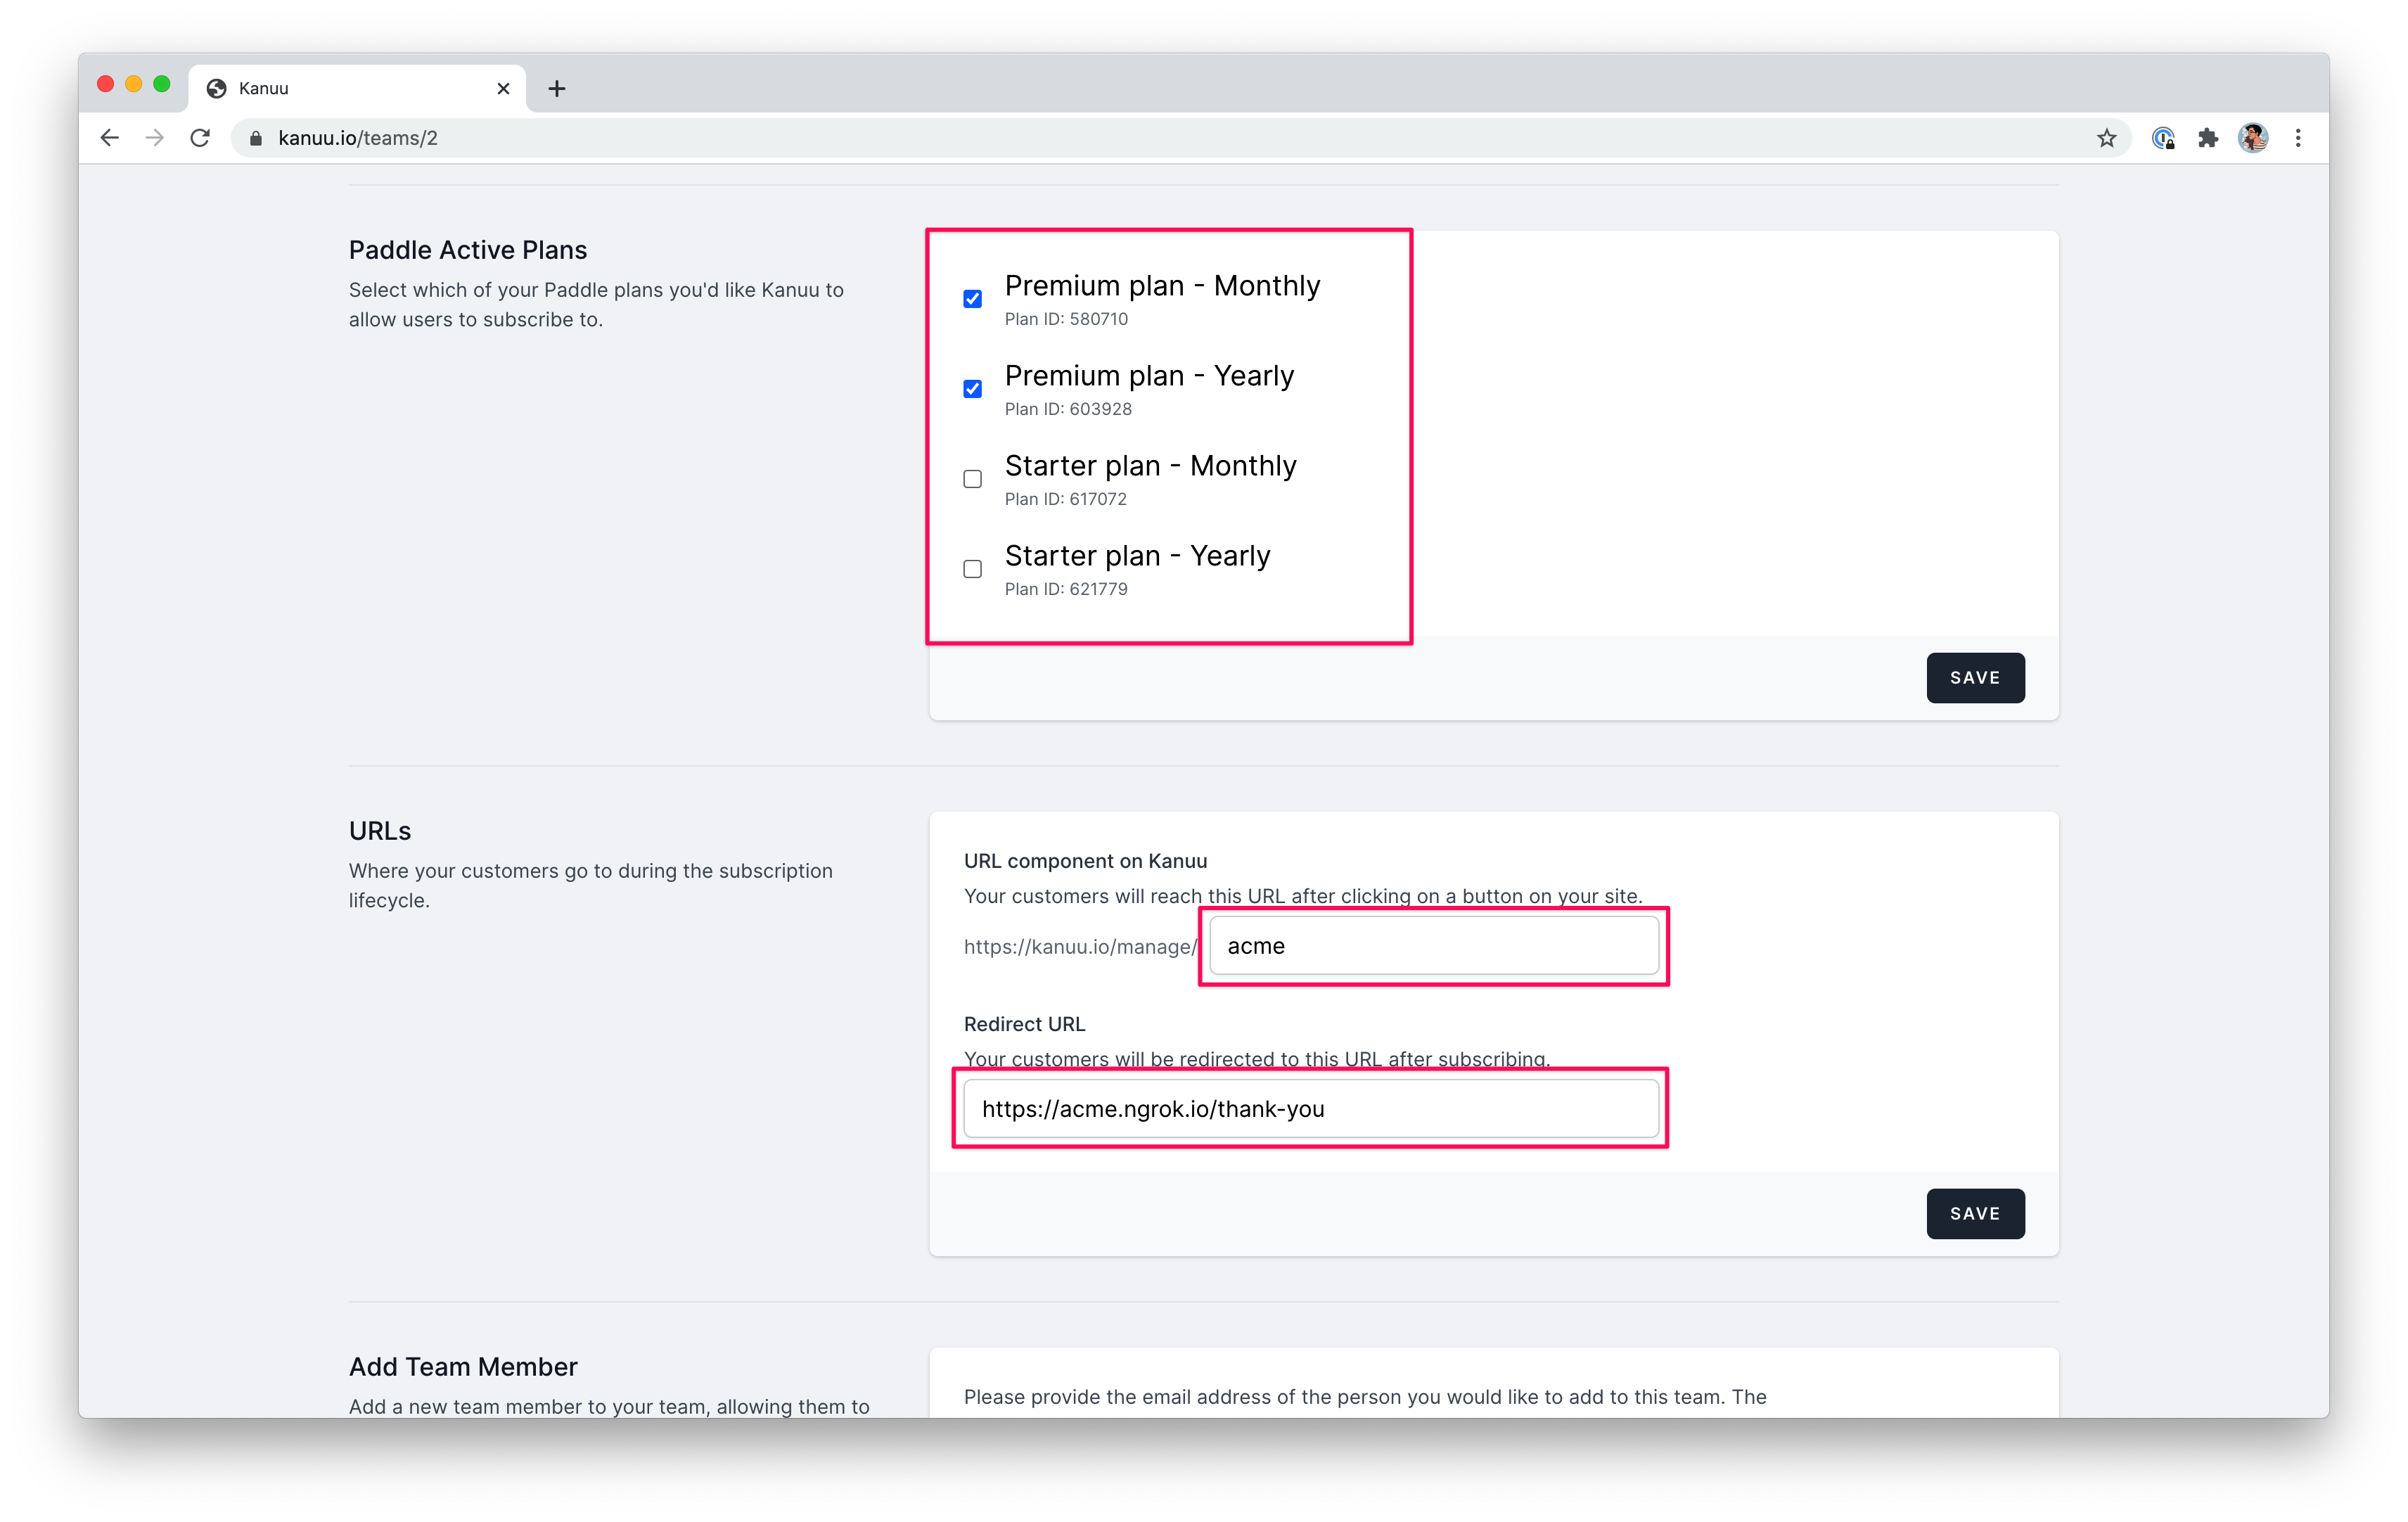
If you have already created your plans on Paddle, you should now see them selected in the next section. Otherwise, create them in your Paddle account and make sure to select them when you come back to Kanuu so they can be visible in the UI. This feature is useful to hide archived plans to your new customers.
Additionally, the next section can be use to customise your URLs.
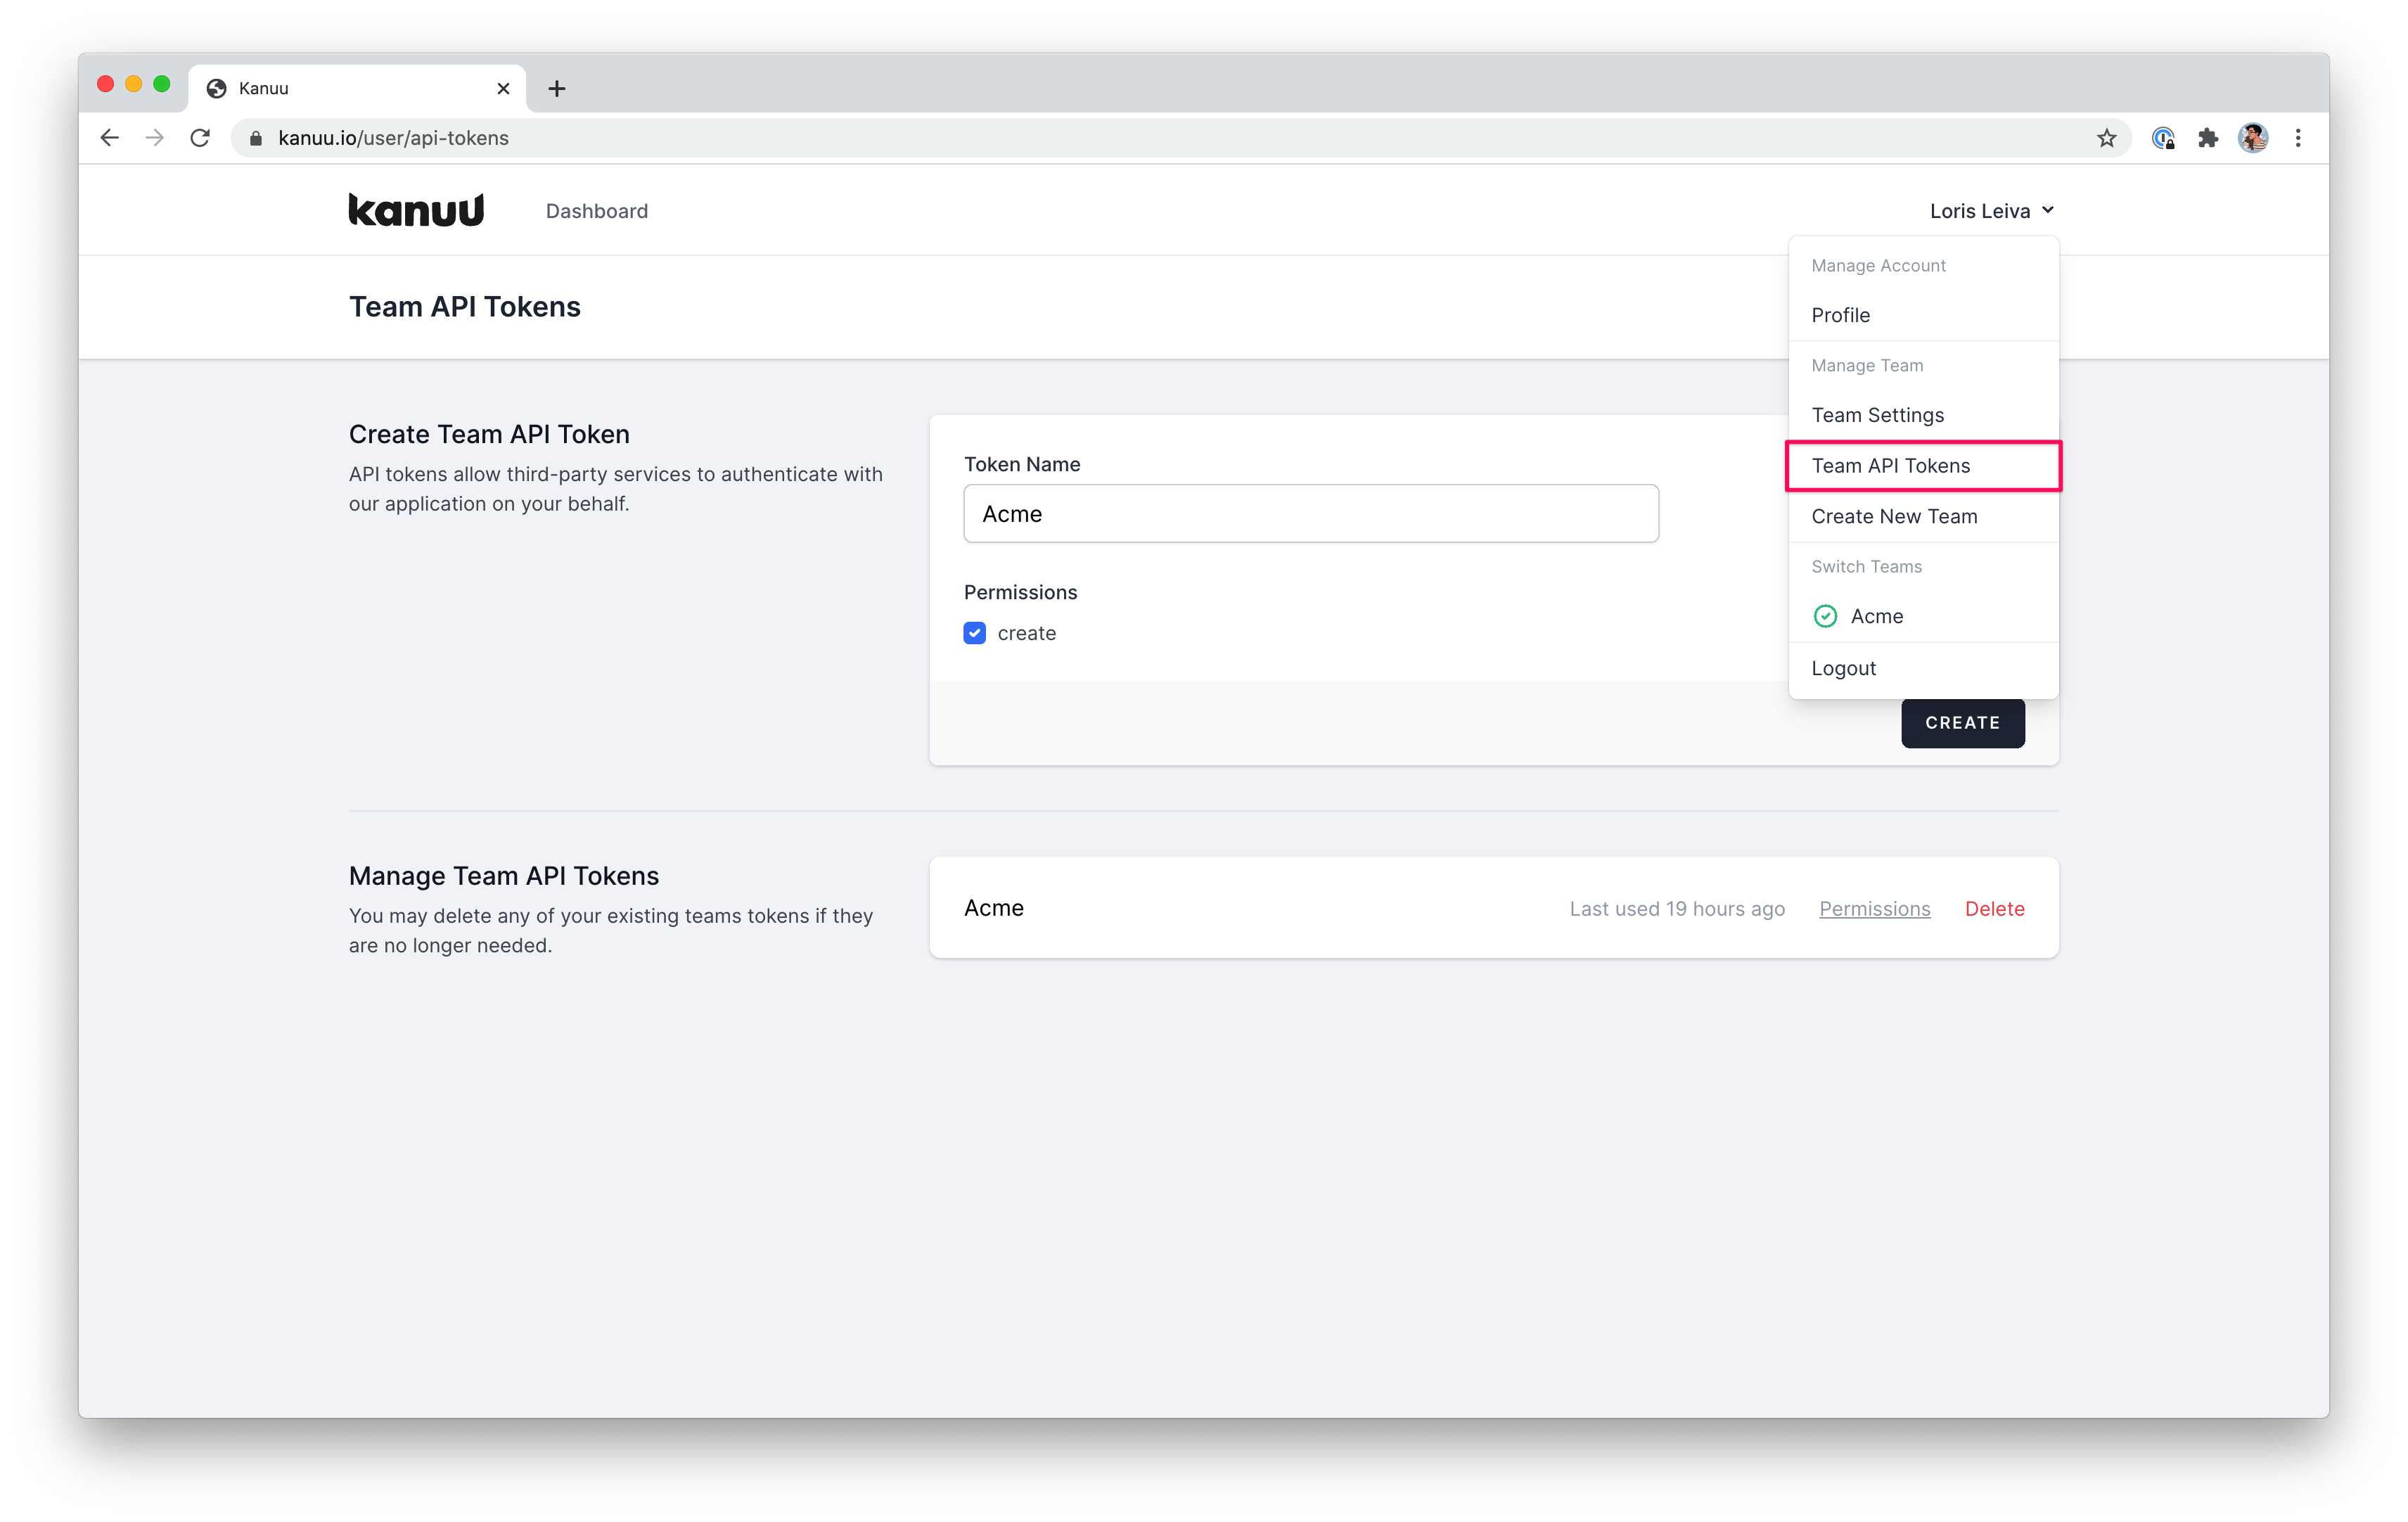
Finally go to the “Team API Tokens” page and create a new API key for your application. Make sure you save it as you’ll need it in your .env file.
That’s it, you’re all set up with Kanuu. Let’s go back to the code!
The Kanuu package
Since we’re using Laravel, let’s download Kanuu’s Laravel package to get started.
composer require kanuu-io/kanuu-laravel
Now let’s paste our Kanuu API key and our Paddle public key in our .env file. It should look like this:
KANUU_API_KEY="sn71bn8tsZKY0oMtbqRqbnV4FYRCwRK21SVqcIfA"
PADDLE_PUBLIC_KEY="-----BEGIN PUBLIC KEY-----
MIGeMA0GCSqGSIb3DQEBAQUAA4GMADCBiAKBgFCTPPt2xm/rFTN2FAp9R4Lc3gzr
SHkHj9BJp5JWcuFkJlvU/6BUHUTnidJPtf9P4MmqW+vF5Rcuabg7FhOiumytfQZg
f7UTXYeZTh8/BFOub2LRdvM8rEr16I2smtFbHy0W2tSkPzTLnV8jFBdlbZ90wIWo
ChAqYGhgexmc1ZOkt/oOC7F659hNlXSkVHhLjv4aN1jJ+Kqi/GK2mzxEmHiZATgR
XKbWz/xxGrHZ705ibQu7NCZKNh97M9QSjU5Sc67/f/yA1zjSt+Cm2ZdEEHoqMiY0
I61h/YSxrBUe7l/ABBYp6ETYjWFqmUzOYZcmuihQKkumrJi7dlI+s2mqrCK6A/Hq
IVekLilKDo6jsnwLmkQwU/HKKL75wtQJVqxD7Qa0YoZ/7ifTdsaabOBxSx17ZdeO
u9jHK47oDzAZT6cpzXRmsPwFibgMTUAy4LfE7SEHx+g6Qelc4KbiXjaEMsrqQI0t
23qli1Z4RnAm1U3nnh1yIdlObgEECAFT2oXij13tPahTDOidbvo7X9vZpguyObuA
OVHv+CAmSrxwEs0u8I1X65cUa0rU5nIxv1qTUUozcUfypx42b80BM5x7uFT54SR/
TmFLWITRjm34jDE9BlfeqmFkIElcNmNOPEcpmzcOeyezUprZ1ZfXbPe3iw0HjjKb
jmN/Z5OEgY3c9J87A9psTDAQABEAAQ==
-----END PUBLIC KEY-----"
The Subscription model
This is the part that will vary based on our application’s need.
In this article, we’ll assume we want to subscribe users. Therefore we will create a Subscription model and add a one-to-many relationship between users and subscriptions.
However, it is worth noting that we can attach subscriptions to any model we want. If we want to charge teams instead of users, we simply attach the Subscription model to the Team model instead.
The same goes for the Subscription model itself. This is the data we get from Paddle when a subscription gets created, updated and cancelled. If you want to split that data in multiple tables and models, go for it! In this article we’ll keep things simple and tailored to the most common use cases of billing but don’t let that restrict your creativity.
Okay let’s do this! We start by creating our Subscription model with a migration and a factory by running:
php artisan make:model Subscription -mf
Next let’s write the migration. We’ll capture the following essential data from Paddle but feel free to have a look at what else is available to store.
$table->id();
$table->foreignId('user_id')->nullable()->constrained('users')->nullOnDelete();

// Paddle identifiers.
$table->string('paddle_user_id');
$table->string('paddle_subscription_id');
$table->string('paddle_plan_id');
$table->string('paddle_checkout_id')->nullable();

// Subscription state.
$table->enum('status', ['active', 'trialing', 'past_due', 'paused', 'deleted']);
$table->timestamp('cancelled_at')->nullable();

$table->timestamps();
Remember to run php artisan migrate to add this table to your database.
Next, let’s add the user relationship and some helper methods to our new Subscription model. For instance:
class Subscription extends Model
{
    use HasFactory;

    // Disable mass-assignment exceptions.
    protected $guarded = [];

    // Cast 'cancelled_at' to a Carbon instance.
    protected $dates = ['cancelled_at'];

    public function user(): BelongsTo
    {
        return $this->belongsTo(User::class);
    }

    public function scopeActive($query)
    {
        return $query->where('status', '=', 'active');
    }

    public function onGracePeriod(): bool
    {
        return $this->cancelled_at
            && $this->cancelled_at->isFuture();
    }
}
The HasSubscription trait
Now that we have a Subscription model, let’s add a relationship to the User model with a bunch of helpful billing methods such as isSubscribed — because at the end of the day, isn’t that all we care about?
I like putting all these in a HasSubscriptions trait to reduce the size of my User class. Create a new file at app/Concerns/HasSubscription.php and add the following methods:
// App\Concerns\HasSubscription

trait HasSubscriptions
{
    public function subscriptions(): HasMany
    {
        return $this->hasMany(Subscription::class);
    }

    public function isSubscribed(): bool
    {
        return $this->subscriptions()->active()->exists();
    }

    public function activeSubscription(): ?Subscription
    {
        return $this->subscriptions()->latest()->active()->first();
    }

    public function onGracePeriod(): bool
    {
        return ($subscription = $this->activeSubscription())
            ? $subscription->onGracePeriod()
            : false;
    }
}
Now we simply need to use that trait on our User model. Note that if you were charging teams instead, you could use the same trait on your team model.
class User extends Authenticatable
{
    use HasFactory, Notifiable;
    use HasSubscriptions;

    // ...
}
Whilst we’re doing all of that, let’s also add a new Subscribed middleware by running php artisan make:middleware Subscribed.
class Subscribed
{
    public function handle(Request $request, Closure $next)
    {
        if (! $request->user() || ! $request->user()->isSubscribed()) {
            abort(402, 'You must be subscribed to perform this action');
        }

        return $next($request);
    }
}
Webhooks made easy
Okay, now that our app is all ready to welcome Paddle’s data, let’s implement these webhooks.
Fortunately, Kanuu’s Laravel package comes equipped with a HandlePaddleWebhook controller that uses the PADDLE_PUBLIC_KEY variable to verify the signature for us. So all we need to do is register it in our routes/web.php file like so:
Route::post('webhooks/paddle', '\Kanuu\Laravel\HandlePaddleWebhook')->name('webhooks.paddle');
Since webhooks cannot be CSRF protected, we’ll need to disable that route on the VerifyCsrfToken middleware.
// App\Http\Middleware\VerifyCsrfToken

protected $except = [
    'webhooks/*',
];
``

Finally, we need to add our custom logic to parse Paddle data into our own `Subscription` model. Go to your `AppServiceProvider` and add the following closures:

```php
// App\Providers\AppServiceProvider

public function boot()
{
    // 1. Get model from identifier.
    Kanuu::getModelUsing(function ($identifier) {
        return User::findOrFail($identifier);
    });

    // 2. Add subscription listeners.
    Kanuu::on('subscription_*', function ($payload, User $user) {
        // Data available on all subscription events.
        $data = [
            'paddle_user_id' => $payload->user_id,
            'paddle_plan_id' => $payload->subscription_plan_id,
            'paddle_checkout_id' => $payload->checkout_id,
            'status' => $payload->status,
        ];

        // The `cancellation_effective_date` is only available on the `subscription_cancelled` event.
        if (isset($payload->cancellation_effective_date)) {
            $data['cancelled_at'] = $payload->cancellation_effective_date;
        }

        // Create or update based on the paddle subscription_id.
        $user->subscriptions()->updateOrCreate(
            ['paddle_subscription_id' => $payload->subscription_id], $data
        );
    });
}
- The first closure is optional but allows you to transform a Kanuu identifier into a model of your choice. As you’ll see in the next section, the Kanuu identifier can be anything that is unique to your own billable entity — for us, it is users and therefore user ids.
- The second closure is listening for all webhooks whose event name starts with
subscription_. So this will be triggered every time a subscription is created, updated or cancelled. In our case, all we want to do is make sure our Subscription model is kept up-to-date with Paddle data so a simpleupdateOrCreatefor all three scenarios is enough.
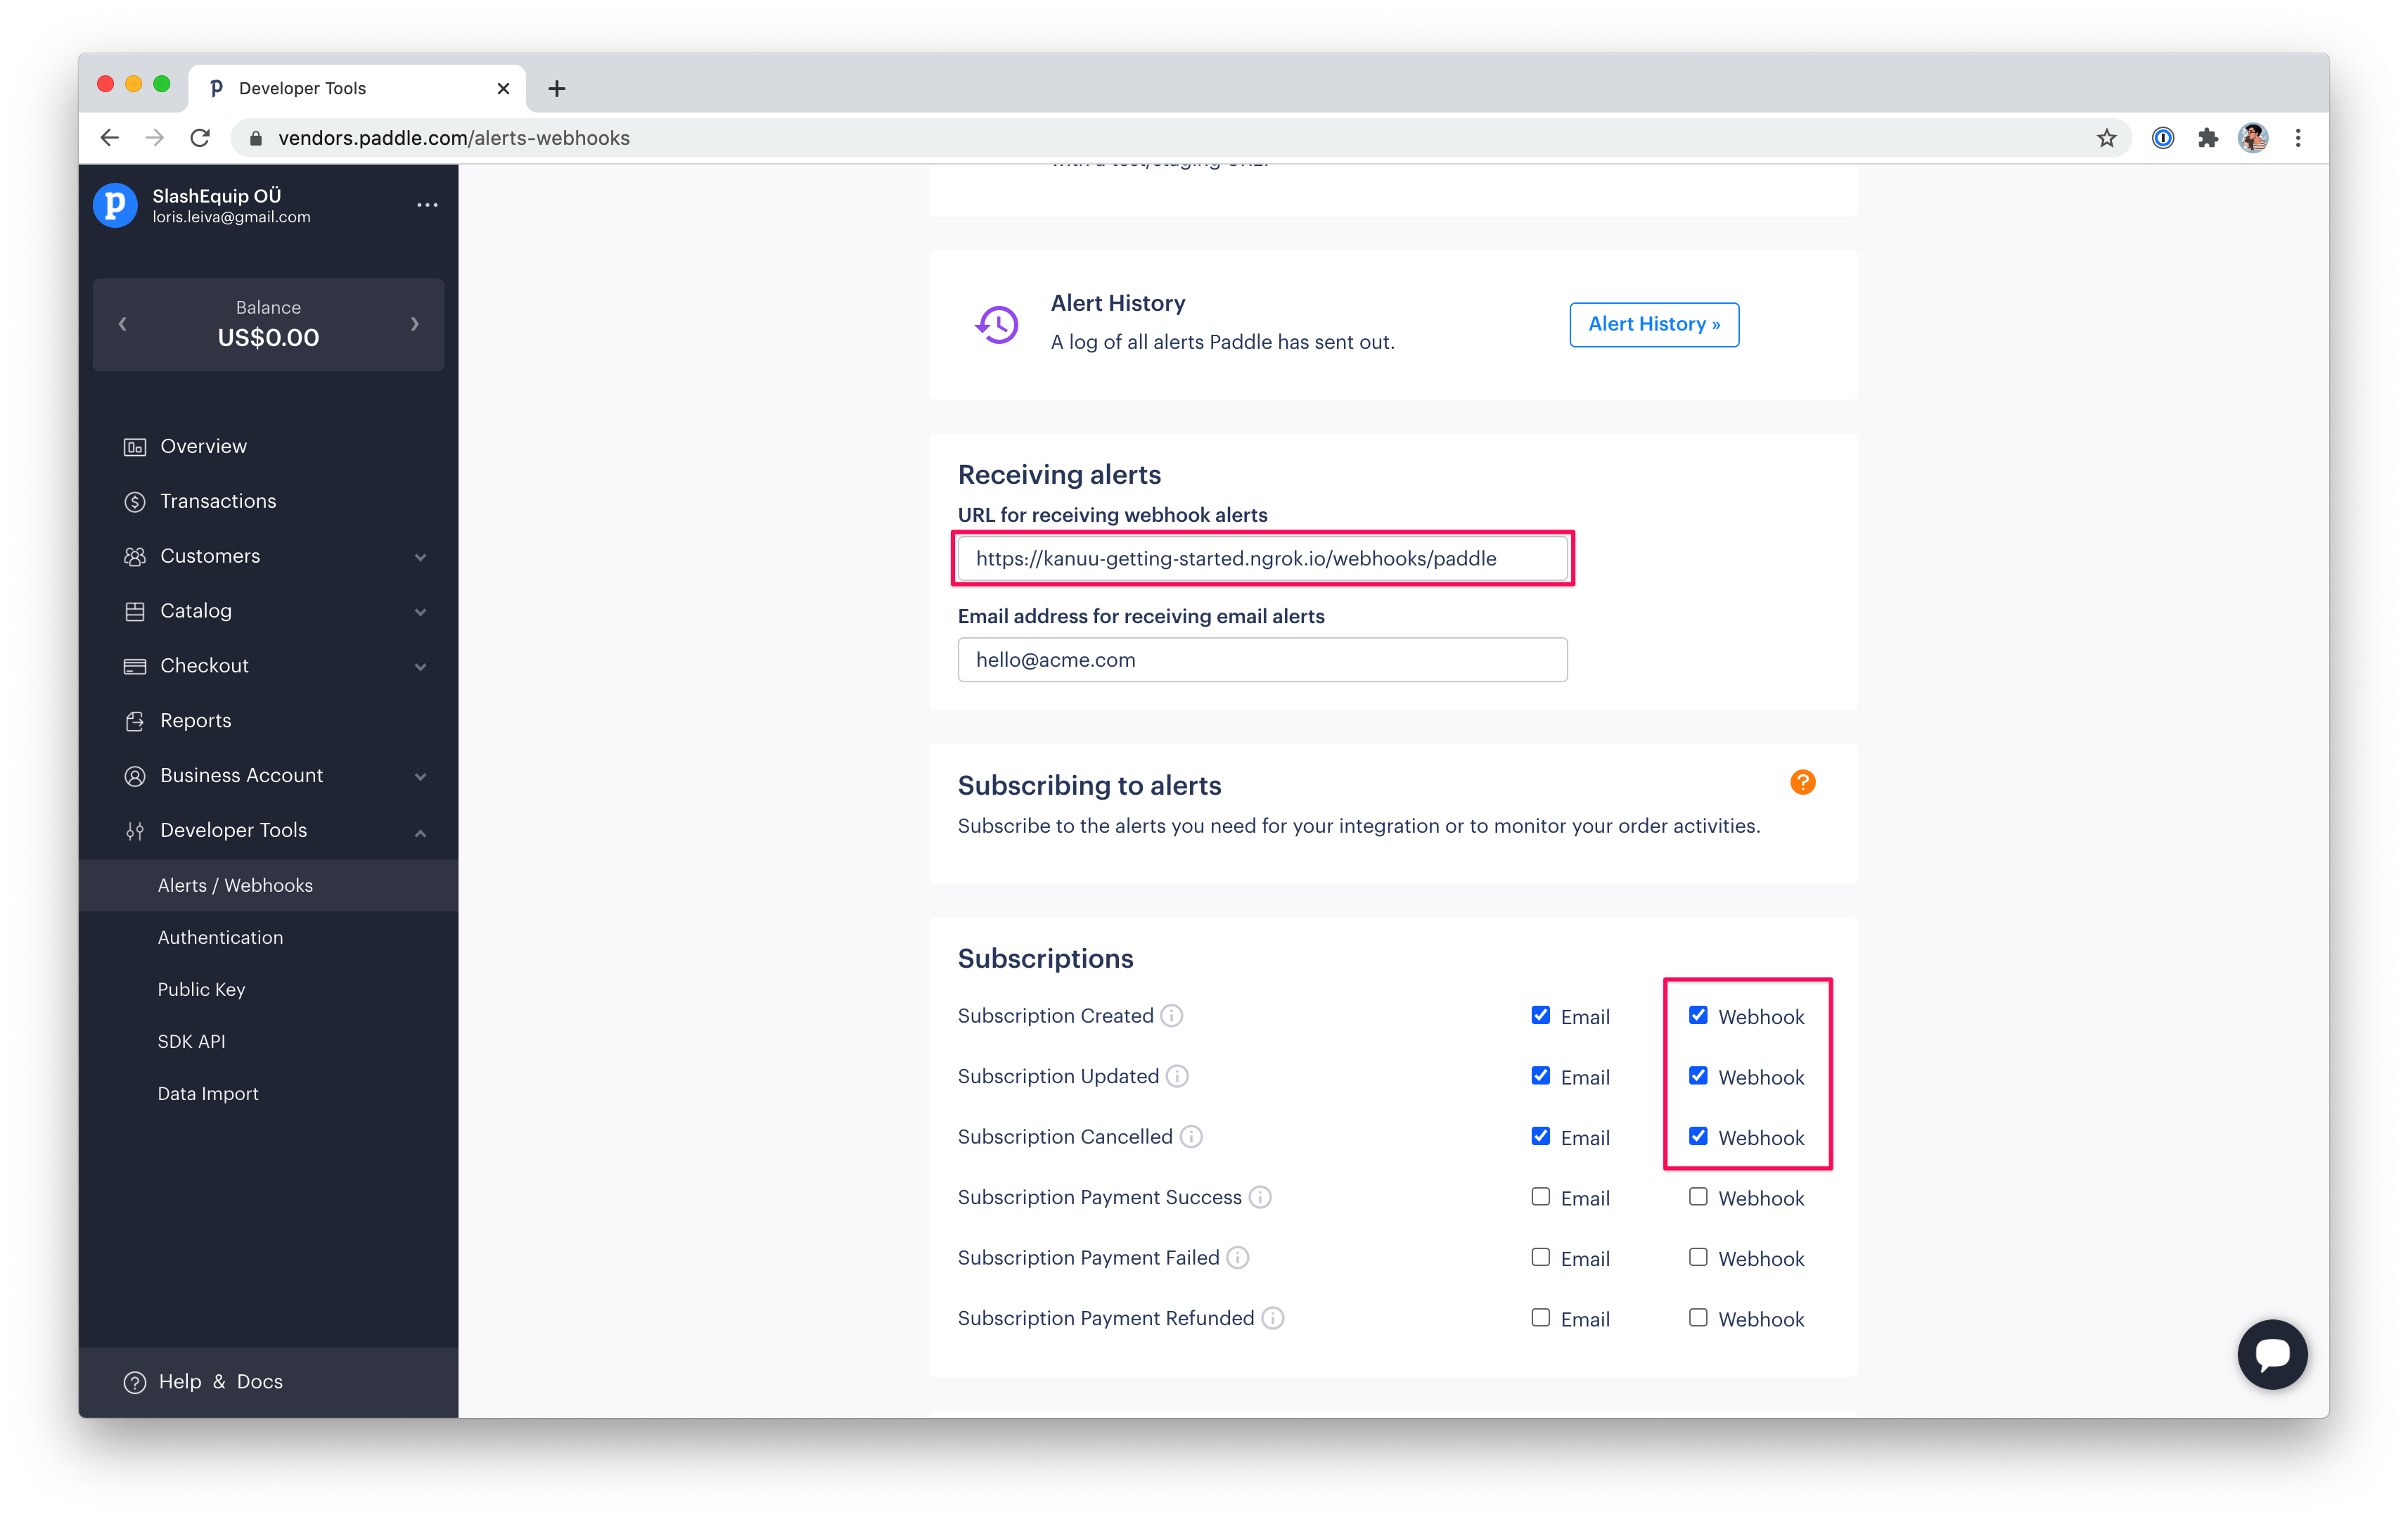
And we’re all set up with webhooks! Now we just need to tell Paddle which URL they should use to send webhooks. On your Paddle account go to “Developer Tools > Alerts / Webhooks” and copy your application URL followed by /webhooks/paddle. For your local environment, you can use ngrok with Laravel Valet to get a shareable link by running valet share.
Also, make sure the 3 subscription webhooks are selected.
The Kanuu button
The final piece of the puzzle. Redirecting our users to Kanuu so they can manage their subscriptions. Again, the Laravel package makes this ridiculously simple.
Add the following route to redirect users to Kanuu. It takes a unique identifier as a parameter. This is the identifier Kanuu will use to differentiate our billable entities. In our case, that’s simply a user so we’ll always give the user id.
Route::get('kanuu/{identifier}', '\Kanuu\Laravel\RedirectToKanuu')->name('kanuu.redirect');
Now we can use that route in our templates to create a nice “Manage your subscription” button.
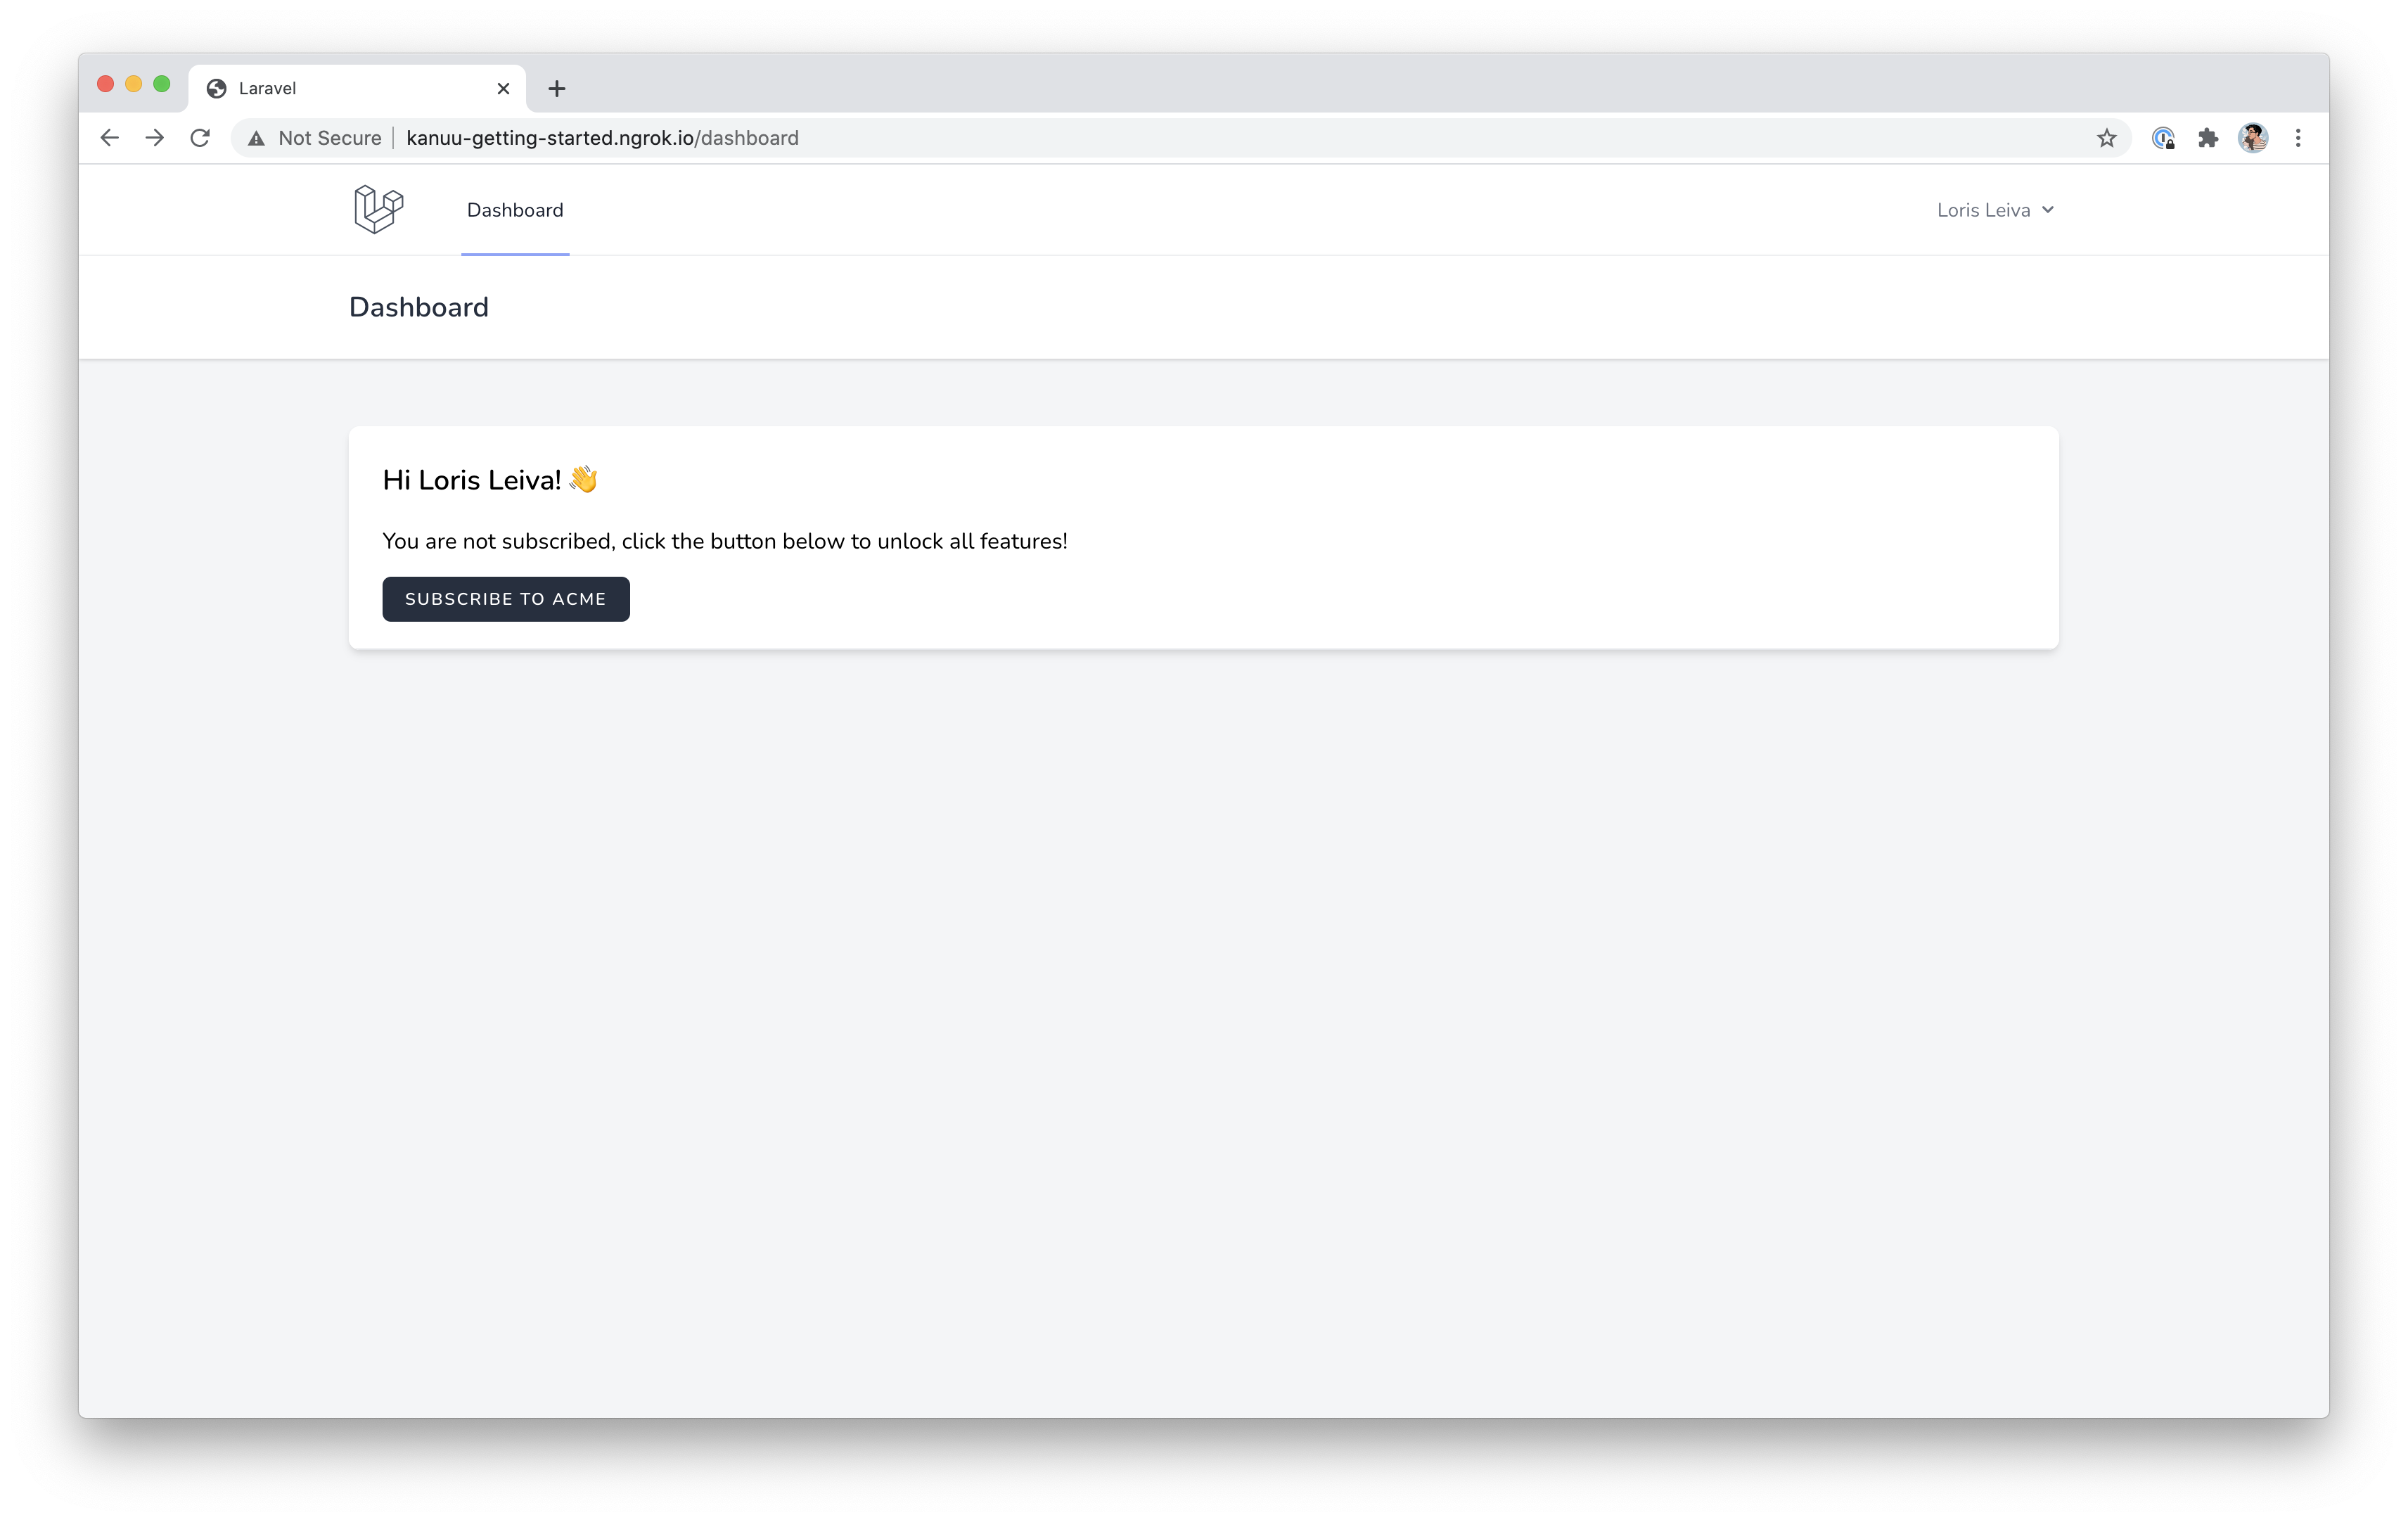
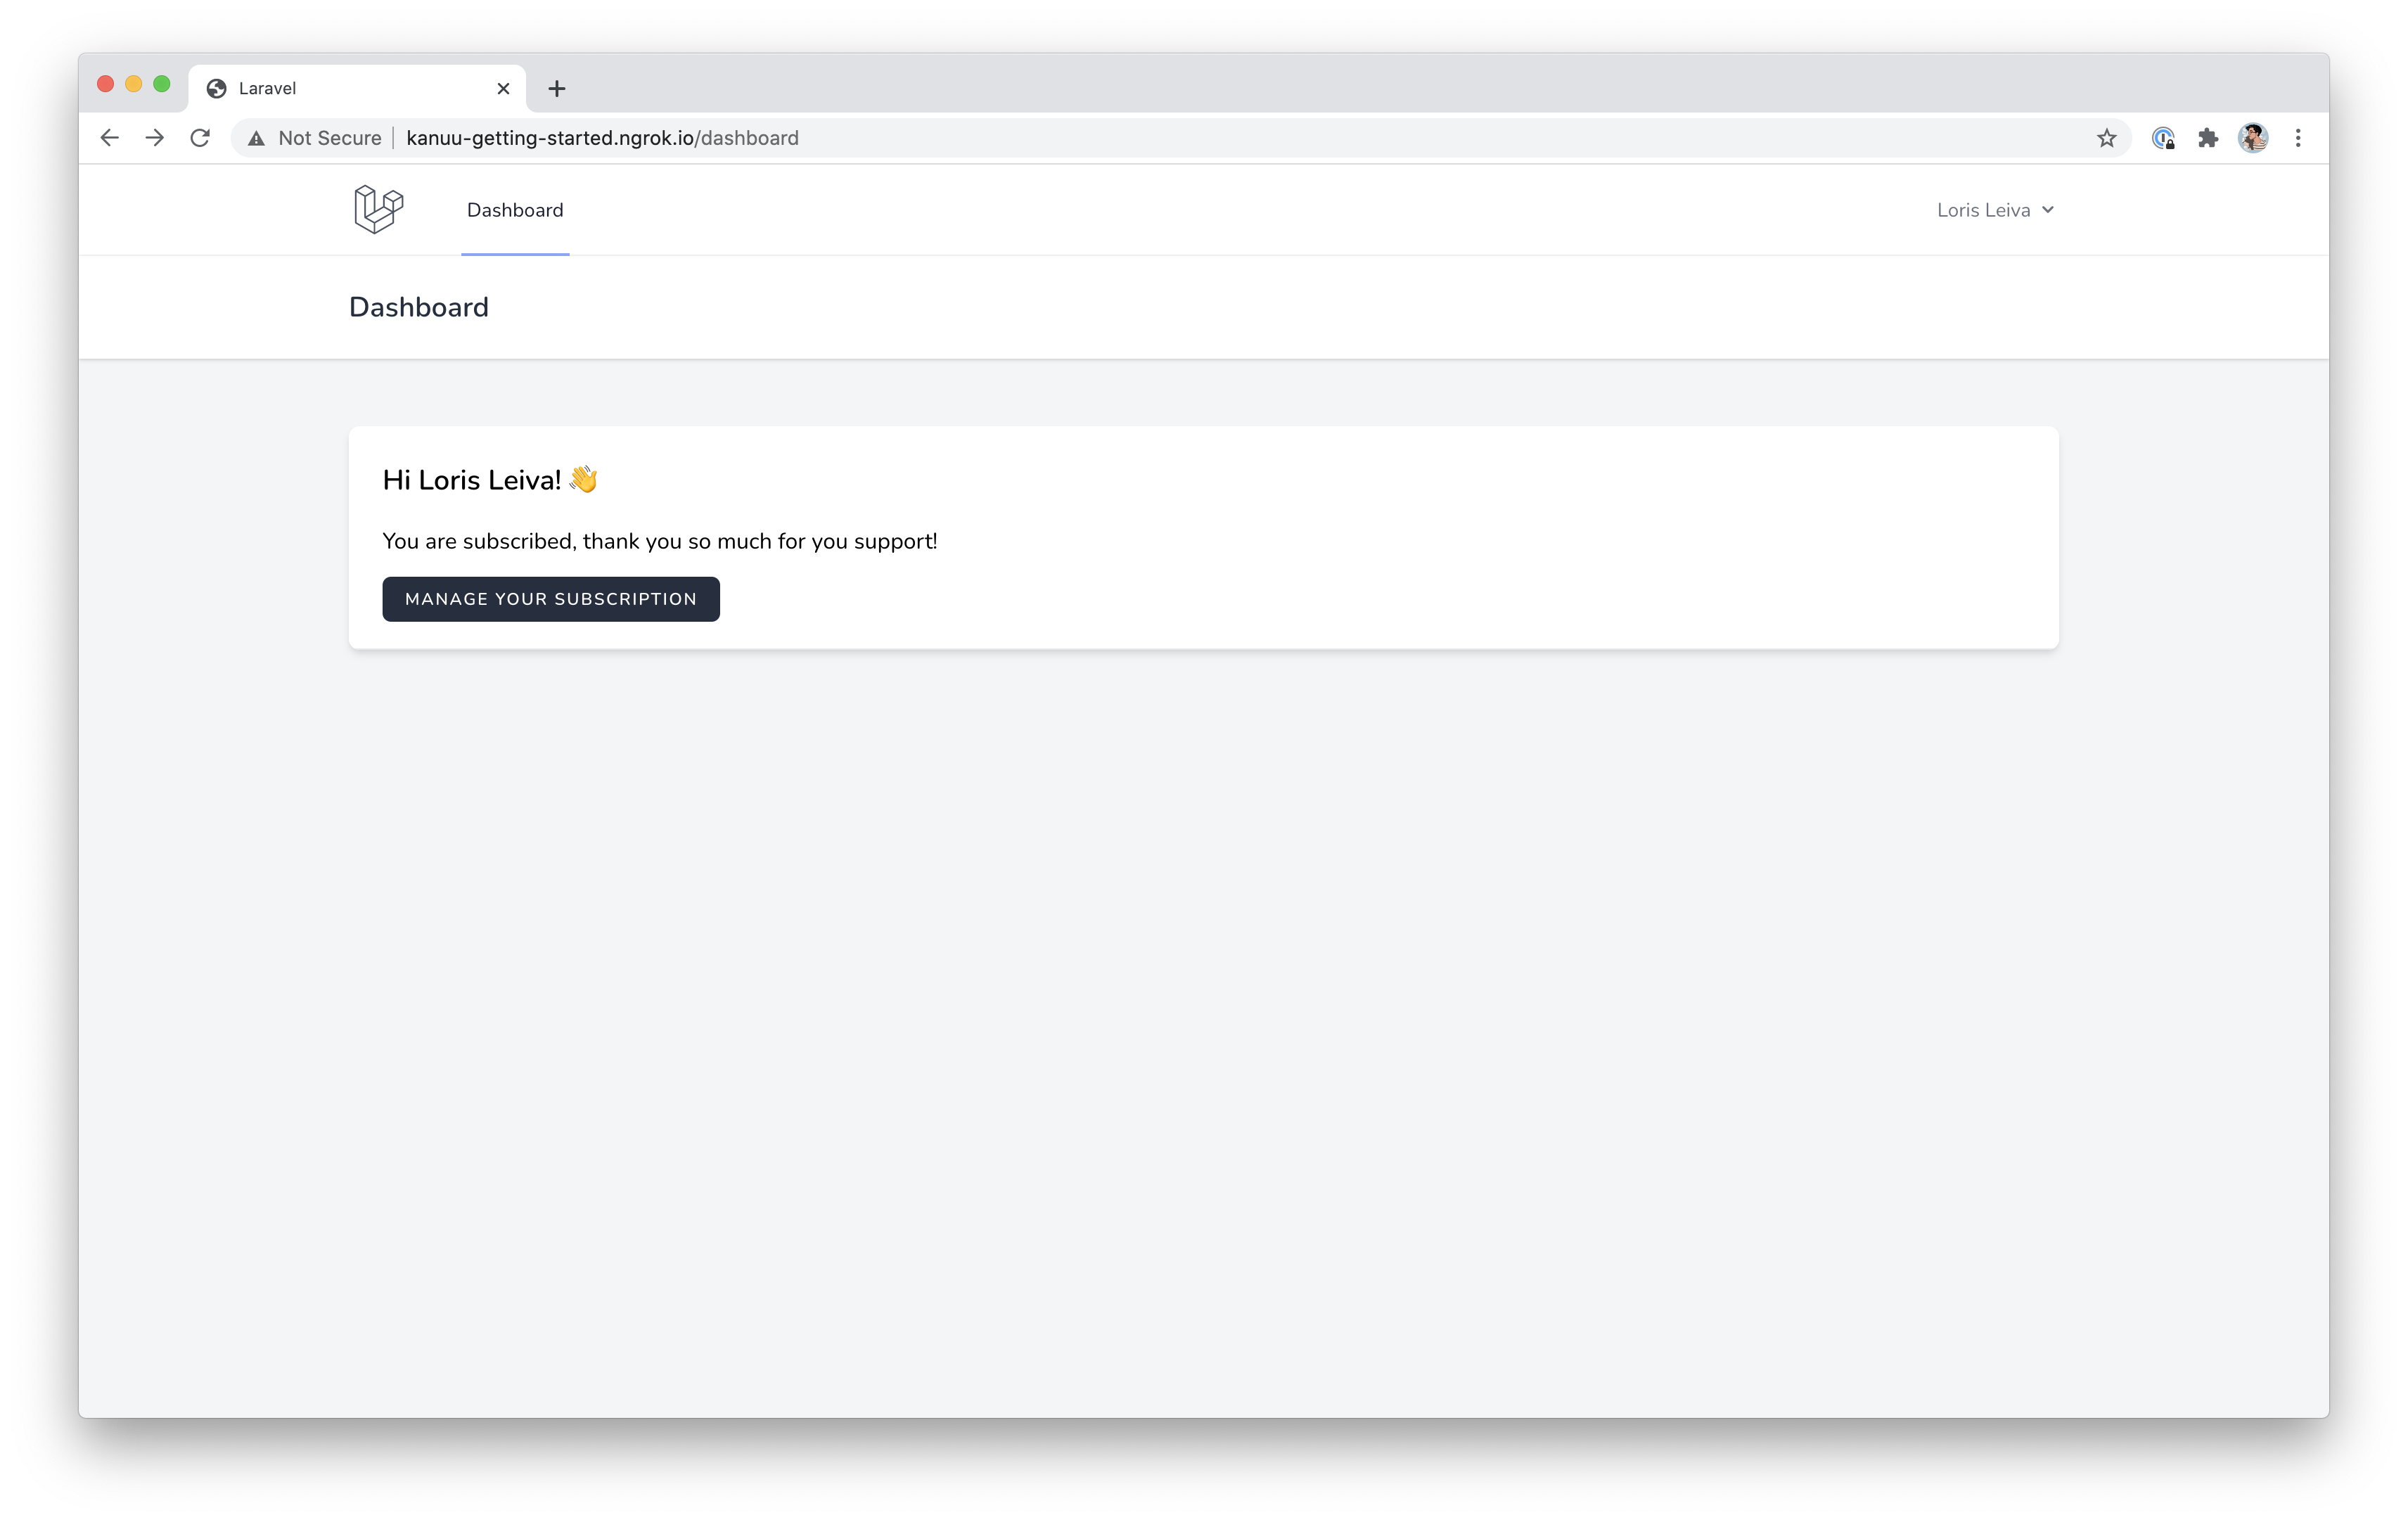
For this article, let’s put that button directly in the dashboard. We’ll also make sure we change the copy slightly based on if the user is subscribed or not.
<!-- resources/views/dashboard.blade.php -->


@php($user = auth()->user())
<h1 class="font-semibold text-xl mb-4">Hi {{ $user->name }}! 👋</h1>
@if($user->isSubscribed())
    <p class="mb-4">You are subscribed, thank you so much for you support!</p>
@else
    <p class="mb-4">You are not subscribed, click the button below to unlock all features!</p>
@endif
<a
    href="{{ route('kanuu.redirect', $user) }}"
    class="px-4 py-2 bg-gray-800 rounded-md font-semibold text-xs text-white uppercase tracking-widest hover:bg-gray-700">
    {{ $user->isSubscribed() ? 'Manage your subscription' : 'Subscribe to Acme' }}
</a>
This is what it looks like when you’re not subscribed.
And this is what it looks like when you are.
Conclusion
Congratulations, we did it! 🎉
We got billing out of the way in 10 minutes.
Well, maybe a little bit longer as we had to go through some Paddle and Kanuu theory but hopefully you can see how quickly it’s going to be to implement billing in your next side projects!
And to speed things up even more, here is the repository that was used when writing this article so you can gloriously copy/paste some code from there into your application.
If you only want to compare the changes we've made to the brand new Laravel application, use the link below to compare branches.
Kanuu is a brand new project and I’m super excited it about. If you have any feedback regarding Kanuu or this entire process, I’d love to hear your thoughts.
Thank you and happy billing! 💰
