Renderless editable textarea
Following my previous article introducing a renderless component that resizes a textarea, we'll now explore one that can make all sorts of changes to a textarea's content.
Contrary to our <resizable-textarea> component that acted as a simple wrapper, our new <editable-textarea> will go one step further and allow us to control its behaviour from outside of the component.
Use and control
We simply wrap our component around a textarea and we give it a reference in order to control its behaviour.
<editable-textarea ref="editor">
    <textarea></textarea>
</editable-textarea>
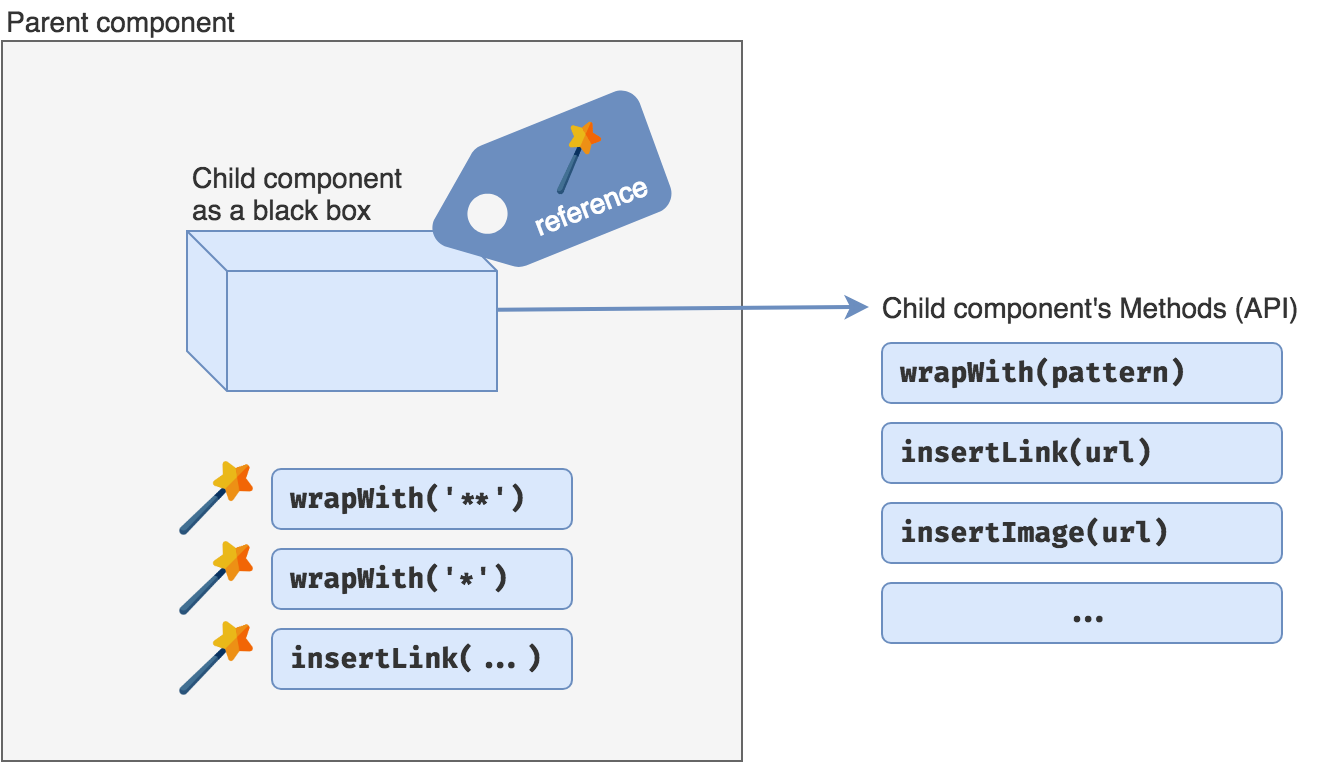
Then within the parent component, we can call any methods defined in the editable-textarea component.
this.$refs.editor.wrapWith('**') // Toggles: bold
this.$refs.editor.wrapWith('*')  // Toggles: italic
this.$refs.editor.wrapWith('~~') // Toggles: strikethrough
And that's it. The parent component does not need to know anything about how this function is implemented or even listen to any events.
It only needs to know about the underlying "API" provided by the child component. It is then the parent's responsibility to provide the buttons that will trigger the use of its API.
See the Pen Editable Textarea by Loris Leiva (@lorisleiva) on CodePen.
Components with magic wands ✨
The reference of such components can be seen as magic wands that control the entire ecosystem of an underlying black box, a.k.a Facades.
Such components are really powerful as they provide reusable complex behaviour with very low coupling.
Diving into the component
Less theory more practice. Let's see how this editable-textarea works.
Renderless
It simply renders whatever its wrapping.
render () {
    return this.$slots.default[0]
},
Get and update the textarea's content
First it has a method that extracts the content of the underlying textarea with the selection's position. Since we assume the component will be wrapping a textarea directly, we can access it using this.$el.
methods: {
    getContent () {
        return {
            text: this.$el.value,
            start: this.$el.selectionStart,
            end: this.$el.selectionEnd,
        }
    }
}
For example, a textarea containing Hello world with world selected will return:
{
    text: 'Hello world',
    start: 6, // Position of 'w'
    end: 11   // Position of 'd' + 1
}
It also has a complementary method that updates the textarea with a given text and selects it at the given positions.
methods: {
    getContent () { ... },
    updateContent (text, start, end) {

        // Updates the textarea's value.
        this.$el.value = text

        // Trigger an 'input' event directly on the DOM element.
        triggerEvent(this.$el, 'input')

        // Select the right portion of text.
        this.$el.selectionStart = start
        this.$el.selectionEnd = end

        // Focus the textarea since we propably clicked on a button.
        this.$el.focus()

        return text
    },
}
As you can see we use a triggerEvent() helper function that triggers an event on the DOM element directly instead of relying on inter-component event communication.
This frees the parent component of knowing which events to listen to and reduces coupling. If the parent component is using v-model or @input on the textarea, it will automatically be updated of any changes.
Now that we can get and update the text of the textarea we can have fun creating methods that follow this schema:
let { text, start, end } = this.getContent()
// Do something with text, start, end.
return this.updateContent(text, start, end)
Wrap selection with patterns
A very easy way to wrap the selected text within a pattern (like ** for bold in markdown), is the following:
wrapWith (pattern) {
    let { text, start, end } = this.getContent()

    // Cut the text before, inside and after the selection.
    let { before, selection, after } = cutTextWithSelection(text, start, end)

    // Add the pattern around the selection.
    before = before + pattern
    after = pattern + after

    return this.updateContent(
        before + selection + after,       // Reassemble the text
        before.length,                    // Start selection after `before`
        before.length + selection.length, // End selection after `before + selection`
    )
},
However, we might want the pattern to get removed if it already exists. Meaning if I call wrapWith('**') twice on world of Hello world, I expect Hello world, not Hello ****world****.

wrapWith (pattern) {
    let { text, start, end } = this.getContent()
    let { before, selection, after } = cutTextWithSelection(text, start, end)

    // Check if the pattern is already around the selection.
    // Using lodash helper functions `startsWith` and `endsWith`.
    let removePattern = endsWith(before, pattern)
        && startsWith(after, pattern)

    // Add or remove the pattern around the selection.
    before = removePattern ? before.slice(0, - pattern.length) : before + pattern
    after = removePattern ? after.slice(pattern.length) : pattern + after

    return this.updateContent(
        before + selection + after,
        before.length,
        before.length + selection.length,
    )
},

This works fine but we have a little conflict between bold ** and italic *. If I call wrapWith('**') (bold) followed by wrapWith('*') (italic), I expect the result to be: Hello ***world*** (bold + italic). Let's add a little exception in our method.

wrapWith (pattern) {
    let { text, start, end } = this.getContent()
    let { before, selection, after } = cutTextWithSelection(text, start, end)

    // Exception for bold and italic.
    let keepItalicPattern = pattern === '*'
        && endsWith(before, '**') && ! endsWith(before, '***')
        && startsWith(after, '**')  && ! startsWith(after, '***')

    // Do not remove the pattern if we add italic on bold.
    let removePattern = _.endsWith(before, pattern)
        && _.startsWith(after, pattern)
        && ! keepItalicPattern

    before = removePattern ? before.slice(0, - pattern.length) : before + pattern
    after = removePattern ? after.slice(pattern.length) : pattern + after

    return this.updateContent(
        before + selection + after,
        before.length,
        before.length + selection.length,
    )
},

And that's it. It might be a very small text editor but you have full control of it and it's already a bit smarter than GitLab's version. 😘

Helper functions
Here's the code for the two helper functions that were used in the previous sections.
function triggerEvent (el, type) {
    if ('createEvent' in document) {
        // modern browsers, IE9+
        var e = document.createEvent('HTMLEvents')
        e.initEvent(type, false, true)
        el.dispatchEvent(e)
    } else {
        // IE 8
        var e = document.createEventObject()
        e.eventType = type
        el.fireEvent('on'+e.eventType, e)
    }
}

function cutTextWithSelection (text, start, end) {
    return {
        before: text.substring(0, start),
        selection: text.substring(start, end),
        after: text.substring(end, text.length),
    }
}
Conclusion
Whilst those components as Facades are very powerful, they are not useful in every case. Sometimes some good all props with some events are more than enough. However for those cases where you need to extract complex and reusable behaviour from a component, they can be a great way to encapsulate that logic.
Another example of usage could be to open/close a modal from outside the component. Something like that:
<user-delete-modal ref="modal"></user-delete-modal>
<button @click="$refs.model.open()">Delete account</button>
Remember also that we did not couple the component with its parent by adding some event communication. Therefore it is very easy to chain the editable-textarea component with the resizable-textarea component (in whichever order). See it for yourself:
See the Pen Editable Textarea with resizable textarea by Loris Leiva (@lorisleiva) on CodePen.
Don't hesitate to share your ideas for new components as Facades. 💡